OWNER'S MANUAL
MANUEL DU PROPRIETAIRE
MANUAL DEL USUARIO
BEDIENUNGSANLEITUNG
MANUALE DI ISTRUZIONI
GEBRUIKSAANWIJZING
9A09146800
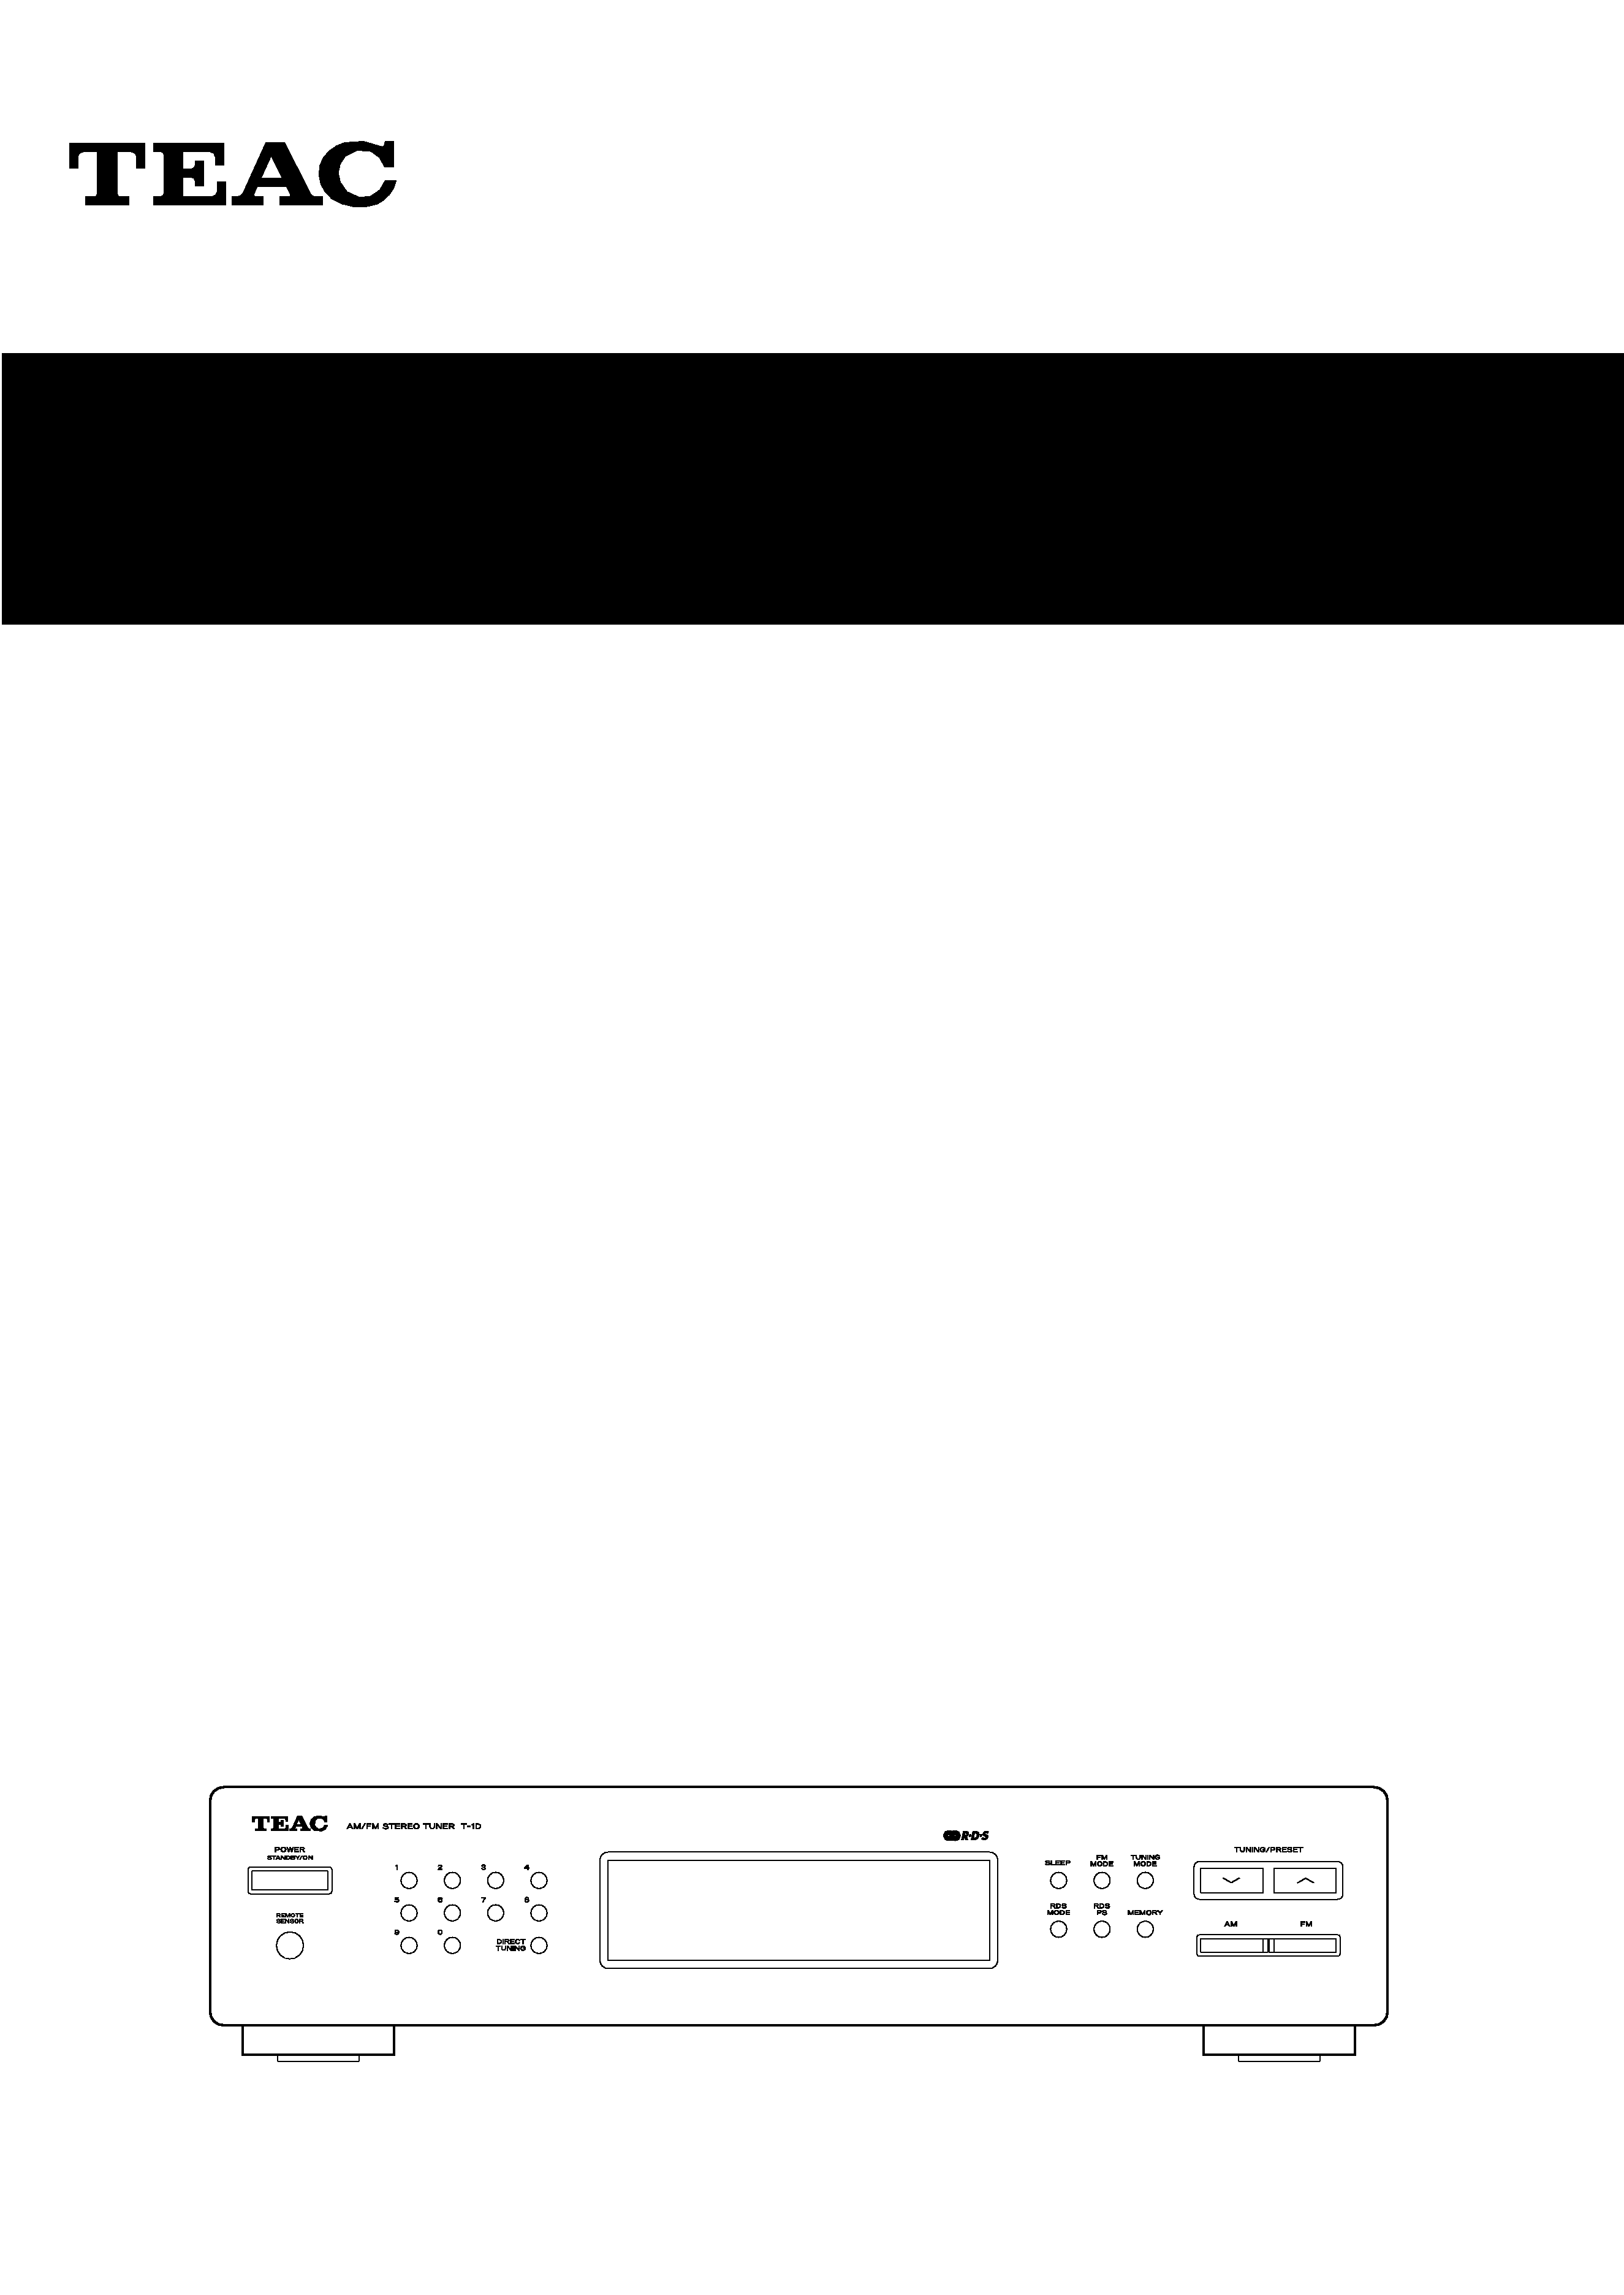
T-1D
AM/FM Stereo Tuner
ENGLISH
Contents
2
Thanks for buying a TEAC. Read this manual carefully to get the
best performance from this unit.
Before Use . . . . . . . . . . . . . . . . . . . . . . . . . . . . . . . . . . . . . . . . . . . . 2
Connection . . . . . . . . . . . . . . . . . . . . . . . . . . . . . . . . . . . . . . . . . . . . 5
Connecting Antennas . . . . . . . . . . . . . . . . . . . . . . . . . . . . . . . . . . 6
Name of Each Control . . . . . . . . . . . . . . . . . . . . . . . . . . . . . . . . . . 8
Radio Reception . . . . . . . . . . . . . . . . . . . . . . . . . . . . . . . . . . . . . . 10
Direct Tuning . . . . . . . . . . . . . . . . . . . . . . . . . . . . . . . . . . . . . . . . . 12
Sleep Timer . . . . . . . . . . . . . . . . . . . . . . . . . . . . . . . . . . . . . . . . . . 12
Preset Tuning . . . . . . . . . . . . . . . . . . . . . . . . . . . . . . . . . . . . . . . . 14
RDS . . . . . . . . . . . . . . . . . . . . . . . . . . . . . . . . . . . . . . . . . . . . . . . . . 18
Troubleshooting . . . . . . . . . . . . . . . . . . . . . . . . . . . . . . . . . . . . . . 22
Specifications . . . . . . . . . . . . . . . . . . . . . . . . . . . . . . . . . . . . . . . . 22
PTY Programs . . . . . . . . . . . . . . . . . . . . . . . . . . . . . . . . . . . . . . . . 46
Read this before operation
< Choose the installation location of your unit carefully. Avoid
placing it in direct sunlight or close to a source of heat. Also
avoid locations subject to vibrations and excessive dust, heat,
cold or moisture.
< Do not open the cabinet as this might result in damage to the
circuitry or electrical shock. If a foreign object should get into
the set, contact your dealer.
< When removing the power plug from the wall outlet, always
pull directly on the plug, never yank the cord.
< Do not attempt to clean the unit with chemical solvents as this
might damage the finish. Use a clean, dry cloth.
< Keep this manual in a safe place for future reference.
Maintenance
If the surface of the unit gets dirty, wipe with a soft cloth or use
diluted mild soap liquid. Be sure to remove any excess
completely. Do not use thinner, benzine or alcohol as they may
damage the surface of the unit.
IMPORTANT(for U.K.Customers)
DO NOT cut off the mains plug from this equipment. If the plug
fitted is not suitable for the power points in your home or the
cable is too short to reach a power point, then obtain an
appropriate safety approved extension lead or consult your
dealer.
If nonetheless the mains plug is cut off, remove the fuse and
dispose of the plug immediately, to avoid a possible shock
hazard by inadvertent connection to the mains supply.
If this product is not provided with a mains plug, or one has to be
fitted, then follow the instructions given below:
IMPORTANT. DO NOT make any connection to the larger
terminal which is marked with the letter E or by the safety earth
symbol | or coloured GREEN or GREEN-and-YELLOW.
The wires in the mains lead on this product are coloured in
accordance with the following code:
BLUE
: NEUTRAL
BROWN : LIVE
As these colours may not correspond with the coloured
markings identifying the terminals in your plug proceed as
follows:
The wire which is coloured BLUE must be connected to the
terminal which is marked with the letter N or coloured BLACK.
The wire which is coloured BROWN must be connected to the
terminal which is marked with the letter L or coloured RED.
When replacing the fuse only a correctly rated approved type
should be used and be sure to re-fit the fuse cover.
IF IN DOUBT -- CONSULT A COMPETENT ELECTRICIAN.
CAUTION
The product shall not be exposed to dripping or splashing and
that no object filled with liquids, such as vases, shall be
placed on the product.
Do not install this product in a confined space such as a book
case or similar unit.
Before Use
FRANÇAIS
ESPAÑOL
Sommaire
Indice
3
ENGLISH
/
F
RENCH
/
ESPA
Ñ
OL
Nous vous remercions pour l'achat d'un appareil TEAC. Lire ce
manuel avec attention pour obtenir les meilleures performances
possibles de cet appareil.
Avant Utilisation . . . . . . . . . . . . . . . . . . . . . . . . . . . . . . . . . . . . . . . 3
Connexions . . . . . . . . . . . . . . . . . . . . . . . . . . . . . . . . . . . . . . . . . . . 5
Raccordements d'antenne . . . . . . . . . . . . . . . . . . . . . . . . . . . . . . 7
Nomenclature . . . . . . . . . . . . . . . . . . . . . . . . . . . . . . . . . . . . . . . . . 9
Réception de la radio . . . . . . . . . . . . . . . . . . . . . . . . . . . . . . . . . . 11
Syntonisation directe . . . . . . . . . . . . . . . . . . . . . . . . . . . . . . . . . . 13
Temporisation de veille . . . . . . . . . . . . . . . . . . . . . . . . . . . . . . . . 13
Syntonisation préréglée . . . . . . . . . . . . . . . . . . . . . . . . . . . . . . . 15
RDS . . . . . . . . . . . . . . . . . . . . . . . . . . . . . . . . . . . . . . . . . . . . . . . . . 19
Dépannage . . . . . . . . . . . . . . . . . . . . . . . . . . . . . . . . . . . . . . . . . . 22
Spécifications . . . . . . . . . . . . . . . . . . . . . . . . . . . . . . . . . . . . . . . . 23
Programmes PTY . . . . . . . . . . . . . . . . . . . . . . . . . . . . . . . . . . . . . 46
Lire ceci avant de faire fonctionner l'appareil
< Choisir avec soin l'endroit où vous placerez votre appareil.
Eviter de le placer directement au soleil ou près d'une source
de chaleur. Eviter aussi les endroits sujets à des vibrations, à
de la poussière excessive, à la chaleur, au froid ou à
l'humidité.
< Ne pas ouvrir le coffret car ceci risquerait de provoquer des
dommages aux circuits ou des chocs électriques. Si un objet
rentre dans l'appareil, contacter votre revendeur.
< Lors du débranchement du cordon d'alimentation de la prise
murale, toujours tirer sur la fiche et non sur le cordon.
< Ne pas essayer de nettoyer l'appareil avec des solvants
chimiques car ceci pourrait endommager le fini de l'appareil.
Utiliser un chiffon propre et sec.
< Garder soigneusement ce manuel d'instructions pour une
référence ultérieure.
Entretien
Si la surface de l'appareil devient sale, nettoyer celle-ci à l'aide
d'un chiffon doux ou utiliser une solution diluée de savon doux. La
nettoyer entièrement en ne laissant aucune trace. Ne pas utiliser
de diluant, de benzine ou d'alcool car ils risquent d'endommager
la surface de l'appareil.
Enhorabuena por la adquisición de un TEAC. Lea detenidamente
este manual a fin de obtener el mejor rendimiento de esta
unidad.
Previo al empleo . . . . . . . . . . . . . . . . . . . . . . . . . . . . . . . . . . . . . . . 3
Conexión . . . . . . . . . . . . . . . . . . . . . . . . . . . . . . . . . . . . . . . . . . . . . 5
Conexión de antenas . . . . . . . . . . . . . . . . . . . . . . . . . . . . . . . . . . . 7
Nombre de los controles . . . . . . . . . . . . . . . . . . . . . . . . . . . . . . . . 9
Recepción de radio. . . . . . . . . . . . . . . . . . . . . . . . . . . . . . . . . . . . 11
Sintonización directa . . . . . . . . . . . . . . . . . . . . . . . . . . . . . . . . . . 13
Temporizador de desconexión . . . . . . . . . . . . . . . . . . . . . . . . . . 13
Sintonización preajustada . . . . . . . . . . . . . . . . . . . . . . . . . . . . . . 15
RDS . . . . . . . . . . . . . . . . . . . . . . . . . . . . . . . . . . . . . . . . . . . . . . . . . 19
Solución de problemas. . . . . . . . . . . . . . . . . . . . . . . . . . . . . . . . . 23
Especificaciones . . . . . . . . . . . . . . . . . . . . . . . . . . . . . . . . . . . . . . 23
Programas PTY (por tipo) . . . . . . . . . . . . . . . . . . . . . . . . . . . . . . 46
Lea lo siguiente antes de poner en
funcionamiento el aparato
< Elija con cuidado el lugar de instalación para su aparato. No
lo coloque a la luz solar directa o cerca de fuentes que
generen calor. Evite también lugares expuestos a vibraciones
y muy polvorientos, calurosos, fríos o húmedos.
< No abra el gabinete ya que esto podría producir daños en los
circuitos o electrochoques, Si se entrara algún objeto en el
interior del aparato, póngase en contacto con su
concesionario.
< Al desenchufar el cordón del tomacorriente, tire siempre de la
clavija, nunca del cordón.
< No utilice solventes químicos para limpiar el aparato ya que
podría dañar el acabado. Use un paño seco y limpio.
< Guarde este manual en un lugar seguro para usarlo como
referencia en el futuro.
Mantenimiento
Cuando la superficie de la unidad se ensucia, límpiela con un
trozo de tela suave o use un líquido jabonoso suave y diluido.
Asegúrese de eliminar cualquier exceso de humedad
completamente. No se debe usar diluente, bencina o alcohol
pues podrían dañar la superficie de la unidad.
Avant Utilisation
Previo al empleo
4
B
T-1D
A-1D
Amplifier
Amplificateur
Amplificador
5
ENGLISH
/
F
RENCH
/
ESPA
Ñ
OL
ENGLISH
FRANÇAIS
ESPAÑOL
Connection
Connexions
ATTENTION
Mettre tous les éléments de votre
chaîne hors tension avant de
procéder au raccordement de cet
appareil.
Lire attentivement le mode d'emploi
de chacun des éléments que vous
souhaitez utiliser avec cet appareil.
< S'assurer que chaque connecteur est
bien enfoncé. Pour éviter les bruits
parasites, ne pas attacher ensemble
le cordon secteur avec les autres
câbles.
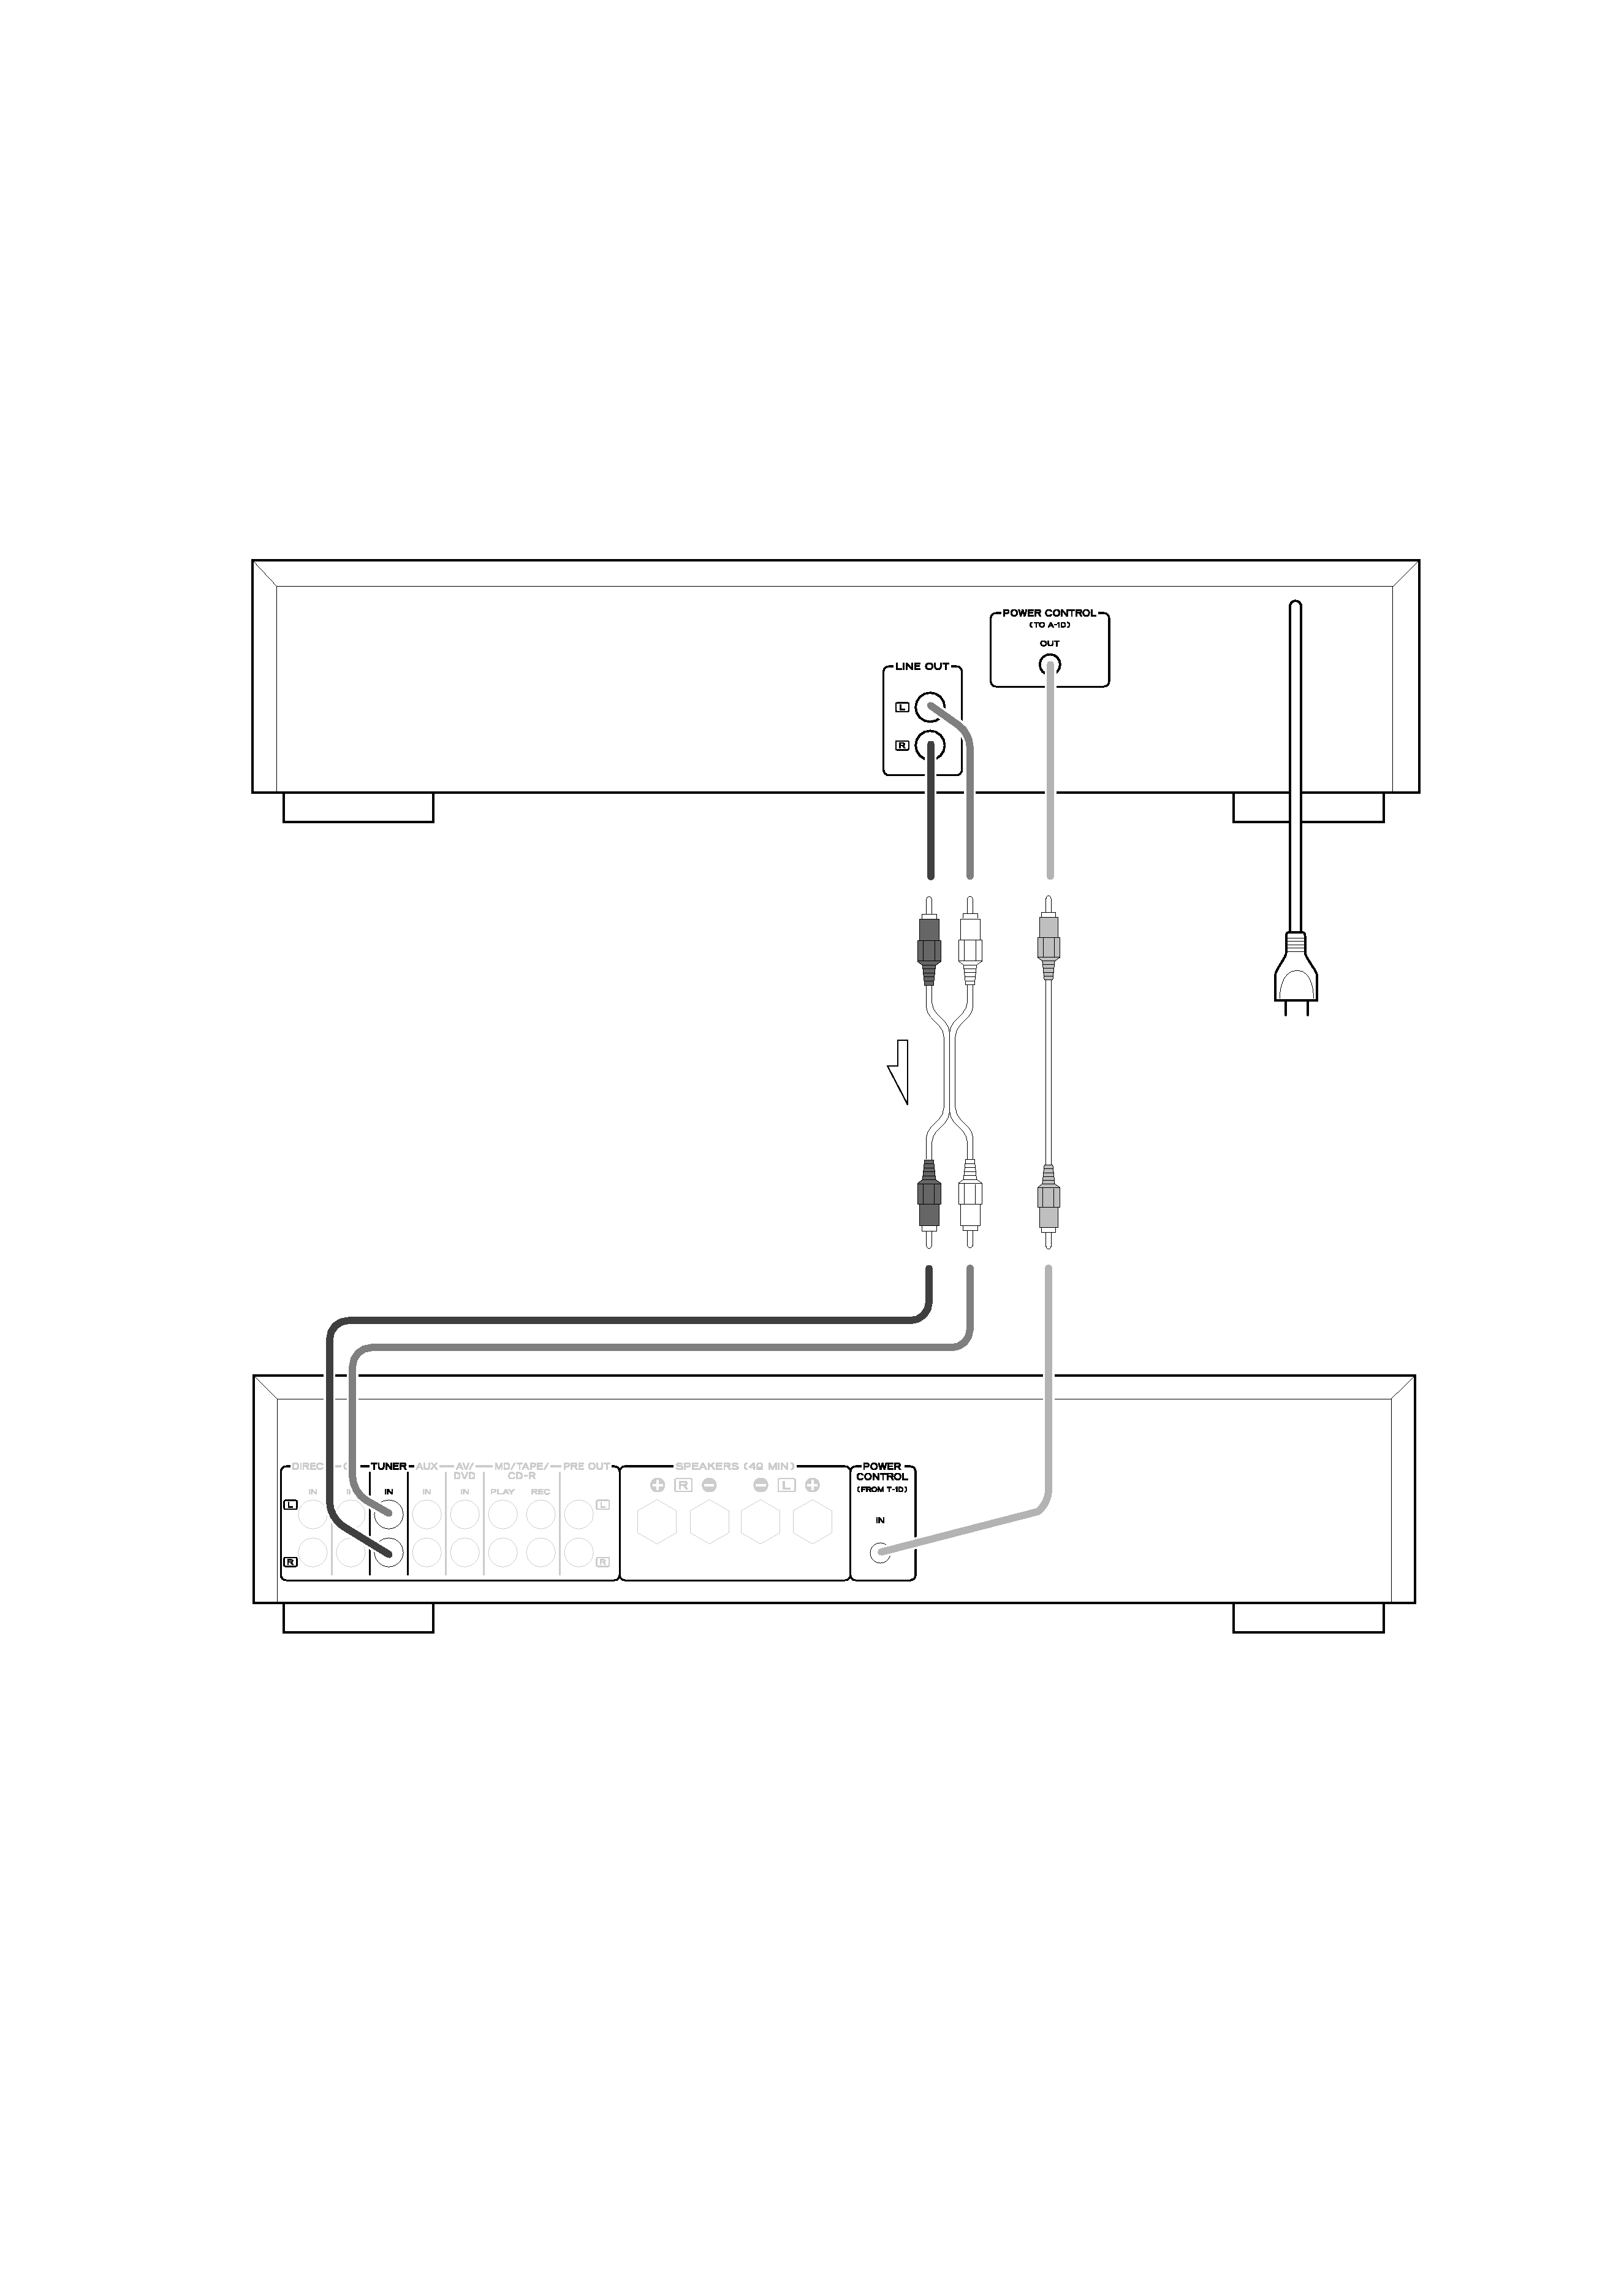
LINE OUT
Raccorder l'appareil à l'aide de
cordons munis d'une prise RCA.
Veiller à brancher:
Fiche blanche
w
connecteur blanc(L : gauche)
Fiche rouge
w
connecteur rouge (R :Droite)
Cordon d'alimentation (AC)
Bien
brancher
le
cordon
d'alimentation sur une prise de
courant qui fournit la tension
correcte.
Tenir la fiche d'alimentation en
branchant ou débranchant le cordon
d'alimentation.
POWER CONTROL
Si vous possédez le TEAC A-1D,
connecter la prise POWER CONTROL
de chaque appareil avec le cordon de
commande de minuterie (fourni avec
le T-1D).
C
B
A
CAUTION
Turn off the power of all the
equipment
before
making
connections.
Read instructions of each component
you intend to use with this unit.
< Be sure to insert each plug securely.
To prevent hum and noise, do not
bundle the connection cords with the
power cord.
LINE OUT
Connect the component with RCA pin
cords. Make sure to connect :
white plug w white jack(L:left)
red plug w red jack(R:right)
Power cord (AC)
Be sure to connect the power cord to
an AC outlet which supplies the
correct voltage.
Hold the power plug when plugging
or unplugging the power cord.
POWER CONTROL
If you have TEAC A-1D, connect the
POWER CONTROL jack of each
component with the timer control
cord (provided).
C
B
A
Conexión
PRECAUCIÓN
Apague todos los componentes antes
de realizar las conexiones.
Lea las instrucciones de todos los
componentes que vaya a utilizar con
la unidad.
< Inserte debidamente los conectores.
Para evitar ruido y zumbidos, no
mezcle en el mismo mazo los cables
de conexión y el de alimentación.
LINE OUT
Utilice
cables
provistos
de
conectores RCA:
conector blanco
w
terminal blanco (L: izquierda)
conector rojo
w
terminal rojo (R: derecha)
Cordón de alimentación (AC)
Asegúrese de conectar el cordón de
alimentación a un tomacorriente de
CA que tenga el voltaje correcto.
Sujete el enchufe para enchufar o
desenchufar
el
cordón
de
alimentación.
POWER CONTROL
Si tiene un componente A-1D de
TEAC, conecte la toma POWER
CONTROL de cada componente con
el cordón de control de temporizador
(suministrado con el T-1D).
C
B
A
