Z
9A09899200
DAB/FM Stereo Radio
OWNER'S MANUAL
SR-L30DAB

2
Contents
Thank you for choosing TEAC. Read this
manual carefully to get the best
performance from this unit.
Contents. . . . . . . . . . . . . . . . . . . . . . . . . . . 2
Before Use . . . . . . . . . . . . . . . . . . . . . . . . . 3
Connection . . . . . . . . . . . . . . . . . . . . . . . . . 4
Names of Each Control . . . . . . . . . . . . . . . . 6
Setting up your DAB Tuner . . . . . . . . . . . . . 8
Auto Tuning . . . . . . . . . . . . . . . . . . . . . . . . 8
Using the Channel List . . . . . . . . . . . . . . . . 9
Using Function Control . . . . . . . . . . . . . . . 10
Station order . . . . . . . . . . . . . . . . . . . . 10
Signal error rate . . . . . . . . . . . . . . . . . . 11
Preset tune . . . . . . . . . . . . . . . . . . . . . . 12
DRC value . . . . . . . . . . . . . . . . . . . . . . 13
Manual tune. . . . . . . . . . . . . . . . . . . . . 14
Software version. . . . . . . . . . . . . . . . . . 15
Changing Display Settings. . . . . . . . . . . . . 16
Listening to FM Stations . . . . . . . . . . . . . . 17
Preset Tuning . . . . . . . . . . . . . . . . . . . . . . 18
About DAB . . . . . . . . . . . . . . . . . . . . . . . . 20
Specifications . . . . . . . . . . . . . . . . . . . . . . 21
Factory Reset. . . . . . . . . . . . . . . . . . . . . . . 21
Troubleshooting . . . . . . . . . . . . . . . . . . . . 22
IMPORTANT (for U.K.Customers)
DO NOT cut off the mains plug from this
equipment. If the plug fitted is not suitable for
the power points in your home or the cable is
too short to reach a power point, then obtain
an appropriate safety approved extension lead
or consult your dealer.
If nonetheless the mains plug is cut off,
remove the fuse and dispose of the plug
immediately, to avoid a possible shock hazard
by inadvertent connection to the mains
supply.
If this product is not provided with a mains
plug, or one has to be fitted, then follow the
instructions given below:
IMPORTANT. DO NOT make any connection
to the larger terminal which is marked with
the letter E or by the safety earth symbol| or
coloured GREEN or GREEN-and-YELLOW.
The wires in the mains lead on this product
are coloured in accordance with the following
code:
BLUE
: NEUTRAL
BROWN : LIVE
As these colours may not correspond with the
coloured markings identifying the terminals in
your plug proceed as follows:
The wire which is coloured BLUE must be
connected to the terminal which is marked
with the letter N or coloured BLACK.
The wire which is coloured BROWN must be
connected to the terminal which is marked
with the letter L or coloured RED.
When replacing the fuse only a correctly rated
approved type should be used and be sure to
re-fit the fuse cover.
IF IN DOUBT -- CONSULT A COMPETENT
ELECTRICIAN.

3
Before Use
Read this before operation
<
As the unit may become warm during
operation, always leave sufficient space
around the unit for ventilation.
<
Do not use any AC adaptors other than
the one included with this unit to avoid
fire, electric shock, etc. Be sure to connect
the AC adaptor to an AC outlet which
supplies correct voltage.
<
Choose the installation location of your
unit carefully. Avoid placing it in direct
sunlight or close to a source of heat. Also
avoid locations subject to vibrations and
excessive dust, heat, cold or moisture.
<
Do not place the unit on the amplifier or
the receiver.
<
Do not open the cabinet as this might
result in damage to the circuitry or
electrical shock. If a foreign object should
get into the unit, contact your dealer or
service company.
<
When removing the AC adaptor from the
wall outlet, never yank the cord.
<
Do not attempt to clean the unit with
chemical solvents as this might damage
the finish. Use a clean, dry cloth.
<
Keep this manual in a safe place for
future reference.
CAUTION
The product shall not be exposed to
dripping or splashing and that no object
filled with liquids, such as vases, shall be
placed on the product.
Do not install this equipment in a confined
space such as a book case or similar unit.
Beware of condensation
When the unit is moved from a cold to a
warm place, or used after a sudden
temperature change, there is a danger of
condensation; vapor in the air could
condense on the internal mechanism,
making correct operation impossible. To
prevent this, or if this occurs, leave the unit
for one or two hours with the power turned
on. Then the unit will stabilize at the
temperature of its surroundings.
Maintenance
If the surface of the unit gets dirty, wipe
with a soft cloth or use diluted neutral
cleaning liquid. Be sure to remove any fluid
completely. Do not use thinner, benzine or
alcohol as they may damage the surface of
the unit.

4
Connection
DIGITAL IN
CD-R, MD, etc.
AC outlet
AUDIO IN
cassette tape deck,
amplifier, etc.
B
C
E
A
D
optical
digital
cable
RCA
cable
CAUTION
<
Turn off the power of all the equipment before making connections.
<
Read instructions of each component you intend to use with this unit.
<
Be sure to insert each plug securely. To prevent hum and noise, do not bundle the
connection cords.

5
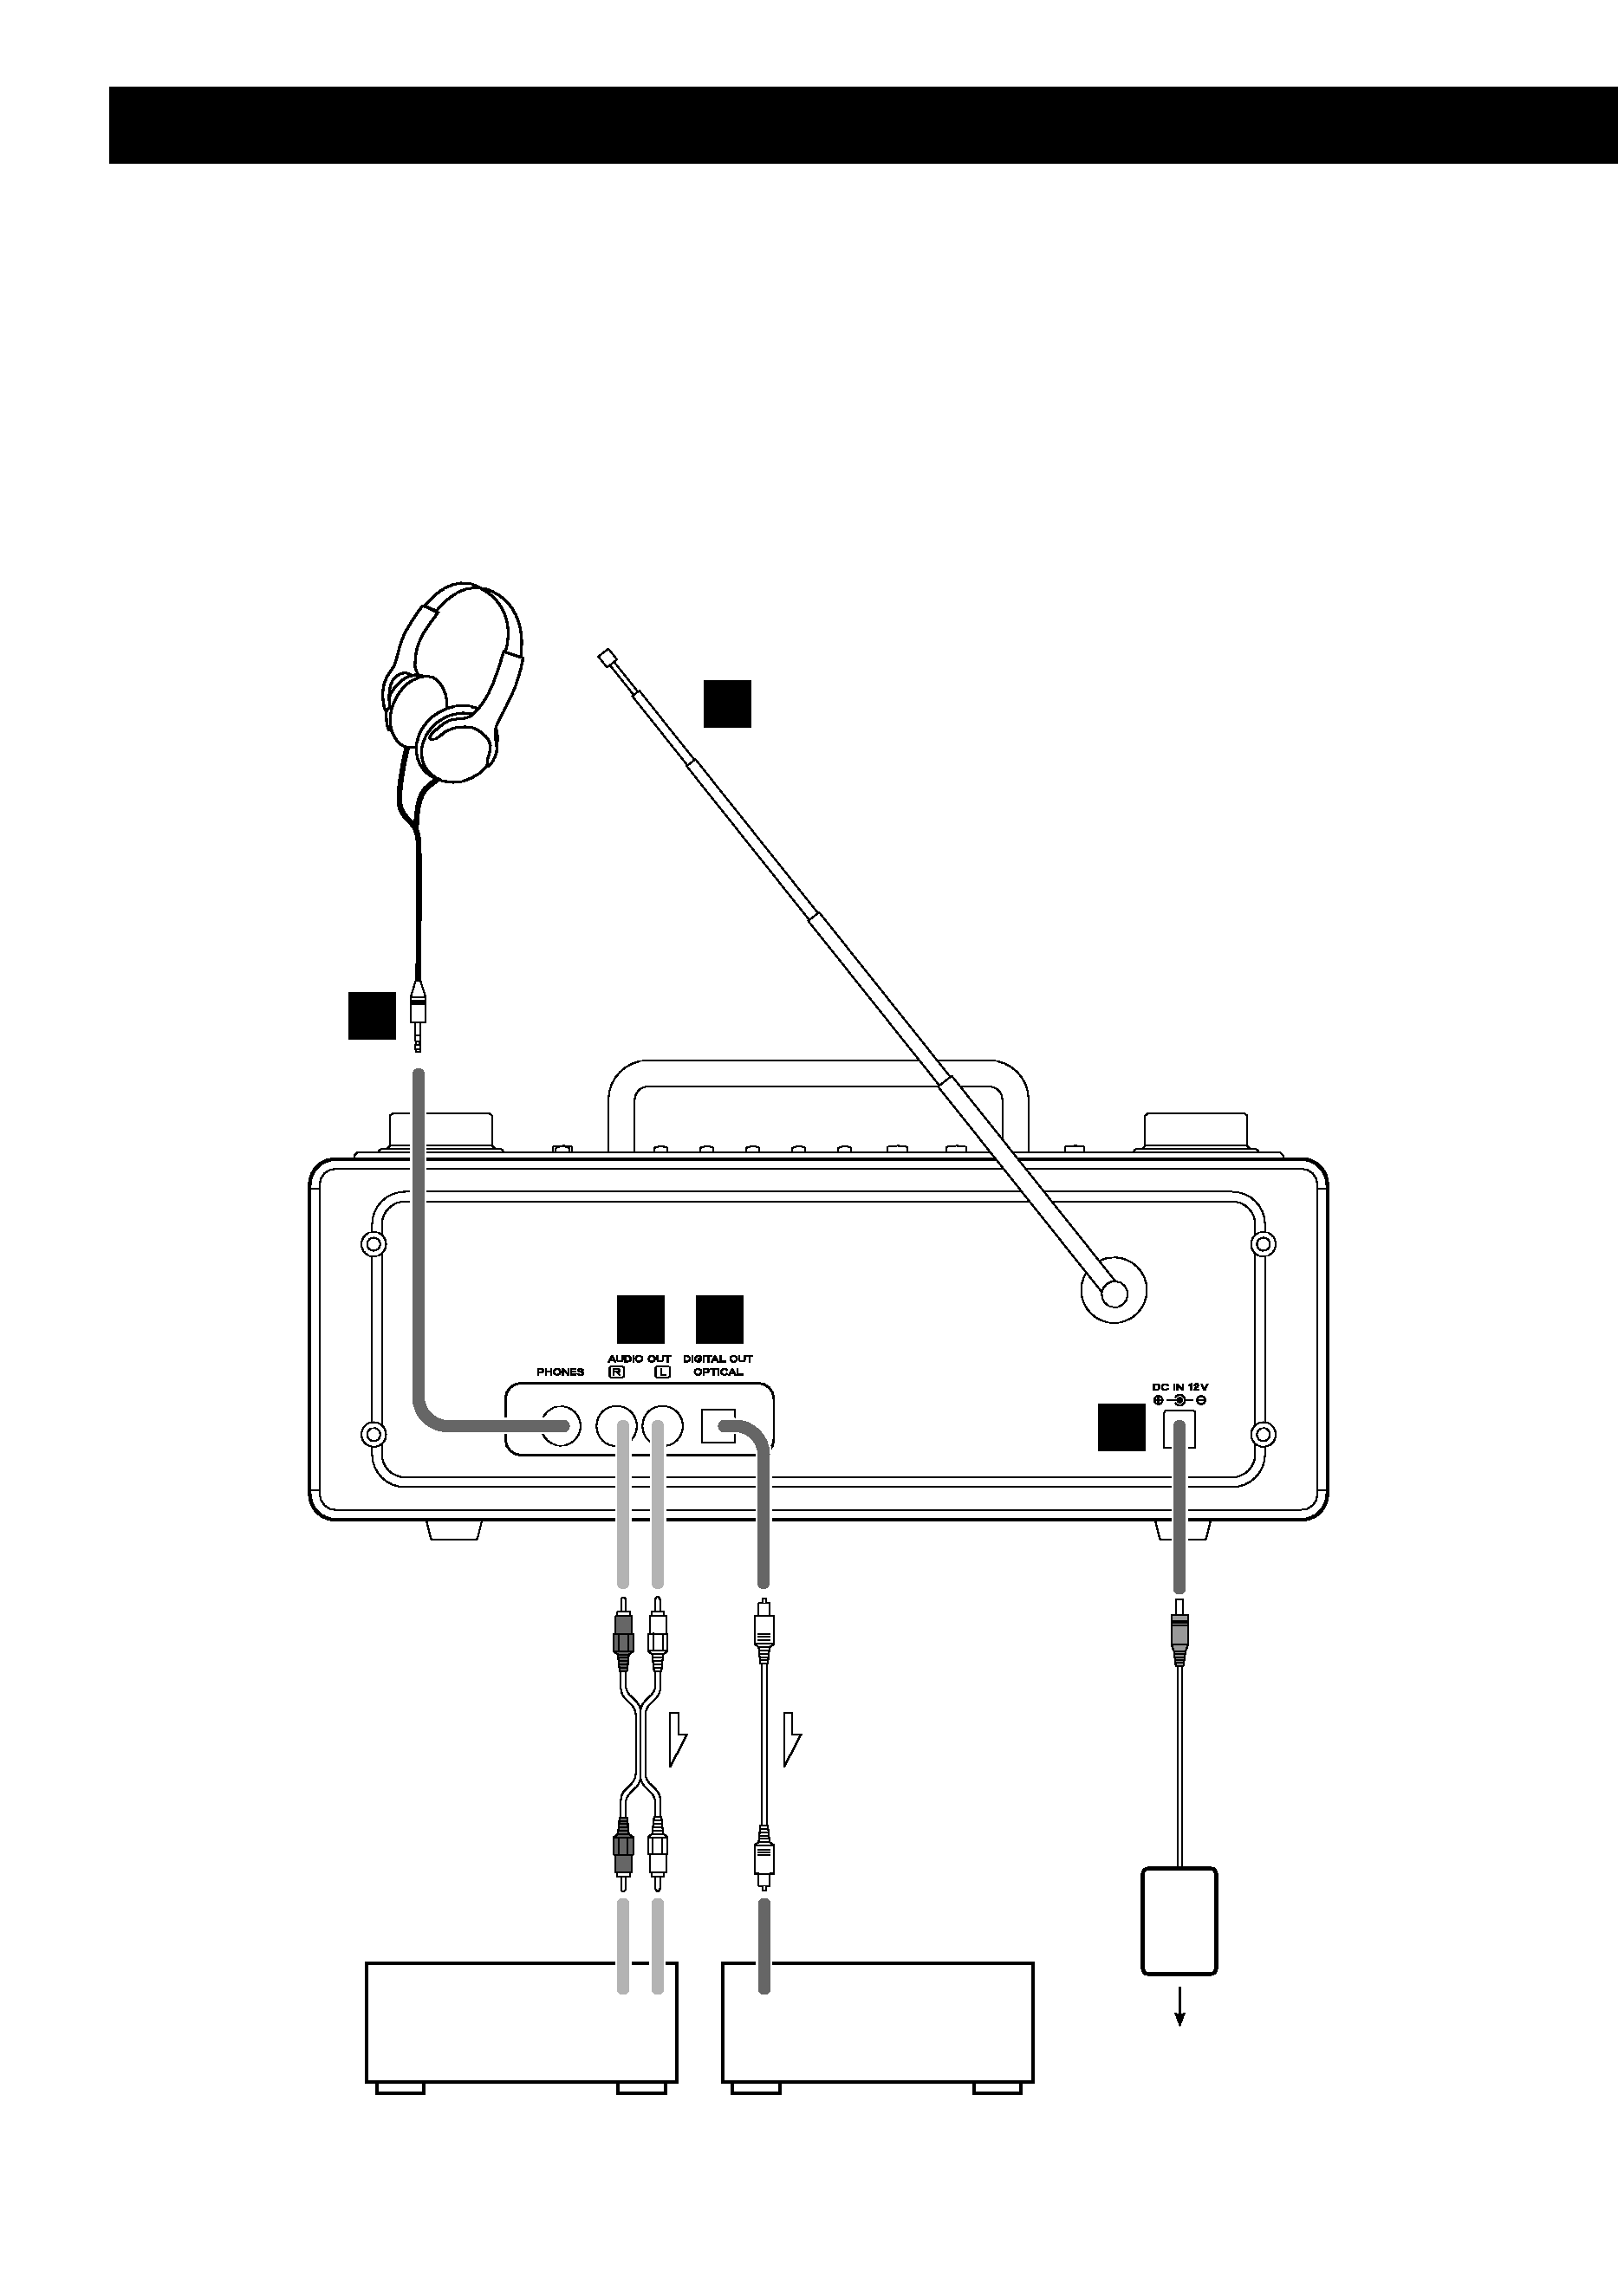
AUDIO OUT jack
Analogue 2-channel audio signal is output from this jack.
Connect the component with RCA pin cable.
AUDIO OUT (SR-L30DAB) w AUDIO IN (cassette tape deck, amplifier, etc.)
Make sure to connect :
white plug w white jack (L: left)
red plug w red jack (R: right)
DIGITAL OUT terminal
DAB's digital audio signal is output from this terminal. If you want to record
digitally, or decode the signal using an external digital decoder, connect the
component with an optical cable.
DIGITAL OUT (SR-L30DAB) w DIGITAL IN (decoder, CD-R, MD, etc.)
<
When inserting the plug of the optical cable, the protective shutter of the
terminal will open and you should hear it click into position when fully
inserted. Be careful that you do not force the plug, because this could result
in damage to the protective shutter, the cable, or the unit itself.
DC IN
Connect the provided AC adaptor to this jack. After all other connections are
complete, connect the AC adaptor's plug to the AC wall socket.
<
Do not use any AC adaptors other than the one included with this unit to
avoid fire, electric shock, etc. Be sure to connect the adaptor to an AC outlet
which supplies correct voltage.
PHONES
For private listening, insert the headphones plug into this jack, and adjust the
volume using the VOLUME buttons.
DAB/FM Indoor Antenna
Strech the telescopic antenna and point it towards the direction which gives
the best reception.
<
You can check the DAB signal strength. Tune in a DAB station and press the
SELECT button once to display the signal strength.
E
D
C
B
A
