MICROFILM
SERVICE MANUAL
For Primary Service
Model Name Using Similar Mechanism
NEW
CD Mechanism Type
BU-23
Optical Pick-up Type
KHS-180A/J1N
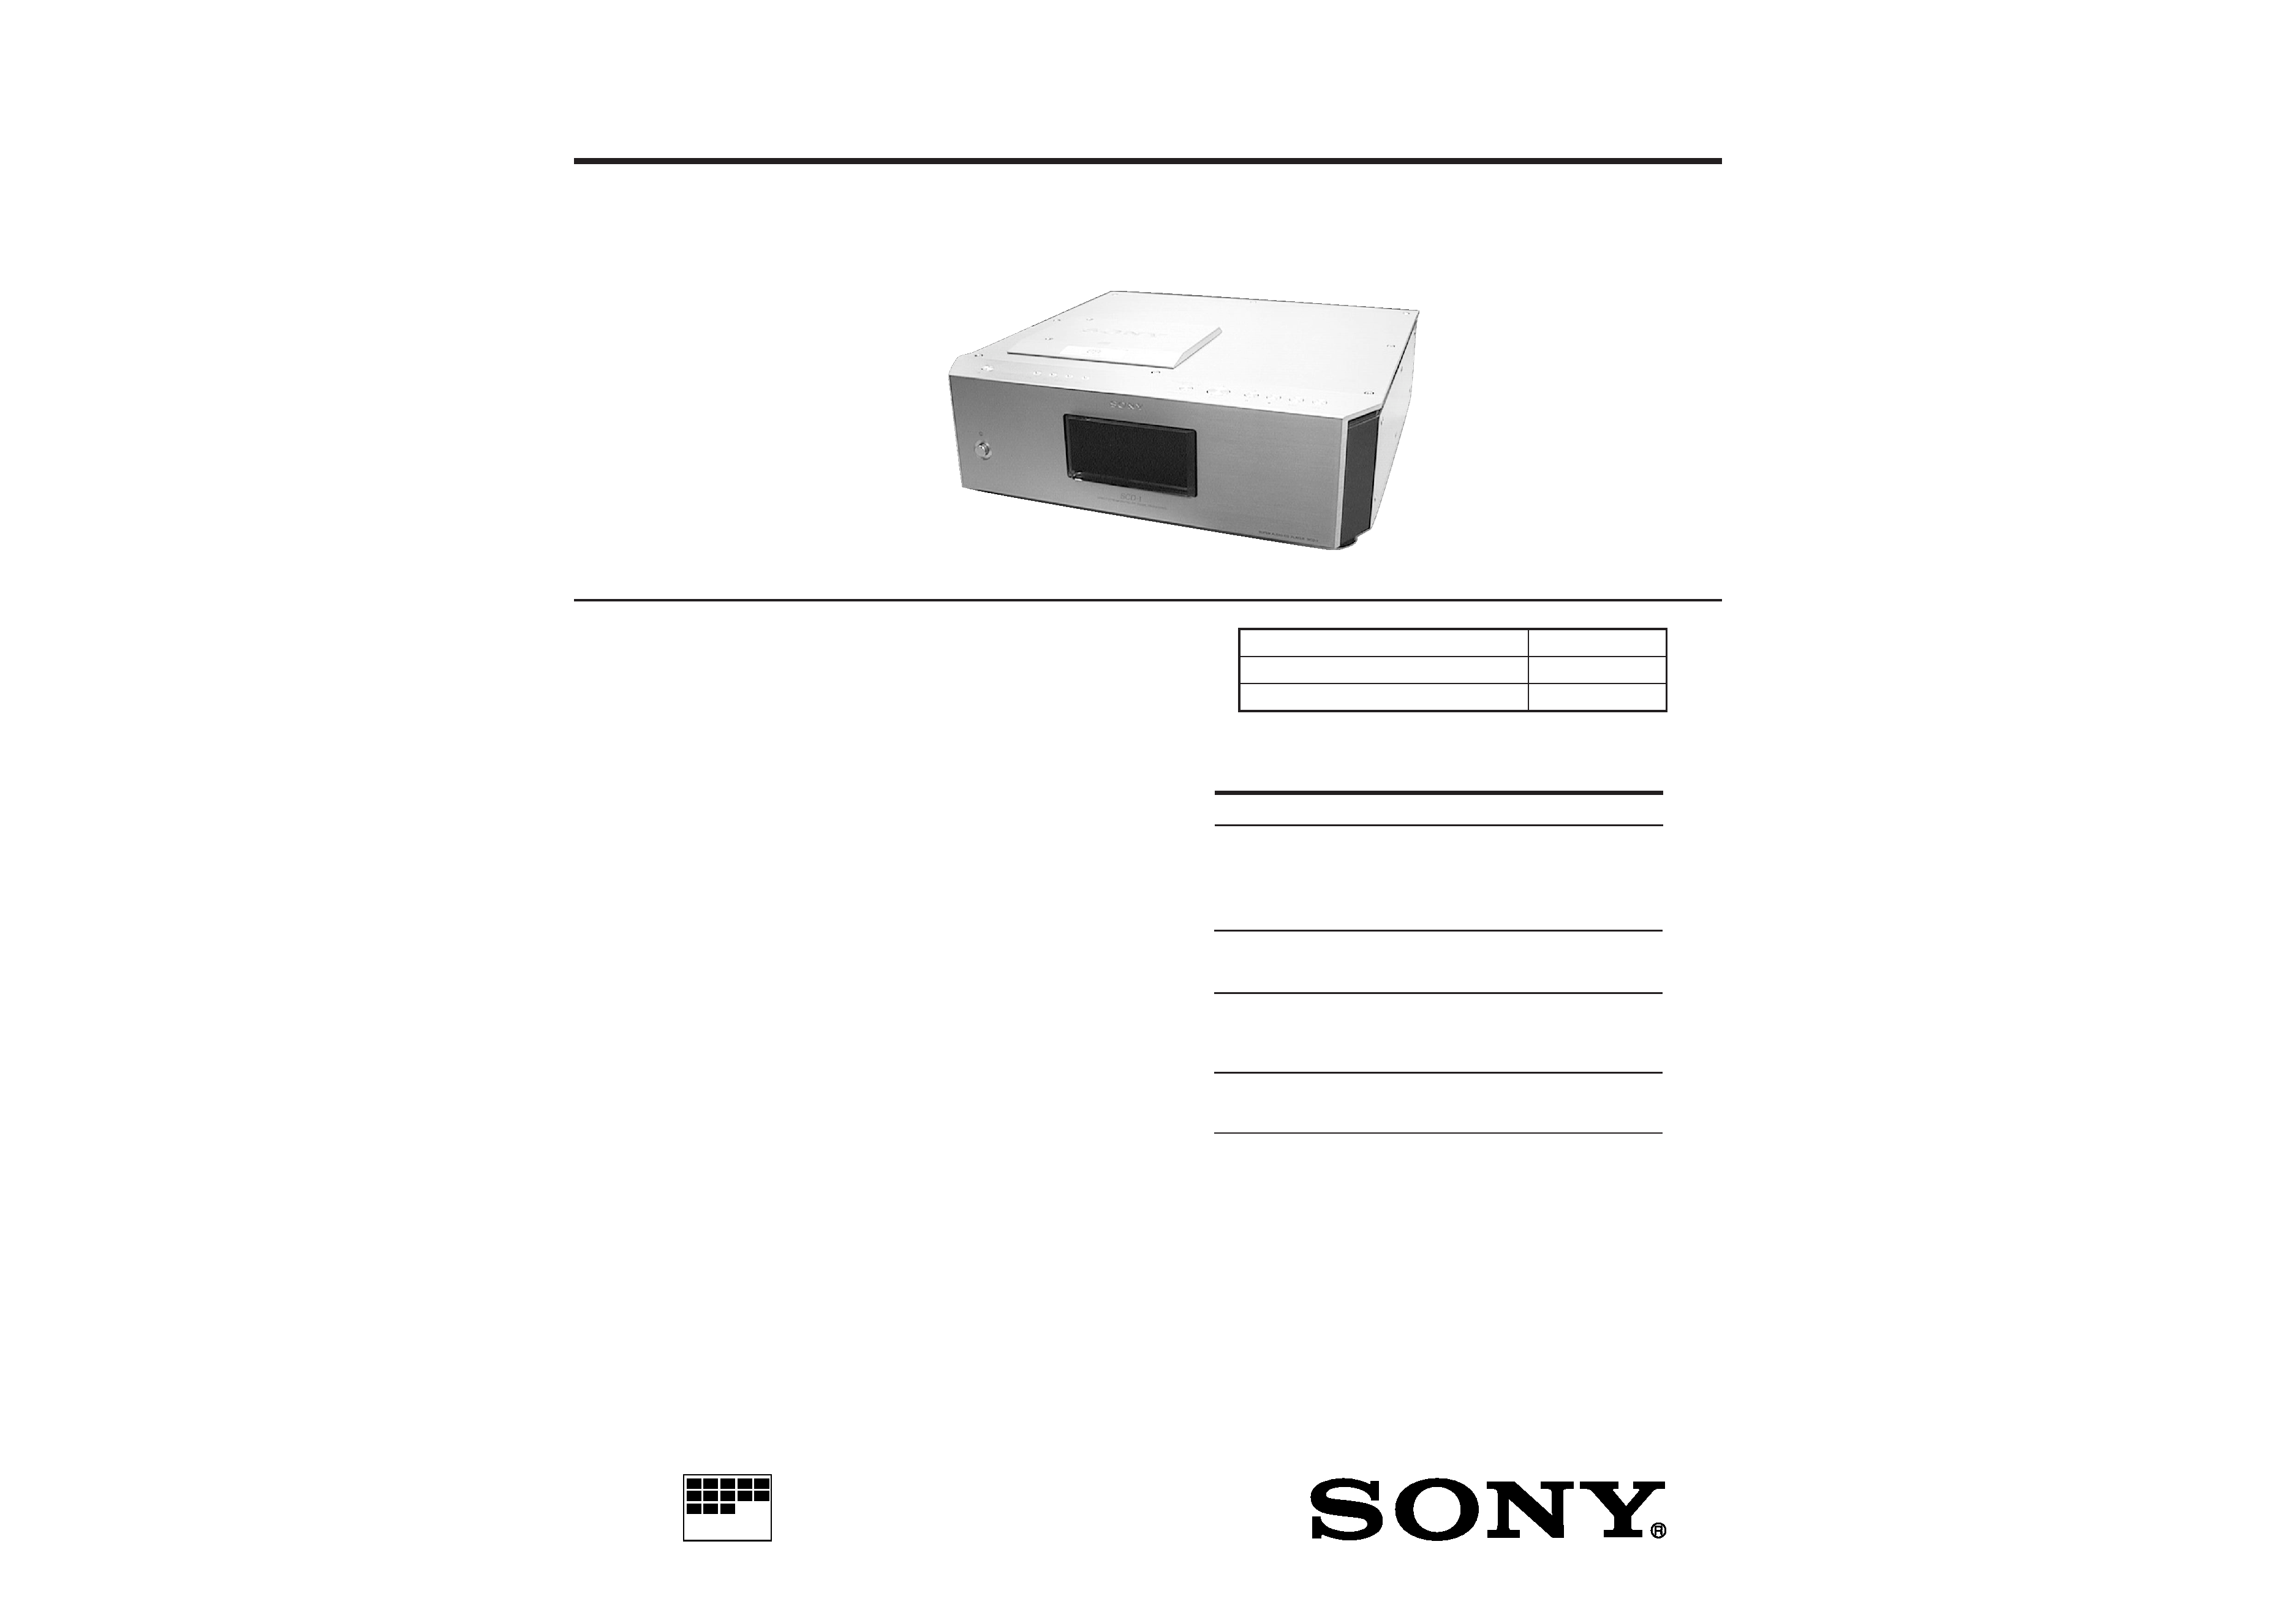
SUPER AUDIO CD PLAYER
US Model
Canadian Model
AEP Model
SPECIFICATIONS
SCD-1/777ES
Photo: SCD-1
When a super audio CD is played
Playing frequency range
2 Hz to 100 kHz
Frequency response
2 Hz to 50 kHz (3 dB)
Dynamic range
105 dB or more
Total harmonic distortion rate
0.0012 % or less
Wow and flutter
Value of measurable limit (
±0.001 %
W. PEAK) or less
When a CD is played
Frequency response
2 Hz to 20 kHz
Dynamic range
100 dB or more
Total harmonic distortion rate
0.0017 % or less
Wow and flutter
Value of measurable limit (
±0.001 %
W. PEAK) or less
Output connector
*Output only the audio signals of the CD
Load impedance
LINE OUT
UNBALANCED
LINE OUT
BALANCED
DIGITAL OUT
OPTICAL*
DIGITAL OUT
COAXIAL*
Phono
jacks
Jack type
Square
optical
output
connector
Coaxial
output
connector
2 Vrms
(at 50 kilohms)
XLR
4 Vrms
(at 50 kilohms)
18 dBm
Over 10 kilohms
Over 600 ohms
Light emitting
wave length:
660 nm
75 ohms
Output level
0.5 Vp-p
(
)
(SCD-1)
ANALOG OUT
(SCD-777ES)
(SCD-1)
Continued on next page
Though the appearance of SCD-777ES differs from that of
SCD-1, the structure and contents are almost same, and
therefore typically the SCD-1 is described, except remarks.
2
General
Laser
Semiconductor laser (
= 780,650 nm)
Emission duration: continuous
Power requirements
European models: 230 V AC, 50/60 Hz
USA and Canadian models:
120 V AC, 60 Hz
Power consumption
36 W
Dimensions (w/h/d)
430
× 149 × 436 mm
(17
× 5 7/8 × 17 1/4 in.) incl. projecting
parts
Mass (approx.)
26.5 kg (58 lbs 7 oz.) (SCD-1)
Supplied accessories
25 kg (55 lbs 2 oz.) (SCD-777ES)
· Audio connecting cord
(phono jack
× 2 y phono jack × 2) (1)
· Mains lead (1)
· Plug adapter (U.S.A. and Canadian models only) (1)
· Stabilizer (1)
· Remote commander (remote) RM-DS1 (1)
· R03 (size-AAA) batteries (2)
Design and specifications are subject to change without notice.
Features
Playback of the Super Audio CD recorded
in the DSD format
The DSD (Direct Stream Digital) format is the core
technology of a Super Audio CD, allowing music
reproduction that is extremely faithful to the original
sound.
The DSD format, using a 2.8224 MHz sampling frequency
64 times higher than that of a conventional CD, and the 1-
bit quantization, makes possible recording of more than
four times the data information of the PCM format which
is used for a conventional CD.
Different from the PCM format which performs data
decimation and interpolation via digital filters, the DSD
format adopts the simple playback process. In other
words, the A/D converted 1-bit digital signal only passes
through an analog low-pass filter before playback.
As a whole, the DSD format achieves both a wide
frequency range of theoretically over 100 kHz, and a wide
dynamic range across the audible frequency range at the
same time, and results in high-quality music reproduction
faithful to the original sound.
To play back a Super Audio CD recorded in the DSD
format with exceptional quality, the SCD-1/777ES employs
a newly developed DSD decoder and D/A converter
system, as well as a chassis and loading mechanism
especially designed for this unit.
Playback of a conventional CD with
higher quality
The SCD-1/777ES can also play back a conventional CD
higher quality than a conventional CD player. To
provide enhanced quality,
various advanced
independent optical pickups ar e incorporated;
Audio CDs,
In addition, a 24-bit
digital filter is
By selecting one
characteristics, you can adjust the tone quality in
accordance with the
Others
· A Super Audio CD can mark up to 255 track/index
numbers. Corresponding to that format, the SCD-1/
777ES incorporates a large 3-digit display
.
· The supplied remote is capable of controlling either the
SCD-1/777ES and a conventional Sony CD player.
(See D (SCD-1) or B (SCD-777ES)
selector on page 10 and A CD1/ CD2 selector on page
with
the SCD-1/777ES employs
technologies. For example, two
Super
and the other for
precision variable coefficient (V.C.)
provided for CD playback (see page 19).
of five filters which have different cutoff
music source or your audio system.
COMMAND MODE
conventional CDs.
one is for
11.)
Parts List (Accessories)
1-418-347-11 REMOTE COMMANDER (RMD-DS1)
1-506-411-21 ADAPTOR, AC PLUG 3P-2P (US, Canadian)
1-551-631-22 CORD, POWER (AEP)
1-551-812-11 CORD, POWER (US, Canadian)
1-558-271-11 CORD, CONNECTION
3-865-537-11 MANUAL, INSTRUCTION (ENGLISH, FRENCH)
(SCD-1)
3-865-537-21 MANUAL, INSTRUCTION (GERMAN, SPANISH,
DUTCH) (SCD-1: AEP)
3-865-537-31 MANUAL, INSTRUCTION
(SWEDISH, ITALIAN, PORTUGUESE)
(SCD-1: AEP)
3-868-032-11 MANUAL, INSTRUCTION (ENGLISH, FRENCH)
(SCD-777ES)
3-868-032-21 MANUAL, INSTRUCTION (GERMAN, SPANISH,
DUTCH) (SCD-777ES: AEP)
3-868-032-31 MANUAL, INSTRUCTION (SWEDISH, ITALIAN,
PORTUGUESE) (SCD-777ES: AEP)
4-214-892-01 COVER, BATTERY (for RMD-DS1)
4-222-473-01 DISC (SACD)
A-4672-800-A STABILIZER ASSY
Ref. No.
Part No.
Description
Remark
Laser radiant power: 1.52 µW at 780 nm (for CD)
5.47 µW at 650 nm (for SACD)
* These output is the value measured at a distance of about
200 mm form the objective lense surface on the optical pick-
up.
3
SECTION
1
GENERAL
8GB
Location and
Functions of
Parts
This chapter tells you about the
location and functions of the various
buttons and controls on the front and
rear panels and the supplied r
emote.
Further details are provided on the
pages indicated in parentheses.
It also tells you about the information
that appears in the display window.
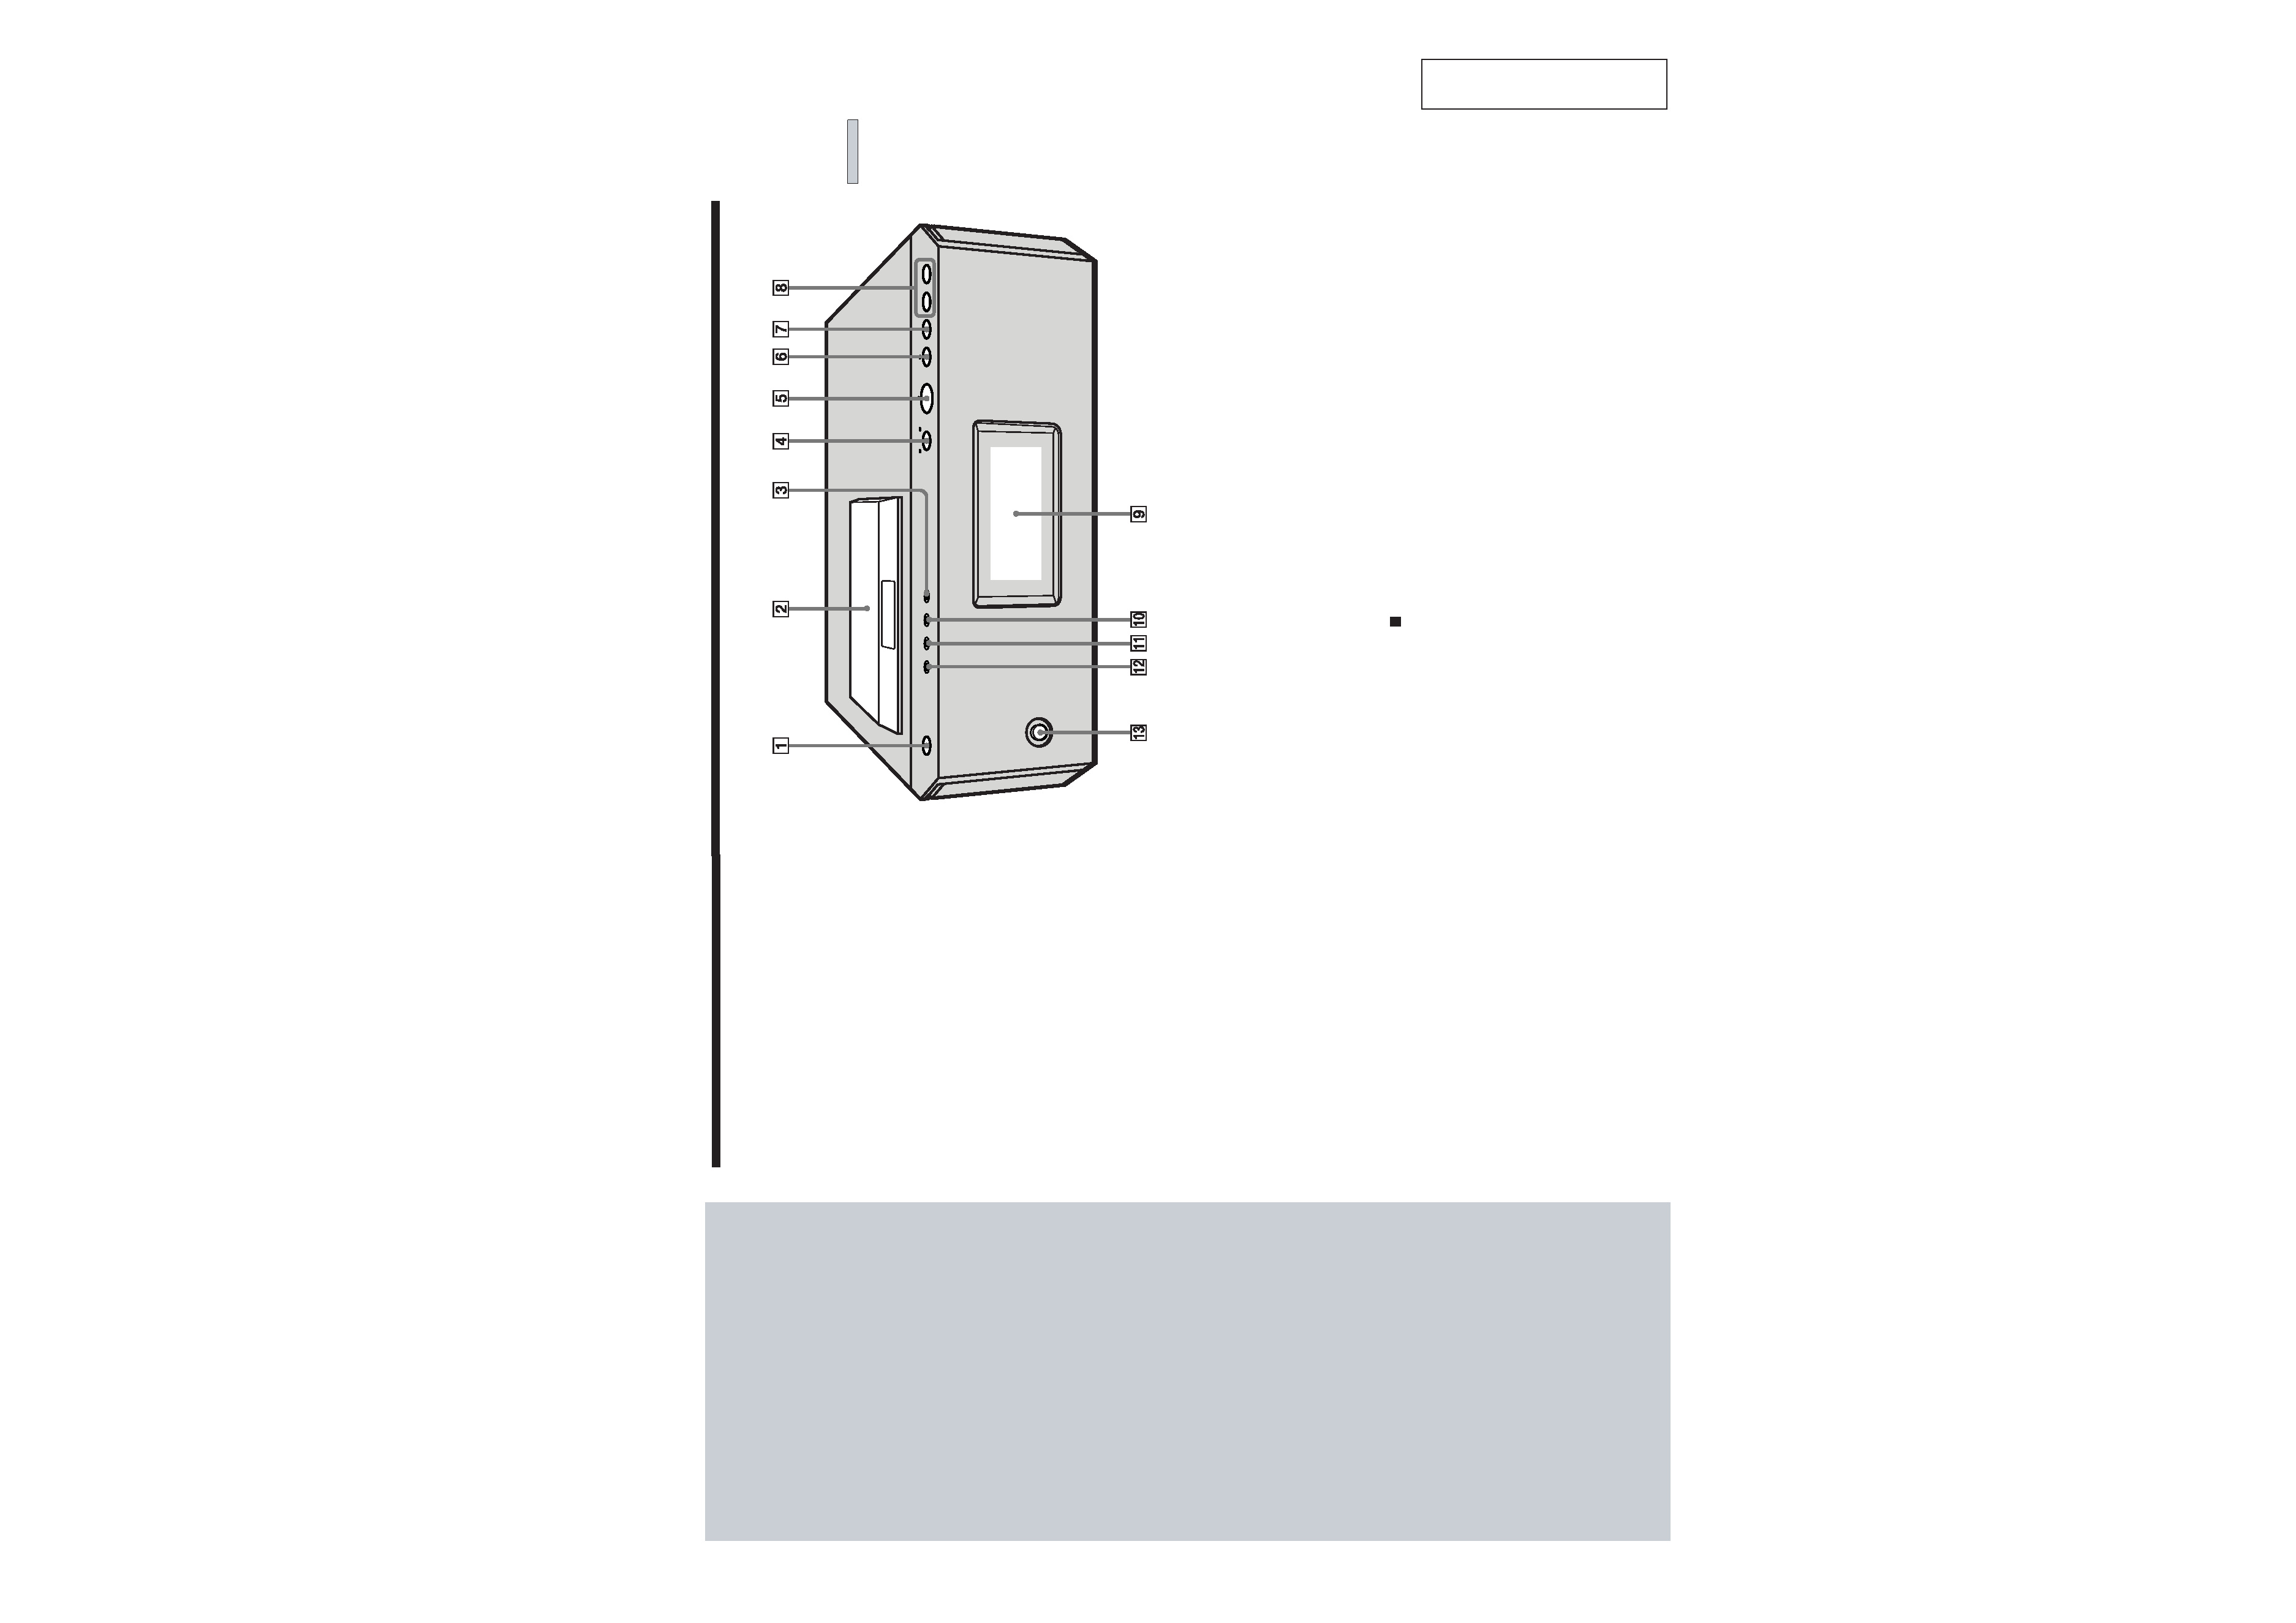
Front Panel Parts
Descriptions
1
A
button (12)
Press to open the disc lid.
2
Disc lid (12)
Press A to open/close the disc lid.
3
FILTER button (19)
Press to select the digital filter type when playing a
CD.
4
SACD/CD button (12)
Each time you press the button while the player is
stopped, the SACD or CD indicator on the upper side
of the player lights. Select the indicator that matches
the type of CD you want to play. For details on the
type of discs you can play, see "Compatible Disc
Types" on page 7.
5
H
button (12)
Press to start play.
6
X
button (13)
Press to pause play.
9GB
Location
and
Functions
of
Parts
7
x
button (13)
Press to stop play.
8
l
/L button (13)
Each time you press l, you go back to the
preceding track; each time you press L, you go to
the succeeding track.
9
Display window (Remote sensor
) (13)
Shows various information.
0
DIGITAL OUT button (5)
Press when a component is connected to the DIGITAL
OUT connectors. Each time you press the button, the
display switches between "16 bit" (the audio signals of
a CD can be output) and "OFF" (the audio signals of a
CD cannot be output).
qa
TEXT button (14)
Shows TEXT information when the player detects a
TEXT disc.
qs
TIME button (13)
Each time you press the button, the playing time of the
track and the total remaining time on the disc appear
in the display.
qd
!
(power) switch (12)
Press to turn on the player.
This
section
is
e
xtr
acted
from
instruction
manual.
4
10GB
Location
and
Functions
of
Parts
5
Switches depending on amplifier to be connected. For
details, see "About the Switch Marked "STANDARD"
on the rear panel of the player" on page 6.
6
DIGITAL OUT (CD) OPTICAL connector (5)
Connect to an audio component using an optical
digital cable.
7
DIGITAL OUT (CD) COAXIAL connector (5)
Connect to an audio component using the coaxial
digital cable.
Note
Only the audio signals of the CD can be output from the
DIGITAL OUT connectors shown in 6 and 7. Those of the
Super Audio CD cannot be output through DIGITAL OUT.
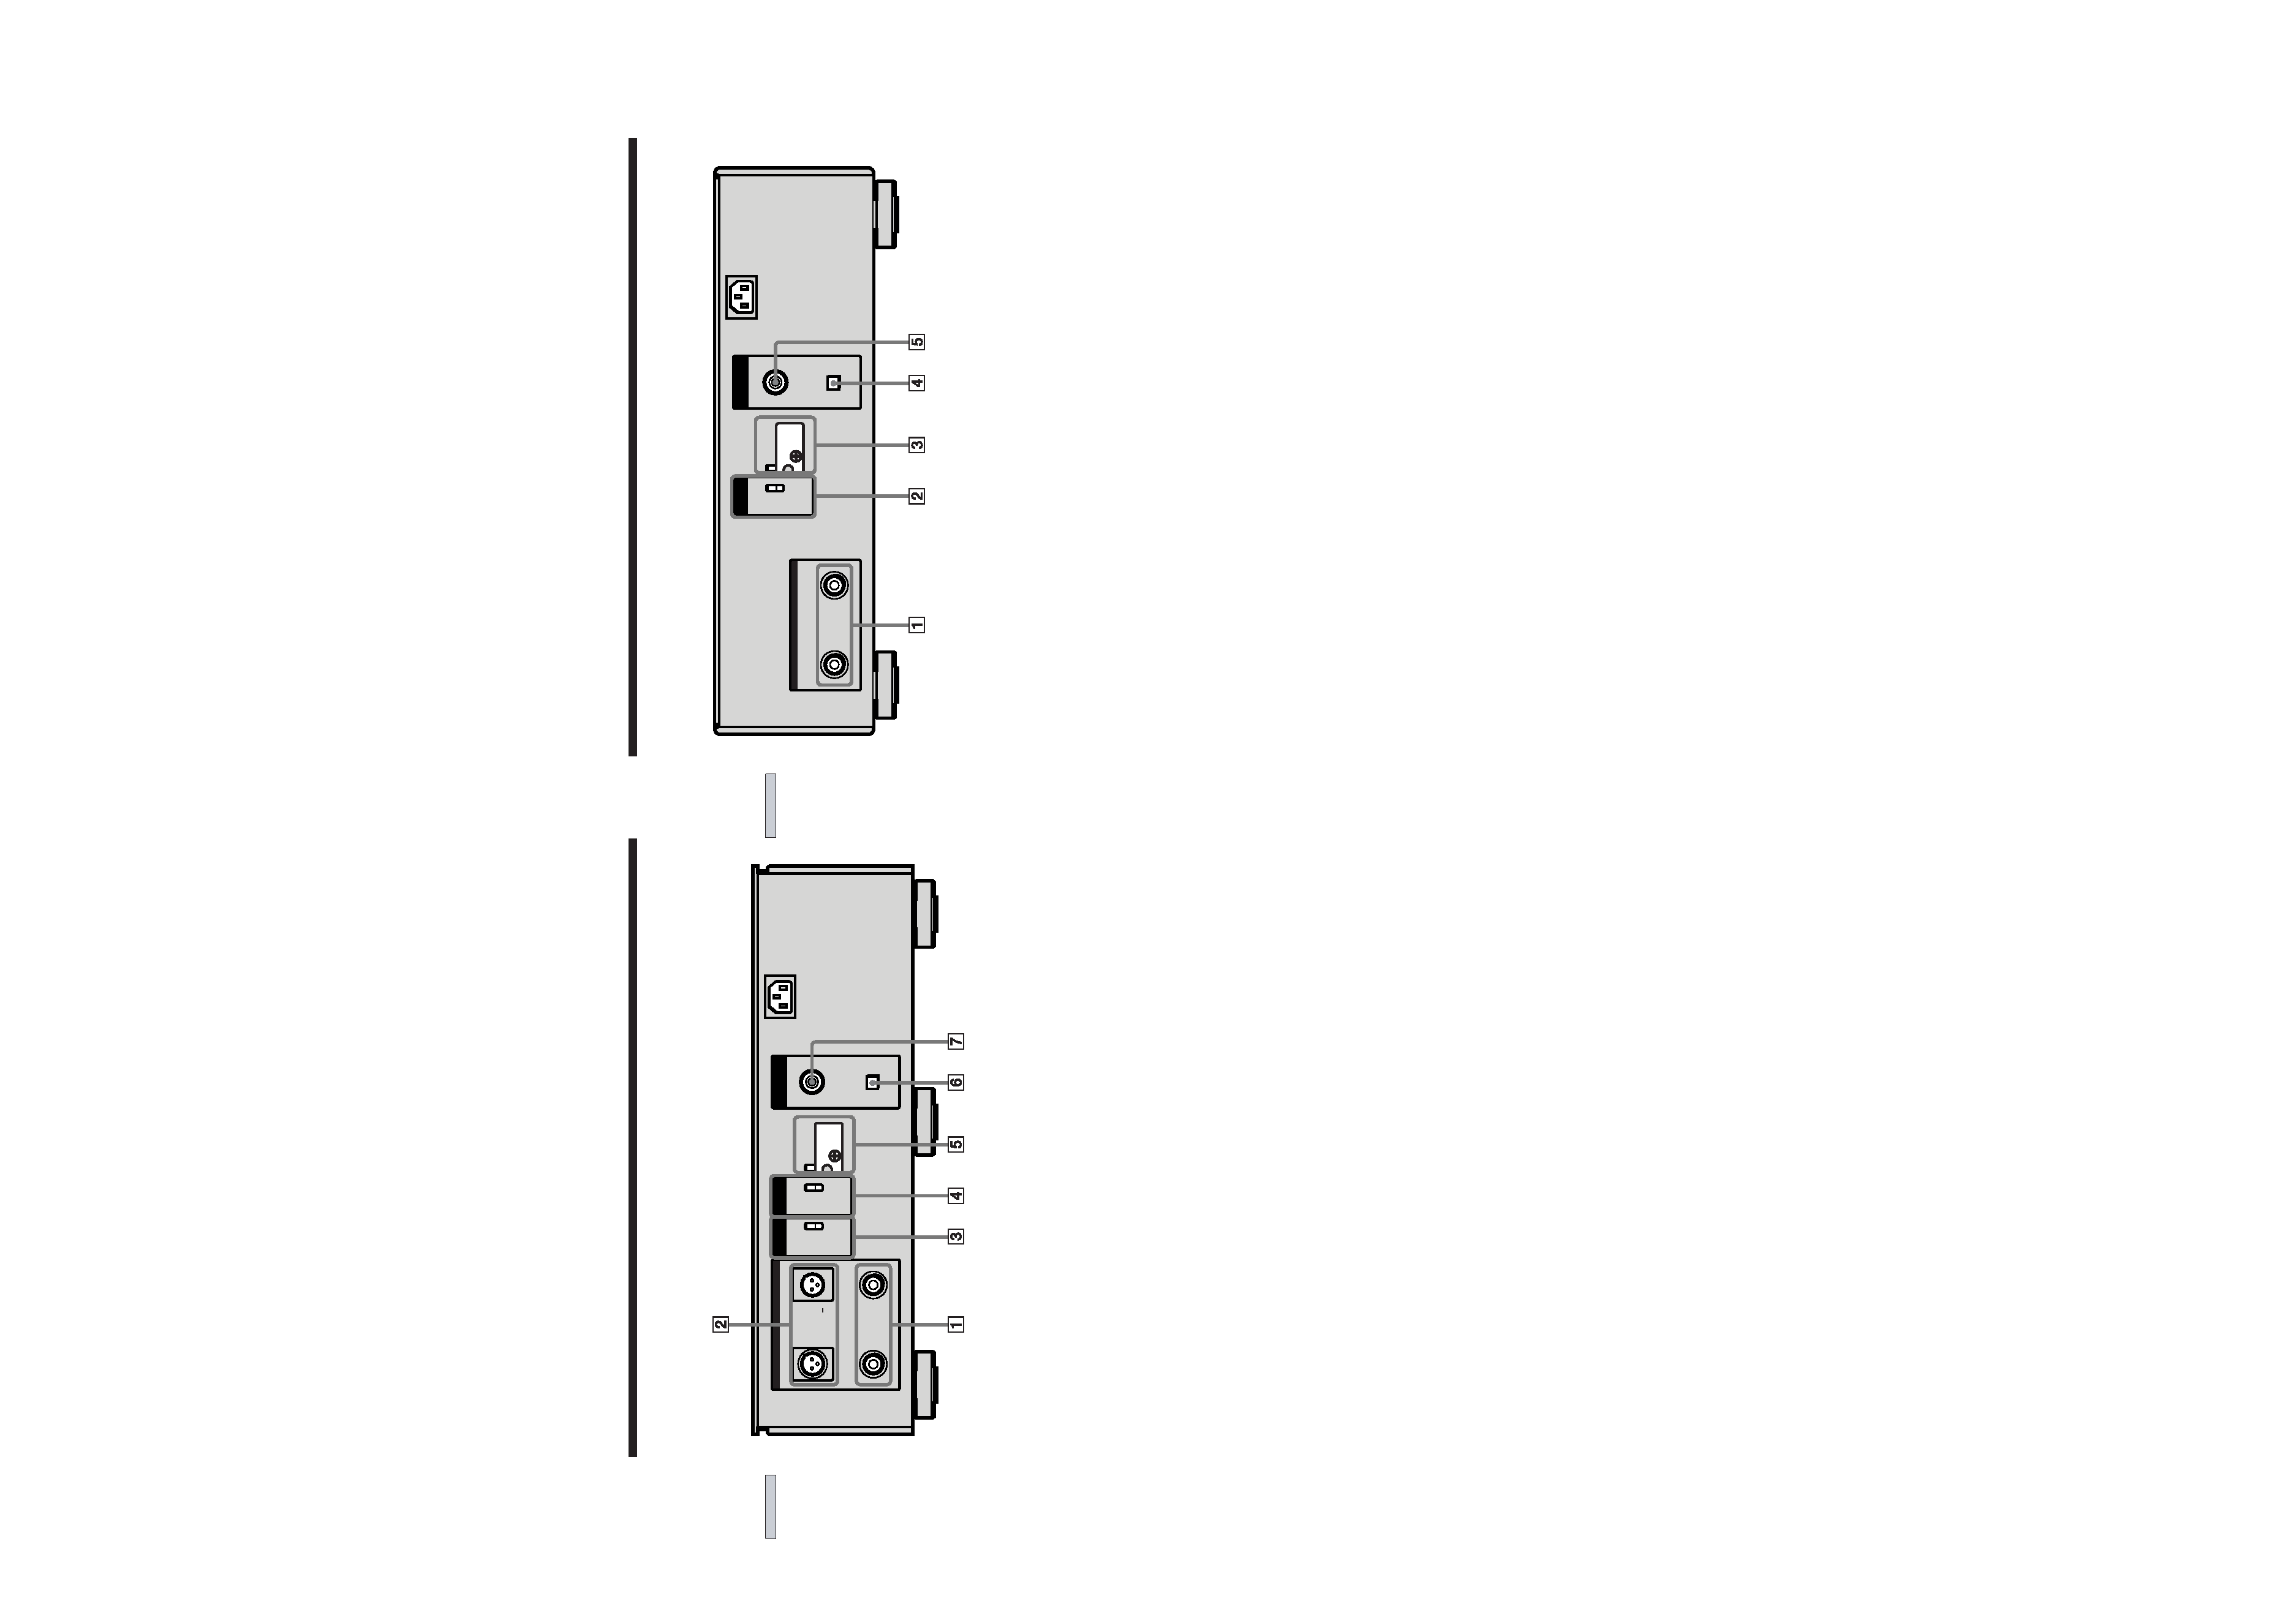
Rear Panel Parts Descriptions (SCD-1)
COMMAND
MODE
BALANCED
OUT
COAXIAL
OPTICAL
DIGITAL OUT
CD
~AC IN
LINE OUT (ANALOG)
RL
RL
BALANCED
UNBALANCED
1:GROUND
2:HOT (+)
3:COLD ( )
ON
OFF
CD1
CD2
STANDARD
CUSTOM
TA - E1 / N1
1
LINE OUT (ANALOG) UNBALANCED jacks (5)
Connect to an audio component using the audio
connecting cord.
2
LINE OUT (ANALOG) BALANCED connectors (5)
Connect to an audio component using the XLR
(balanced) cord.
3
BALANCED OUT ON/OFF switch (5)
Set to ON when the audio component is connected to
the LINE OUT BALANCED connectors. In case of
another connection, set it to OFF.
4
COMMAND MODE selector
Normally set to CD1. When you connect a Sony CD
player other than this player, set to CD2. In this case,
you can control both the other Sony CD player and
this player with CD1/CD2 on the remote. Set to CD1
to control the other Sony CD player, or CD2 to control
this player.
10GB
Location
and
Functions
of
Parts
4
DIGITAL OUT CD OPTICAL connector (5)
Connect to an audio component using an optical
digital cable.
5
DIGITAL OUT CD COAXIAL connector (5)
Connect to an audio component using the coaxial
digital cable.
Note
Only the audio signals of the CD can be output from the
DIGITAL OUT CD connectors shown in 4 and 5. Those of the
Super Audio CD cannot be output through DIGITAL OUT CD.
Rear Panel Parts Descriptions (SCD-777ES)
COMMAND
MODE
COAXIAL
OPTICAL
DIGITAL OUT
CD
~AC IN
ANALOG OUT
RL
CD1
CD2
STANDARD
CUSTOM
TA - E1 / N1
1
ANALOG OUT jacks (5)
Connect to an audio component using the audio
connecting cord.
2
COMMAND MODE selector
Normally set to CD1. When you connect a Sony CD
player other than this player, set to CD2. In this case,
you can control both the other Sony CD player and
this player with CD1/CD2 on the remote. Set to CD1
to control the other Sony CD player, or CD2 to control
this player.
3
Switches depending on amplifier to be connected. For
details, see "About the Switch Marked "STANDARD"
on the rear panel of the player" on page 6.
5
11GB
Location
and
Functions
of
Parts
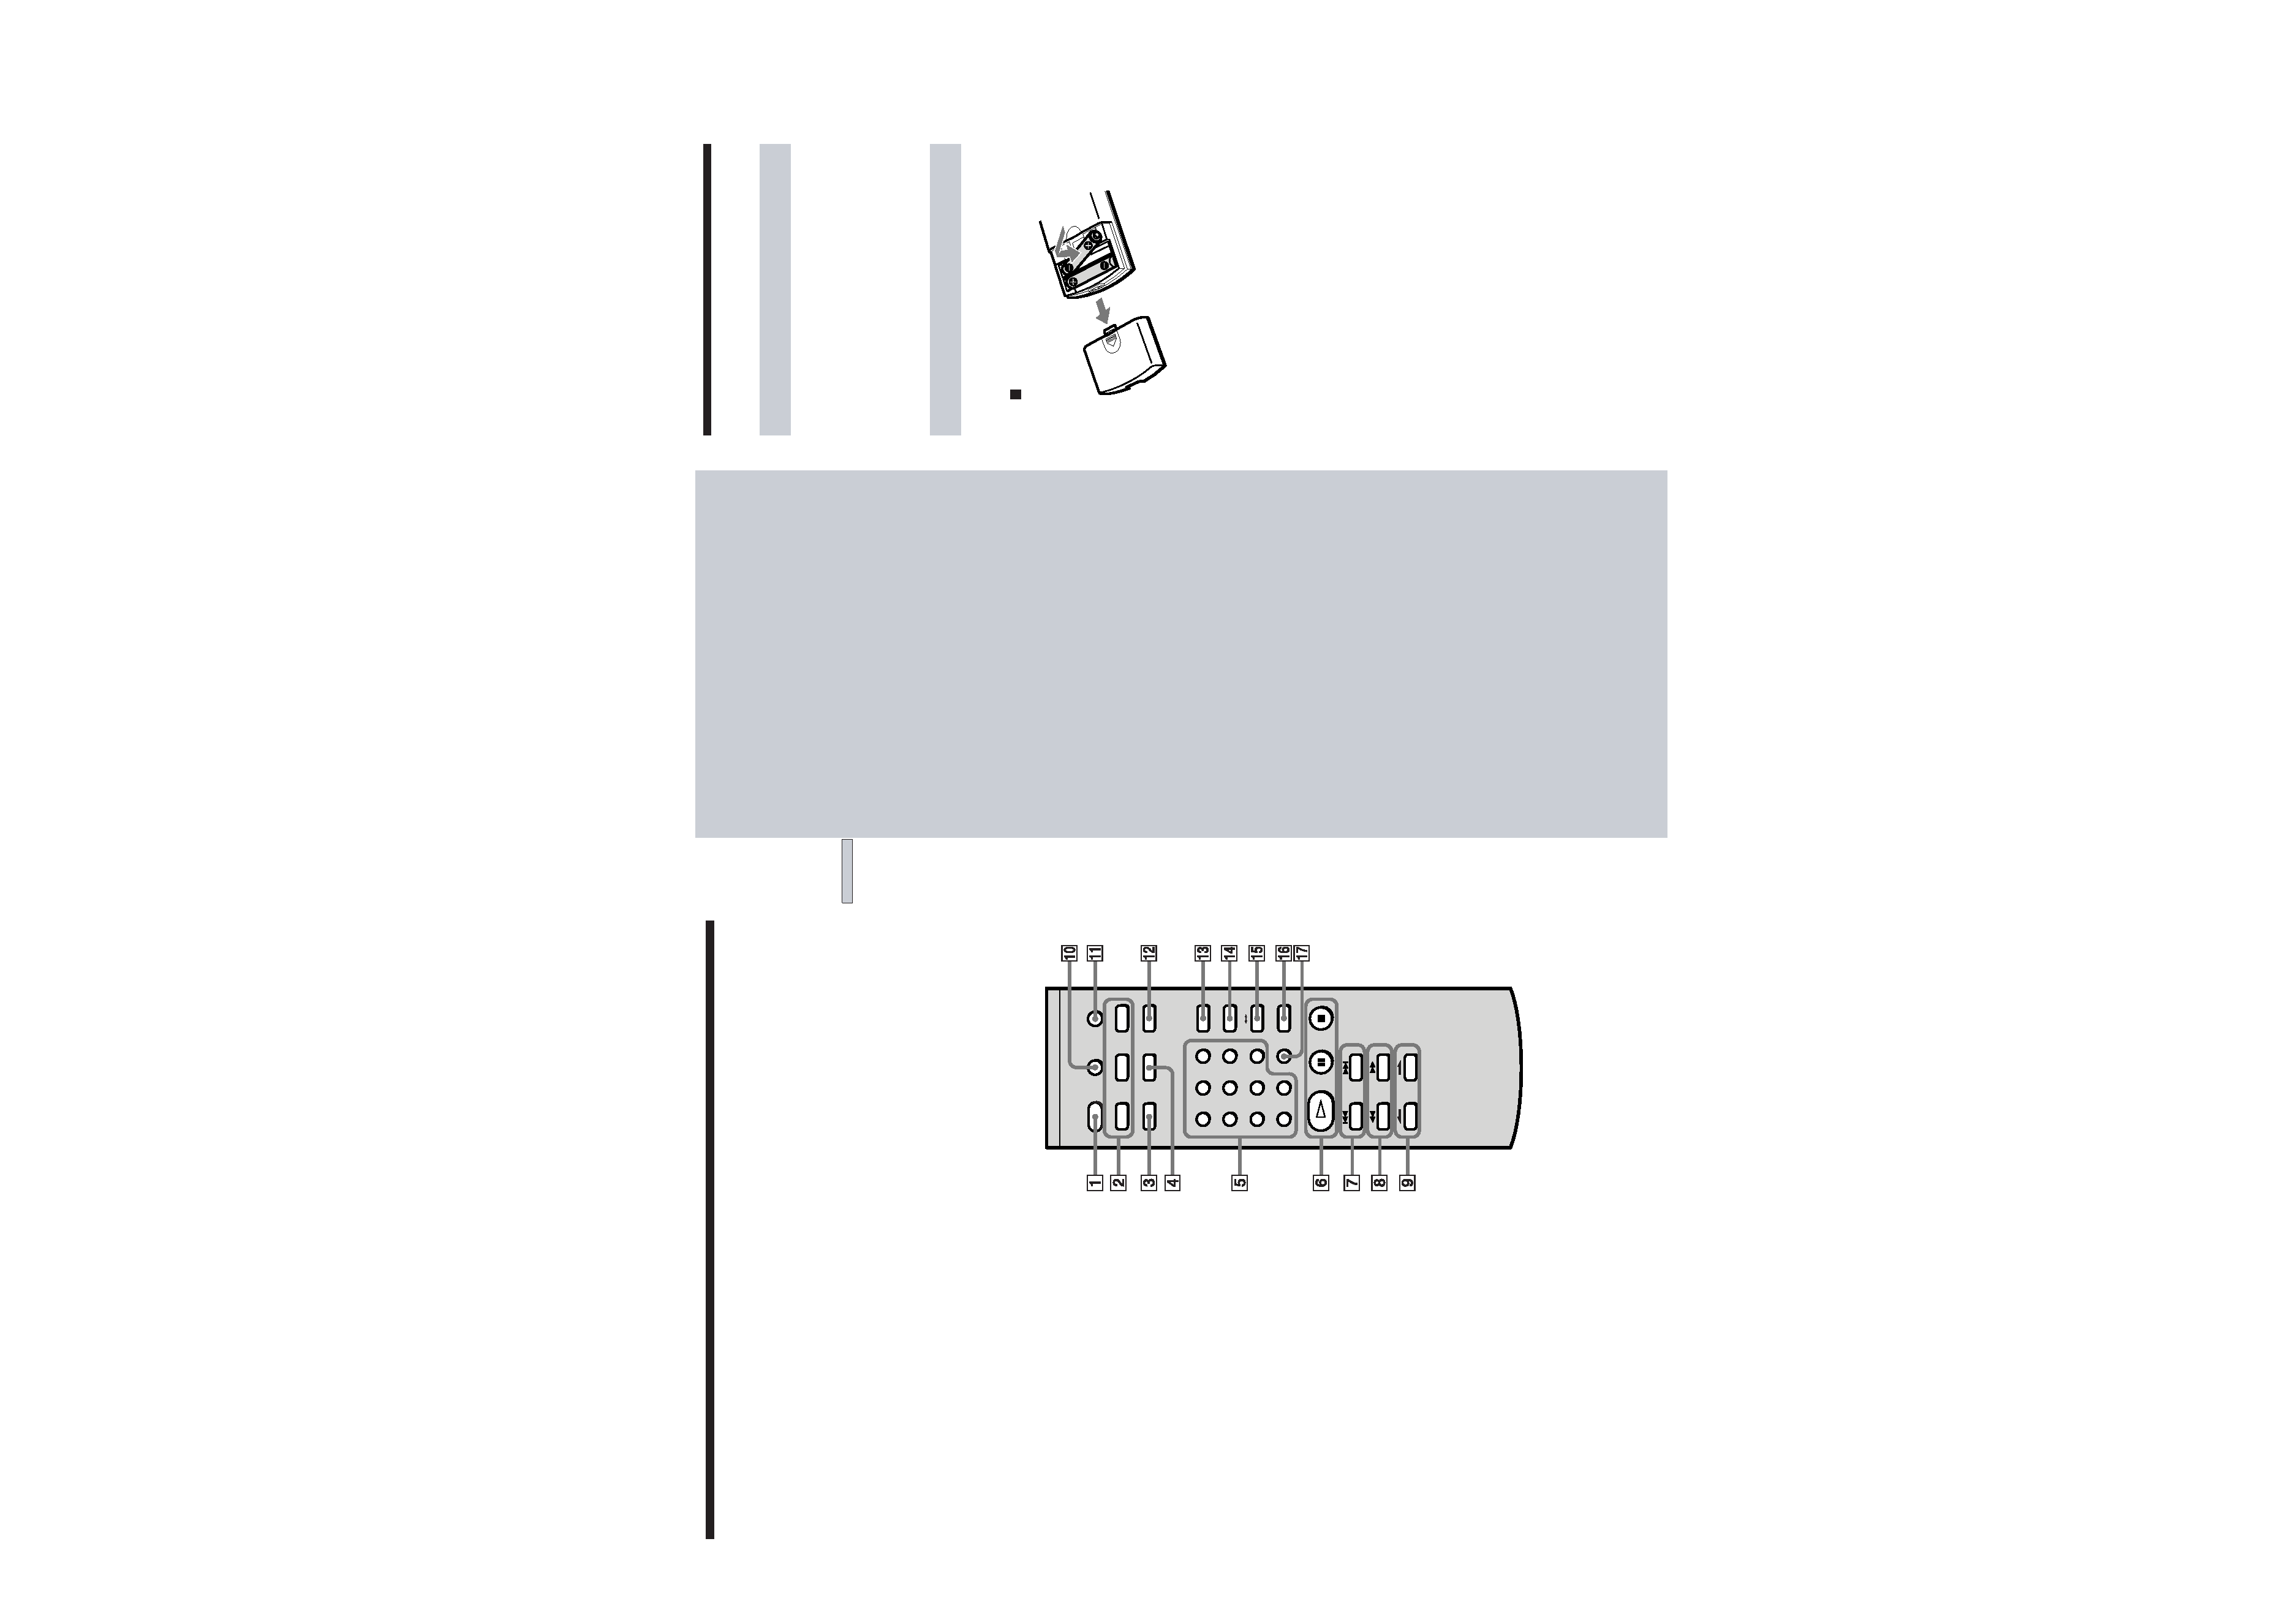
1
CD1/CD2 selector
Select when you connect a Sony CD player other than
this player. Set to CD1 to control the other Sony CD
player, or CD2 to control this player. In this case, you
have to set the COMMAND MODE selector on the
rear panel to CD2.
2
CONTINUE button (17, 18)
Press to resume normal play fr
om Shuffle Play or
Programme Play
.
SHUFFLE button (17)
Press to select Shuffle Play.
PROGRAM button (18)
Press to select Programme Play
.
3
TEXT/ENTER button (14, 15)
Shows the TEXT information when the player detects
a TEXT disc.
4
LANGUAGE button (15)
Press to change the displayed language if the TEXT
disc has several languages.
5
Number buttons (15)
Press to enter the track numbers.
6
H
button (12)
Press to start play.
X
button (13)
Press to pause play
.
x
button (13)
Press to stop play.
7
AMS ./> (AMS: Automatic Music Sensor)
buttons (13, 15)
Press to locate a specific track.
8
m
/M buttons (16)
Press to locate a portion you want to play within a
track.
9
INDEX >/. buttons (16)
Press to locate a specific point marked with an index
signal when you play a disc that has index signals.
0
FILTER button (19)
Press to select the digital filter type when a CD is
played.
qa
SACD/CD button (12)
Each time you press the button, the SACD or CD
indicator on the front of the player lights. Select the
indicator that matches the type of CD you want to
play.
Remote Parts Descriptions
qs
TIME button (13)
Each time you press the button, the playing time of the
track and the remaining time on the disc appear in the
display.
qd
DISPLAY MODE button (14)
Press to turn off the information.
qf
REPEAT button (16)
Press repeatedly to play all tracks or only one track on
the disc.
qg
AyB button (17)
Press to select Repeat A-B Play
.
qh
CHECK button (18)
Press to check the programmed order
.
qj
CLEAR button (18)
Press to delete a programmed track number
.
CD1· ·CD2
FILTER
SACD/CD
CONTINUE
PLAY MODE
PROGRAM
SHUFFLE
TEXT
LANGUAGE
TIME
ENTER
DISPLAY
MODE
REPEAT
CHECK
A
B
12
3
45
6
7
8
>10
10/0
CLEAR
9
AMS
INDEX
4GB
Getting
Started
This chapter provides information on
the supplied accessories and how to
connect various audio components to
the SuperAudio CD player. Be sure
to read this chapter thoroughly before
you actually connect anything to the
player.
Before You Start the
Hookup
Checking the supplied accessories
This player comes with the following items:
· Audio connecting cord
(phono jack
× 2 y phono jack × 2) (1)
· Mains lead (1)
· Plug adapter (U.S.A. and Canadian models only) (1)
· Stabilizer (1)
· Remote commander (remote) RM-DS1 (1)
· R03 (size-AAA) batteries (2)
Inserting batteries into the remote
Insert two R03 (size-AAA) batteries into the battery
compartment with the + and correctly oriented to the
markings. When using the remote, point it at the remote
sensor
on the player.
z When to replace the batteries
Under normal conditions, the batteries should last for about six
months. When the remote no longer operates the player, replace
both batteries with new ones.
Notes
· Do not leave the remote in an extremely hot or humid place.
· Do not drop any foreign object into the remote casing,
particularly when replacing the batteries.
· Do not use a new battery with an old one.
· Do not expose the remote sensor to direct sunlight or lighting
apparatus. Doing so may cause a malfunction.
· If you do not intend use the remote for an extended period of
time, remove the batteries to avoid possible damage from
battery leakage and corrosion.
