R
Instruction Manual
KP-51PS2/AUS
© 2002 by Sony Corporation
EN
100 Hz
Projection TV
4-082-171-41(0)

3
EN
Introduction
Thank you for choosing this Sony 100 Hz Projection TV model.
Before operating the set, please read this manual thoroughly and retain it for future reference.
· Symbols used in the manual:
·
Important information.
·
Information on a feature.
· 1,2... Sequence of instructions.
·
Shaded buttons on the remote control show the
buttons you have to press to follow the sequence
of instructions.
·
Informs you of the result of the instructions.
Table of Contents
Introduction....................................................................................................................................................................................................................... 3
Safety Information............................................................................................................................................................................................................ 4
Overview
Checking the Accessories Supplied.................................................................................................................................................................. 5
Overview of TV Buttons .................................................................................................................................................................................... 5
Overview of Remote Control Buttons.............................................................................................................................................................. 6
Installation
Inserting Batteries into the Remote Control.................................................................................................................................................... 7
Connecting the Aerial and VCR ....................................................................................................................................................................... 7
First Time Operation
Switching on the set and Automatically Tuning............................................................................................................................................ 8
Adjusting Colour Registration (Convergence) ............................................................................................................................................... 9
Menu System
Changing the Screen Format ........................................................................................................................................................................... 10
Introducing the Menu System......................................................................................................................................................................... 10
Using the Menu System:
Adjusting the Picture ..................................................................................................................................................................................... 11
Adjusting the Sound ...................................................................................................................................................................................... 12
Using the Features menu............................................................................................................................................................................... 14
Manually Tuning the TV ............................................................................................................................................................................... 15
Labelling a channel ........................................................................................................................................................................................ 16
Skipping programme positions.................................................................................................................................................................... 17
Using the "Further Programme Preset" function...................................................................................................................................... 18
Inputting your personal ID ........................................................................................................................................................................... 19
Using the Demo Mode................................................................................................................................................................................... 20
Labelling and Selecting the screen format of Input Sources .................................................................................................................... 21
Using Multi PIP (Picture In Picture)............................................................................................................................................................ 22
Using PAP (Picture And Picture)................................................................................................................................................................. 22
Teletext ...................................................................................................................................................................................................................... 23
Optional Connections
Remote Control of other Sony Equipment .................................................................................................................................................... 25
Connecting Optional Equipment.................................................................................................................................................................... 26
Using Optional Equipment.............................................................................................................................................................................. 27
Additional Information
Optimum Viewing Area .................................................................................................................................................................................. 28
Specifications ..................................................................................................................................................................................................... 29
Troubleshooting ................................................................................................................................................................................................ 30

4 Safety Information
Additional Safety Information
· After transporting the projection TV directly from a cold to a warm location, or if the room temperature has changed suddenly,
pictures may be blurred or show poor colour over portions of the picture. This is because moisture has condensed on the mirrors
or lenses inside the projection TV. Let the moisture evaporate before using the projection TV.
· To obtain a clear picture, do not expose the screen to direct illumination or direct sunlight. If possible, use spot lighting directed
down from the ceiling.
· Displaying a still picture for long periods of time, for instance, when operating a video game or personal computer or viewing a
programme with a banner display, may damage the picture tube. To lessen this, keep the picture contrast level low. This also applies to
leaving the on screen display viewable for extended periods.
· Avoid touching the screen, and take care not to scratch the surface with hard objects.
Safety Information
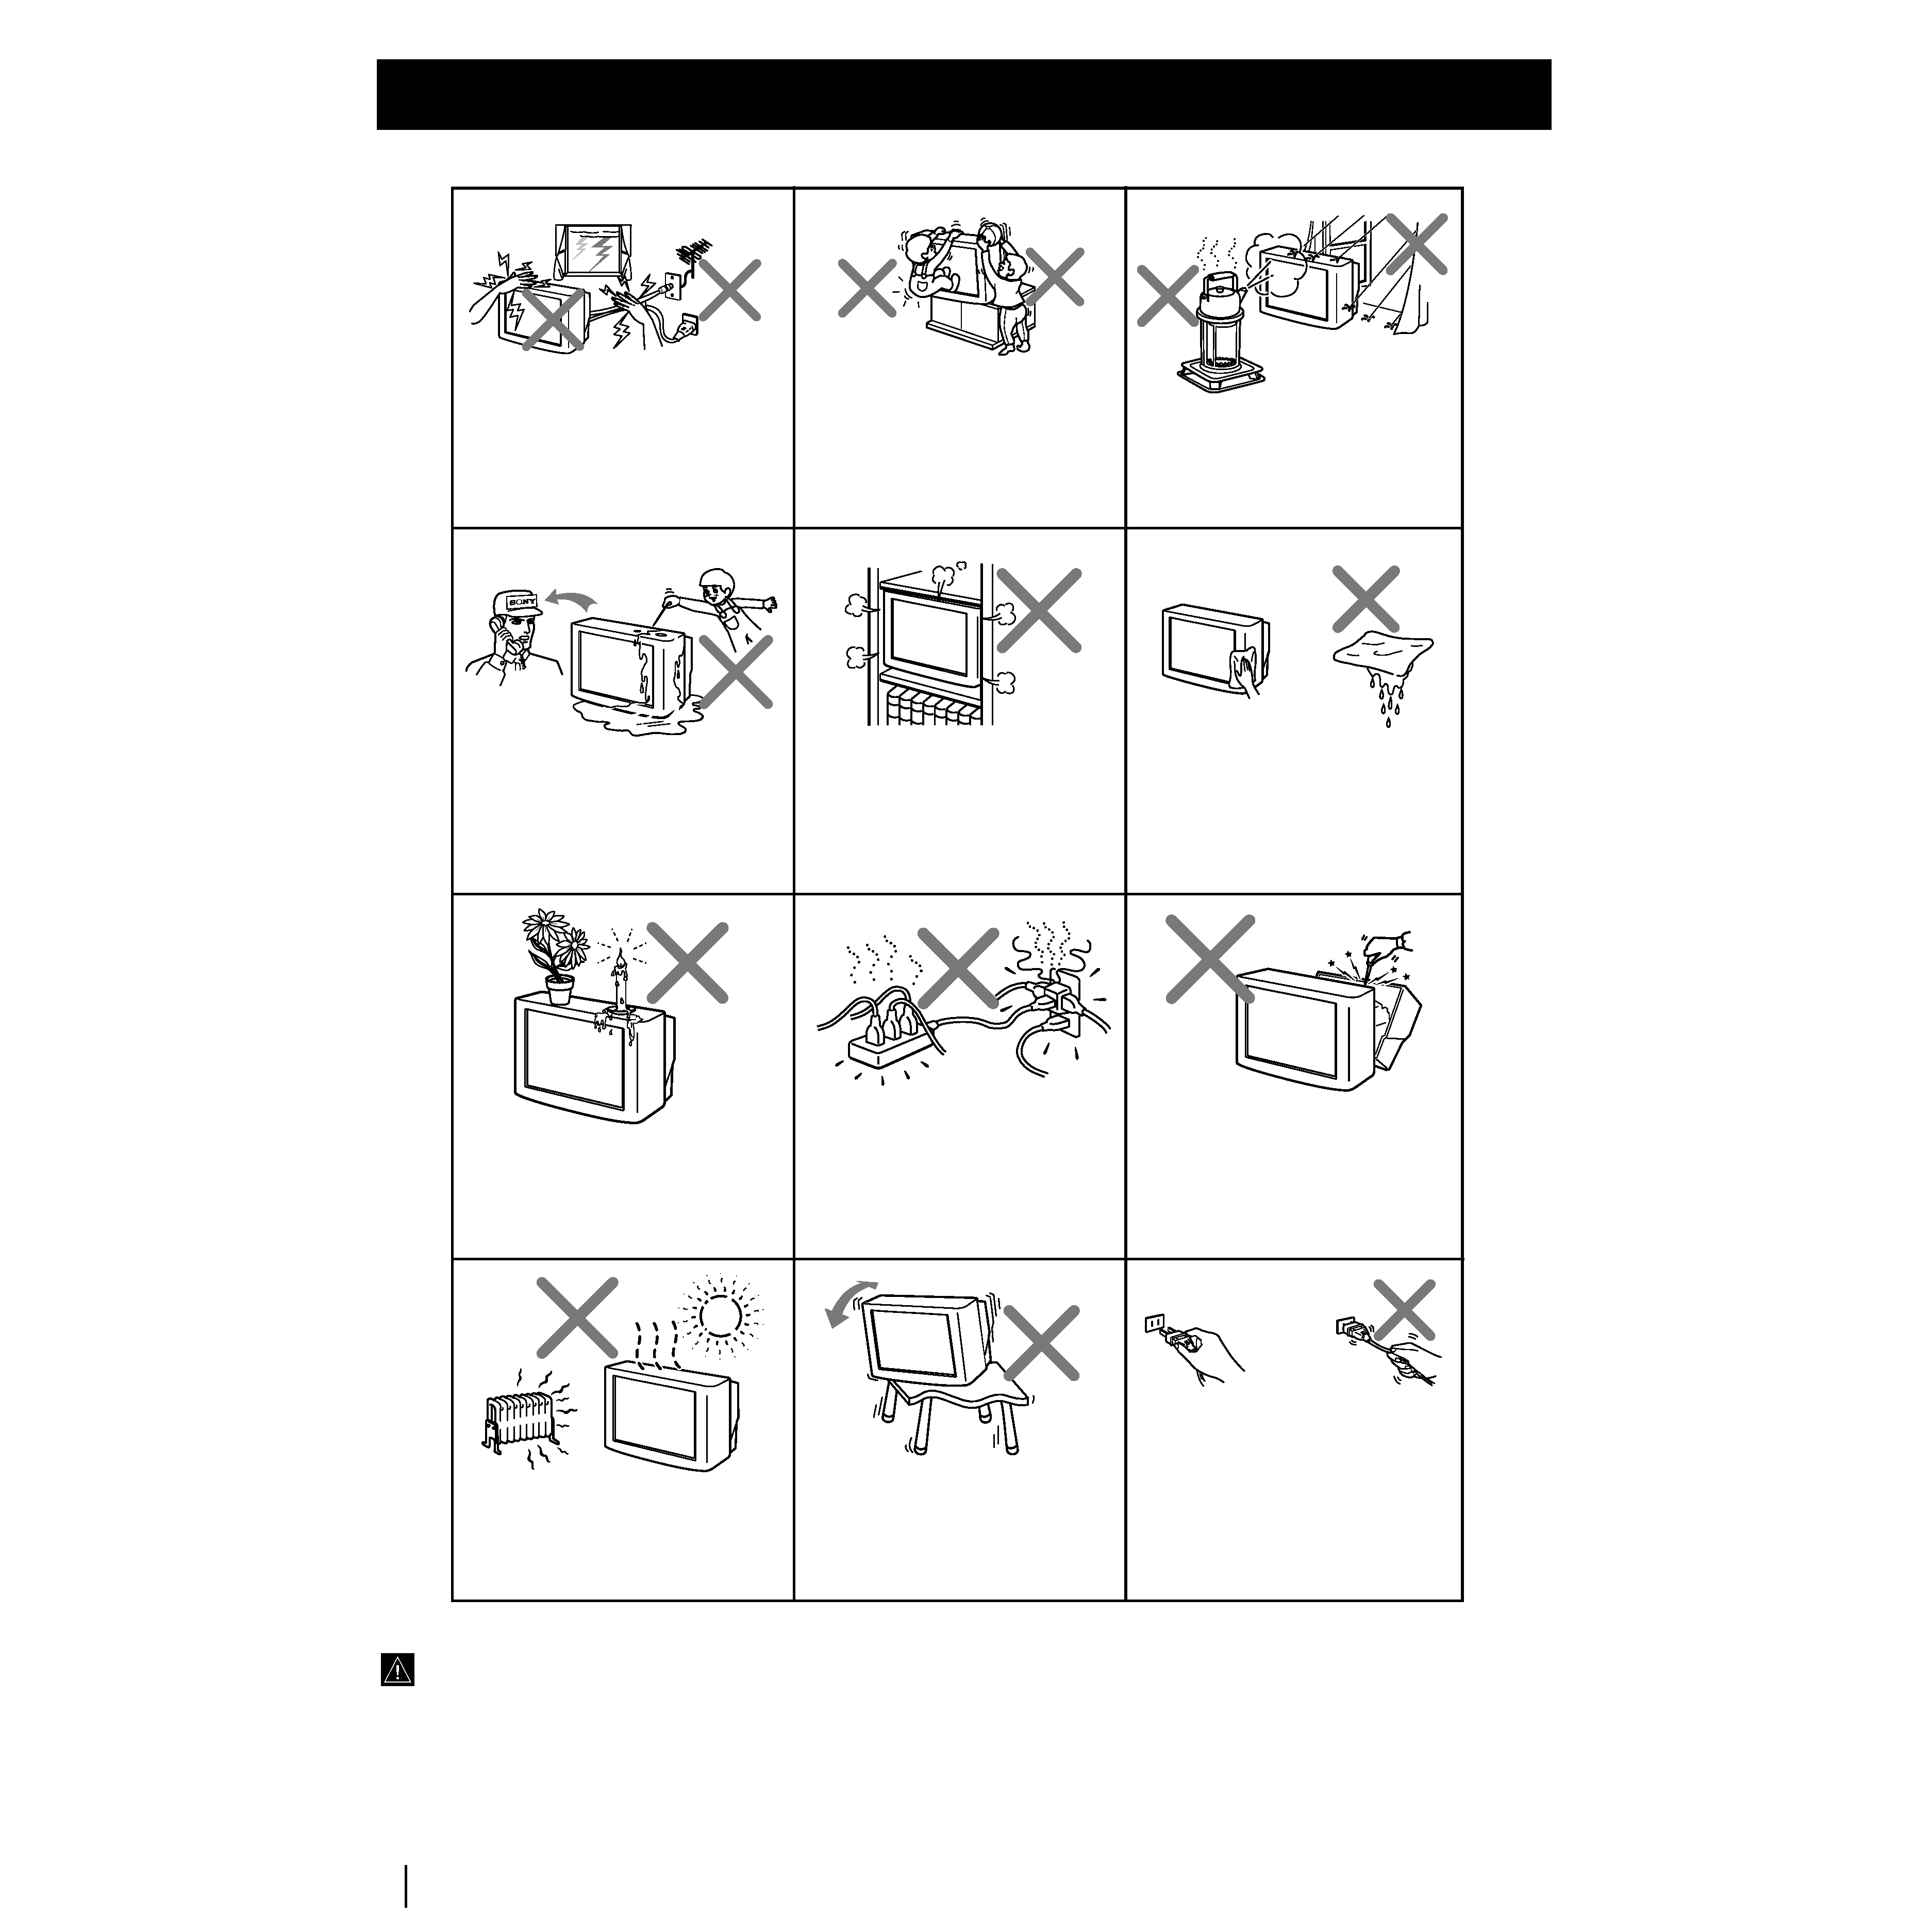
Do not operate the TV if any liquid or solid
object falls into it. Have it checked
immediately by qualified personnel only.
Clean the TV with a dry and soft cloth.
Do not use benzine, thinner, or any
other chemicals to clean the TV. Do not
scratch the picture tube.
Do not block the ventilation openings of
the TV.
Do not install the TV in a confined
space, such as a bookcase or built-in
cabinet.
Do not place any objects on the TV.
Do not plug in too many appliances to
the same power socket. Do not
damage the power cord.
Do not open the cabinet and the rear cover
of the TV as high voltages and other hazards
are present inside the TV. Refer servicing
and disposal of the TV to qualified
personnel.
Your TV is recommended for home use only.
Do not use the TV in any vehicle or where it
may be subject to excessive dust, heat,
moisture or vibrations.
Install the TV on a stable TV stand and
floor which can support the TV set
weight. Ensure that the TV stand surface
is flat and its area is larger than the
bottom area of the TV.
Pull the power cord out by the plug. Do
not pull the power cord itself. Even if your
TV is turned off, it is still connected to the
AC power source (mains) as long as the
power cord is plugged in. Unplug the TV
before moving it or if you are not going to
use it for several days.
To prevent fire or shock hazard, do not expose
the TV to rain or moisture.
For children's safety, do not leave children
alone with the TV. Do not allow children to
climb onto it.
For your own safety, do not touch any part
of the TV, the power cord and the antenna
cable during lightning storms.
· Dangerously high voltages are present inside the TV.
· Operate the TV only between 220 - 240 V AC.

5
EN
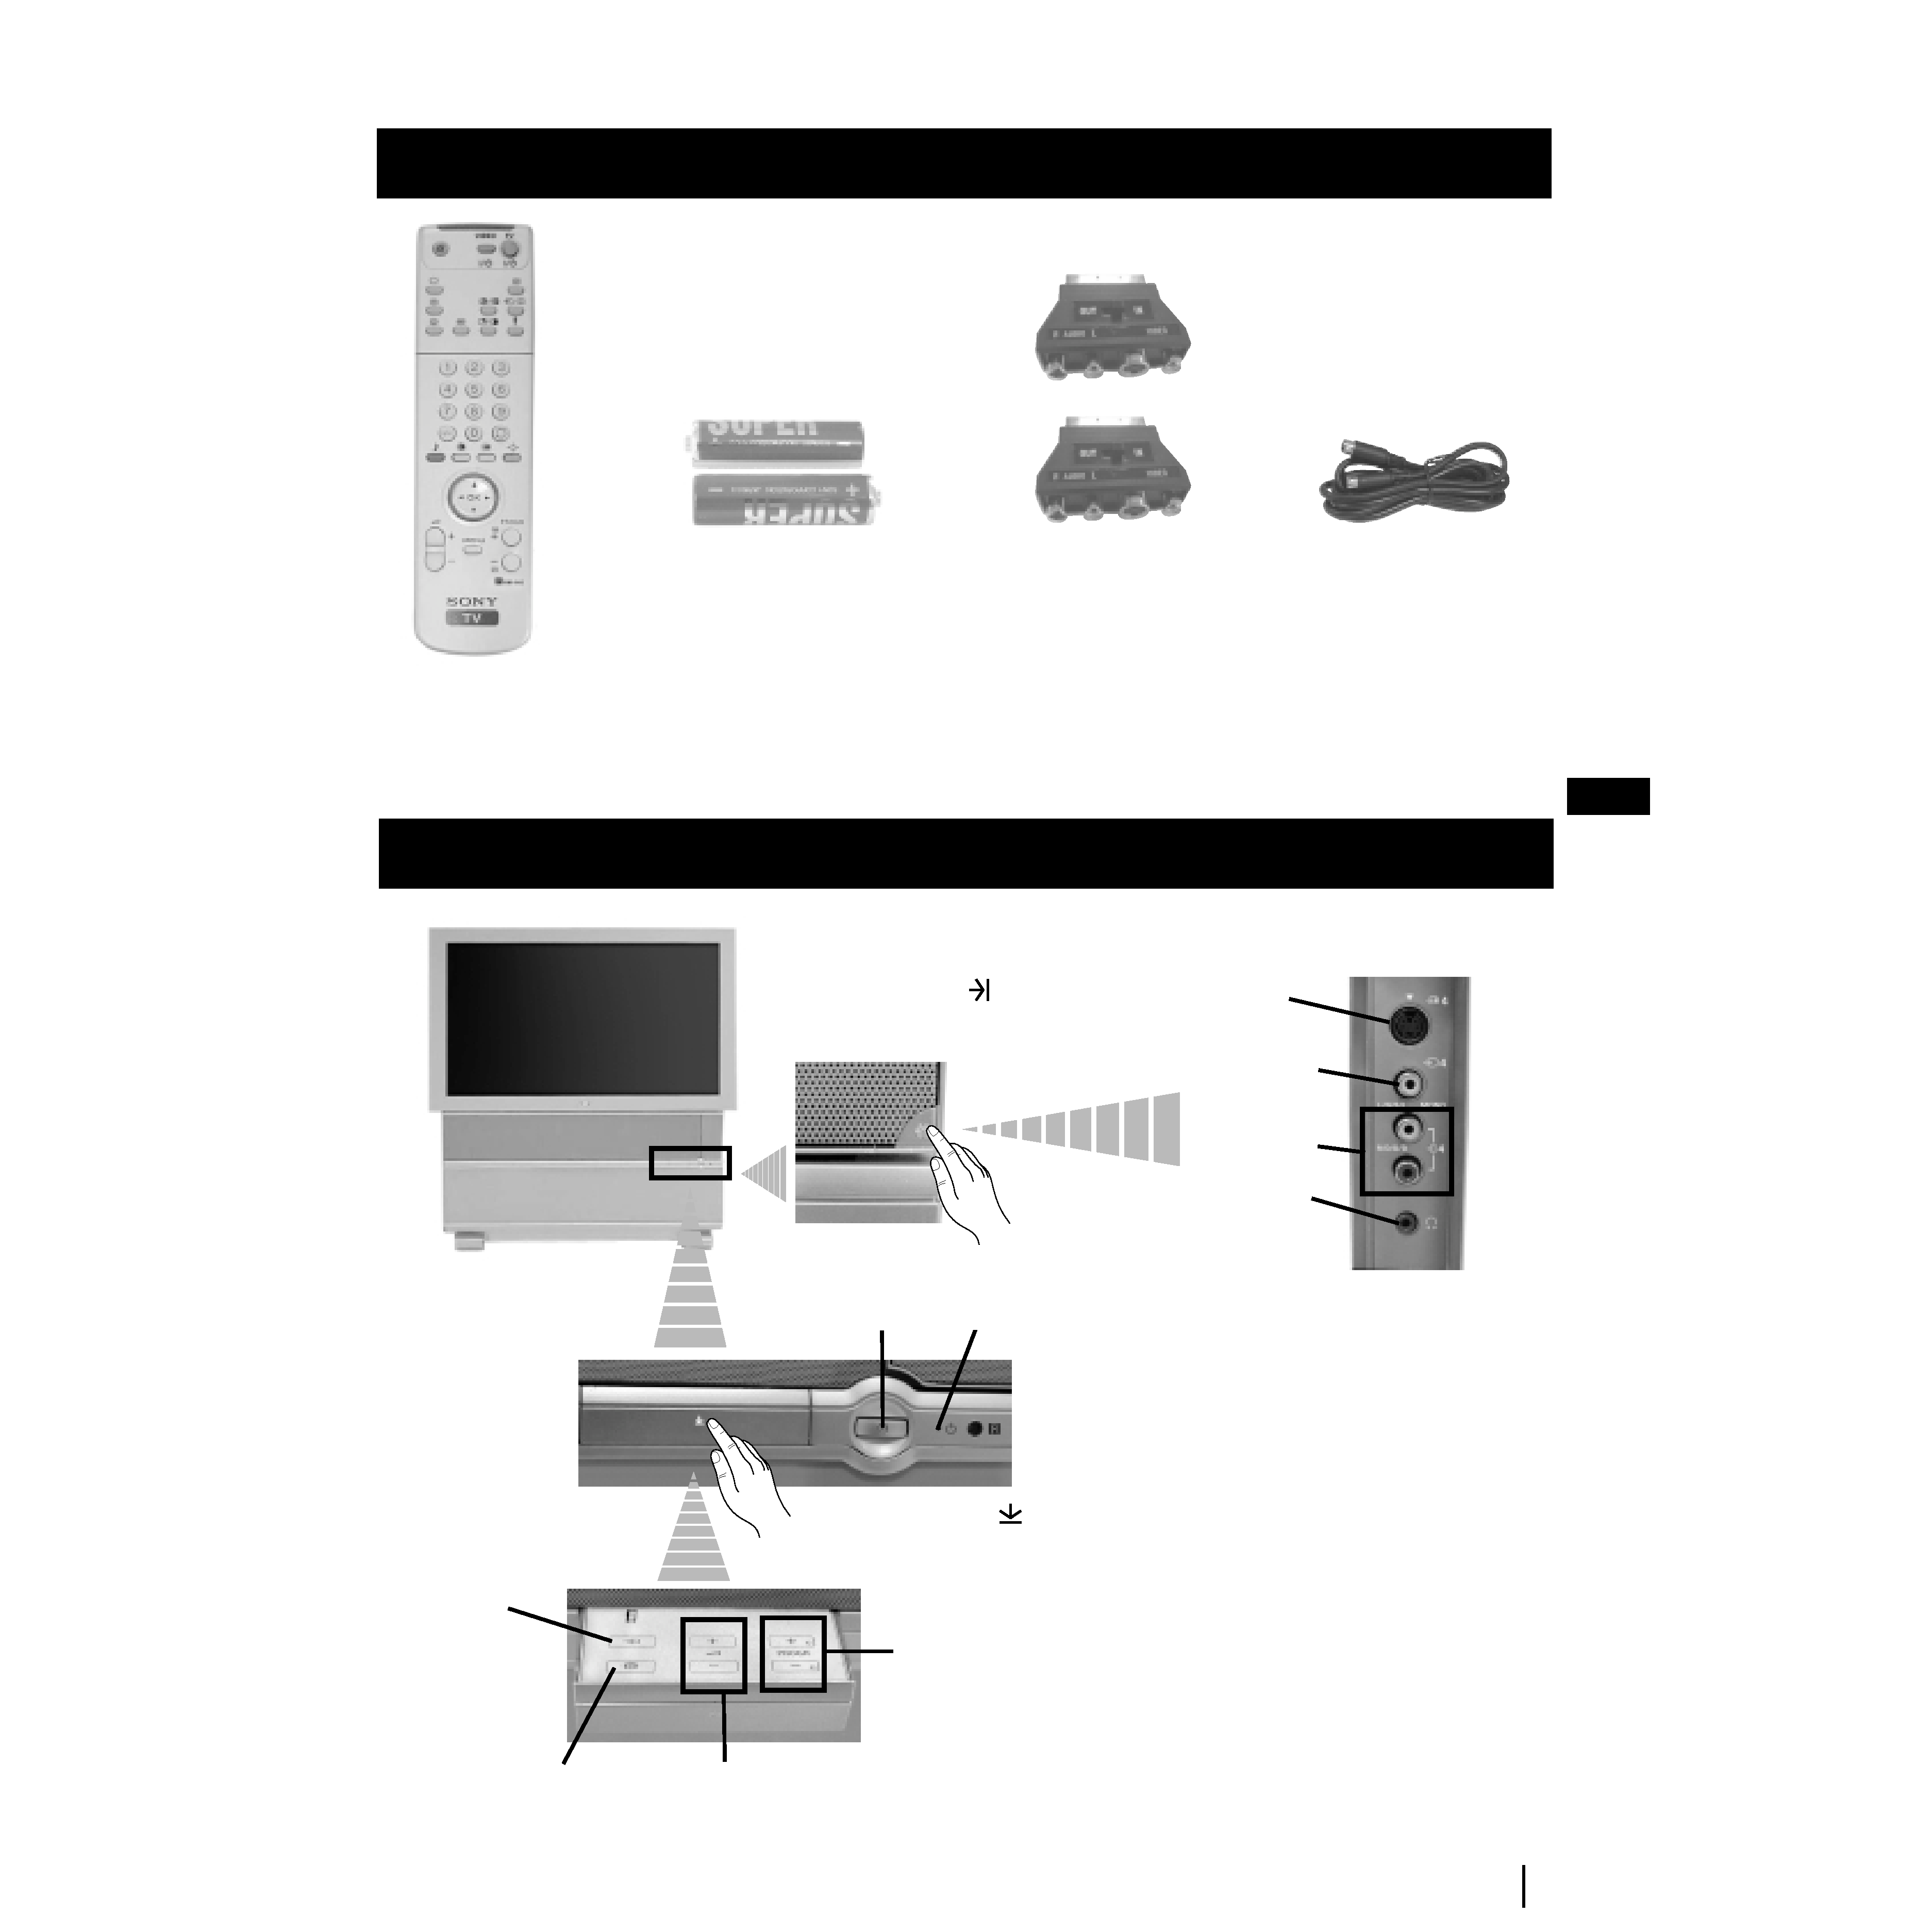
One Remote Control
(RM-903)
Overview of TV Buttons
Checking the Accessories Supplied
Overview
Two batteries (R6 type)
Overview
s
Programme up
or down buttons
(selects TV channels)
Selecting
input
source
Auto
Convergence
button
Volume control
buttons
Press on the mark
, on the front
of the projection TV to reveal the front
buttons.
Standby indicator
S Video
Input jack
Video Input
jack
Audio Input
jacks
Headphone
jack
On
/Off Switch
Press on the mark
to reveal the front
connectors.
Two Scart Adaptors
One S Video cable

6
S
RM 903
PROGR
MENU
1
4
7
2
5
8
0
3
6
9
K
VIDEO
TV
VIDEO
TV
VTR1234 DVD
CH
Overview
Overview of Remote Control Buttons
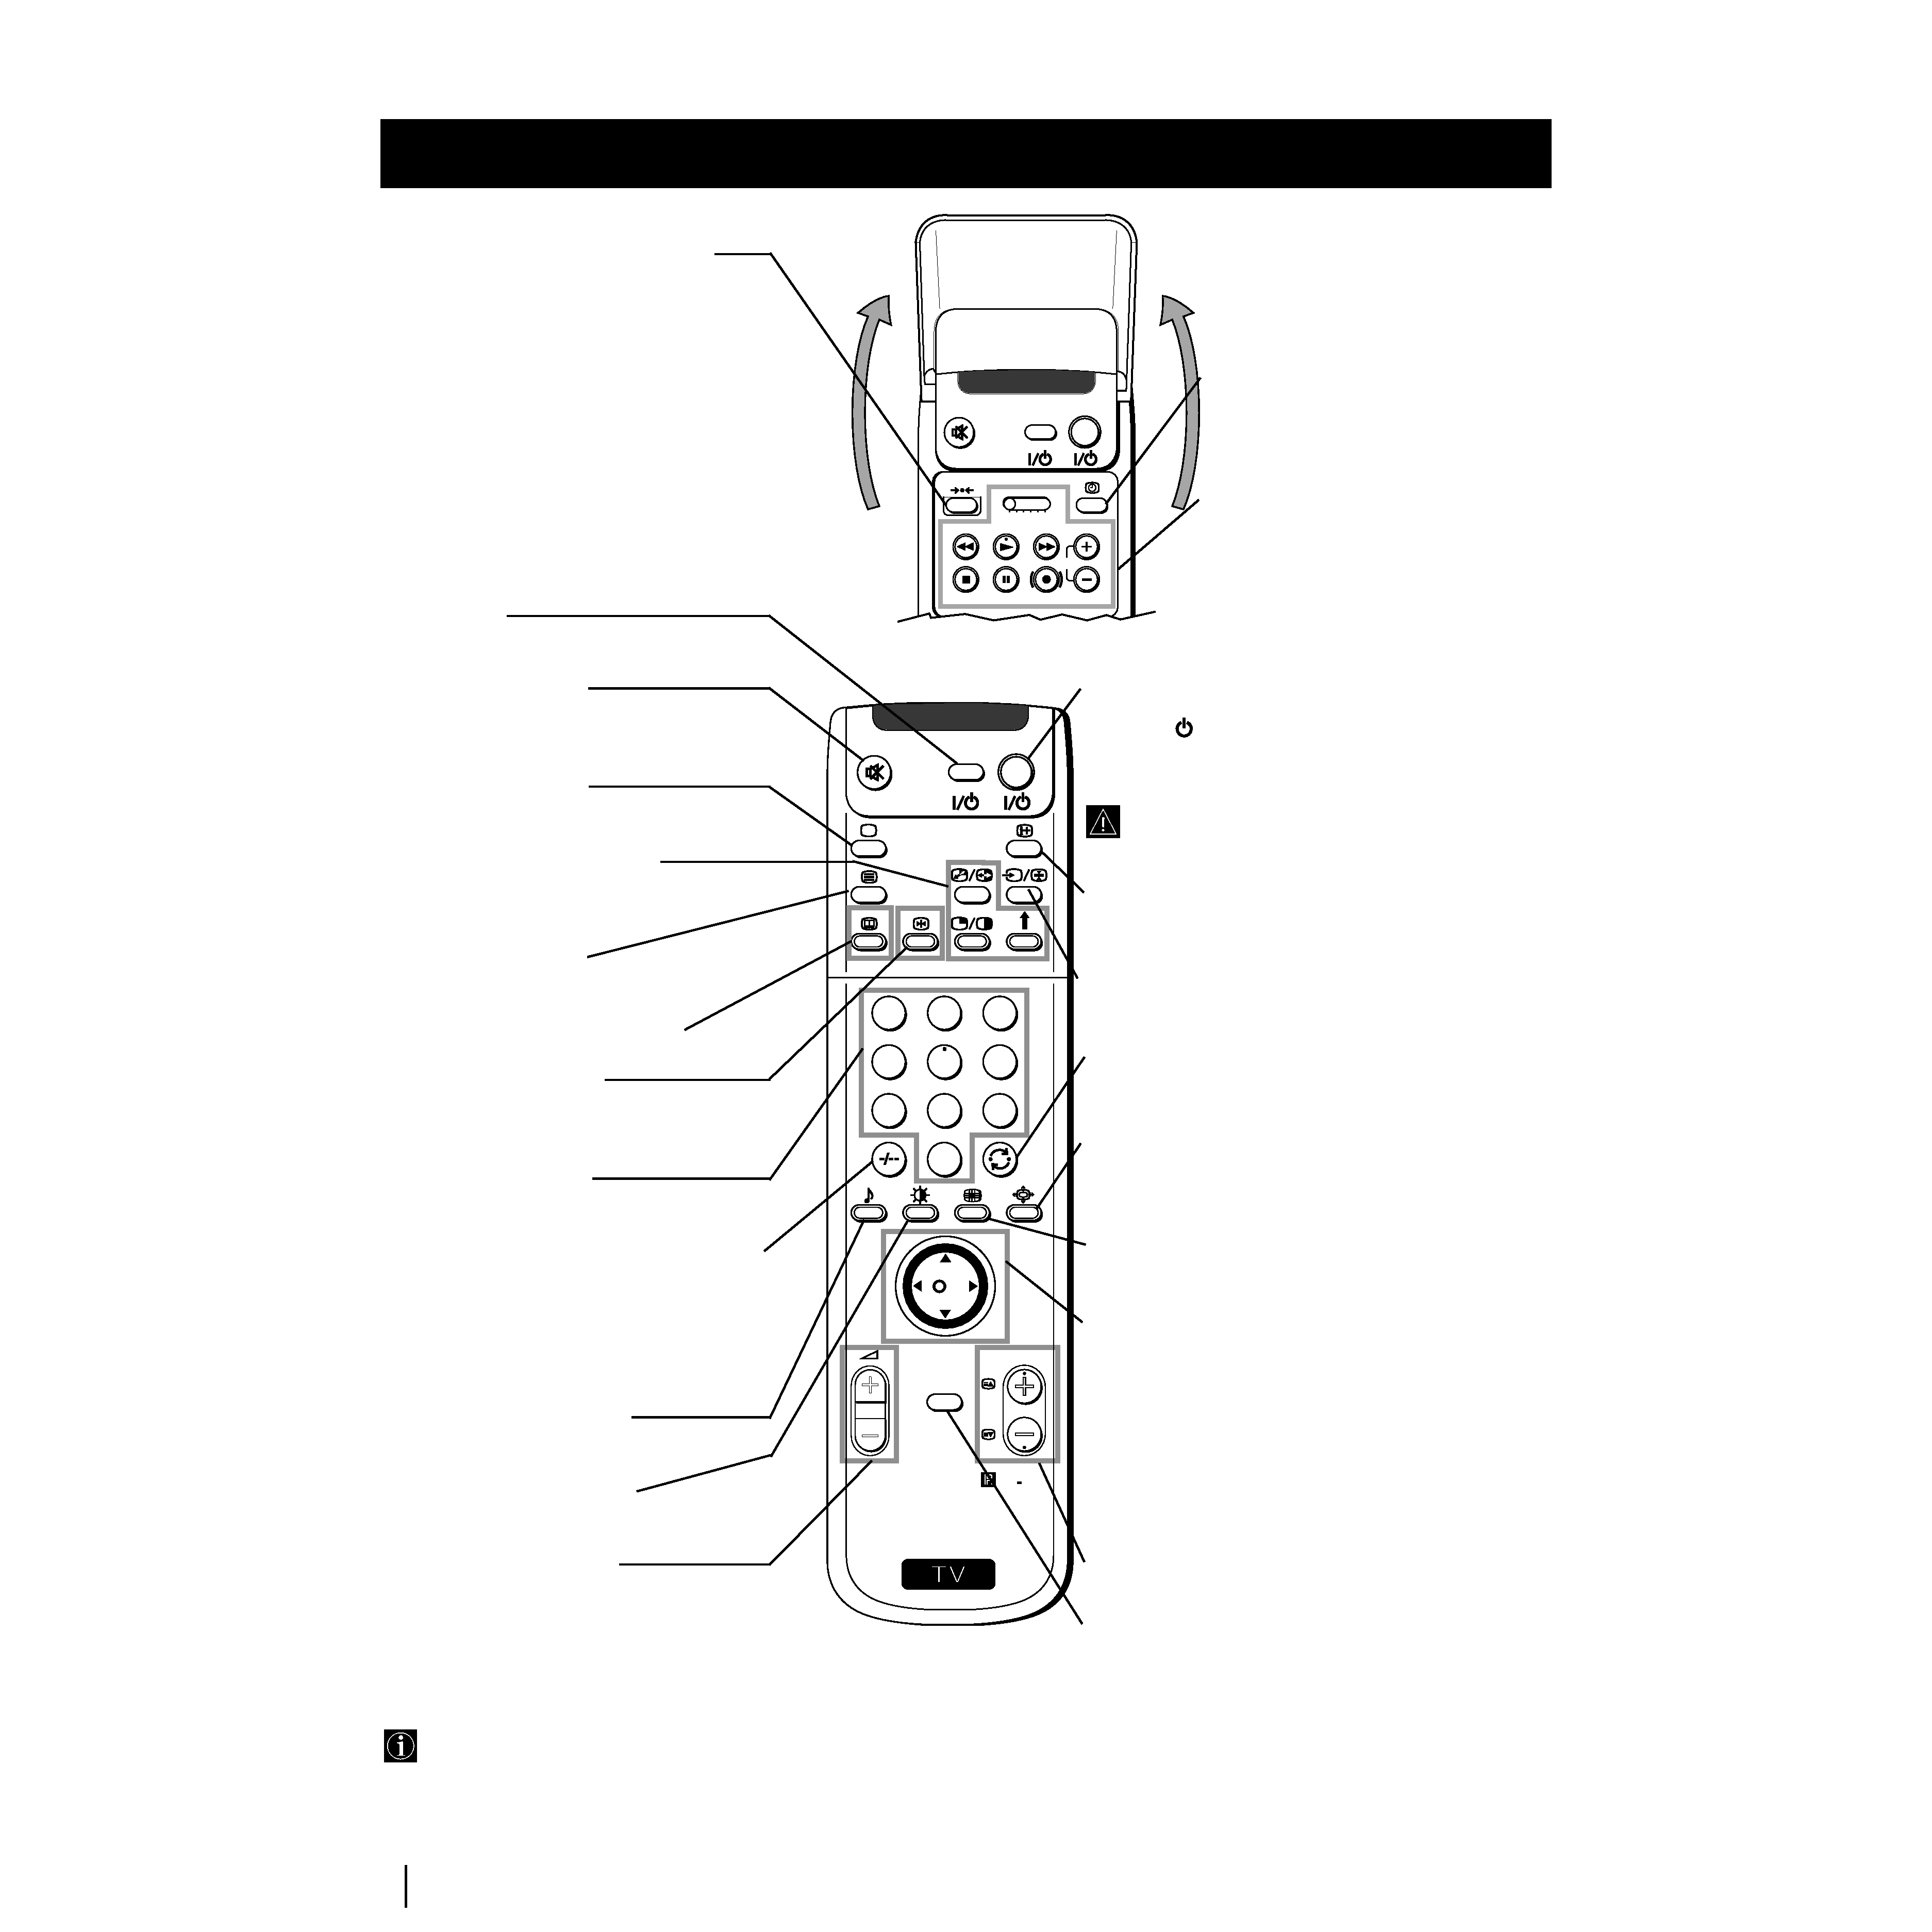
Resetting to factory set levels
Press the to return the picture and sound
settings to factory set levels. This will also
return the set to the install condition, the
"Auto Tuning" menu will appear on the
screen, refer to the section "Switching on the
set and automatically Tuning" (step 2) of this
manual.
VCR on/off
Press to switch your VCR on or off.
Muting the Sound
Press to mute TV sound.
Press again to restore the sound.
Selecting TV mode
Press to switch off Teletext or video input.
PAP (Picture And Picture)
For more details, please refer to the section
"Using PAP (Picture And Picture)".
Selecting Teletext
Press to switch on Teletext.
This button does not work on this set.
Freezing the picture
Press to freeze the picture. Press again to
return to the normal picture.
Selecting channels
Press to select channels.
For double-digit programme numbers, e.g.
23, press -/-- first, then the buttons 2 and 3.
If you enter an incorrect first digit, this
should be corrected by entering another digit
(0-9) and then selecting -/-- button again to
enter the programme number of your choice.
Selecting Sound mode
Press repeatedly to change the sound mode.
Selecting Picture mode
Press repeatedly to change the picture mode.
Adjusting TV Volume
Press to adjust the volume of the TV.
Displaying the time
Press to switch the time on or off
(available only when teletext is
broadcast).
VCR operation
For more details, please refer to the
section "Remote Control of other
Sony Equipment".
Besides TV functions, all coloured buttons as well as green
symbols are also used for Teletext operation. For more details,
please refer to the "Teletext" section of this instruction manual.
Overview
To Temporarily Switch Off
Press to temporarily switch off TV (the standby
indicator
on the set lights up in red). Press
again to switch on TV from standby mode.
To save energy we recommend switching off completely
when TV is not in use.
After 15-30 minutes without a signal and
without any button being pressed, the set
switches automatically into standby mode.
Displaying On Screen Information
Press to display all on-screen indications.
Press again to cancel.
Selecting Input source
Press repeatedly until the desired input symbol of
the source appears on the screen.
Back to the channel last watched
Press to watch the last channel selected (watched for
at least 5 seconds).
Selecting Screen format
Press repeteadly to change the format of the screen
(for more details, please refer to the section
"Changing the Screen format").
Displaying Multi PIP (Picture In Picture)
Press to display Multi PIP mode. Press again to
cancel.
Joystick for menu selection
· When MENU is switched on:
4
Scroll Up
$
Scroll Down
Z
Previous menu or selection
z
Next menu or selection
OK Confirms your selection
· When MENU is switched off:
Z
Return to the last menu screen.
OK Shows a channel overview
Selecting channels
Press to select the next or previous channel.
Displaying the menu system
Press to display the menu on the screen. Press again
to remove the menu display from the screen.
