English
S-VSL3
SPEAKER SYSTEM
Operating Instructions
SISTEMA DE ALTAVOCES
Manual de instrucciones
CAUTION
[Installation]
¶ Do not install speakers in unstable, unlevel, or leaning
positions. Damage or personal injury could be caused
if the speaker falls.
¶ When connecting this speaker system to a television or
audio component, read the respective component's
operating instructions carefully, disconnect the power,
and connect according to the instructions. Always
perform connections using the designated wires and
cables.
¶ The speaker system's front grill cannot be removed. Do
not attempt to remove it since damage will result.
[Using the Speakers]
¶ If sound from speakers is distorted, do not play for
extended periods of time, since the speaker may
overheat and could present a fire danger.
¶ Do not climb or sit on the speakers, or hang from them.
Take special precautions if the speakers are used
around children. A falling or broken speaker could
cause personal injury.
¶ Do not place heavy items on the speaker, or items
which hang over the speaker's edge, since loss of
balance could cause the object to fall and hurt
someone.
¶ These speakers are magnetically shielded, and should
not cause color distortion even when used nearby
television sets. On rare occasions, installing the
speaker very close to a television may result in some
degree of color distortion; in such cases, disconnect
the television's power, wait 15-30 minutes, and turn on
power again. If color distortion continues, try
separating the television and speakers.
Thank you for purchasing this Pioneer product.
Be sure to read these Operating Instructions fully to
understand the correct use of your product.
Before Using:
¶ This speaker system has a nominal impedance of 6 .
Connect it to a stereo amplifier designed for a load
impedance of 416
(the speaker output terminals
should be labeled "416
").
¶ To protect the speakers from excessive inputs always
follow these guidelines:
Do not input power loads larger than the specified
permissible maximums.
Always disconnect amplifier power before
connecting this and other components to your
amplifier.
If a graphic equalizer is used to augment high-
range sounds, reduce the speaker's sound volume
to prevent damaging the speakers.
Do not attempt to produce very high sound volumes
from an underpowered amplifier. The amplifier's
harmonic distortion will increase and speakers may
be damaged.
Care of the Speaker Cabinets
Under normal use, use a soft dry cloth to wipe dust from
the cabinet surface. In case of severe soiling, dip a clean
cloth in a weak (1:5 or 1:6) solution of neutral detergent
and water, wring out thoroughly, and wipe the dirt away,
then wipe with a dry cloth. Never expose the surface to
alcohol, thinner, benzene, or insecticide since the surface
printing and finish may come off. If using a chemically
impregnated dusting cloth, read the instructions carefully
and follow all precautions for use.
A speaker system's sound characteristics will change
depending on the environment and conditions under
which the system is. A speaker system can be used
without problem immediately after purchase, but its
design performance characteristics will be best
demonstrated after breaking them in by playing
music for several dozen hours.
Note

2
En
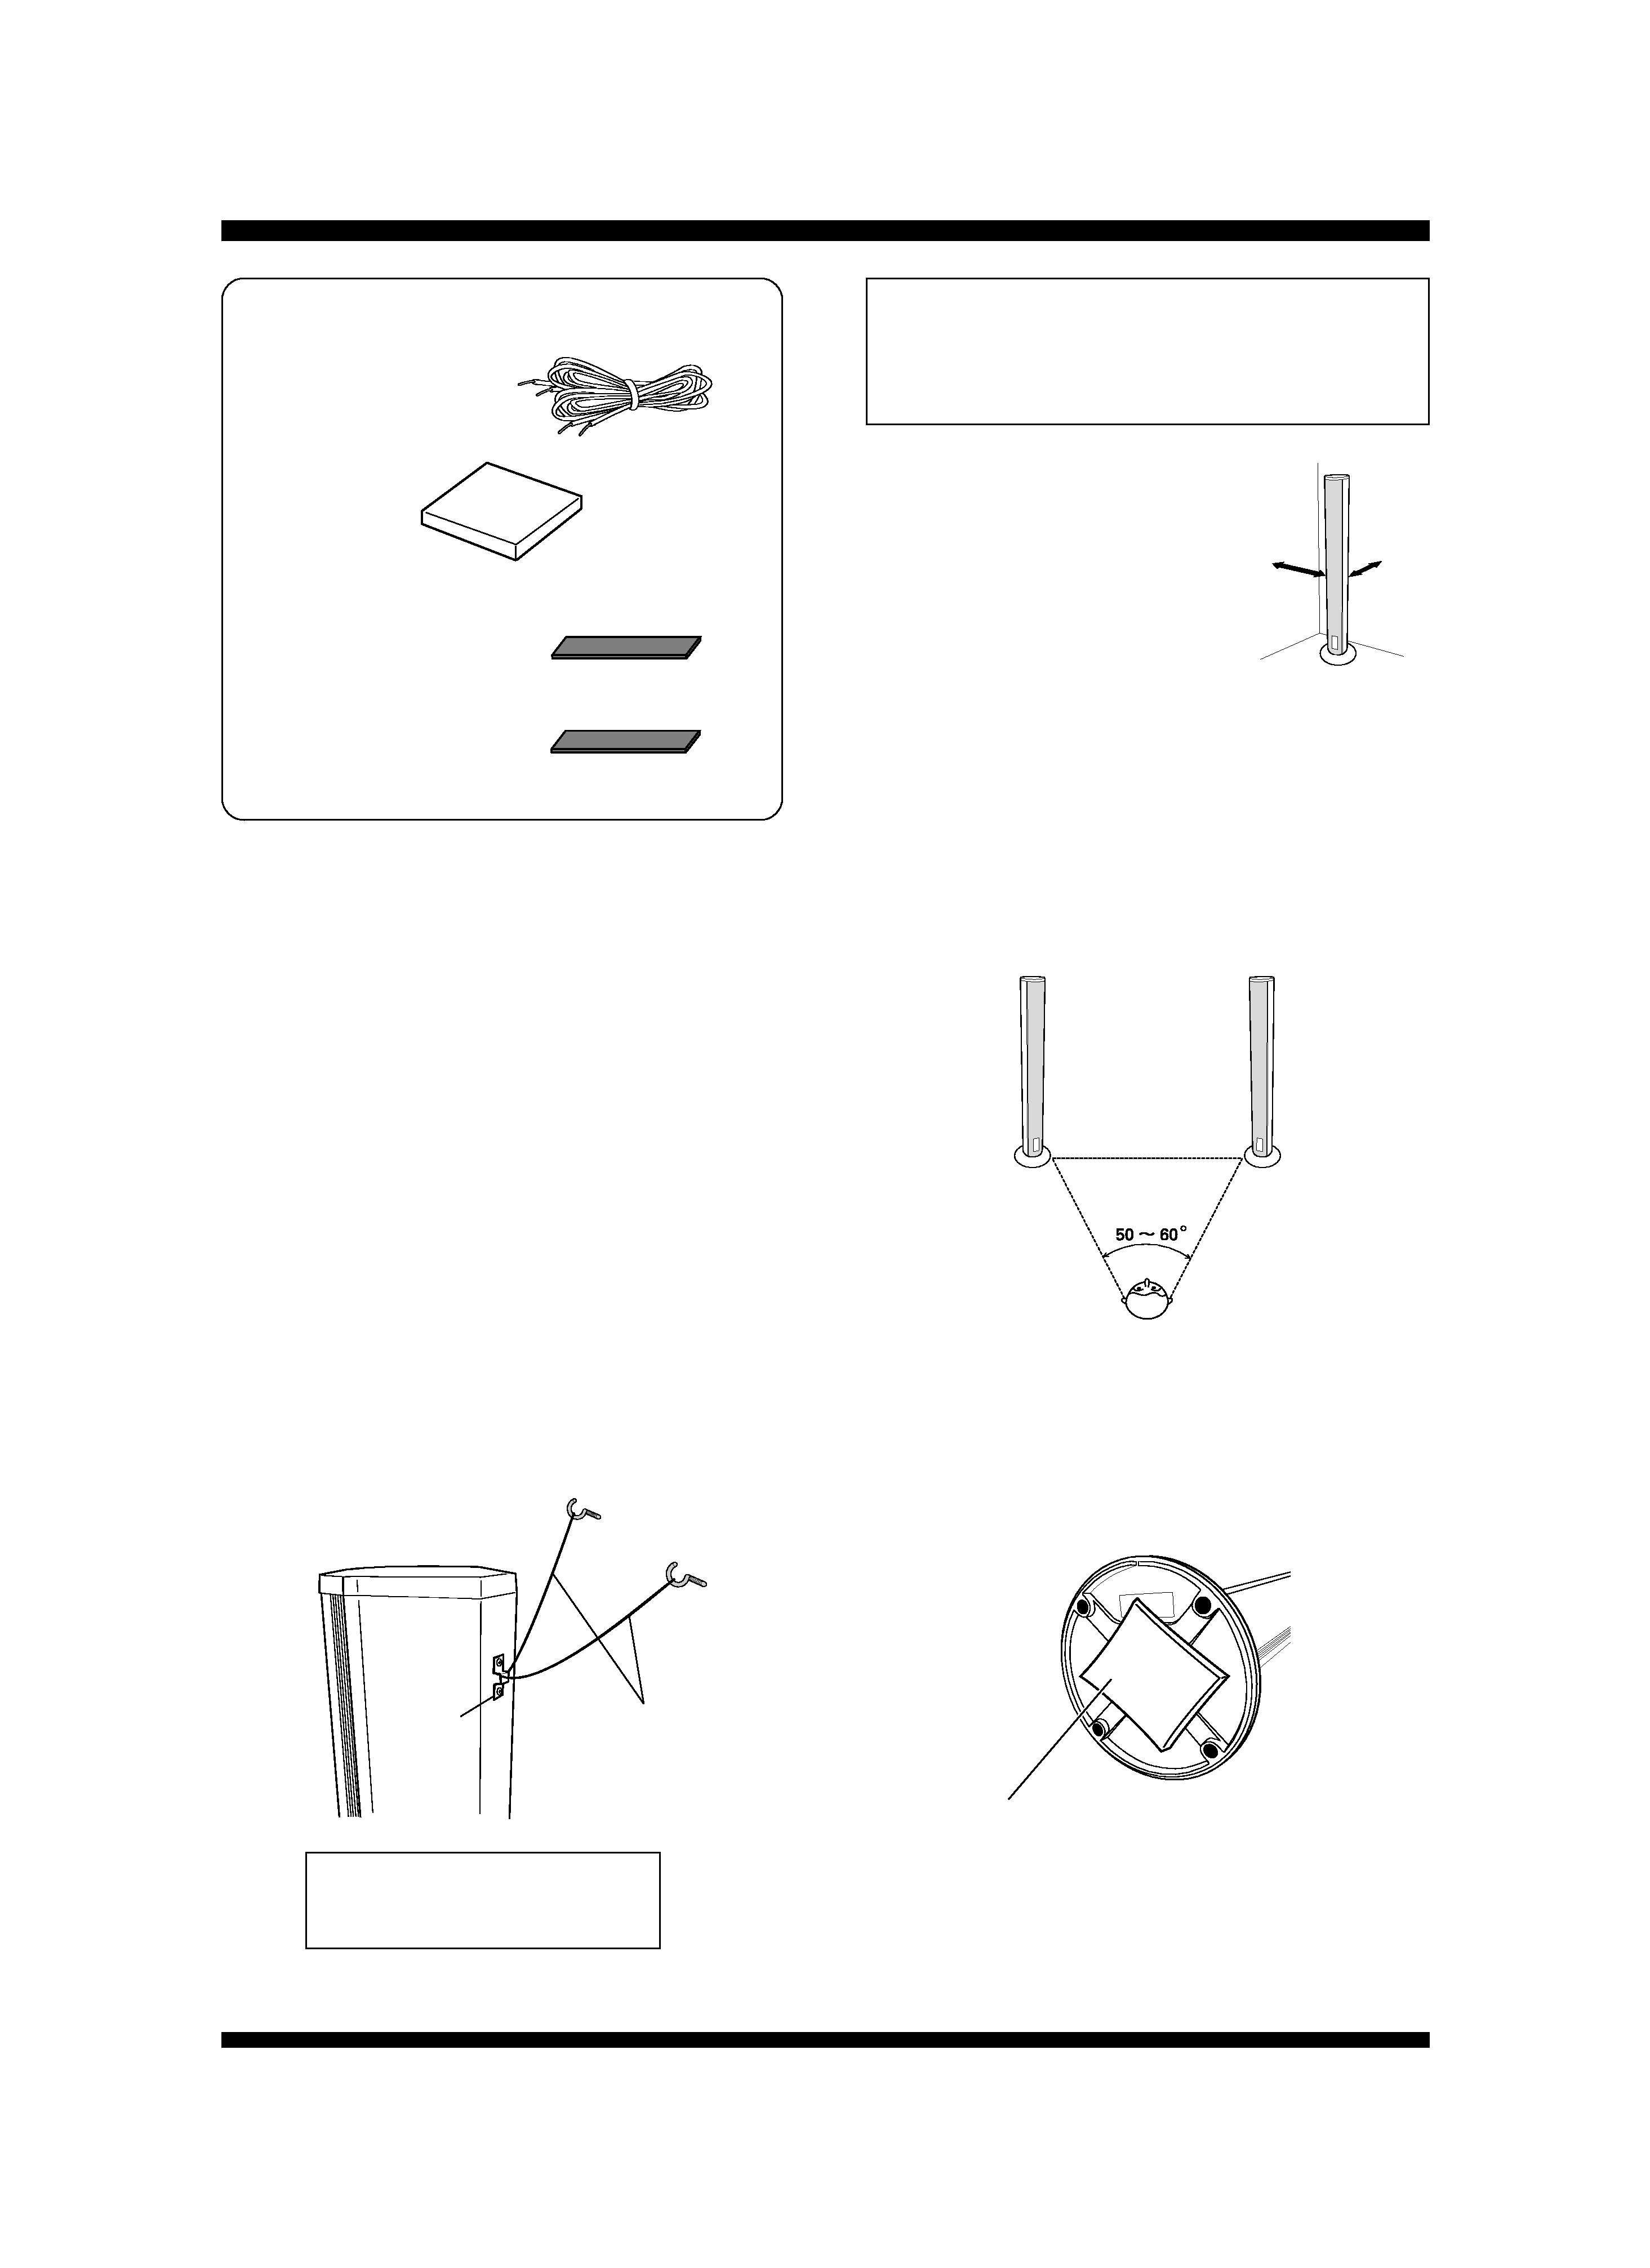
¶ Speaker wire
¶ Acoustic control
material
¶ Hook-and-loop fastener strip
(hook) x 1
¶ Hook-and-loop fastener strip
(loop) x 1
¶ Operating Instructions
Confirm your Accessories
Regarding Installation
The playback sound from the speaker system may change
sensitively as a result of influences from the conditions of
the listening room. When installing the speakers,
consider the location carefully in order to get optimum
results from your installation.
¶ For a suspended installation, fasten a cord or chain to
the metal fixture on the rear panel and attach securely
to a pillar or wall. Be sure the pillar or wall used has
sufficient strength to support the speaker's weight.
After installing the speaker, confirm that it is
supported securely and will not fall.
¶ If the speaker falls it may be damaged.
¶ Do not hang the speaker directly from the metal fixture
on the rear panel. To prevent the speaker from falling,
always attach a cord or chain to the metal fixture when
suspending the speaker from a wall or pillar.
<Rear Panel of Speaker>
Cable or chain
Mounting
fixture
Always attach a cord or chain to the
mounting fixture when using the
speaker in a suspended installation.
¶ This speaker system weighs
about 8 kilograms. Floor installa-
tions should be on a flat and
stable floor surface; the speaker
should be installed away from
walls, as shown in the accompa-
nying illustration.
The distance between the speaker and the wall behind
it can be changed to adjust the bass emphasis. Adjust
the distance so that no audible difference in tone is
heard from left and right speakers.
¶ The most natural listening experience will be produced
when the listening position is midway between and an
equal distance from the two speakers, as shown.
Adjust the speaker wire to the same length from both
speakers.
7 Adjusting the Bass Range
This speaker system is supplied with acoustic control
material which can be affixed to the bottom of the stand
as a means of adjusting the bass frequency range.
Apply the material as shown, in accordance with your
installation location and personal listening tastes.
50cm
20cm
Acoustic control material
Apply acoustic control material sheet to the
bottom surface of the speaker system stand.
Take care not to allow the sheet to come
between the small skid-pads and floor.
Pioneer disclaims all responsibility for any losses or
damage resulting from improper assembly,
installation, insufficient strength of the installation
materials, misuse, or natural disasters.

3
En
English
¶ When using the speakers in a room with permeable
walls, place the speakers as closely as possible along
the walls, or install them in front of a screen or other
object with reflective properties.
¶ When used with a television, the speakers should be
installed so that their front surfaces are in the same
plane as the screen of the television.
¶ When using the speakers with a television screen, the
optimum breadth of sound will be produced when the
television screen is placed midway between the right
and left speakers, and the speakers are oriented at
angles of about 5060° from the listening position.
¶ In rooms with hard reflective or resonating walls, it may
be desirable to cover the walls with a curtain, and/or
place a carpet on the floor to dampen excessive sound
reflection. Extending the curtain all the way to the
corners will help prevent local deadening of the sound.
On the other hand, if the wall opposite the speakers
(behind the listening position) is also composed of a
hard surface, placing a thick curtain over the wall will
help prevent the production of standing waves, and
result in better sound.
Installation Precautions
¶ These speaker systems are heavy; installing them in
unstable locations is extremely dangerous and should
be avoided.
Connection to Amplifier
Terminals are provided at the bottom of the speakers for
connection to an amplifier.
1 Disconnect the power cord to the amplifier.
2 Use the provided accessory speaker wires to connect
the input terminals at the bottom of the speakers to the
amplifier's speaker output terminals.
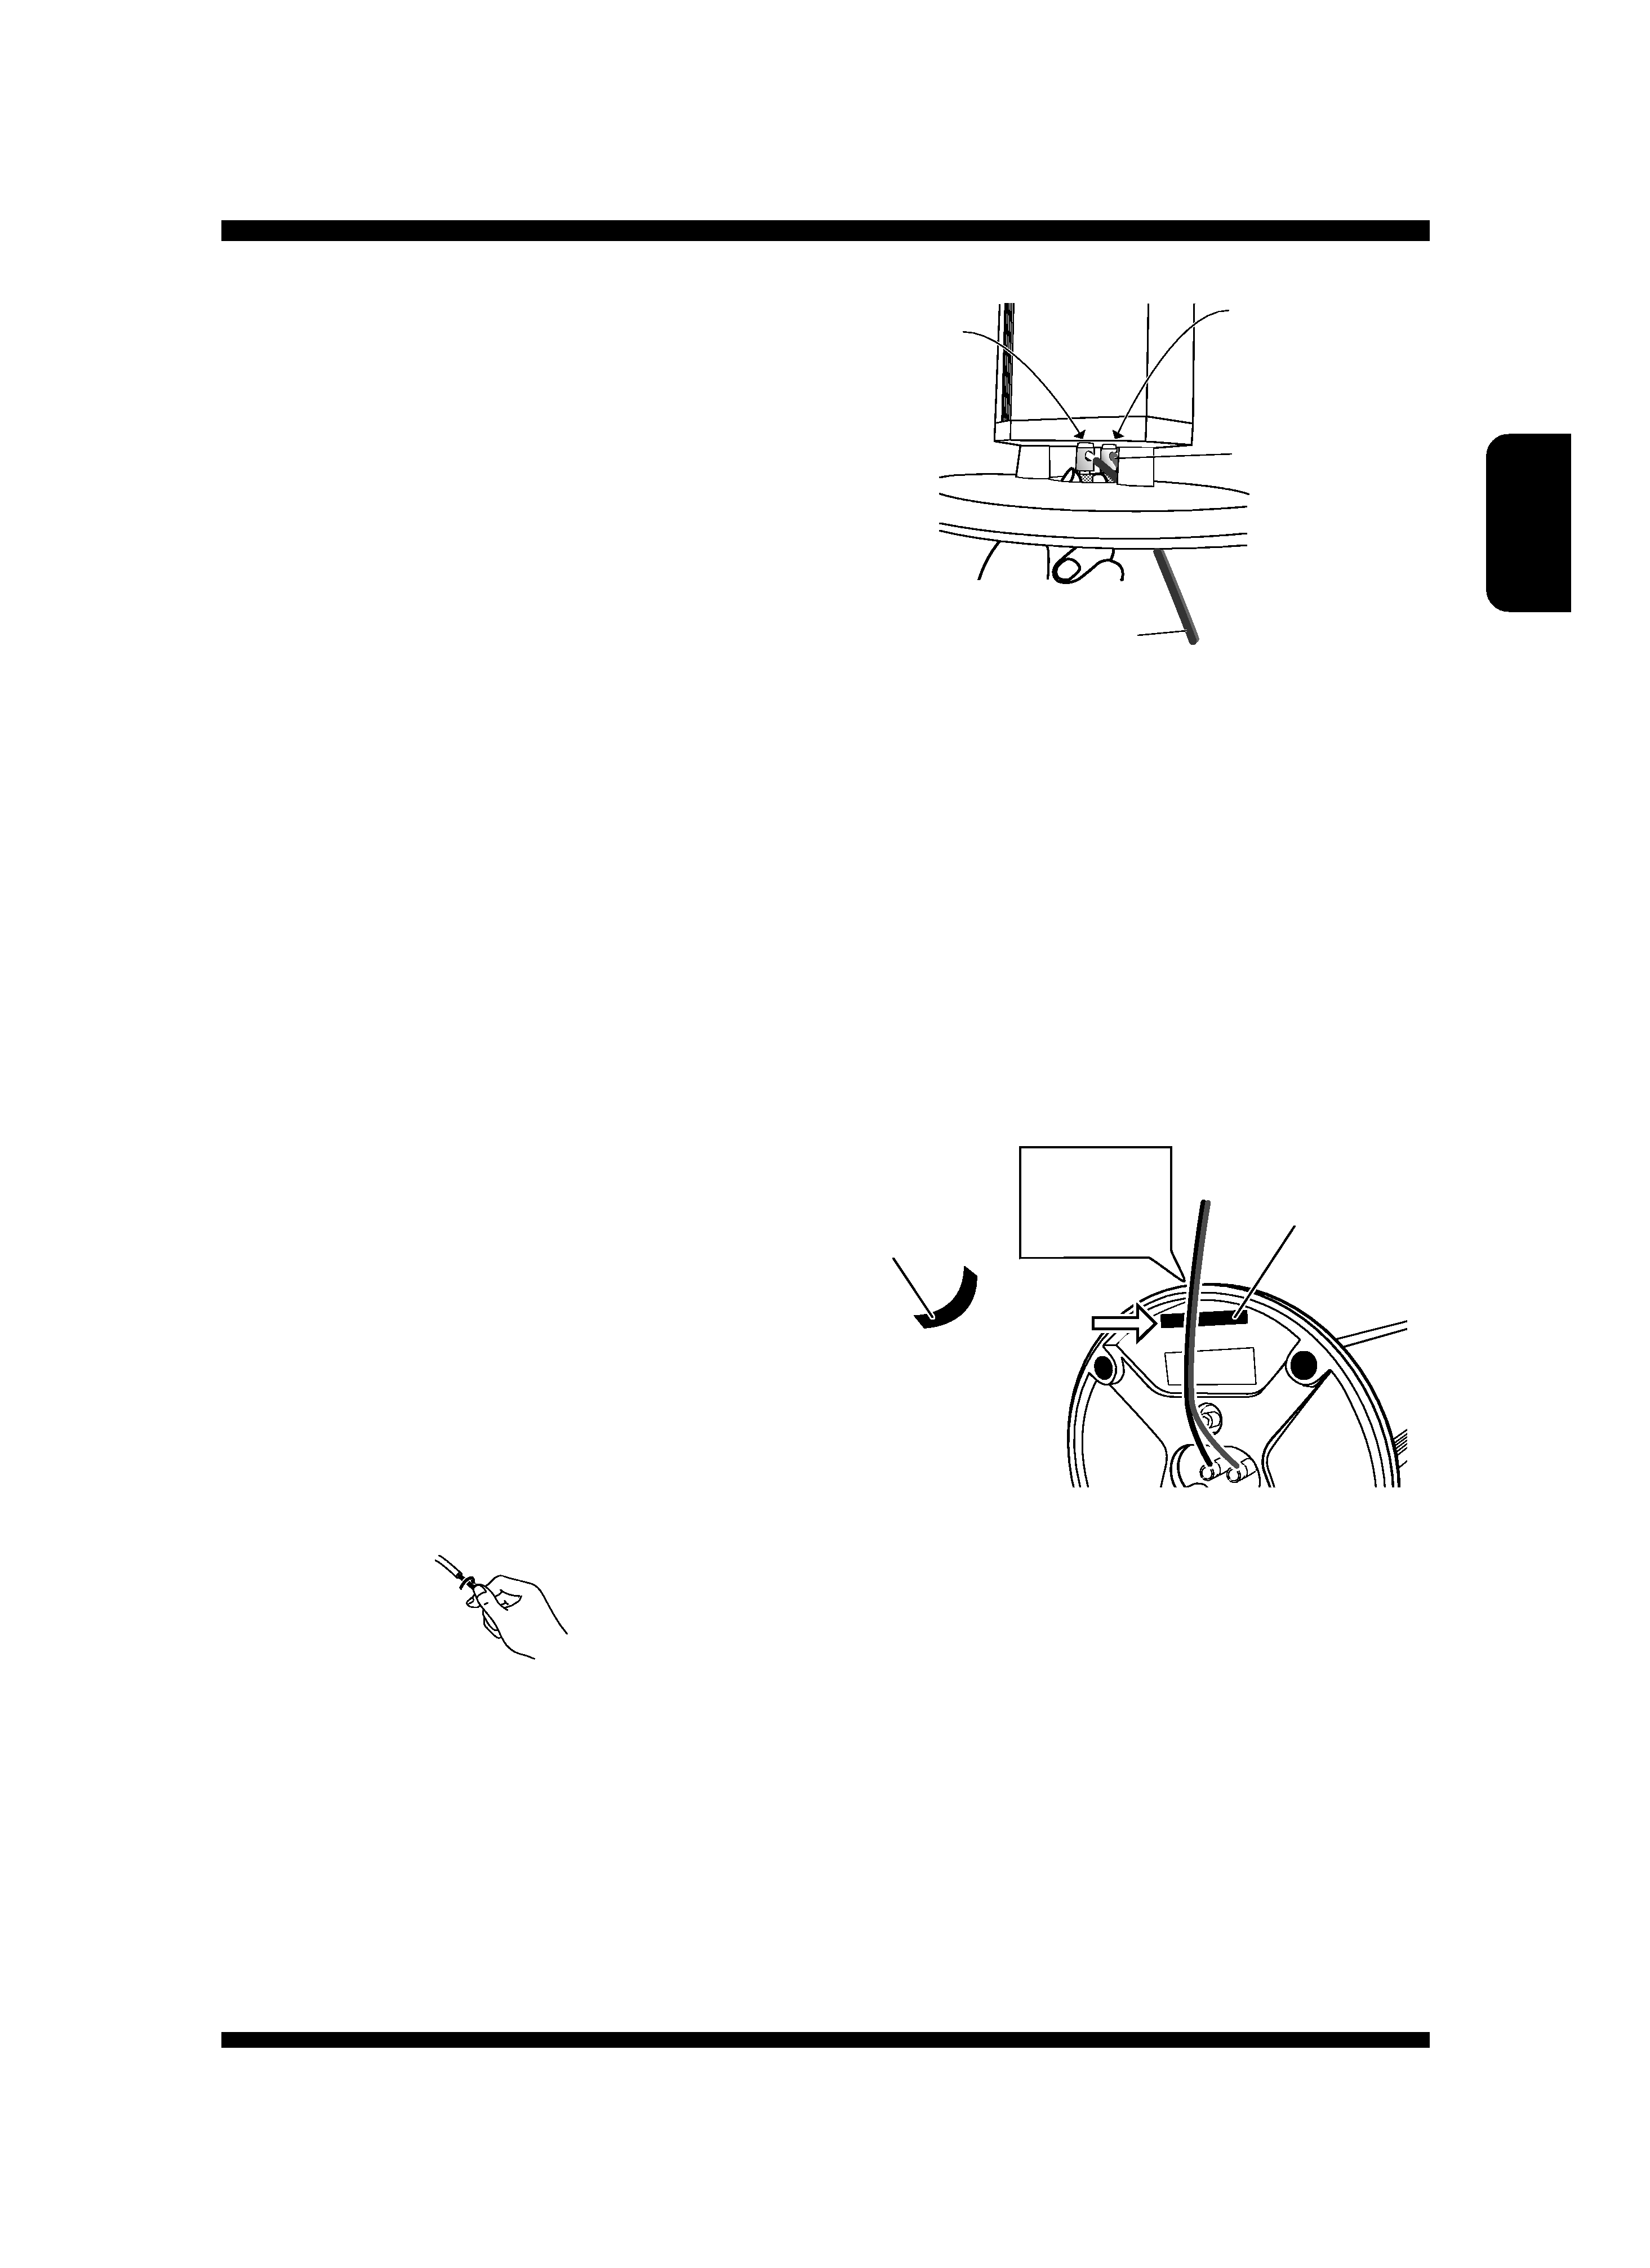
Connect the
ª terminal to the wire with the white line;
connect the
· terminal to the solid-color wire.
1. Remove insulation at end of wire and twist
ends of wire strands.
2. Insert speaker wire through hole in the
bottom of the speaker stand.
3. Loosen the screws, pass the wire cores
through the terminal holes, and retighten
the screws thoroughly.
4. Remove the protective backing paper from
the hook-and-loop fastener strip (hook strip),
and apply to the bottom of the speaker stand
near the rim depression for the speaker wire
(see illustration).
5. Pass the speaker wire through the rim
depression as shown.
6. Place the other hook-and-loop fastener strip
(loop strip) onto the first strip (hook) with
the speaker wire passing between the two
strips, so as to fix the speaker wire in
position.
¶ After connecting the wires to terminals, pull gently on
the wire and confirm that the wire lead is fastened
securely to its terminal. Insecure connections will
result in broken sound and noise.
¶ Do not allow bare wire ends to protrude excessively
from the terminals. If the bare wires from the two leads
touch each other, excessive load will be placed on the
amplifier, leading to possible damage or malfunction.
¶ Be sure to connect the + and leads to their correct
terminals. If the poles at one end of the wires are
connected mistakenly (+ to , to +), proper stereo
effect will not be produced.
Red
ª
Connect wire with white
line to amplifier's
ª
speaker output terminal.
Black
·
Connect solid-color wire to
amplifier's
· speaker output
terminal.
Hook-and-loop
fastener strip (hook)
Hook-and-loop
fastener strip
(loop)
Rim depression
for speaker
wire.
Place loop
strip over
wire and
onto hook
strip.

4
En
Specifications
Speaker Type ........ Bass-reflex type magnetically shielded
floorstanding speaker
Speaker composition .................................................. 2-way
Woofer ................................................... 8.3 cm cone (x2)
Tweeter ........................................................... 2 cm dome
Nominal impedance ....................................................... 6
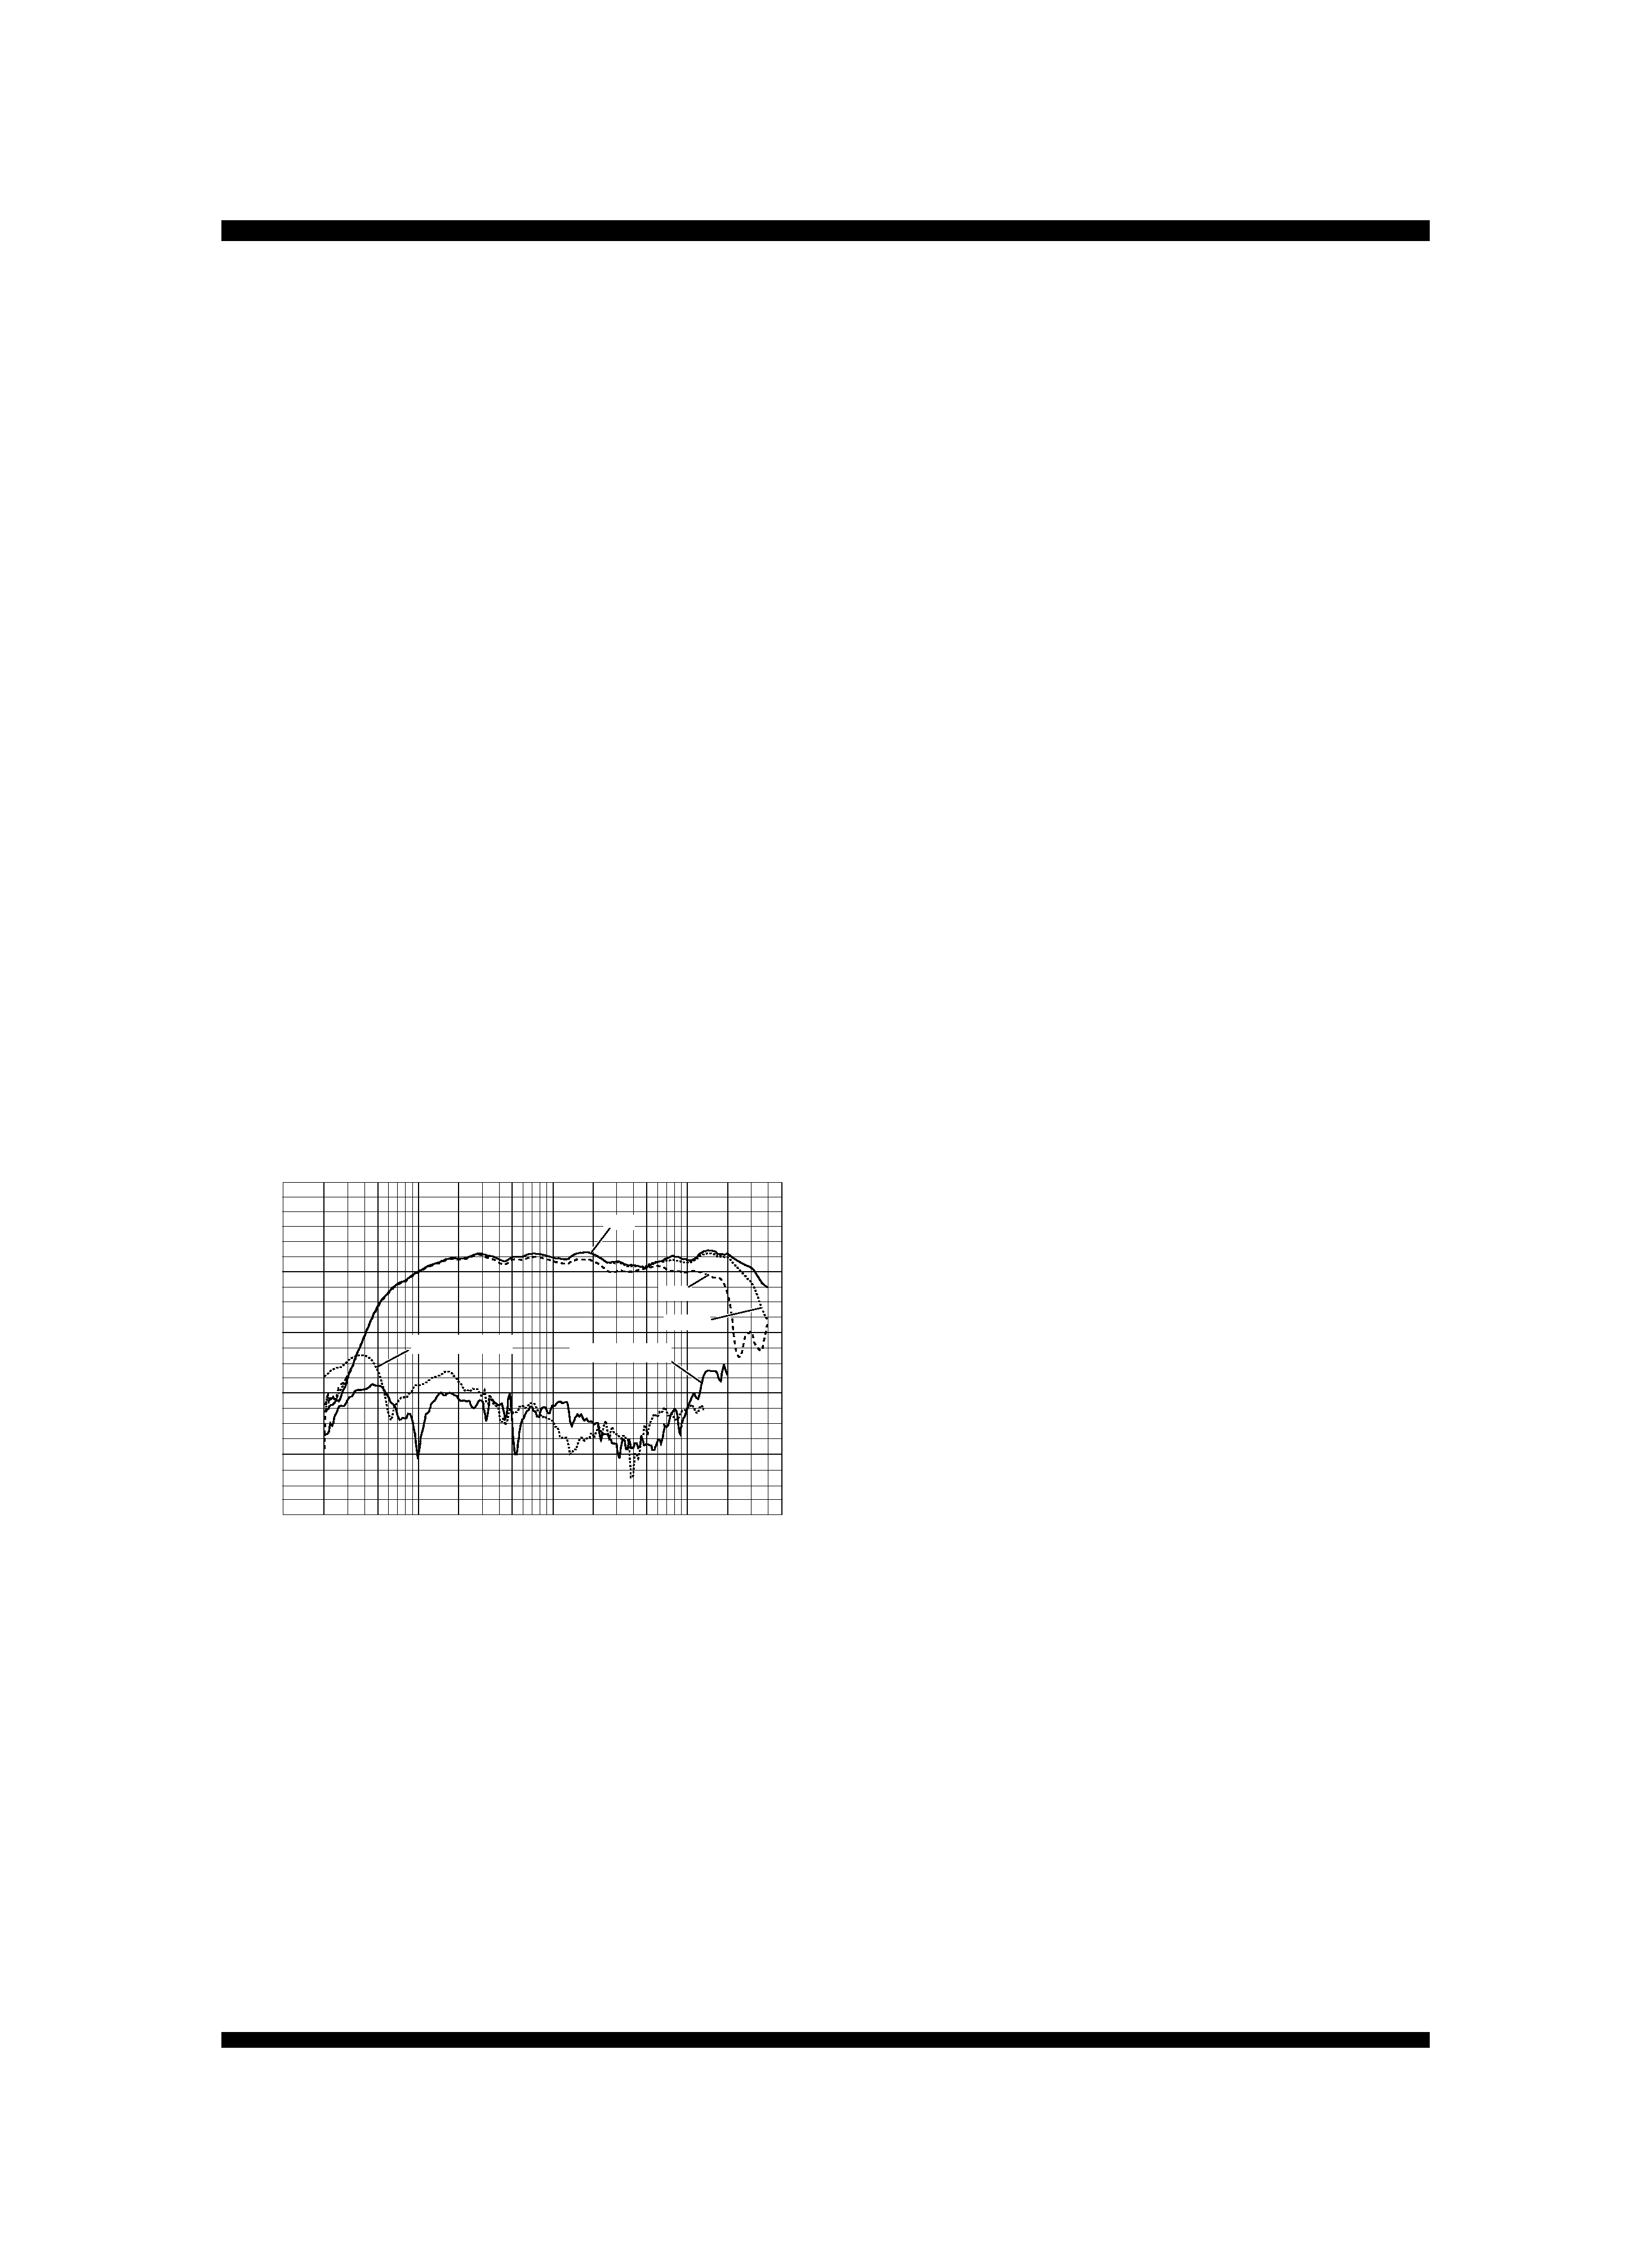
Frequency response ....................................... 5040,000 Hz
Output sound level ...................................... 85dB / W (1 m)
Permissible input
Maximum power ..................................................... 80 W
Crossover frequency ................................................... 4 kHz
External dimensions ...... 240 (H) x 1,080 (H) x 240 (D) mm
Weight ................................................................. 8 kg (each)
Accessories .................................. Speaker wire (7.0 m) x 1
Acoustic control material (white) x 1
Hook-and-loop fastener strip (hook) x 1
Hook-and-loop fastener strip (loop) x 1
Operating Instructions x 1
¶ Appearance and specifications are subject to change
without notice.
Frequency response and harmonic
distortion
20
0
10
100
1 K
10 k
50 kHz
40
60
80
100
0
°
22.5
°
45
°
Frequency response/Harmonic distortion
Output
level
(dB)
Published by Pioneer Corporation.
Copyright © 2004 Pioneer Corporation.
All rights reserved.
3rd harmonik
2nd harmonik

5
Sp
EspañolEspañol
PRECAUCIÓN
[Instalación]
¶ No instale los altavoces en lugares inestables,
desnivelados, o inclinados. Podrían sufrirse daños
personales si se cayeran los altavoces.
¶ Cuando conecte este sistema de altavoces a un
televisor o componente de audio, lea con cuidado las
instrucciones de funcionamiento del componente
respectivo, desconecte la alimentación, y efectúe la
conexión de acuerdo con las instrucciones. Efectúe
siempre las conexiones empleando los conductores y
cables designados.
¶ La rejilla frontal del sistema de altavoces no es
extraíble. No intente extraerla porque ocasionaría
daños.
[Empleo de los altavoces]
¶ Si se distorsiona el sonido que sale por los altavoces,
no reproduzca durante períodos largos de tiempo,
porque podrían sobrecalentarse los altavoces y
presentar peligro de incendio.
¶ No se suba ni se siente encima de los altavoces, y no se
cuelgue tampoco de ellos. Tome precauciones
especiales si los altavoces se emplean en torno a
niños. Los altavoces pueden causar heridas per-
sonales si se caen o se rompen.
¶ No ponga objetos pesados en los altavoces, ni ponga
cosas que puedan colgar por el borde, porque la
pérdida del equilibrio podría hacer que se cayera el
objeto y dañara a alguien.
¶ Estos altavoces están magnéticamente protegidos, y
no causan distorsión del color ni cuando se emplean
cerca de televisores. En muy raras ocasiones, la
instalación de los altavoces muy cerca de un televisor
puede causar cierto grado de distorsión del color; en
tales casos, desconecte la alimentación del televisor y
espere de 15 a 30 minutos, y vuelva a conectar la
alimentación. Si persiste la distorsión de los colores,
trate de separar un poco más los altavoces del
televisor.
Muchas gracias por la adquisición de este producto
Pioneer. Lea todo este manual de instrucciones para
aprender el modo de empleo correcto de este producto.
Antes de la utilización:
¶ Este sistema de altavoces tiene una impedancia
nominal de 6
. Conéctelo a un amplificador estéreo
diseñado para una impedancia de carga de 416
(los
terminales de salida de altavoz deberán estar
marcados con "416
").
¶ Para proteger los altavoces contra entradas excesivas,
siga siempre estas indicaciones:
No introduzca cargas de potencia de entrada
mayores que las máximas permisibles especi-
ficadas.
Desconecte siempre la alimentación del
amplificador antes de conectar éste y otros
componentes a su amplificador.
Si se emplea un ecualizador gráfico para acentuar
el sonido de altas frecuencias, reduzca el volumen
del sonido para evitar daños en los altavoces.
No intente producir volúmenes muy altos con un
amplificador de potencia insuficiente para ello.
Aumentaría la distorsión armónica del ampli-
ficador y podrían dañarse los altavoces.
Cuidados para las cajas acústicas
de los altavoces
Bajo condiciones normales de utilización, emplee un
paño suave y seco para frotar el polvo de la superficie de
las cajas acústicas. En caso de encontrar suciedad
persistente, humedezca un paño limpio en una solución
poco concentrada de detergente neutro y agua (1:5 ó 1:6),
exprímalo bien, y frote la suciedad, y luego seque las
superficies con un paño seco. No exponga nunca la
superficie a alcohol, disolvente, bencina, ni insecticidas
porque saltaría la pintura de la superficie y el acabado. Si
emplea un paño de limpieza impregnado con productos
químicos, lea bien las instrucciones y observe las
precauciones para el empleo.
Las características del sonido de un sistema de altavoces
cambian según el entorno y las condiciones en las que se
encuentran los altavoces. Un sistema de altavoces puede
utilizarse sin problemas inmediatamente después de la
adquisición, pero sus características de rendimiento de
diseño se demostrarán mejor después de haberlos tenido
reproduciendo música varias docenas de horas.
Consejo útil
English
