XC-L77
(DU-L77)
S-L9-LRW
S-L9-A-LRW
S-L8-LRW
CT-L77
Operating Instructions
Mode d'emploi
Bedienungsanleitung
Istruzioni per l'uso
STEREO CD RECEIVER
AMPLI-TUNER CD
STEREO-CD-SPIELER-RECEIVER
SINTOAMPLIFICATORE STEREO CON LETTORE CD
STEREO CASSETTE DECK
PLATINE CASSETTE STEREO
STEREO-CASSETTENDECK
REGISTRATORE STEREO A CASSETTA
SPEAKER SYSTEM
ENCEINTES ACOUSTIQUE
LAUTSPRECHERSYSTEM
SISTEMA DI DIFFUSORI

2
En/Fr
[For Stereo CD Receiver XC-L77]
CAUTION
This product contains a laser diode of higher
class than 1. To ensure continued safety, do
not remove any covers or attempt to gain ac-
cess to the inside of the product.
Refer all servicing to qualified personnel.
The following caution label appears on your
unit.
Location: Bottom of the unit.
CLASS 1
LASER PRODUCT
WARNING: TO PREVENT FIRE OR SHOCK
HAZARD, DO NOT EXPOSE THIS APPLIANCE TO RAIN
OR MOISTURE.
THE STANDBY/ON BUTTON IS SECONDARY CON-
NECTED AND THEREFORE DOES NOT SEPARATE THE
UNIT FROM MAINS POWER IN THE STANDBY POSI-
TION.
This product complies with the Low Voltage Direc-
tive (73/23/EEC), EMC Directives (89/336/EEC, 92/31/
EEC) and CE Marking Directive (93/68/EEC).
These Operating Instructions describe the operating
procedures of not only the XC-L77 Stereo CD Receiver
but the CT-L77 Stereo Cassette Deck as well. How-
ever, the CT-L77 is sold separately.
RISK OF ELECTRIC SHOCK
DO NOT OPEN
CAUTION
ATTENTION
DANGER D'ELECTROCUTION
NE PAS OUVRIR
These labels can be found on the unit's bottom
panel.
L'étiquette suivante se trouve sur le fond de
votre appareil.
CLASS 1
LASER PRODUCT
L'INTERRUPTEUR D'ALIMENTATION (STANDBY/ON)
EST SUR UN CIRCUIT DE CONNEXION SECONDAIRE
ET PAR CONSEQUENT NE COUPE PAS L'ALIMENTATION
SECTEUR SUR LA POSITION D'ATTENTE.
ATTENTION: AFIN DE PREVENIR TOUS
RISQUES DE CHOC ELECTRIQUE OU D`INCENDIE, NE PAS
EXPOSER CET APPAREIL A L`HUMIDITE OU A LA PLUIE.
[Pour l'ampli-tuner CD XC-L77]
ATTENTION
Ce produit renferme une diode à laser d'une
catégorie supérieure à 1. Pour garantir une
sécurité constante, ne pas retirer les couvercles
ni essayer d'accéder à l'intérieur de l'appareil.
Pour toute réparation, s'adresser à un person-
nel qualifié.
Ce produit est conforme à la directive relative aux appareils
basse tension (73/23/CEE), aux directives relatives à la
compatibilité électromagnétique (89/336/CEE, 92/31/CEE) et
à la directive CE relative aux marquages (93/68/CEE).
Ce Mode d'emploi explique le fonctionnement non
seulement de l'Ampli-tuner CD XC-L77, mais aussi
de la Platine cassette stereo CT-L77. Cependant, la
CT-L77 est vendue séparément.
Ces étiquettes se trouvent sur le fond de l'appareil.
RISK OF ELECTRIC SHOCK
DO NOT OPEN
CAUTION
IMPORTANT 1
CAUTION:
TO PREVENT THE RISK OF ELECTRIC SHOCK, DO
NOT REMOVE COVER (OR BACK).
NO USER-
SERVICEABLE PARTS INSIDE. REFER SERVICING TO
QUALIFIED SERVICE PERSONNEL.
The exclamation point within an equilateral triangle is
intended to alert the user to the presence of important
operating and maintenance (servicing) instructions in
the literature accompanying the appliance.
The lightning flash with arrowhead symbol, within an
equilateral triangle, is intended to alert the user to the
presence of uninsulated "dangerous voltage" within the
product's enclosure that may be of sufficient magnitude
to constitute a risk of electric shock to persons.
Thank you for buying this PIONEER product.
Please read through these operating instructions so you will know
how to operate your model properly. After you have finished reading
the instructions, put them away in a safe place for future reference.
In some countries or regions, the shape of the power plug and power
outlet may sometimes differ from that shown in the explanatory
drawings. However, the method of connecting and operating the
unit is the same.
Nous vous remercions pour cet achat d'un produit Pioneer.
Nous vous demandons de lire soigneusement ce mode d'emploi ;
vous serez ainsi à même de faire fonctionner l'appareil
correctement. Après avoir bien lu le mode d'emploi, rangez-le dans
un endroit sûr pour pouvoir vous y référer ultérieurement.
Dans certains pays ou certaines régions, la forme de la fiche
d'alimentation et de la prise d'alimentation peut différer de celle
qui figure sur les schémas, mais les branchements et le
fonctionnement de l'appareil restent les mêmes.

3
English
Français
En/Fr
Contents
1
Before You Start
Before you Start ................................................................. 4
2
Installing and Connecting up
Finding a Suitable Location .............................................. 8
Connecting Up the System ................................................ 9
3
What's What
Front Panel ...................................................................... 18
Remote Control ............................................................... 19
Display ............................................................................. 20
4
Switching On
Switching On and Setting the Clock ............................... 22
Playing a CD .................................................................... 23
Adjusting the Sound ........................................................ 25
Listening to the Radio ..................................................... 27
Playing a Cassette Tape ................................................... 29
5
Using the CD player
Using the Menu System ................................................... 33
Programming the Track Order ....................................... 34
Playing Things Again ...................................................... 36
Playing Tracks at Random .............................................. 37
Changing the Display ...................................................... 38
6
Using the Tuner
The Tuner Menu .............................................................. 39
Memorizing Stations for Quick Recall............................ 39
Listening to a Memorized Station ................................... 40
Giving a Station Memory a Name ................................... 41
An Introduction to RDS ................................................... 43
Displaying RDS Information .......................................... 44
Searching for a Program Type ........................................ 45
Changing the Display ...................................................... 47
7
Using the Tape Deck
Setting the Reverse Mode ................................................. 48
Changing the Display ...................................................... 49
Making Tape Recordings ................................................. 49
Automatically Recording a CD ........................................ 50
Automatically Recording an MD ..................................... 52
Recording Other Sources ................................................. 54
Resetting the Tape Counter ............................................. 55
8
Using the Timer
The Timer Menu .............................................................. 56
Setting the Wake Up Timer .............................................. 56
Cancelling the Wake Up Timer ....................................... 58
Setting Multiple Timers ................................................... 58
Setting the Sleep Timer ................................................... 59
Setting Up a Future Recording ........................................ 60
Canceling the Record Timer ........................................... 62
9
Additional Information
Setting the Display Brightness ......................................... 63
Troubleshooting .............................................................. 64
Maintenance .................................................................... 68
Specifications ................................................................... 70
Sommaire
1
Informations préliminaires
Informations préliminaires ............................................... 4
2
Installation et raccordement
Sélection de l'emplacement idéal ..................................... 8
Raccordement de la chaîne ............................................... 9
3
Nomenclature
Panneau avant ................................................................ 18
Télécommande ................................................................ 19
Afficheur .......................................................................... 20
4
Mise en service
Mise en service et réglage de l'horloge ............................ 22
Lecture d'un disque compact .......................................... 23
Réglage du son ................................................................ 25
Ecoute de la radio ............................................................ 27
Lecture d'une cassette ...................................................... 29
5
Utilisation du lecteur CD
Utilisation du système de menus .................................... 33
Programmation de l'ordre des plages ............................. 34
Lecture répétée de plages ................................................. 36
Lecture aléatoire des plages ............................................. 37
Changement d'affichage ................................................. 38
6
Utilisation de la radio
Le menu radio ................................................................. 39
Mémorisation des stations pour un rappel rapide .......... 39
Ecoute d'une station mémorisée ..................................... 40
Attribution d'un nom à une station mémorisée ............. 41
Introduction au RDS ....................................................... 43
Affichage des informations RDS ..................................... 44
Recherche d'un type de programme ............................... 45
Changement d'affichage ................................................. 47
7
Utilisation de la platine à cassette
Réglage du mode d'inversion ......................................... 48
Changement d'affichage ................................................. 49
Réalisation d'enregistrements ......................................... 49
Enregistrement automatique d'un CD ........................... 50
Enregistrement automatique d'un MD ........................... 52
Enregistrement d'autres sources ..................................... 54
Réinitialisation du compteur .......................................... 55
8
Utilisation de la minuterie
Le menu de la minuterie ................................................. 56
Réglage de la minuterie réveil ........................................ 56
Annulation de la minuterie réveil ................................... 58
Réglage de plusieurs minuteries ..................................... 58
Réglage de la minuterie sommeil ................................... 59
Programmation d'un enregistrement futur ................... 60
Annulation de la minuterie d'enregistrement ................ 62
9
Informations complémentaires
Réglage de la luminosité de l'afficheur .......................... 63
Guide de dépannage ........................................................ 65
Entretien .......................................................................... 69
Spécifications ................................................................... 71

4
En/Fr
Checking What's in the Box
Thank you for buying this Pioneer product. Before starting to set
up your new stereo system, please check that you received the
following supplied accessories in the
XCL77 Stereo CD Receiver box:
· AM loop antenna
· FM wire antenna
· Power cord
· Display unit connecting cord
· Lithium battery CR2025 (for remote control)
· Warranty card
· This instruction manual
In the box that the speakers came in you should find the following
accessories:
· Subwoofer connecting cord
· Speaker cords(
×2)
· Speaker stands (
×2)
· Screws (
×4) (to attach speaker stands)
· Non skid pads (for satellite speakers (
×8), for
subwoofer (
×4))
Using this manual
This manual is for the XCL77 Stereo CD Receiver, CTL77 Stereo
Cassette Deck and SL8/SL9/SL9-A speaker system. It is split
into two broad sections; the first covers setting up, and the second,
using the system. Set up, which starts here, shows you how to
install and connect up the system.
In the second section of the manual, starting on page 18, you'll
learn how to use every feature of the CD receiver/cassette deck
system. The final part of the manual provides a troubleshooting
section and technical specifications.
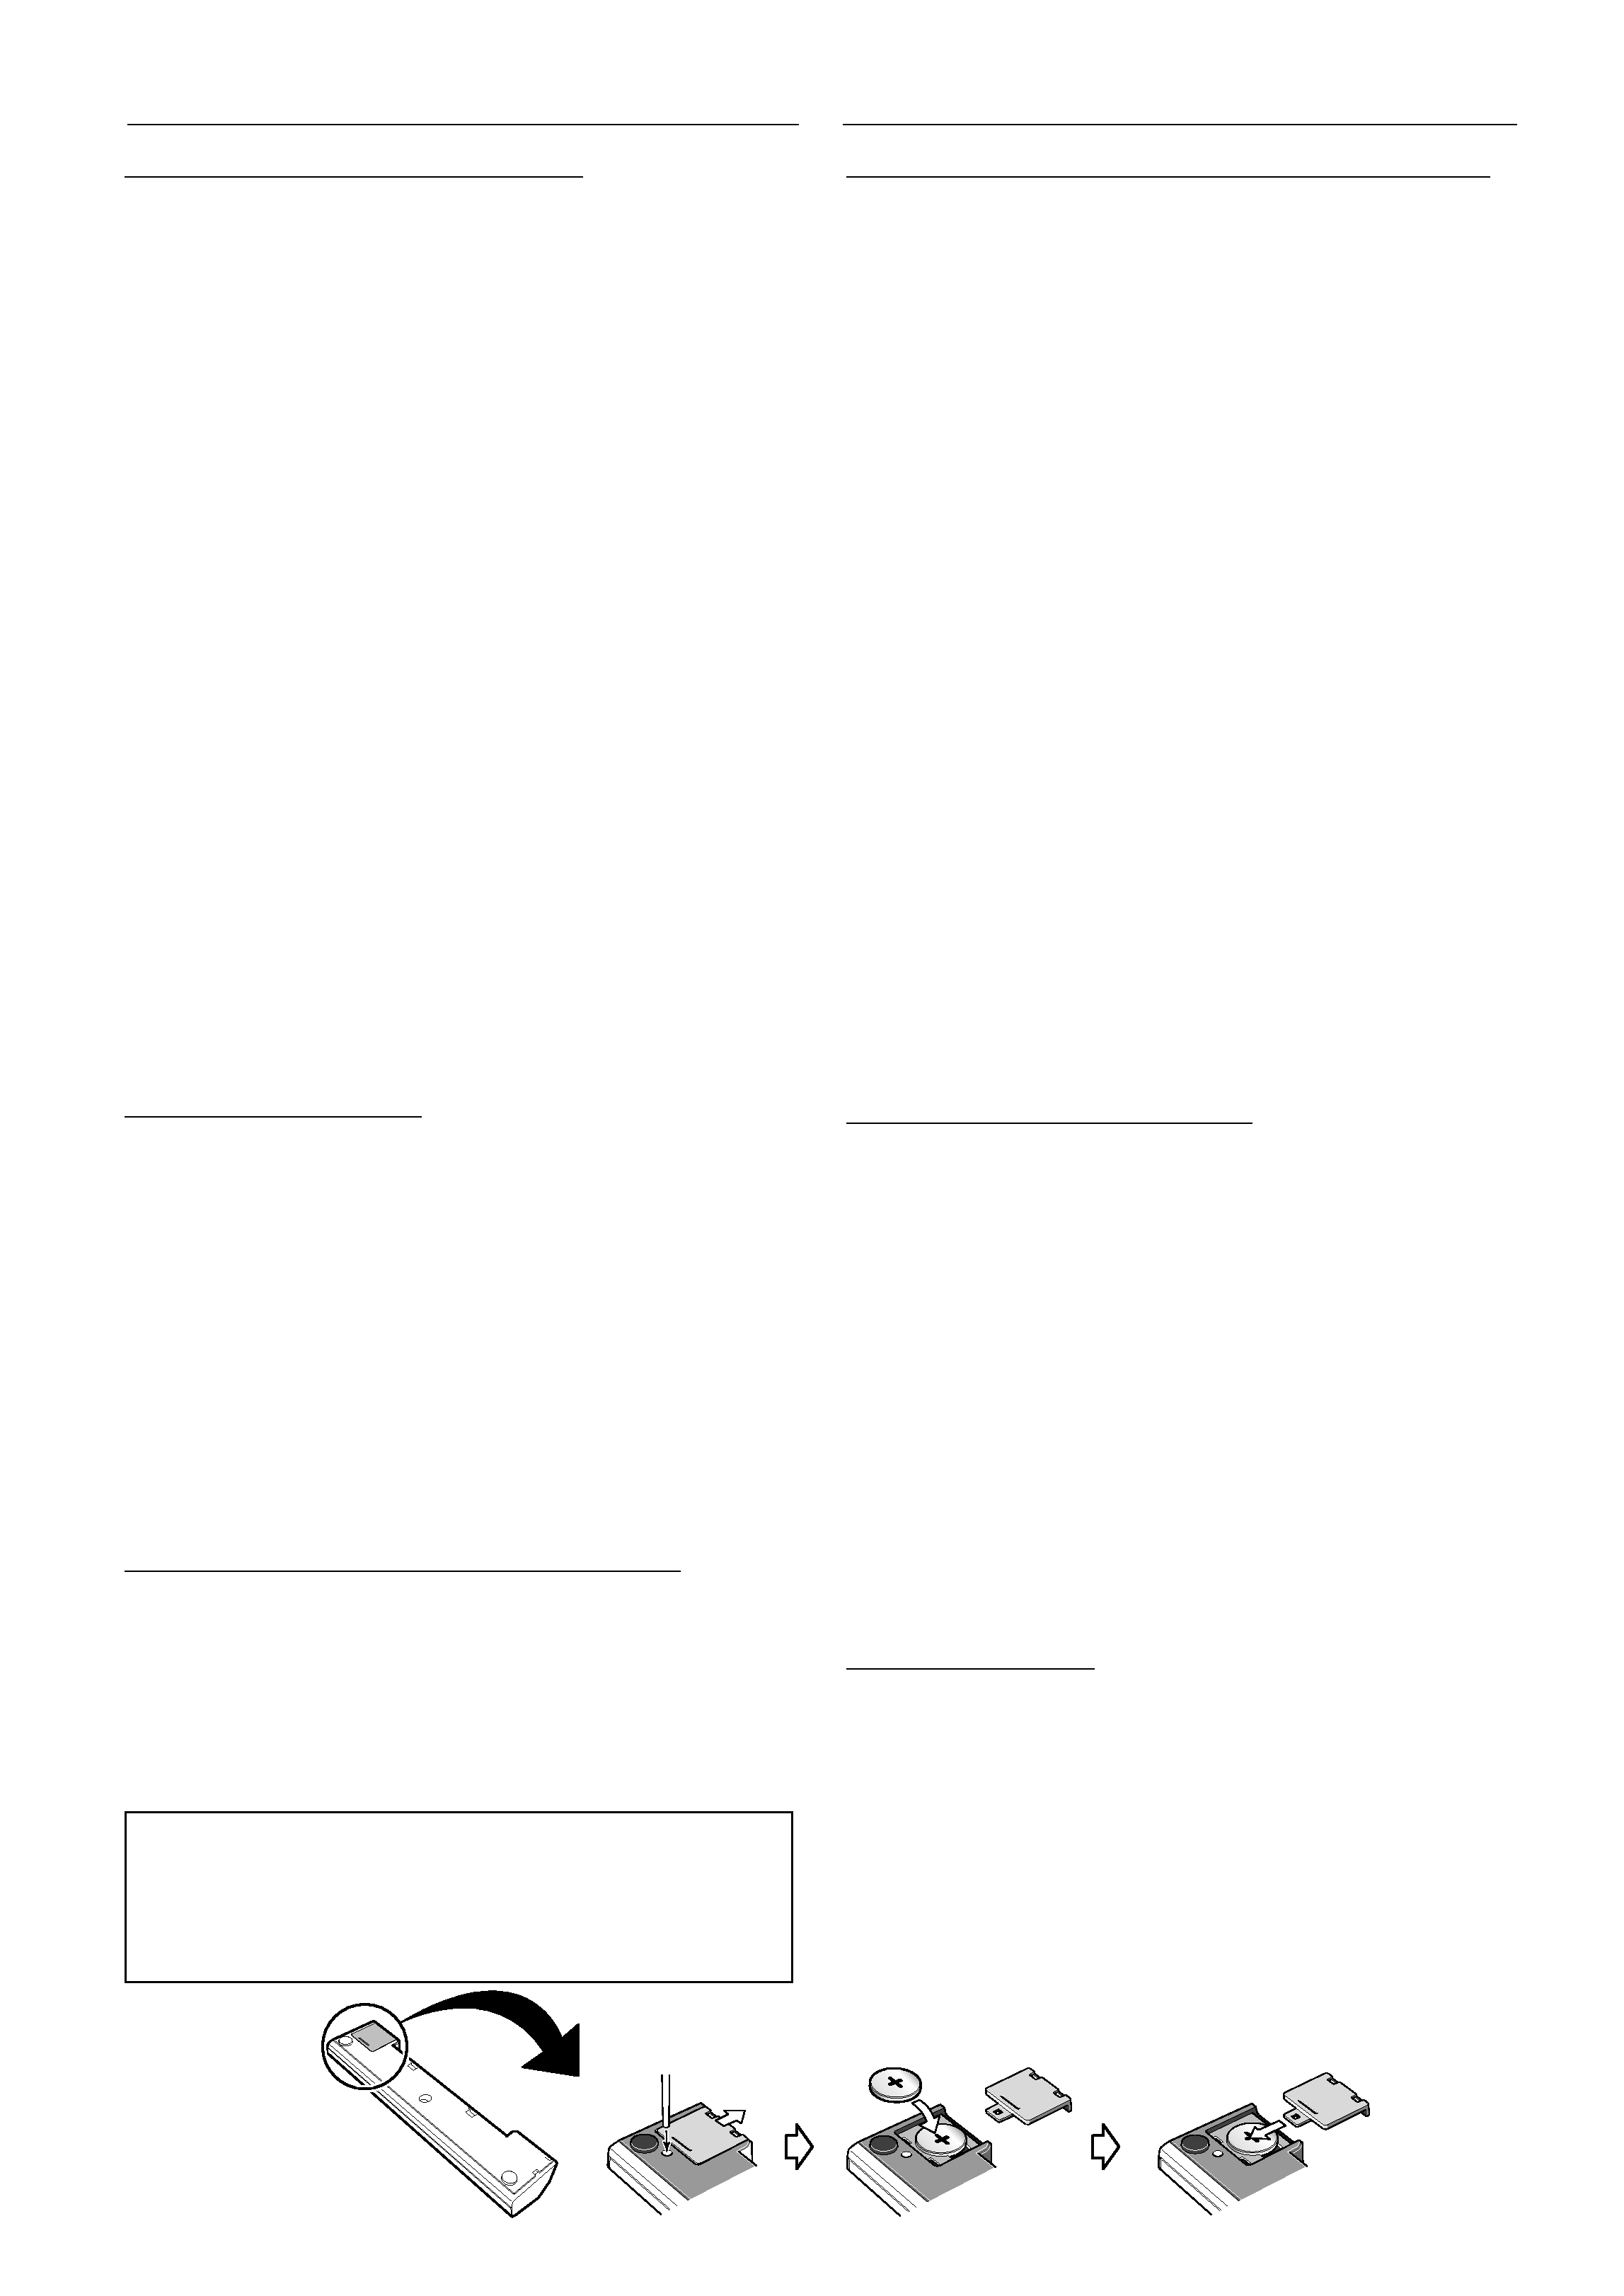
Putting the battery in the remote
1 Turn over the remote control. Push a ball-point pen into the
hole to release the battery cover and slide it off.
2 Put in the supplied battery, taking care to match the plus and
minus sides with the markings inside the compartment.
3 Slide the cover back on, and your remote is ready for use.
Vérification du contenu de l'emballage
Merci pour l'achat de ce produit Pioneer. Avant d'installer votre
nouvelle chaîne stéréo, veuillez vérifier si tous les accessoires
suivants se trouvent bien dans le carton d'emballage de l'ampli-
tuner CD stéréo XC-L77 :
· Antenne cadre AM
· Antenne fil FM
· Cordon d'alimentation
· Câble de liaison de l'afficheur
· Pile au lithium CR2025 (pour la télécommande)
· Carte de garantie
· Ce mode d'emploi
Dans le carton d'emballage des enceintes, vous devez trouver les
accessoires suivants :
· Câble de liaison de caisson de grave
· Câbles d'enceintes (
×2)
· Supports (
×2)
· Vis (
×4) (pour fixer les supports aux enceintes)
· Coussinets anti-dérapants (pour les enceintes
satellites (
×8), pour le caisson de grave (×4))
Utilisation de ce manuel
Ce manuel est conçu pour l'ampli-tuner CD stéréo XC-L77, la
platine à cassette stéréo CT-L77 et le système acoustique S-L8/S-L9/
S-L9-A. Il se divise en deux sections principales ; la première décrit
l'installation et la seconde l'utilisation de la chaîne. La partie
Installation, qui débute ici, vous indique comment installer et
raccorder la chaîne.
La seconde section du manuel, qui commence à la page 18,
indique comment utiliser chaque fonction de l'ampli-tuner CD/
platine à cassette. La dernière partie de ce manuel fournit un
guide de dépannage ainsi que des données techniques.
Mise en place de la pile dans la
télécommande
1 Retournez la télécommande. Appuyez avec un stylo à bille
dans l'orifice pour ouvrir le couvercle de pile et faites-le
glisser.
2 Insérez la pile fournie, en prenant soin de faire correspondre
les faces plus et moins avec les indications à l'intérieur du
logement.
3 Remettez le couvercle en place. La télécommande est prête.
1.
2.
3.
CAUTION
Danger of explosion if battery is incorrectly replaced.
Replace only with the same or equivalent type
recommended by the manufacturer. Discard used
batteries according to the manufacturer's instructions
Before You Start
Informations préliminaires

5
English
Français
En/Fr
CAUTION:
·
Remove the battery if the remote is not going to be used
for a month or more.
·
Remove dead batteries promptly--they can leak and
damage the unit.
·
If the remote is connected to the display, no battery is
necessary for it to work. The battery is not recharged by
connecting the remote to the display, however.
Using the remote control
Keep in mind the following when using the remote control unit:
·
Make sure that there are no obstacles in between the
remote and the remote sensor on the unit.
·
Use within the operating range and angle, as shown in
the diagram above.
·
Remote operation may become unreliable if strong
sunlight or fluorescent light is shining on the unit's
remote sensor.
·
Remote controllers for different devices can interfere with
each other. Avoid using remotes for other equipment
located nearby this unit.
· Replace the battery when you notice a fall off in the
operating range of the remote.
· On the rear of the remote there is a gold-coloured
connector that links the remote with the display unit.
Avoid touching this when using the remote separately.
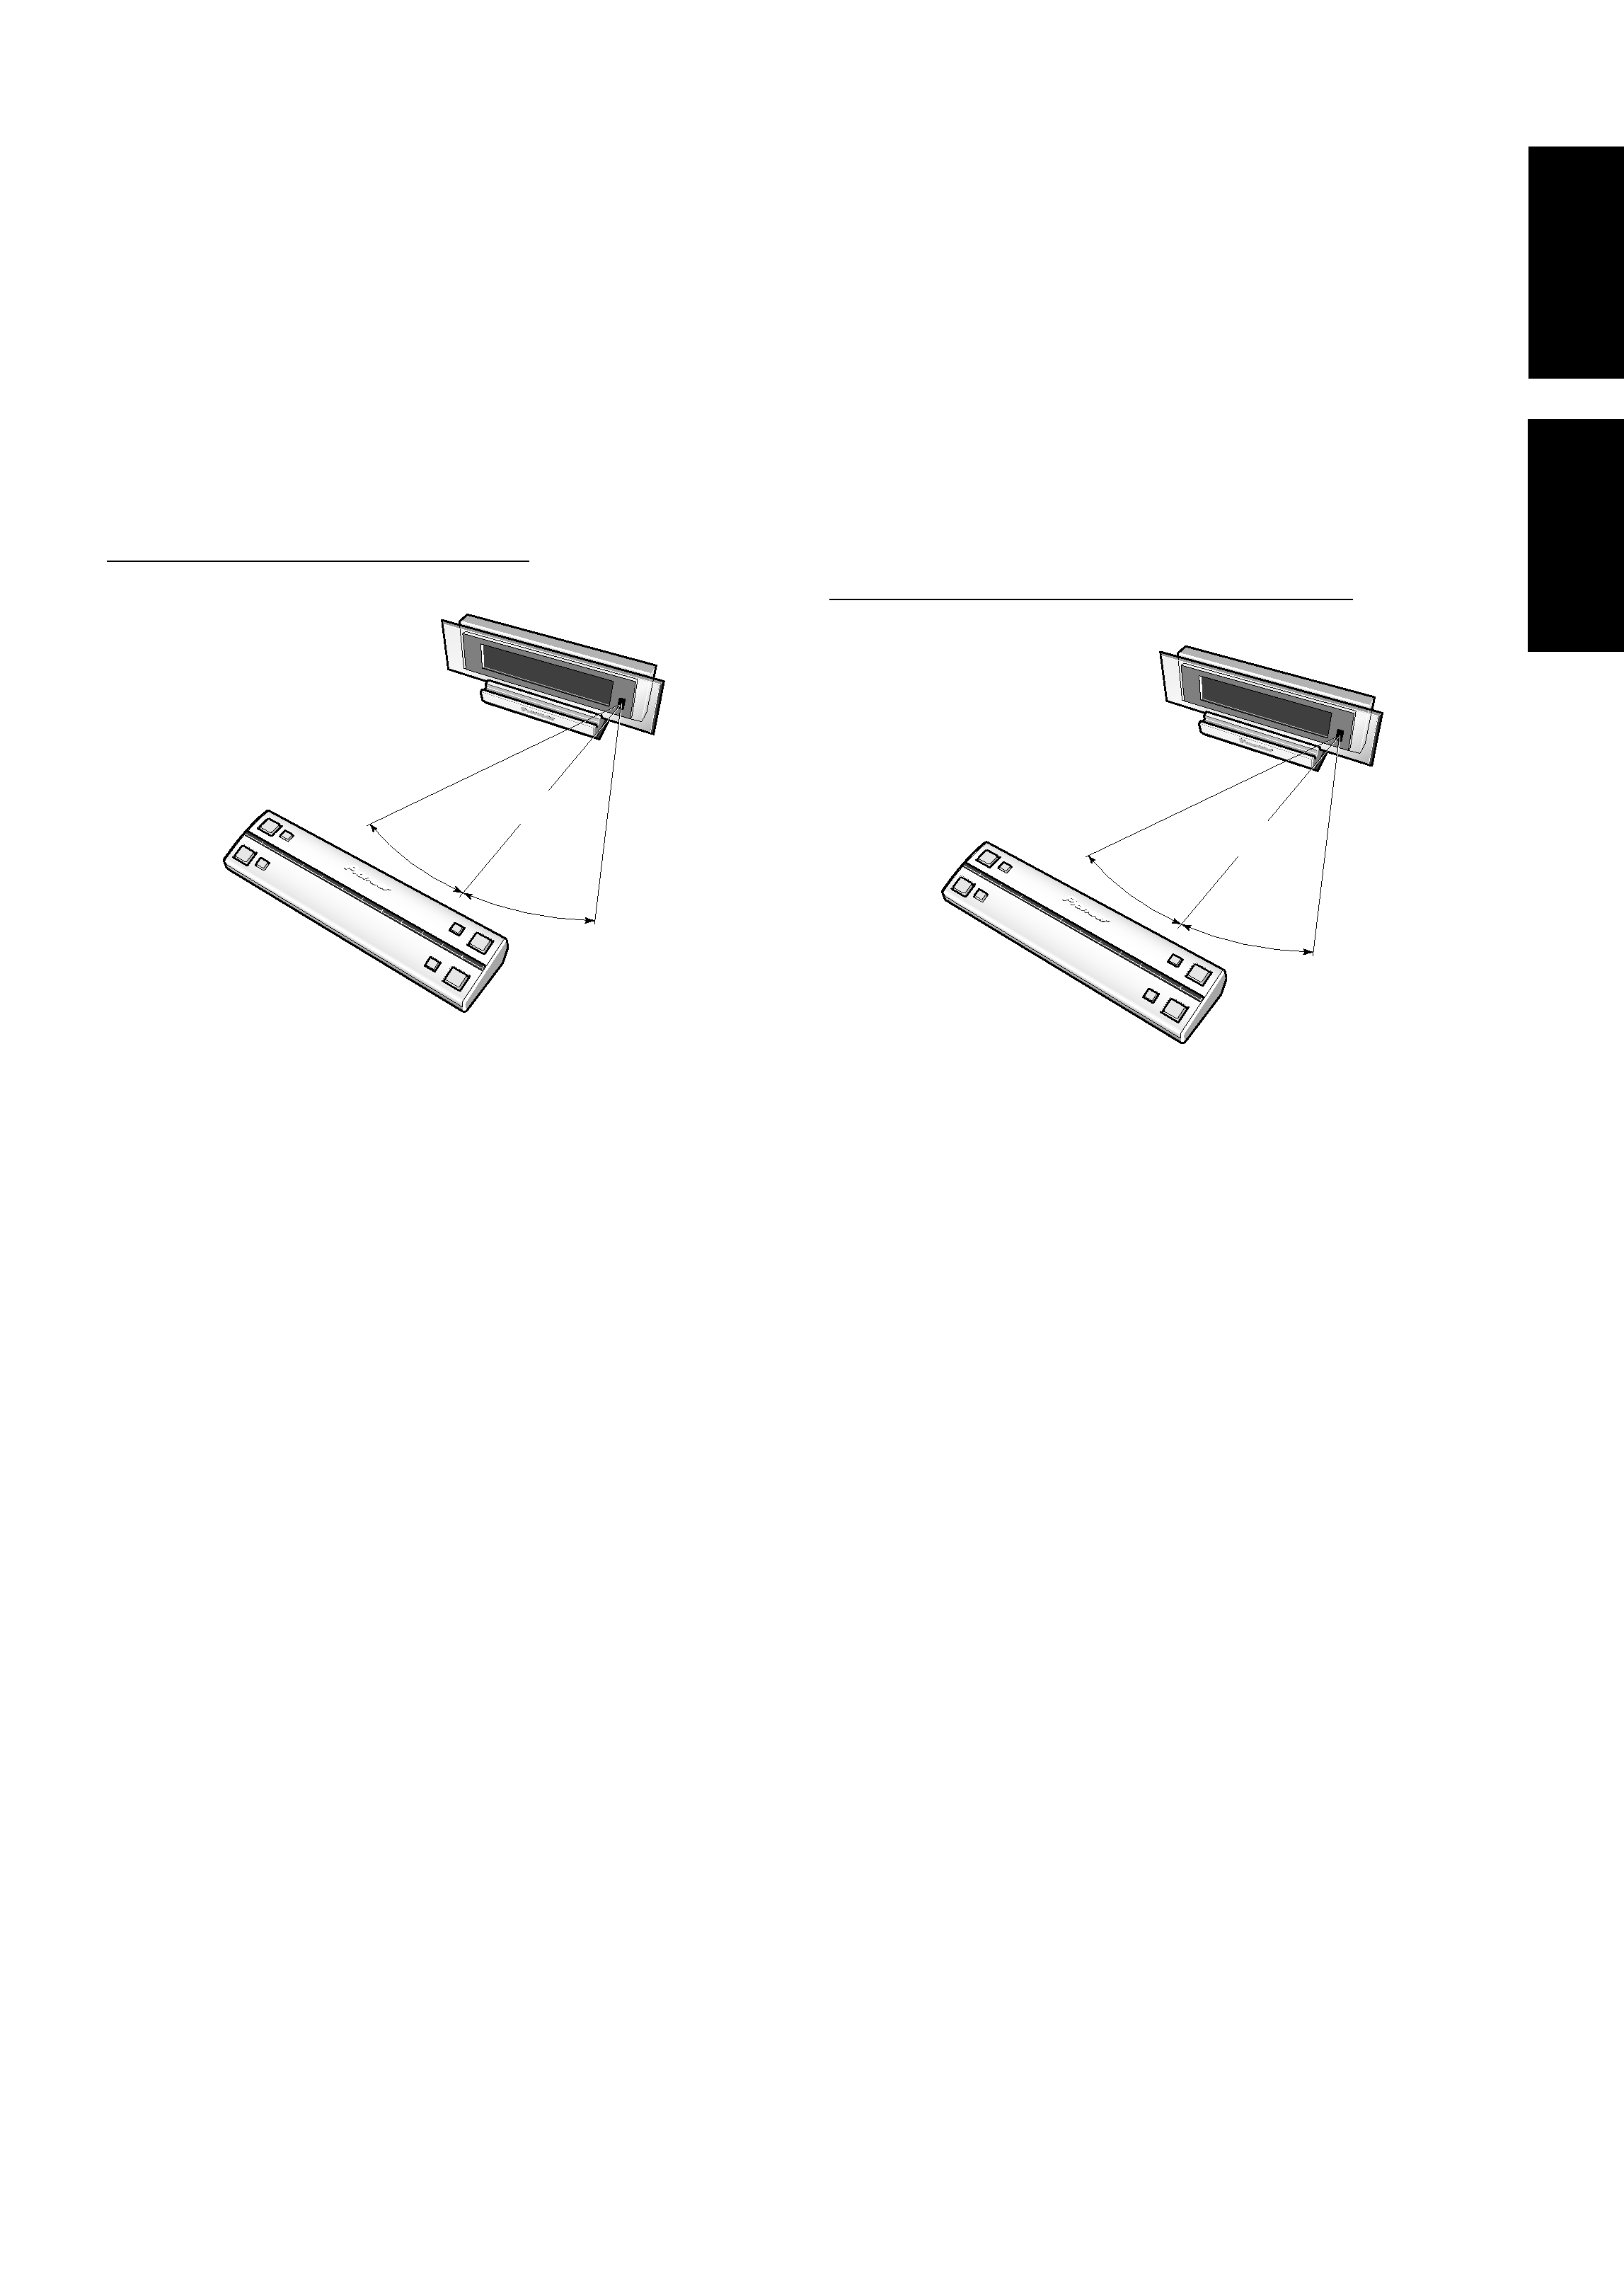
Operating range of the remote
control unit
30o
30o
ATTENTION:
· Retirez la pile si vous n'avez pas l'intention d'utiliser la
télécommande pendant au moins un mois.
· Retirez rapidement une pile vide, car elle peut fuire et
endommager la télécommande.
· Lorsque la télécommande est raccordée à l'afficheur,
aucune pile n'est nécessaire à son fonctionnement. La
pile ne se recharge pas quand la télécommande est
raccordée à l'afficheur.
Utilisation de la télécommande
Souvenez-vous des points suivants lorsque vous utilisez la
télécommande :
· Assurez-vous qu'il n'y a pas d'obstacle entre la
télécommande et le capteur sur l'appareil.
· Utilisez la télécommande dans la plage et l'angle
indiqués sur le schéma ci-dessus.
· La télécommande risque de ne pas bien fonctionner si le
capteur de l'appareil est exposé au soleil ou à une lampe
fluorescente.
· Les télécommandes de divers appareils peuvent créer des
interférences. Evitez d'utiliser d'autres télécommandes
près de cet appareil.
· Remplacez la pile si vous notez une réduction notable de
la portée de la télécommande.
· A l'arrière de la télécommande se trouve un connecteur
plaqué or qui relie la télécommande à l'afficheur. Evitez
de le toucher lorsque vous utilisez la télécommande
séparément.
Portée de la télécommande
30o
30o
7 meters
7 mètres
