DVD PLAYER
DV-S633A
Operating Instructions

2
En
This product incorporates copyright protection
technology that is protected by method claims of
certain U.S. patents and other intellectual property
rights owned by Macrovision Corporation and other
rights owners. Use of this copyright protection
technology must be authorized by Macrovision
Corporation, and is intended for home and other
limited viewing uses only unless otherwise authorized
by Macrovision Corporation. Reverse engineering or
disassembly is prohibited.
CONGRATULATIONS ON YOUR PURCHASE OF
THIS FINE PIONEER PRODUCT.
Pioneer is on the leading edge of DVD research for
consumer products and this unit incorporates the latest
technological developments.
We are sure you will be fully satisfied with the DVD
player.
Thank you for your support.
Please read through these operating instructions so
you will know how to operate your model properly.
After you have finished reading the instructions, put
them away in a safe place for future reference.
· This player is not suitable for commercial use.
On the bonnet of the unit.

3
En
Table Of Contents
1
Before You Start
Features ............................................................................. 4
What's in the box ............................................................ 5
Putting the batteries in the remote control ............. 5
Using the remote control ............................................. 5
Discs compatible with this player .............................. 6
DVD Video regions ......................................................... 7
MP3 compatibility information ................................... 7
2
Connecting Up
Easy Setup ........................................................................ 8
Home theater video connections ............................... 9
Home theater audio connections ............................. 10
3
Controls & Displays
Front panel ..................................................................... 11
Remote control ............................................................. 12
Display ............................................................................. 13
4
Getting Started
Setting the TV System
(except for Taiwanese model) ................................... 14
Using the Setup Navigator ......................................... 15
Playing discs .................................................................. 18
Navigating DVD disc menus ...................................... 20
Navigating Super VCD/Video CD PBC menus ..... 20
Navigating DVD-RW discs menus ............................ 20
5
Playing Discs
Introduction ................................................................... 21
Finding what you want on a disc .............................. 21
Switching camera angles ............................................. 22
Switching subtitles ....................................................... 22
Switching audio language ........................................... 23
Switching audio channel (DVD-Audio) ................... 23
Switching audio channel
(DVD-RW/Super VCD/Video CD/CD/MP3) ........ 23
Making a program list .................................................. 24
Programming tips .......................................................... 25
Using random play ....................................................... 26
Using repeat play ......................................................... 27
Bookmarking a place in a disc
(LAST MEMORY) .......................................................... 28
Memorizing disc settings
(CONDITION MEMORY) .......................................... 29
Displaying disc information ...................................... 30
6
Playing MP3s
Playing MP3s ................................................................. 31
Searching for folders and tracks ............................... 32
Using random play ....................................................... 32
Using repeat play ......................................................... 32
Displaying MP3 information ...................................... 32
Using the MP3 Navigator ........................................... 33
Making a program list of MP3 tracks ....................... 34
7
DVD Setup Menu
Using the Setup menu ................................................. 35
Setup Menu Mode ........................................................ 35
OSD Settings ................................................................. 36
Audio settings ................................................................ 36
Video settings ................................................................ 43
Language settings ........................................................ 48
General settings ............................................................ 51
8
Additional Information
Handling discs .............................................................. 54
Storing discs ................................................................. 54
Discs to avoid ............................................................... 54
Cleaning the pickup lens ........................................... 54
Problems with condensation .................................... 54
Hints on installation .................................................... 55
Moving the player ......................................................... 55
Glossary .......................................................................... 56
Troubleshooting ............................................................ 58
Resetting the Player .................................................... 60
Country Code List ........................................................ 62
Language code list ....................................................... 62
Specifications .................................................. back page

4
En
Before You Start
1
Features
525 line digital progressive-scan
component video output
Compared to standard interlaced video,
progressive scan effectively doubles the
amount of video information fed to your TV or
monitor. The result is a stable, flicker-free
image. (Check your TV/monitor for compat-
ibility with this feature.)
For the very highest picture quality, try
watching a movie on DVD-Video on a progres-
sive-scan compatible TV.
What is Super VCD?
Logos:
This player supports the IEC's Super VCD
standard. Compared to the Video CD
standard, Super VCD offers superior
picture quality, and allows two stereo
soundtracks to be recorded. Super VCD
also supports the widescreen size.
Superlative audio performance with
DVD-Audio, Dolby*1 Digital and
DTS*2 software
Logos: 1
R
The DV-S633A delivers breathtaking sound
quality with Dolby Digital and DTS discs.
TruSurround*3
Logo:
When used with stereo sources, TruSurround
creates a realistic surround-sound effect using
just two speakers (see page 38).
MP3 compatibility
This player is compatible with CD-R, CD-RW
and CD-ROM discs that contain MP3 audio
tracks (see pages 7, 31).
Video Adjust
This new type of DNR (Digital Noise
Reduction) for encoding video enables
you to adjust the video settings on a more
detailed and exact level. There are three
possible settings to choose from. These
include: TV (CRT), PDP, and Professional.
This technology can remember which
setting you've chosen and employ it at the
proper time. (see page 45).
Legato PRO (Legato Link
Conversion PRO)
The Legato PRO digital filter restores some of
the high-frequency information lost in the CD
and DVD recording and mastering process by
upsampling from 44.1kHz to 176.4kHz for CD
and from 48kHz to 192kHz for DVD.
Legato PRO has four settings, including
Standard and three effect settings. You can
also switch it off. (see page 41).
Hi-Bit
Hi-Bit extends the dynamic range of the main
front speakers by effectively increasing the bit
depth from 16-20 bit to 24 bit. This allows
the player to reveal greater detail in low level
audio (see page 41).
High quality 24-bit/192kHz DAC
The high specification 24-bit/192kHz DAC
delivers dynamic, smooth and expansive
analog sound from CDs and DVDs.
Graphical Setup Navigator
Setting up your DVD player is easy using the
graphical Setup Navigator. Answer the
questions that appear on-screen and the
Setup Navigator makes the necessary audio,
video and language settings for you (see page
15).

5
En
1
Before You Start
*1 Manufactured under license from Dolby
Laboratories. "Dolby" and the double-D
symbol are trademarks of Dolby Laboratories.
Confidential unpublished works. © 1992-
1997 Dolby Laboratories. All rights reserved.
*2 "DTS" and "DTS Digital Surround" are
registered trademarks of Digital Theater
Systems, Inc.
*3 TruSurround and the
® symbol are
trademarks of SRS Labs, Inc. TruSurround
technology is incorporated under license
from SRS Labs, Inc.
What's in the box
Thank you for buying this Pioneer prod-
uct. Please confirm that the following
accessories are in the box when you open
it.
· Remote control
· AA/R6P dry cell batteries x2
· Stereo audio cable (red/white)
· Video cable (yellow)
· Power cable
· These operating instructions
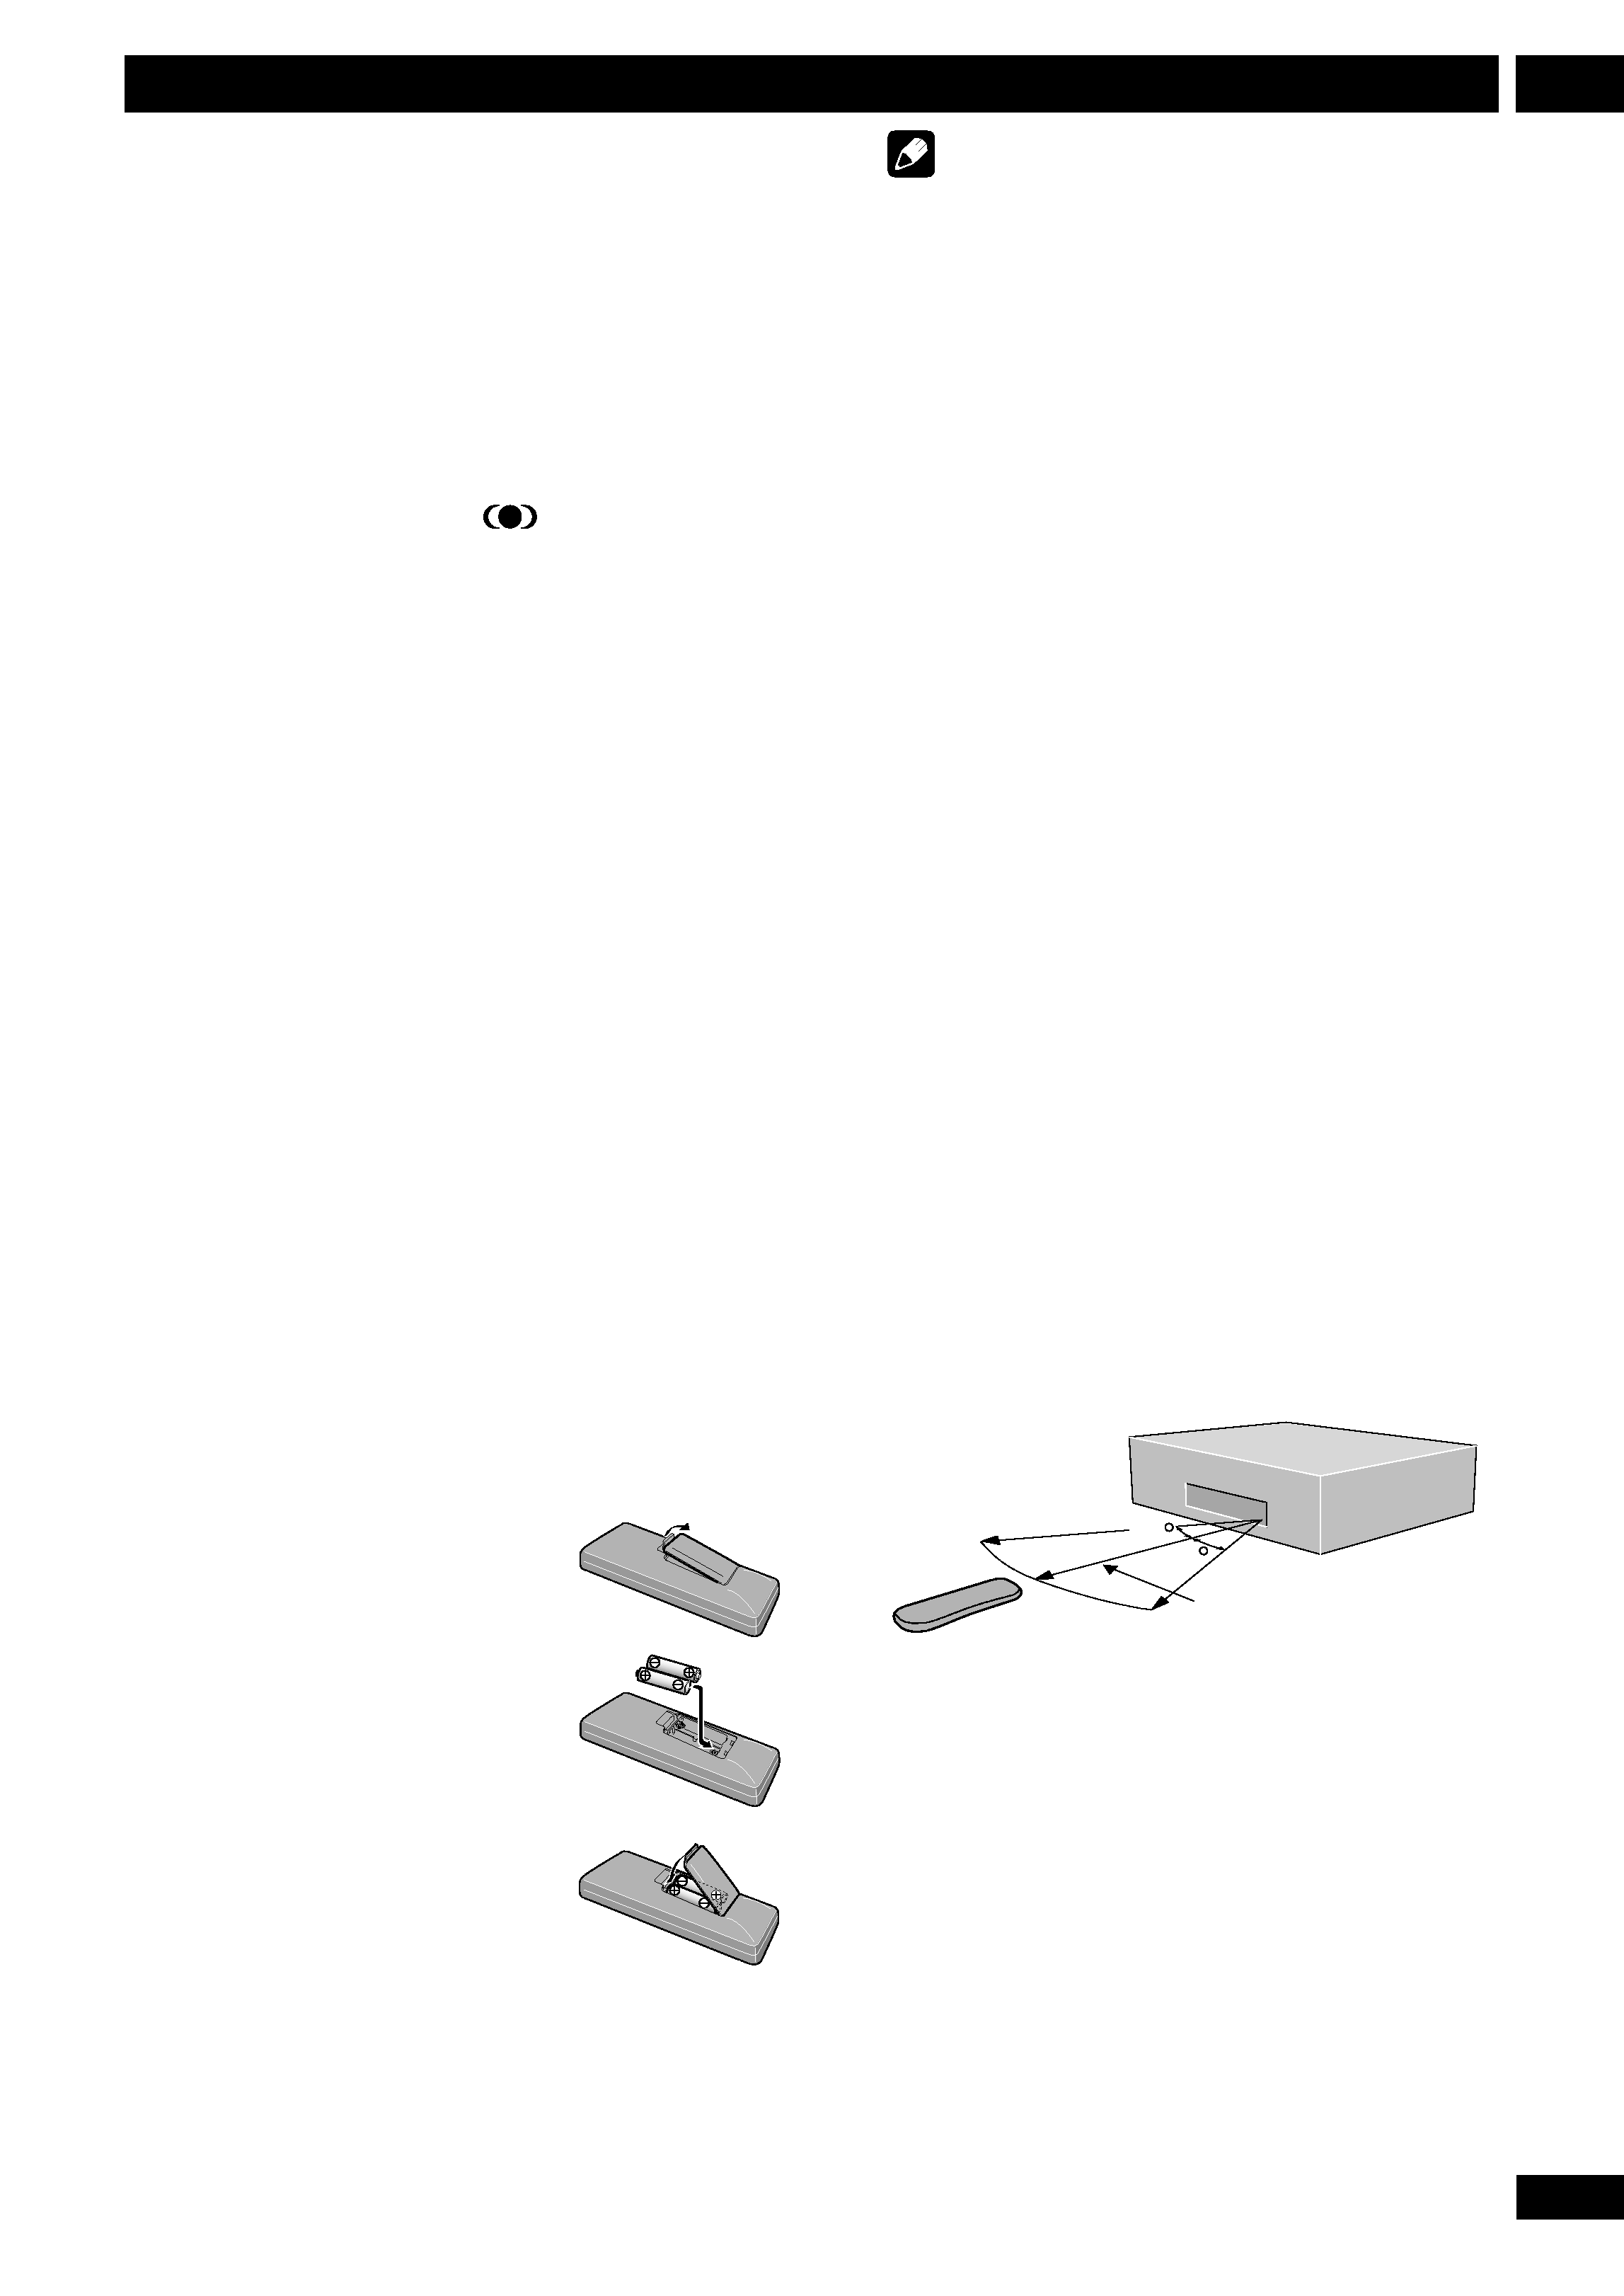
Putting the batteries in the
remote control
1 Open the battery
compartment cover on
the back of the remote
control.
2 Insert two AA/R6P
batteries into the bat-
tery compartment
following the indications
(
ª, ·) inside the
compartment.
3 Close the cover.
Note
Incorrect use of batteries can result in hazards
such as leakage and bursting. Please observe the
following:
· Don't mix new and old batteries together.
· Don't use different kinds of battery to-
gether--although they may look similar,
different batteries may have different
voltages.
· Make sure that the plus and minus ends of
each battery match the indications in the
battery compartment.
· Remove batteries from equipment that isn't
going to be used for a month or more.
When disposing of used batteries, please
comply with governmental regulations or
environmental public instruction's rules that
apply in your country or area. H048 En
Using the remote control
Keep in mind the following when using the
remote control:
· Make sure that there are no obstacles
between the remote and the remote sensor
on the unit.
· Use within the operating range and angle, as
shown.
· Remote operation may become unreliable if
strong sunlight or fluorescent light is shining
on the unit's remote sensor.
· Remote controllers for different devices can
interfere with each other. Avoid using remotes
for other equipment located close to this
unit.
· Replace the batteries when you notice a fall
off in the operating range of the remote.
30
30
7m
