PIONEER CORPORATION
4-1, Meguro 1-Chome, Meguro-ku, Tokyo 153-8654, Japan
PIONEER ELECTRONICS (USA) INC.
P.O.Box 1760, Long Beach, CA 90801-1760 U.S.A.
PIONEER EUROPE NV
Haven 1087 Keetberglaan 1, 9120 Melsele, Belgium
PIONEER ELECTRONICS ASIACENTRE PTE.LTD. 253 Alexandra Road, #04-01, Singapore 159936
C PIONEER CORPORATION 2001
K-ZZB. DEC. 2001 Printed in Japan
ORDER NO.
CRT2782
MULTI-COMPACT DISC PLAYER
CDX-M8317ZT
X1H/UC
Service
Manual
CONTENTS
1. SAFETY INFORMATION............................................3
2. EXPLODED VIEWS AND PARTS LIST ......................4
3. BLOCK DIAGRAM AND SCHEMATIC DIAGRAM ....8
4. PCB CONNECTION DIAGRAM................................22
5. ELECTRICAL PARTS LIST........................................28
6. ADJUSTMENT .........................................................31
7. GENERAL INFORMATION.......................................40
7.1 DIAGNOSIS .......................................................40
7.1.1 DISASSEMBLY .............................................40
7.1.2 CONNECTOR FUNCTION DESCRIPTION ...43
7.2 IC ........................................................................44
7.3 EXPLANATION ..................................................46
7.3.1 OPERATIONAL FLOW CHART .....................46
7.3.2 SYSTEM BLOCK DIAGRAM ........................47
7.4 NOTES ON SERVICING ....................................47
7.4.1 CLEANING ....................................................47
7.4.2 FACTORY SETTINGS ...................................47
8. OPERATIONS AND SPECIFICATIONS ....................48
For details, refer to "Important symbols for good services".
VEHICLE
DESTINATION
PRODUCED AFTER TOYOTA PART No. ID No. PIONEER MODEL No.
TOYOTA:MATRIX
U.S.A., CANADA
January 2002
86270-01010
CDX-M8317ZT/X1H/UC
GM:PONTIAC VIB
- This service manual should be used together with the following manual(s):
Model No.
Order No.
Mech. Module Remarks
CX-652
CRT1857
C5
CD Mech. Module:Circuit Description, Mech.Description, Disassembly
TOYOTA

2
CDX-M8317ZT
[ Important symbols for good services ]
In this manual, the symbols shown-below indicate that adjustments, settings or cleaning should be made securely.
When you find the procedures bearing any of the symbols, be sure to fulfill them:
2. Adjustments
To keep the original performances of the product, optimum adjustments or specification confirmation is indispensable.
In accordance with the procedures or instructions described in this manual, adjustments should be performed.
3. Cleaning
For optical pickups, tape-deck heads, lenses and mirrors used in projection monitors, and other parts requiring cleaning,
proper cleaning should be performed to restore their performances.
5. Lubricants, glues, and replacement parts
Appropriately applying grease or glue can maintain the product performances. But improper lubrication or applying
glue may lead to failures or troubles in the product. By following the instructions in this manual, be sure to apply the
prescribed grease or glue to proper portions by the appropriate amount.For replacement parts or tools, the prescribed
ones should be used.
4. Shipping mode and shipping screws
To protect the product from damages or failures that may be caused during transit, the shipping mode should be set or
the shipping screws should be installed before shipping out in accordance with this manual, if necessary.
1. Product safety
You should conform to the regulations governing the product (safety, radio and noise, and other regulations), and
should keep the safety during servicing by following the safety instructions described in this manual.

3
CDX-M8317ZT
1. SAFETY INFORMATION
This service manual is intended for qualified service technicians; it is not meant for the casual do-it-yourselfer.
Qualified technicians have the necessary test equipment and tools, and have been trained to properly and safely repair
complex products such as those covered by this manual.
Improperly performed repairs can adversely affect the safety and reliability of the product and may void the warranty.
If you are not qualified to perform the repair of this product properly and safely, you should not risk trying to do so
and refer the repair to a qualified service technician.
- CD Player Service Precautions
1. For pickup unit(Service)(CXX1235) handling, please
refer to"Disassembly"(see page 40).
During replacement, handling precautions shall be
taken to prevent an electrostatic discharge(protection
by a short pin).
2. During disassembly, be sure to turn the power off
since an internal IC might be destroyed when a
connector is plugged or unplugged.
3. Please checking the grating after changing the pickup
unit(see page 33) since these screws protects the
mechanism during transport, be sure to affix it when
it is transported for repair, etc.

7
7
50
50
50
50
7
7
4
CDX-M8317ZT
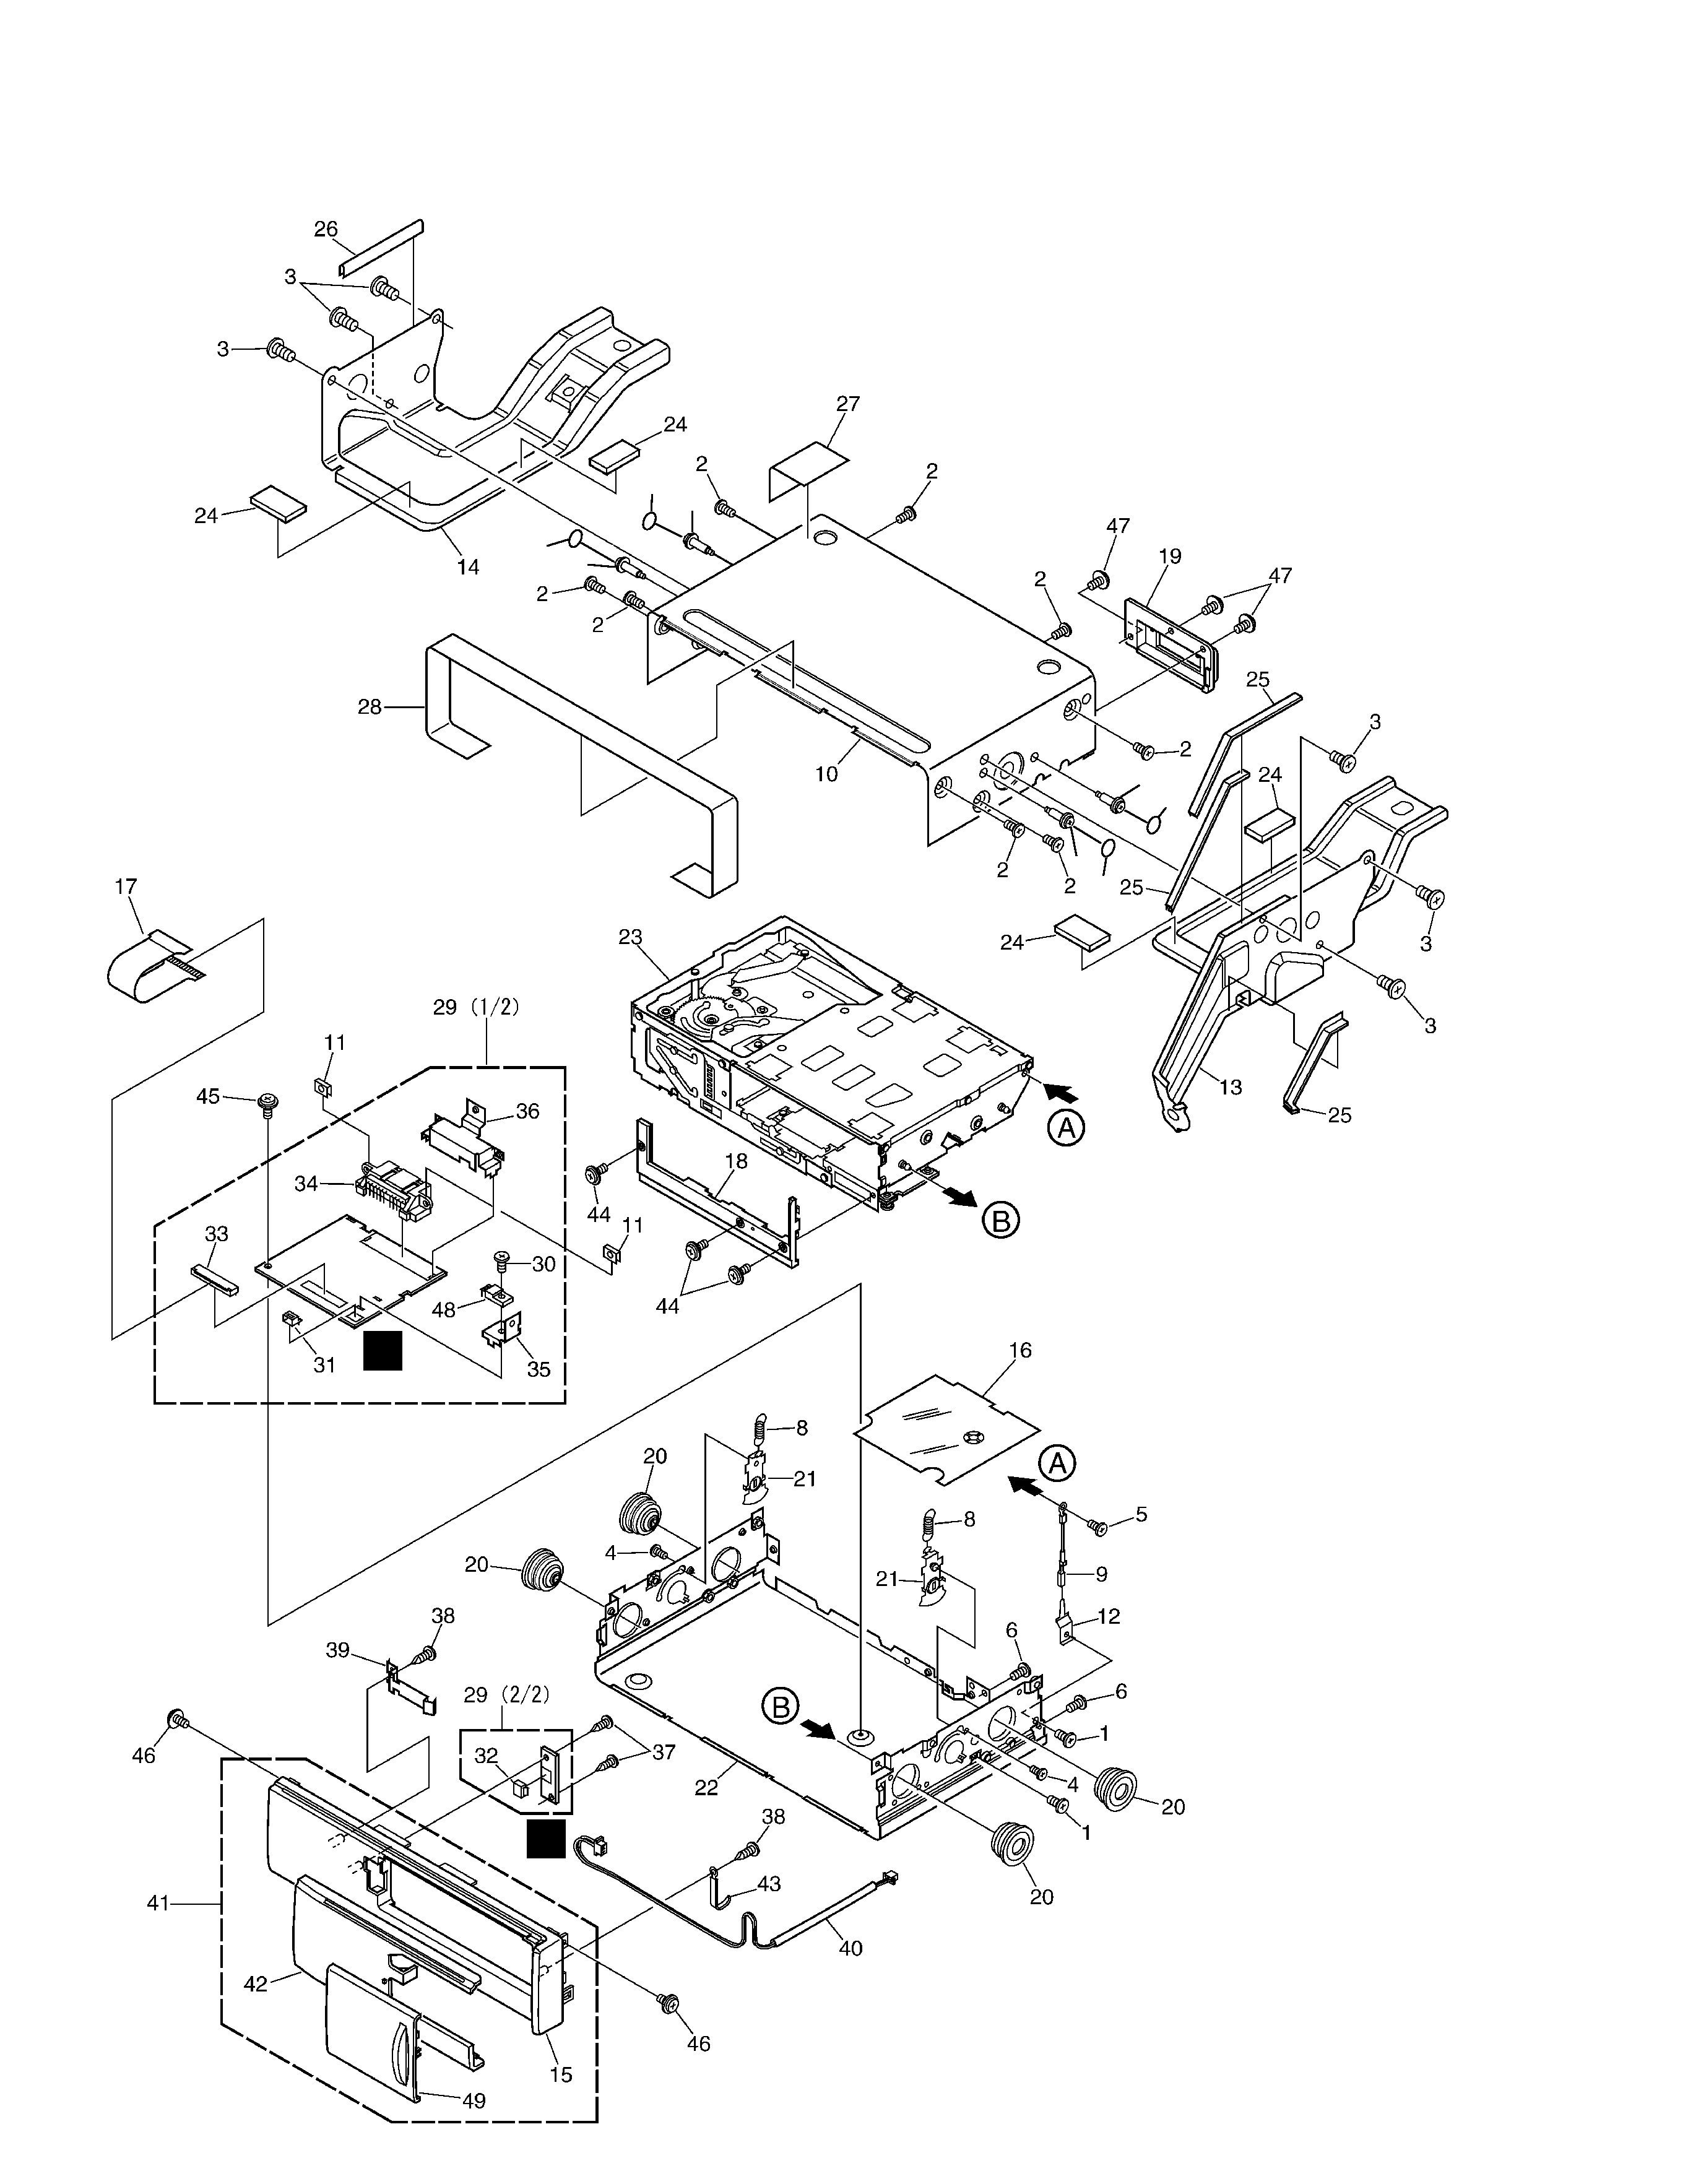
2. EXPLODED VIEWS AND PARTS LIST
2.1 EXTERIOR
E
F

5
CDX-M8317ZT
- EXTERIOR SECTION PARTS LIST
Mark No. Description
Part No.
Mark No. Description
Part No.
1 Screw
BMZ26P040FMC
2 Screw
BMZ30P040FZK
3 Screw
BMZ40P060FZK
4 Screw(M2x4)
CBA1176
5 Screw(M2x3)
CBA1077
6 Screw(M2.6x6)
CBA1014
7 Screw
CBA1353
8 Spring
CBH1874
9 Cord
CDH1312
10 Upper Case
CNB2720
11 Spacer
CNC5536
12 Holder
CNC9707
13 Bracket
CNC9758
14 Bracket
CNC9759
*
15 Grille
CNS4140
16 Insulator
CNM7812
17 PCB
CNP4402
18 Grille
CNS4055
19 Cover
CNS4153
20 Damper
CNV4502
21 Arm Unit
CXA8606
22 Lower Case Unit
CXB8133
23 CD Mechanism Module(C5) CXK4456
24 Cushion
HNM0097
25 Seal
HNM0098
26 Seal
HNM0099
27 Seal
HNM0100
28 Seal
HNM0101
29 Extension Unit
HWX2655
30 Screw
BMZ26P050FMC
31 Plug(CN1702)
CKS1050
32 Plug(CN1991)
CKS1050
33 Connector(CN1701)
CKS2233
34 Connector(CN1102)
CKS2398
35 Holder
CNC6672
36 Holder
CNC6784
37 Screw
BPZ20P060FMC
38 Screw
BPZ26P080FMC
39 Spring
CBL1320
40 Cord Assy
CDE4925
41 Grille Unit
CXA8769
42 Door
CAT1792
43 Clamper
HEF-102
44 Screw
IMS20P035FZK
45 Screw
IMS26P040FMC
46 Screw
IMS30P040FMC
47 Screw
IMS30P060FZK
48 Transistor(Q1952)
2SB1335A
*
49 Door
CAT1746
50 Seal
CNM7806
NOTE:
- Parts marked by "*" are generally unavailable because they are not in our Master Spare Parts List.
- Screws adjacent to
mark on the product are used for disassembly.
- For the applying amount of lubricants or glue, follow the instructions in this manual.
( In the case of no amount instructions, apply as you think it appropriate.)
