Thank you for purchasing the Onkyo Intelligent
Remote Controller. Please read this manual thoroughly
before making connections and plugging in the unit.
Following the instructions in this manual will enable you
to obtain optimum performance and listening enjoyment
from your new Intelligent Remote Controller. Please
retain this manual for future reference.
USR-5RF
Intelligent Remote Controller
Instruction
Manual
Quick Start
4
Before Using
7
Operations
11
Other Information
39
Contents

2
Care
From time to time you should wipe the front and
rear panels and the cabinet with a soft cloth. For
heavier dirt, dampen a soft cloth in a weak solu-
tion of mild detergent and water, wring it out
dry, and wipe off the dirt. Following this, dry
immediately with a clean cloth. Do not use rough
material, thinners, alcohol or other chemical sol-
vents or cloths since these could damage the fin-
ish or remove the panel lettering.
FCC Information for User
CAUTION:
The user changes or modifications not expressly
approved by the party responsible for compli-
ance could void the user's authority to operate
the equipment.
NOTE:
This equipment has been tested and found to
comply with the limits for a Class B digital de-
vice, pursuant to Part 15 of the FCC Rules. These
limits are designed to provide reasonable protec-
tion against harmful interference in a residential
installation. This equipment generates, uses and
can radiate radio frequency energy and, if not in-
stalled and used in accordance with the instruc-
tions, may cause harmful interference to radio
communications. However, there is no guarantee
that interference will not occur in a particular in-
stallation. If this equipment does cause harmful
interference to radio or television reception,
which can be determined by turning the equip-
ment off and on, the user is encouraged to try to
correct the interference by one or more of the fol-
lowing measures:
· Reorient or relocate the receiving antenna.
· Increase the separation between the equip-
ment and receiver.
· Connect the equipment into an outlet on a
circuit different from that to which the re-
ceiver is connected.
· Consult the dealer or an experienced radio/
TV technician for help.
NOTE:
If serial or parallel ports are configured, a fil-
tered/shielded serial or parallel cable is recom-
mended to minimize EMI and ensure FCC B
compliance.
This device complies with Part 15 of the FCC
rules. Operation is subject to the following two
conditions:
Precautions
(1) This device may not cause harmful interfer-
ence, and (2) this device must accept any inter-
ference received, including interference that may
cause undesired operation.
Changes or modifications not expressly ap-
proved by the party responsible for compliance
void the user's authority to operate the equip-
ment.
For Canadian models
NOTE: THIS CLASS B DIGITAL APPA-
RATUS COMPLIES WITH CANADIAN ICES-
003.
For models having a power cord with a polarized
plug:
Modèle pour les Canadien
REMARQUE:
CET
APPAREIL
NUMÉRIQUE DE LA CLASSE B EST CON-
FORME À LA NORME NMB-003 DU
CANADA.

3
Table of contents
Quick Start .................................................................................................................. 4
Quick Reference .......................................................................................................... 5
Introduction ................................................................................................................ 7
1. Intelligent remote controller .................................................................................................... 7
2. Charging the remote controller ................................................................................................ 9
Getting Started ............................................................................................................ 11
1. Activat the remote controller ................................................................................................... 11
2. Define the Brands of Your Devices ......................................................................................... 11
3. Select a Device ........................................................................................................................ 16
4. Operate a Device ..................................................................................................................... 17
5. Adjust the Settings ................................................................................................................... 19
Getting the Maximum out of it .................................................................................. 21
1. Introduction ............................................................................................................................. 21
2. Program Buttons ...................................................................................................................... 23
3. Label Buttons and Menu Items ................................................................................................ 25
4. Add and Move Devices ........................................................................................................... 27
5. Delete and restore .................................................................................................................... 28
6. Record Macros and Set Time .................................................................................................. 30
7. Using the remote controller with Radio Frequency ................................................................ 33
8. ChadEdit .................................................................................................................................. 37
Troubleshooting .......................................................................................................... 39
1. General Problems .................................................................................................................... 39
2. Programming Problems ........................................................................................................... 39
3. Recharging Problems .............................................................................................................. 40
FAQ .............................................................................................................................. 41
Overview of Symbols .................................................................................................. 42
Specifications ............................................................................................................... 43

4
Quick Start
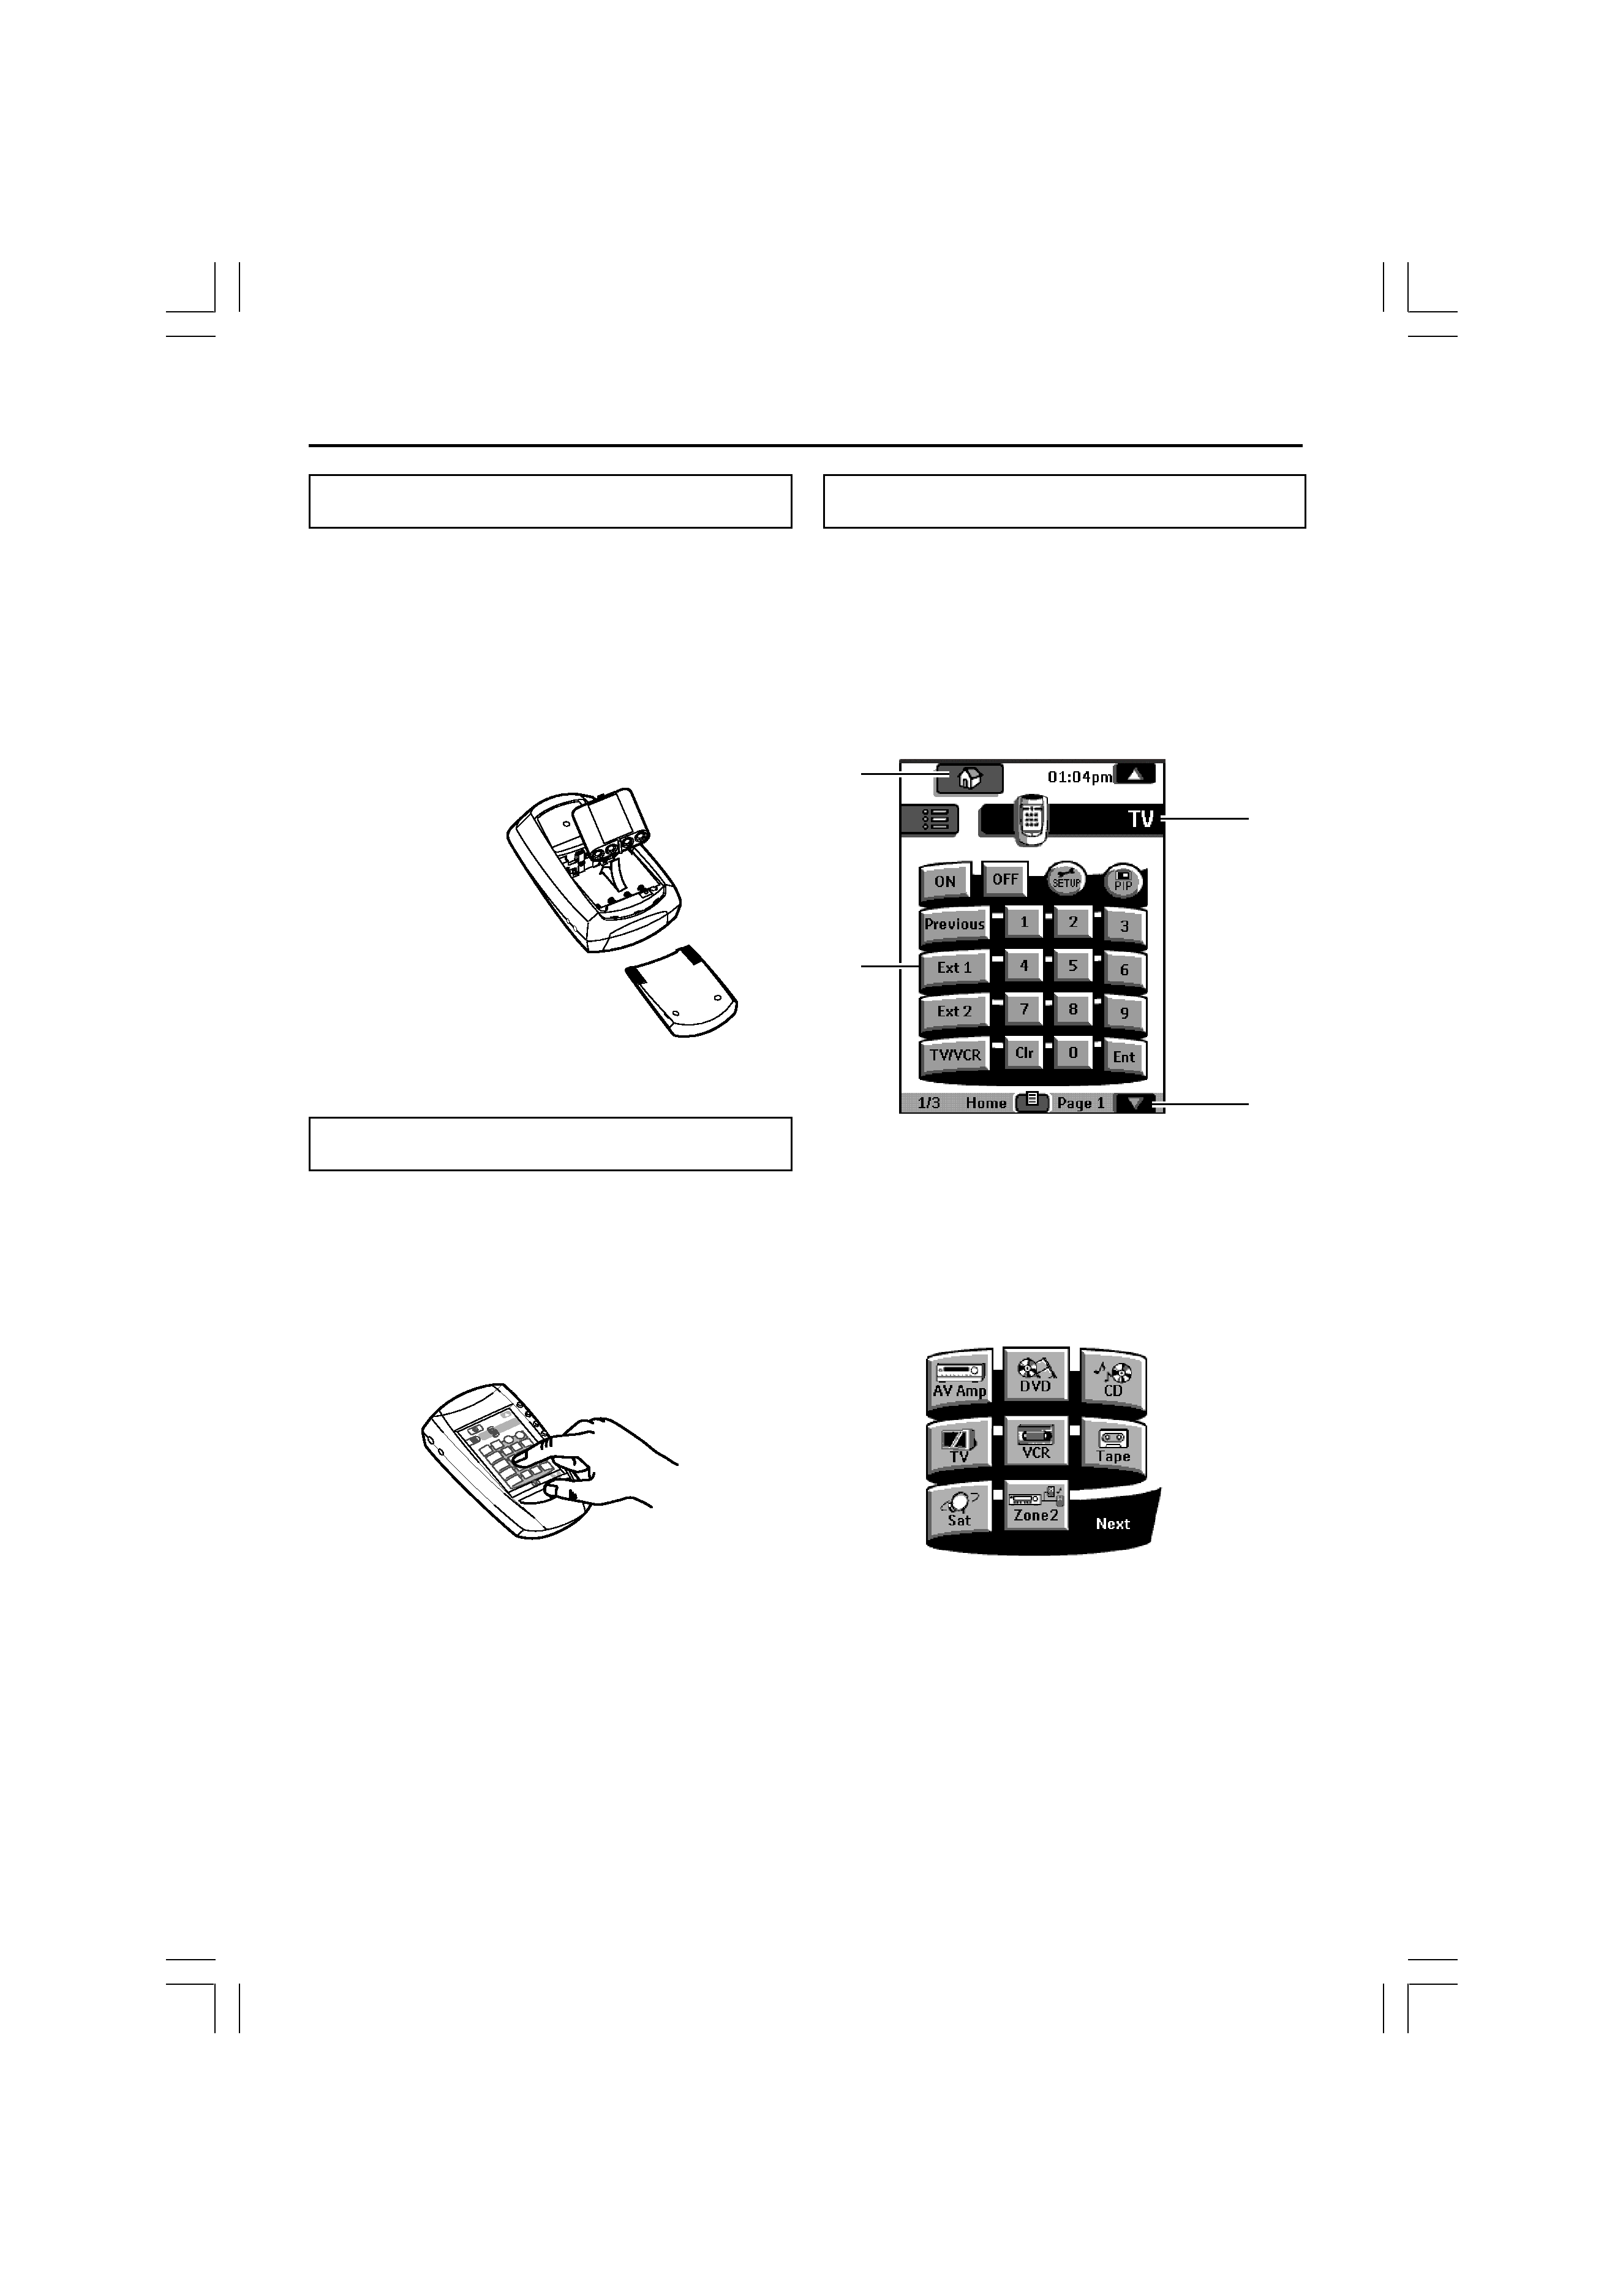
Insert batteries
Insert 4 AA batteries according to the picture on
the inside of the battery compartment.
or
Use a rechargeable battery pack (sold separately).
(Remove the AA battery tray first). Before using
the remote controller, be sure to charge the battery
completely according to the instructions in the
manual.
Touch the screen to start
To turn on the screen, tap it gently with your
finger.
To use the touchscreen, simply tap the images
you see on the screen.
There's no need to turn the screen off -- it shuts
off automatically to save power.
Battery compartment
cover slides off
Be sure to read the manual for important
information about care and use of the
touchscreen.
Operate your components
Fresh out of the box, the remote controller is
already set up to work with popular components
made by Onkyo. Programming the remote
controller is easy: Add components to the Device
menu as necessary. Then, program the commands
to the remote controller for the components. For
instructions, refer to the manual.
1. Home
If you get lost, you can always go Home menu
screen. Just tap Home.
2. Tap name of component to display
component's control panels.
1
2
4
3
3. You can also use the Device menu;
tap to display it.
4. Tap to scroll to next panel for this
component.

5
Quick reference
Quick reference
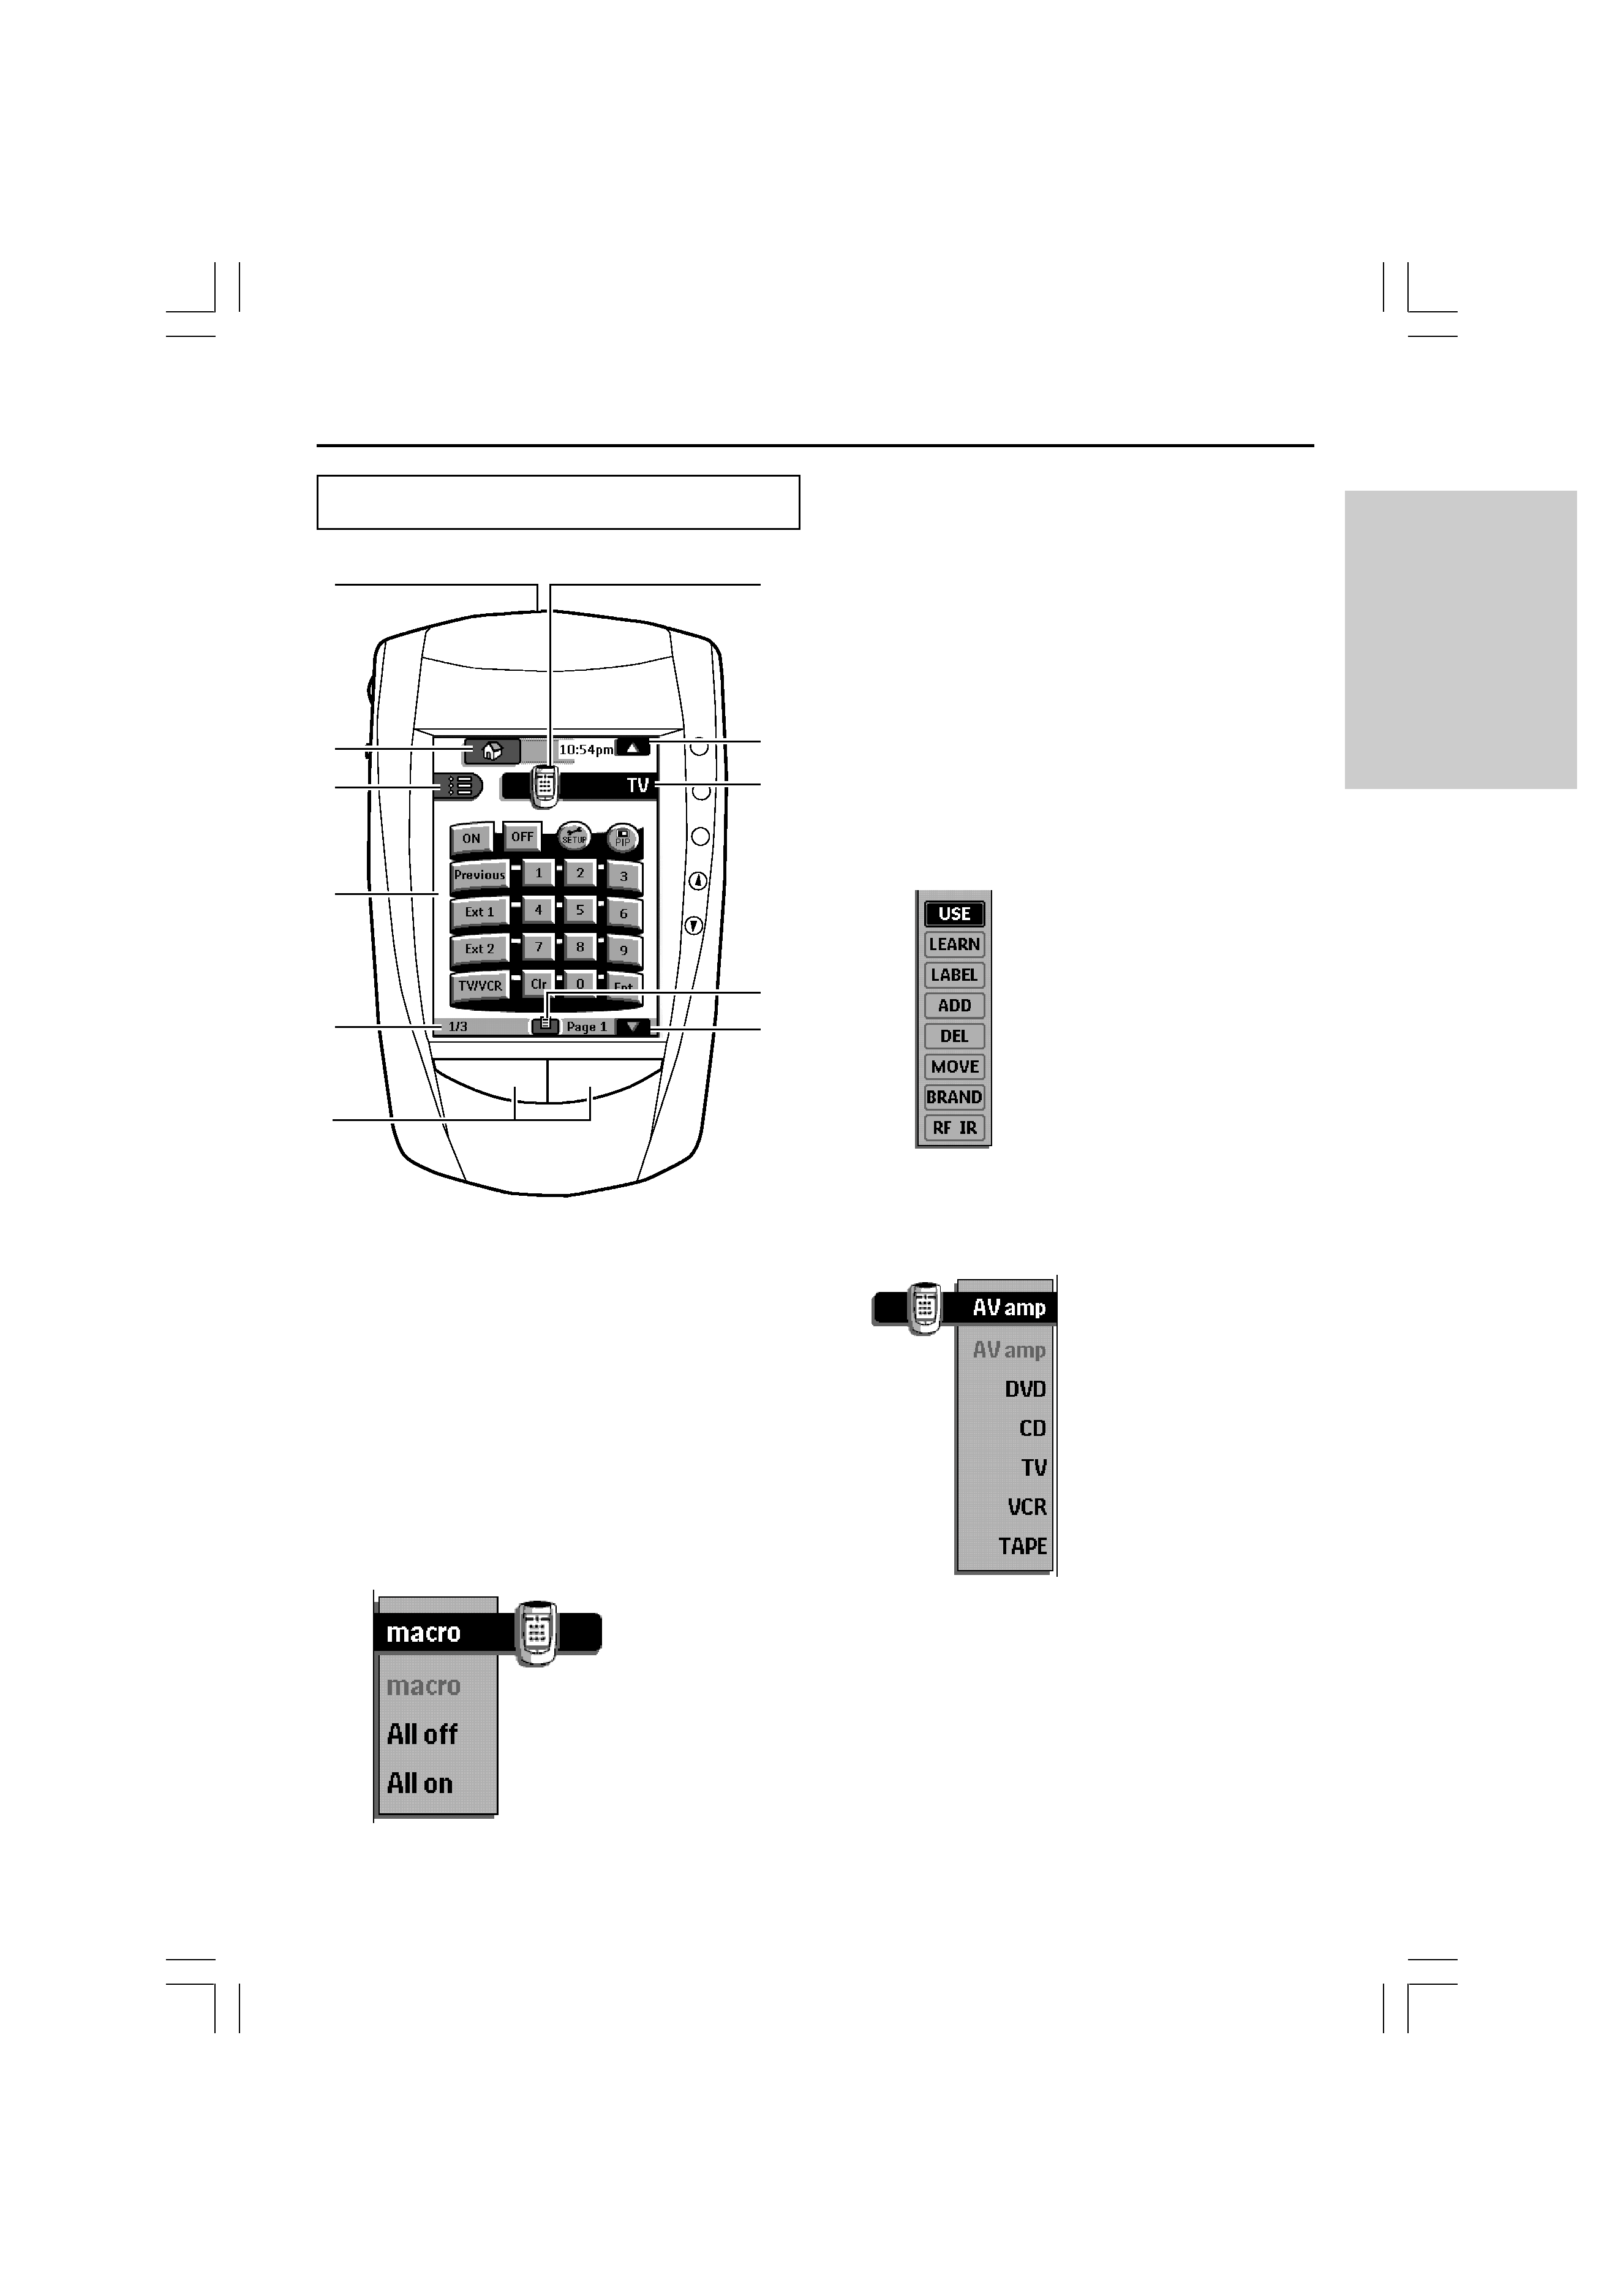
1. Sending eye (IR transmitter)/Learning
eye
Send commands to devices
For learning commands from other remote
controllers
2. Home
Easy access to all components
3. Macro menu
Execute stored lists of commands
4. Control panel
Tap buttons to send commands to components
+
CH
VOL
MUTE
CONT
+
LIGHT
1
2
3
4
5
6
7
8
9
10
11
5. Panel number
Shows what panel you're seeing.
6. Left and Right buttons
Activate the commands shown immediately
above the buttons
7. Scroll button
Display next Control Panel. Scroll buttons may
appear on left.
8. Mode menu
Customize the remote controller (see below)
9. Device menu
Open a component's control panels
10. Scroll button
Display previous control panel
11. Remote controller icon
Press and hold for 3 seconds to go to Setup
