En
Fr Es
English
Français
Español
5.1ch Home Theater Speaker Package
HTP-450
SKF-450F
FRONT SPEAKER
SKC-450C
CENTER SPEAKER
SKM-450S
SURROUND SPEAKER
SKW-450
POWERED SUBWOOFER
Instruction Manual
Thank you for purchasing an Onkyo home theater speaker package.
Please read this manual thoroughly before using your new speakers.
Following the instructions in this manual will enable you to obtain
optimum performance and listening enjoyment from your speaker
package.
Please retain this manual for future reference.
Manuel d'instructions
Merci d'avoir choisi cet ensemble Jeu d'enceintes cinéma d'Onkyo.
Veuillez lire attentivement ce manuel avant d'utiliser vos nouvelles
enceintes. Suivez toutes les consignes figurant dans ce manuel afin de
pouvoir profiter au maximum des fonctions et obtenir un plaisir d'écoute
optimal de votre nouvel ensemble d'enceintes.
Conservez ce manuel afin de pouvoir le consulter ultérieurement.
Manual de instrucciones
Muchas gracias por adquirir un equipo de altavoces home theater de
Onkyo. Lea este manual con atención antes de utilizar los altavoces.
Si sigue las instrucciones de este manual, obtendrá una reproducción y
una escucha óptimas de su equipo de altavoces.
Guarde este manual para futuras referencias.
Contents
Important Safety Instructions............En-2
Precautions.......................................En-3
Package Contents ............................En-3
Getting to know Your Speaker
Package ........................................En-4
Connecting the Speakers .................En-5
About Home Theater ........................En-6
Power Cord Precautions ...................En-7
Adjustment........................................En-7
Operating Precautions ......................En-7
Troubleshooting ................................En-8
Specifications ...................................En-9
Sommaire
Remarques importantes pour votre
sécurité...........................................Fr-2
Précautions........................................Fr-3
Contenu de l'emballage .....................Fr-3
Tour d'horizon de votre système
d'enceintes .....................................Fr-4
Connexion des enceintes ..................Fr-5
A propos du son cinéma à domicile...Fr-6
Précautions pour le câble
d'alimentation .................................Fr-7
Réglages ...........................................Fr-7
Précautions d'utilisation .....................Fr-7
En cas de problème...........................Fr-8
Fiche technique .................................Fr-9
Contenido
Instrucciones de seguridad
importantes ...................................Es-2
Precauciones....................................Es-3
Contenido del paquete .....................Es-3
Descripción del equipo de
altavoces .......................................Es-4
Conectar los altavoces .....................Es-5
Acerca del Home Theater.................Es-6
Precauciones para el cable de
alimentación ..................................Es-7
Ajustes..............................................Es-7
Precauciones de funcionamiento .....Es-7
Solucionar Problemas.......................Es-8
Especificaciones...............................Es-9

En-
2
Important Safety Instructions
1. Read these instructions.
2. Keep these instructions.
3. Heed all warnings.
4. Follow all instructions.
5. Do not use this apparatus near water.
6. Clean only with dry cloth.
7. Do not block any ventilation openings. Install in
accordance with the manufacturer's instructions.
8. Do not install near any heat sources such as radia-
tors, heat registers, stoves, or other apparatus
(including amplifiers) that produce heat.
9. Do not defeat the safety purpose of the polarized or
grounding-type plug. A polarized plug has two
blades with one wider than the other. A grounding
type plug has two blades and a third grounding
prong. The wide blade or the third prong are pro-
vided for your safety. If the provided plug does not
fit into your outlet, consult an electrician for
replacement of the obsolete outlet.
10. Protect the power cord from being walked on or
pinched particularly at plugs, convenience recepta-
cles, and the point where they exit from the appara-
tus.
11. Only use attachments/accessories specified by the
manufacturer.
12. Use only with the cart, stand,
tripod, bracket, or table spec-
ified by the manufacturer, or
sold
with
the
apparatus.
When a cart is used, use cau-
tion when moving the cart/
apparatus
combination
to
avoid injury from tip-over.
13. Unplug this apparatus during lightning storms or
when unused for long periods of time.
14. Refer all servicing to qualified service personnel.
Servicing is required when the apparatus has been
damaged in any way, such as power-supply cord or
plug is damaged, liquid has been spilled or objects
have fallen into the apparatus, the apparatus has
been exposed to rain or moisture, does not operate
normally, or has been dropped.
15. Damage Requiring Service
Unplug the apparatus from the wall outlet and refer
servicing to qualified service personnel under the
following conditions:
A. When the power-supply cord or plug is damaged,
B. If liquid has been spilled, or objects have fallen
into the apparatus,
C. If the apparatus has been exposed to rain or
water,
D. If the apparatus does not operate normally by
following the operating instructions. Adjust only
those controls that are covered by the operating
instructions as an improper adjustment of other
controls may result in damage and will often
require extensive work by a qualified technician
to restore the apparatus to its normal operation,
E. If the apparatus has been dropped or damaged in
any way, and
F. When the apparatus exhibits a distinct change in
performance this indicates a need for service.
16. Object and Liquid Entry
Never push objects of any kind into the apparatus
through openings as they may touch dangerous volt-
age points or short-out parts that could result in a
fire or electric shock.
The apparatus shall not be exposed to dripping or
splashing and no objects filled with liquids, such as
vases shall be placed on the apparatus.
Don't put candles or other burning objects on top of
this unit.
17. Batteries
Always consider the environmental issues and fol-
low local regulations when disposing of batteries.
18. If you install the apparatus in a built-in installation,
such as a bookcase or rack, ensure that there is ade-
quate ventilation.
Leave 20 cm (8") of free space at the top and sides
and 10 cm (4") at the rear. The rear edge of the shelf
or board above the apparatus shall be set 10 cm (4")
away from the rear panel or wall, creating a flue-like
gap for warm air to escape.
WARNING:
TO REDUCE THE RISK OF FIRE OR ELECTRIC
SHOCK, DO NOT EXPOSE THIS APPARATUS
TO RAIN OR MOISTURE.
CAUTION:
TO REDUCE THE RISK OF ELECTRIC SHOCK,
DO NOT REMOVE COVER (OR BACK). NO
USER-SERVICEABLE PARTS INSIDE. REFER
SERVICING
TO
QUALIFIED
SERVICE
PERSONNEL.
The lightning flash with arrowhead symbol, within an
equilateral triangle, is intended to alert the user to the
presence of uninsulated "dangerous voltage" within
the product's enclosure that may be of sufficient
magnitude to constitute a risk of electric shock to
persons.
The exclamation point within an equilateral triangle is
intended to alert the user to the presence of important
operating and maintenance (servicing) instructions in
the literature accompanying the appliance.
WARNING
RISK OF ELECTRIC SHOCK
DO NOT OPEN
RISQUE DE CHOC ELECTRIQUE
NE PAS
OUVRIR
AVIS
PORTABLE CART WARNING
S3125A

En-
3
Precautions
1. AC Fuse
The fuse is located inside the chassis and is not userser-
viceable. If power does not come on, contact your Onkyo
authorized service station.
2. Care
From time to time you should wipe off the cabinet with
a soft cloth. For heavier dirt, dampen a soft cloth in a
weak solution of mild detergent and water, wring it out
dry, and wipe off the dirt. Following this, dry immedi-
ately with a clean cloth. Do not use rough material, thin-
ners, alcohol or other chemical solvents or cloths since
these may damage the finish or remove the panel letter-
ing.
Use a vacuum cleaner to remove dust from hard-to-reach
grilles.
3. Power
WARNING
BEFORE PLUGGING IN THE UNIT FOR THE
FIRST TIME, READ THE FOLLOWING SECTION
CAREFULLY.
The voltage of the available power supply differs
according to country or region. Be sure that the power
supply voltage of the area where this unit will be used
meets the required voltage (e.g., AC 120 V, 60 Hz) writ-
ten on the rear panel.
Auto standby function does not fully shutdown the
SKW-450. If you do not intend to use the SKW-450,
remove the power cord from the AC outlet.
For Canadian models
For models having a power cord with a polarized plug:
CAUTION: TO PREVENT ELECTRIC SHOCK,
MATCH WIDE BLADE OF PLUG TO WIDE SLOT,
FULLY INSERT.
Modèle pour les Canadien
Sur les modèles dont la fiche est polarisee:
ATTENTION: POUR ÉVITER LES CHOCS ÉLEC-
TRIQUES, INTRODUIRE LA LAME LA PLUS
LARGE DE LA FICHE DANS LA BORNE CORRE-
SPONDANTE DE LA PRISE ET POUSSER
JUSQU'AU FOND.
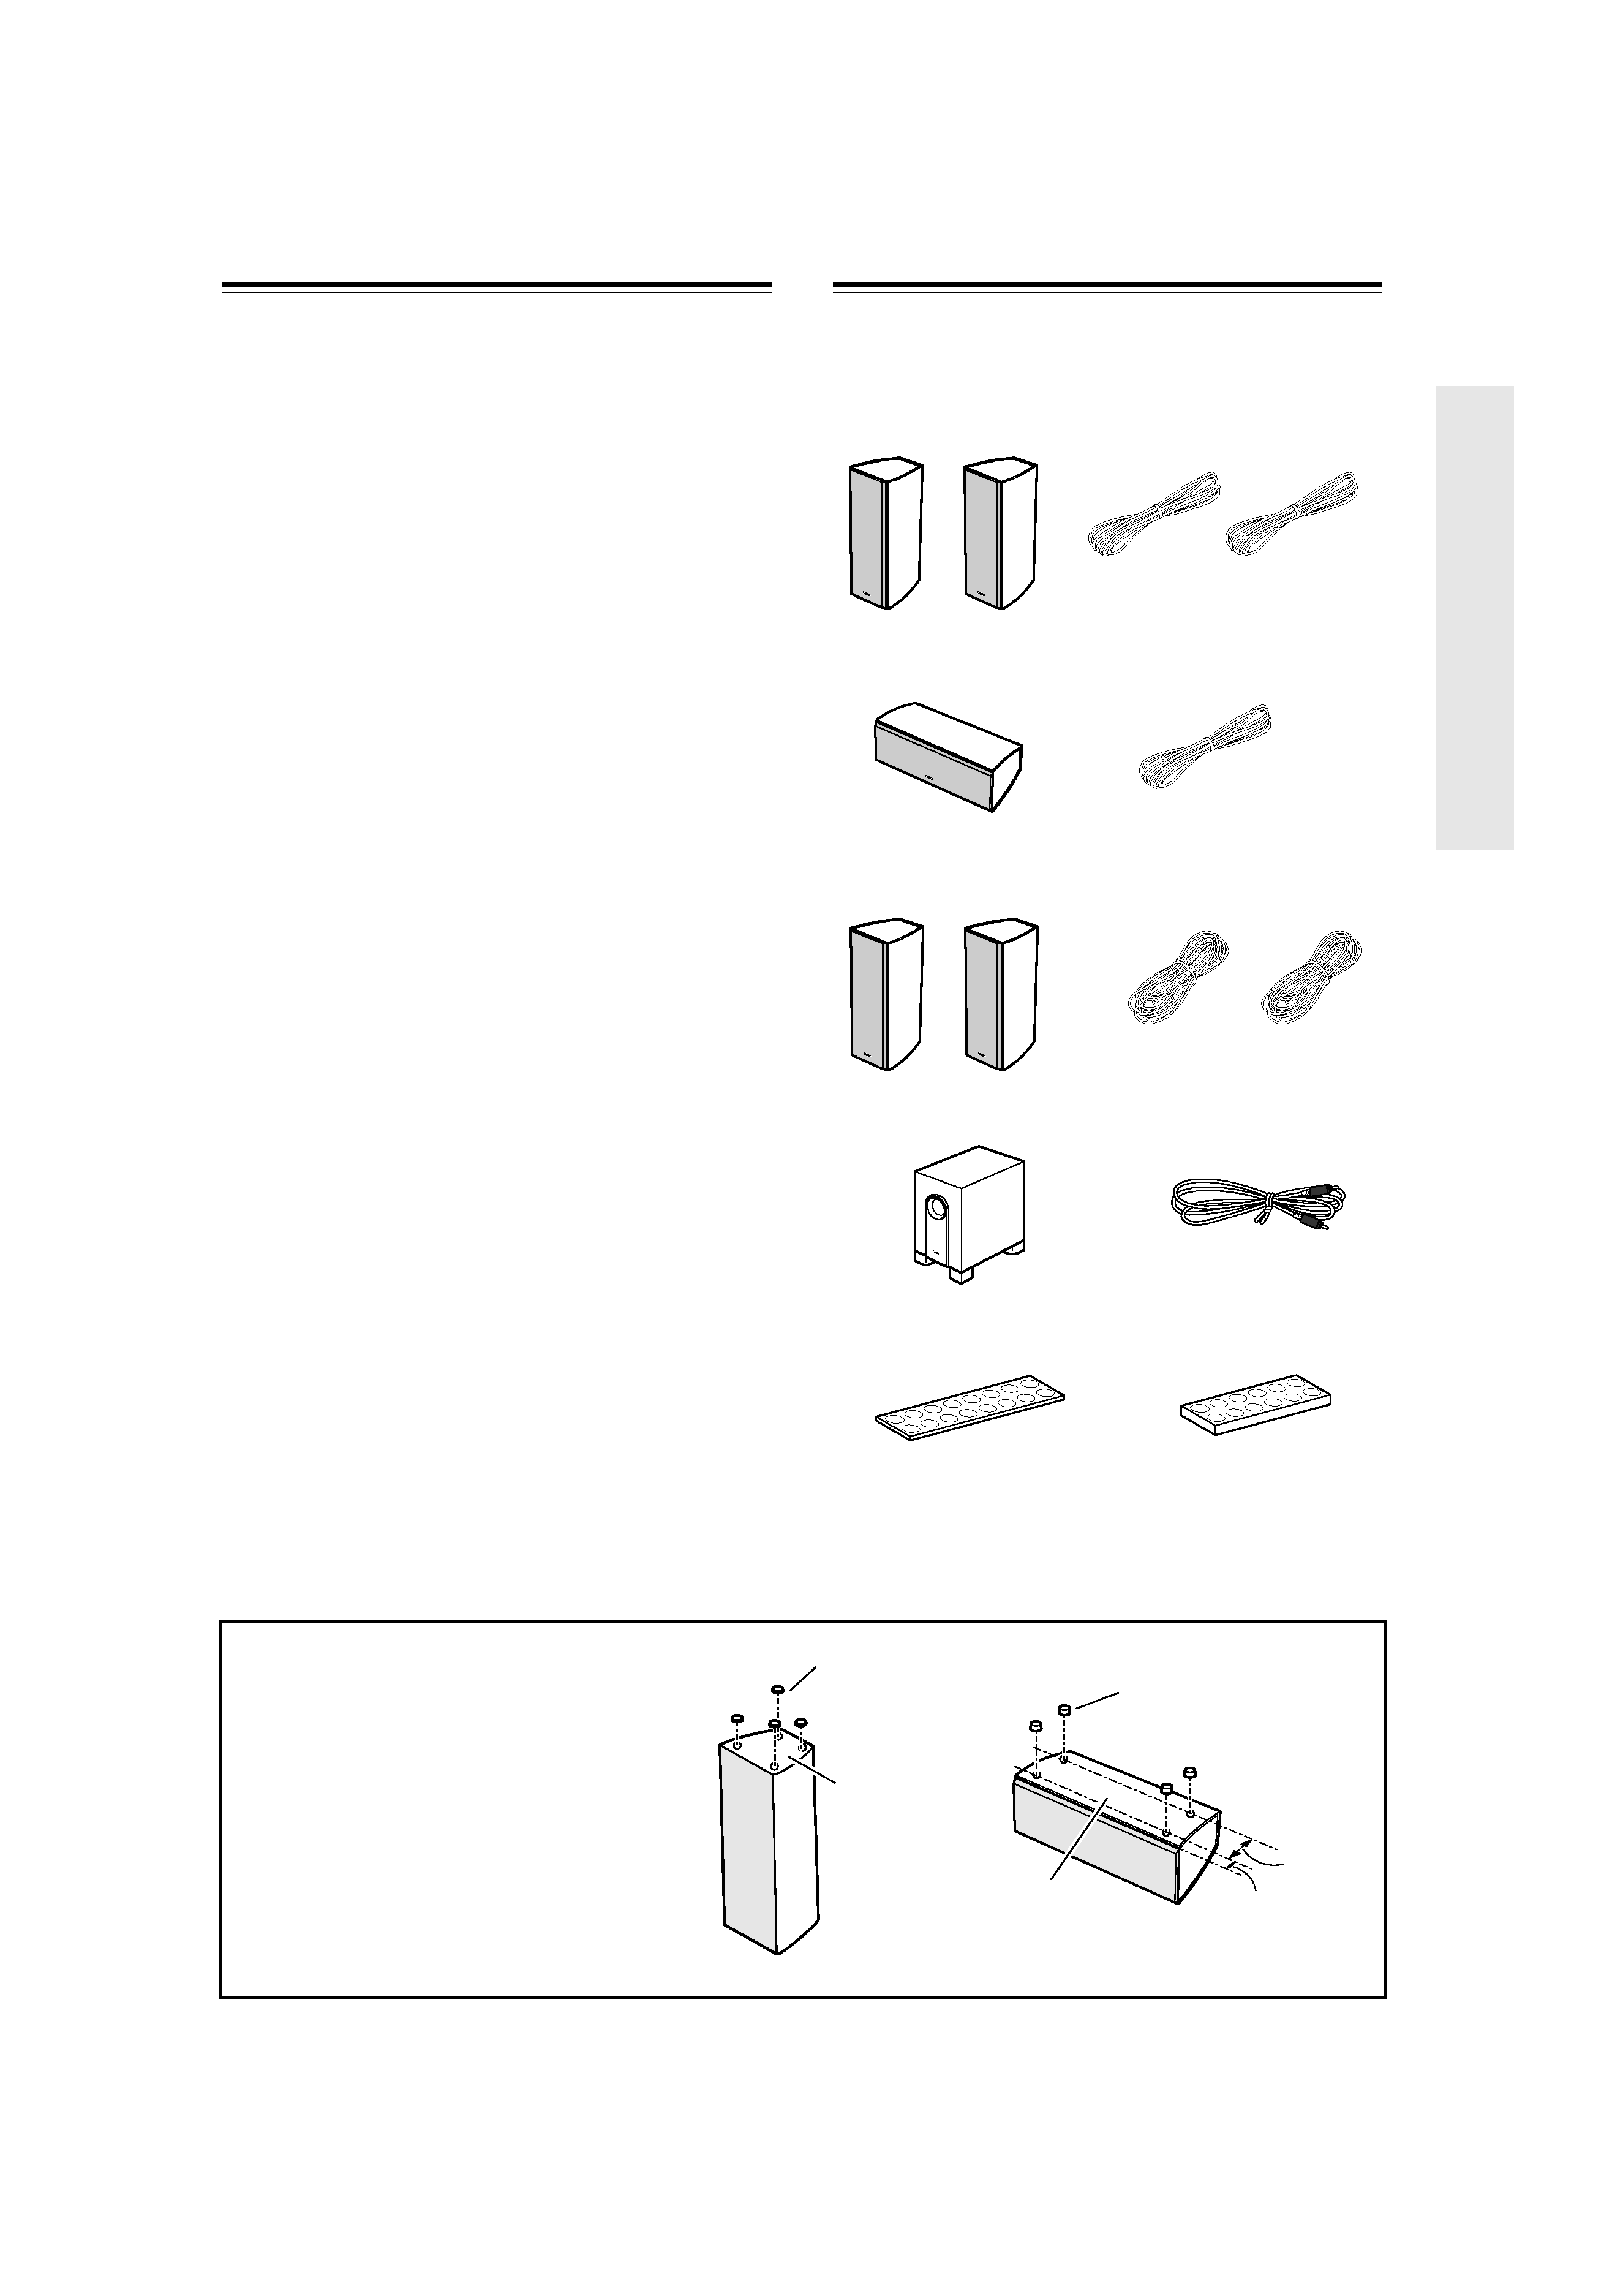
Package Contents
Make sure your box contains all of the items below. If
anything is missing, contact the nearest Onkyo dealer.
The alphabet displayed at the end of the product name
found in catalogs and on package represents the color of
the system. Though the color varies, the specifications
and operations are the same.
· Front speakers
(SKF-450F)
· Speaker cable for front
speakers 11 ft. (3.5 m)
(Red)
(White)
· Center speaker
(SKC-450C)
· Speaker cable for center
speaker 11 ft. (3.5 m)
(Green)
· Surround speakers
(SKM-450S)
· Speaker cables for surround
speakers 30 ft. (9 m)
(Blue)
(Gray)
· Subwoofer (SKW-450)
· RCA cable for sub-
woofer connection
· Thin rubber stoppers
(16)
· Thick rubber stoppers
(12)
Using the Rubber Stoppers for a
More Stable Platform
We recommend using the provided rubber
stoppers to achieve the best possible
sound from your speakers. The rubber
stoppers prevent the speakers from mov-
ing, providing a more stable platform.
Use thick stoppers for the center speaker,
and thin stoppers for the other speakers.
1/2"
(12 mm)
2-3/16"
(55 mm)
Thin rubber
stoppers
Bottom of the
SKF-450F/
SKM-450S
Thick rubber
stoppers
Bottom of the
SKC-450C

En-
4
Getting to know Your Speaker Package
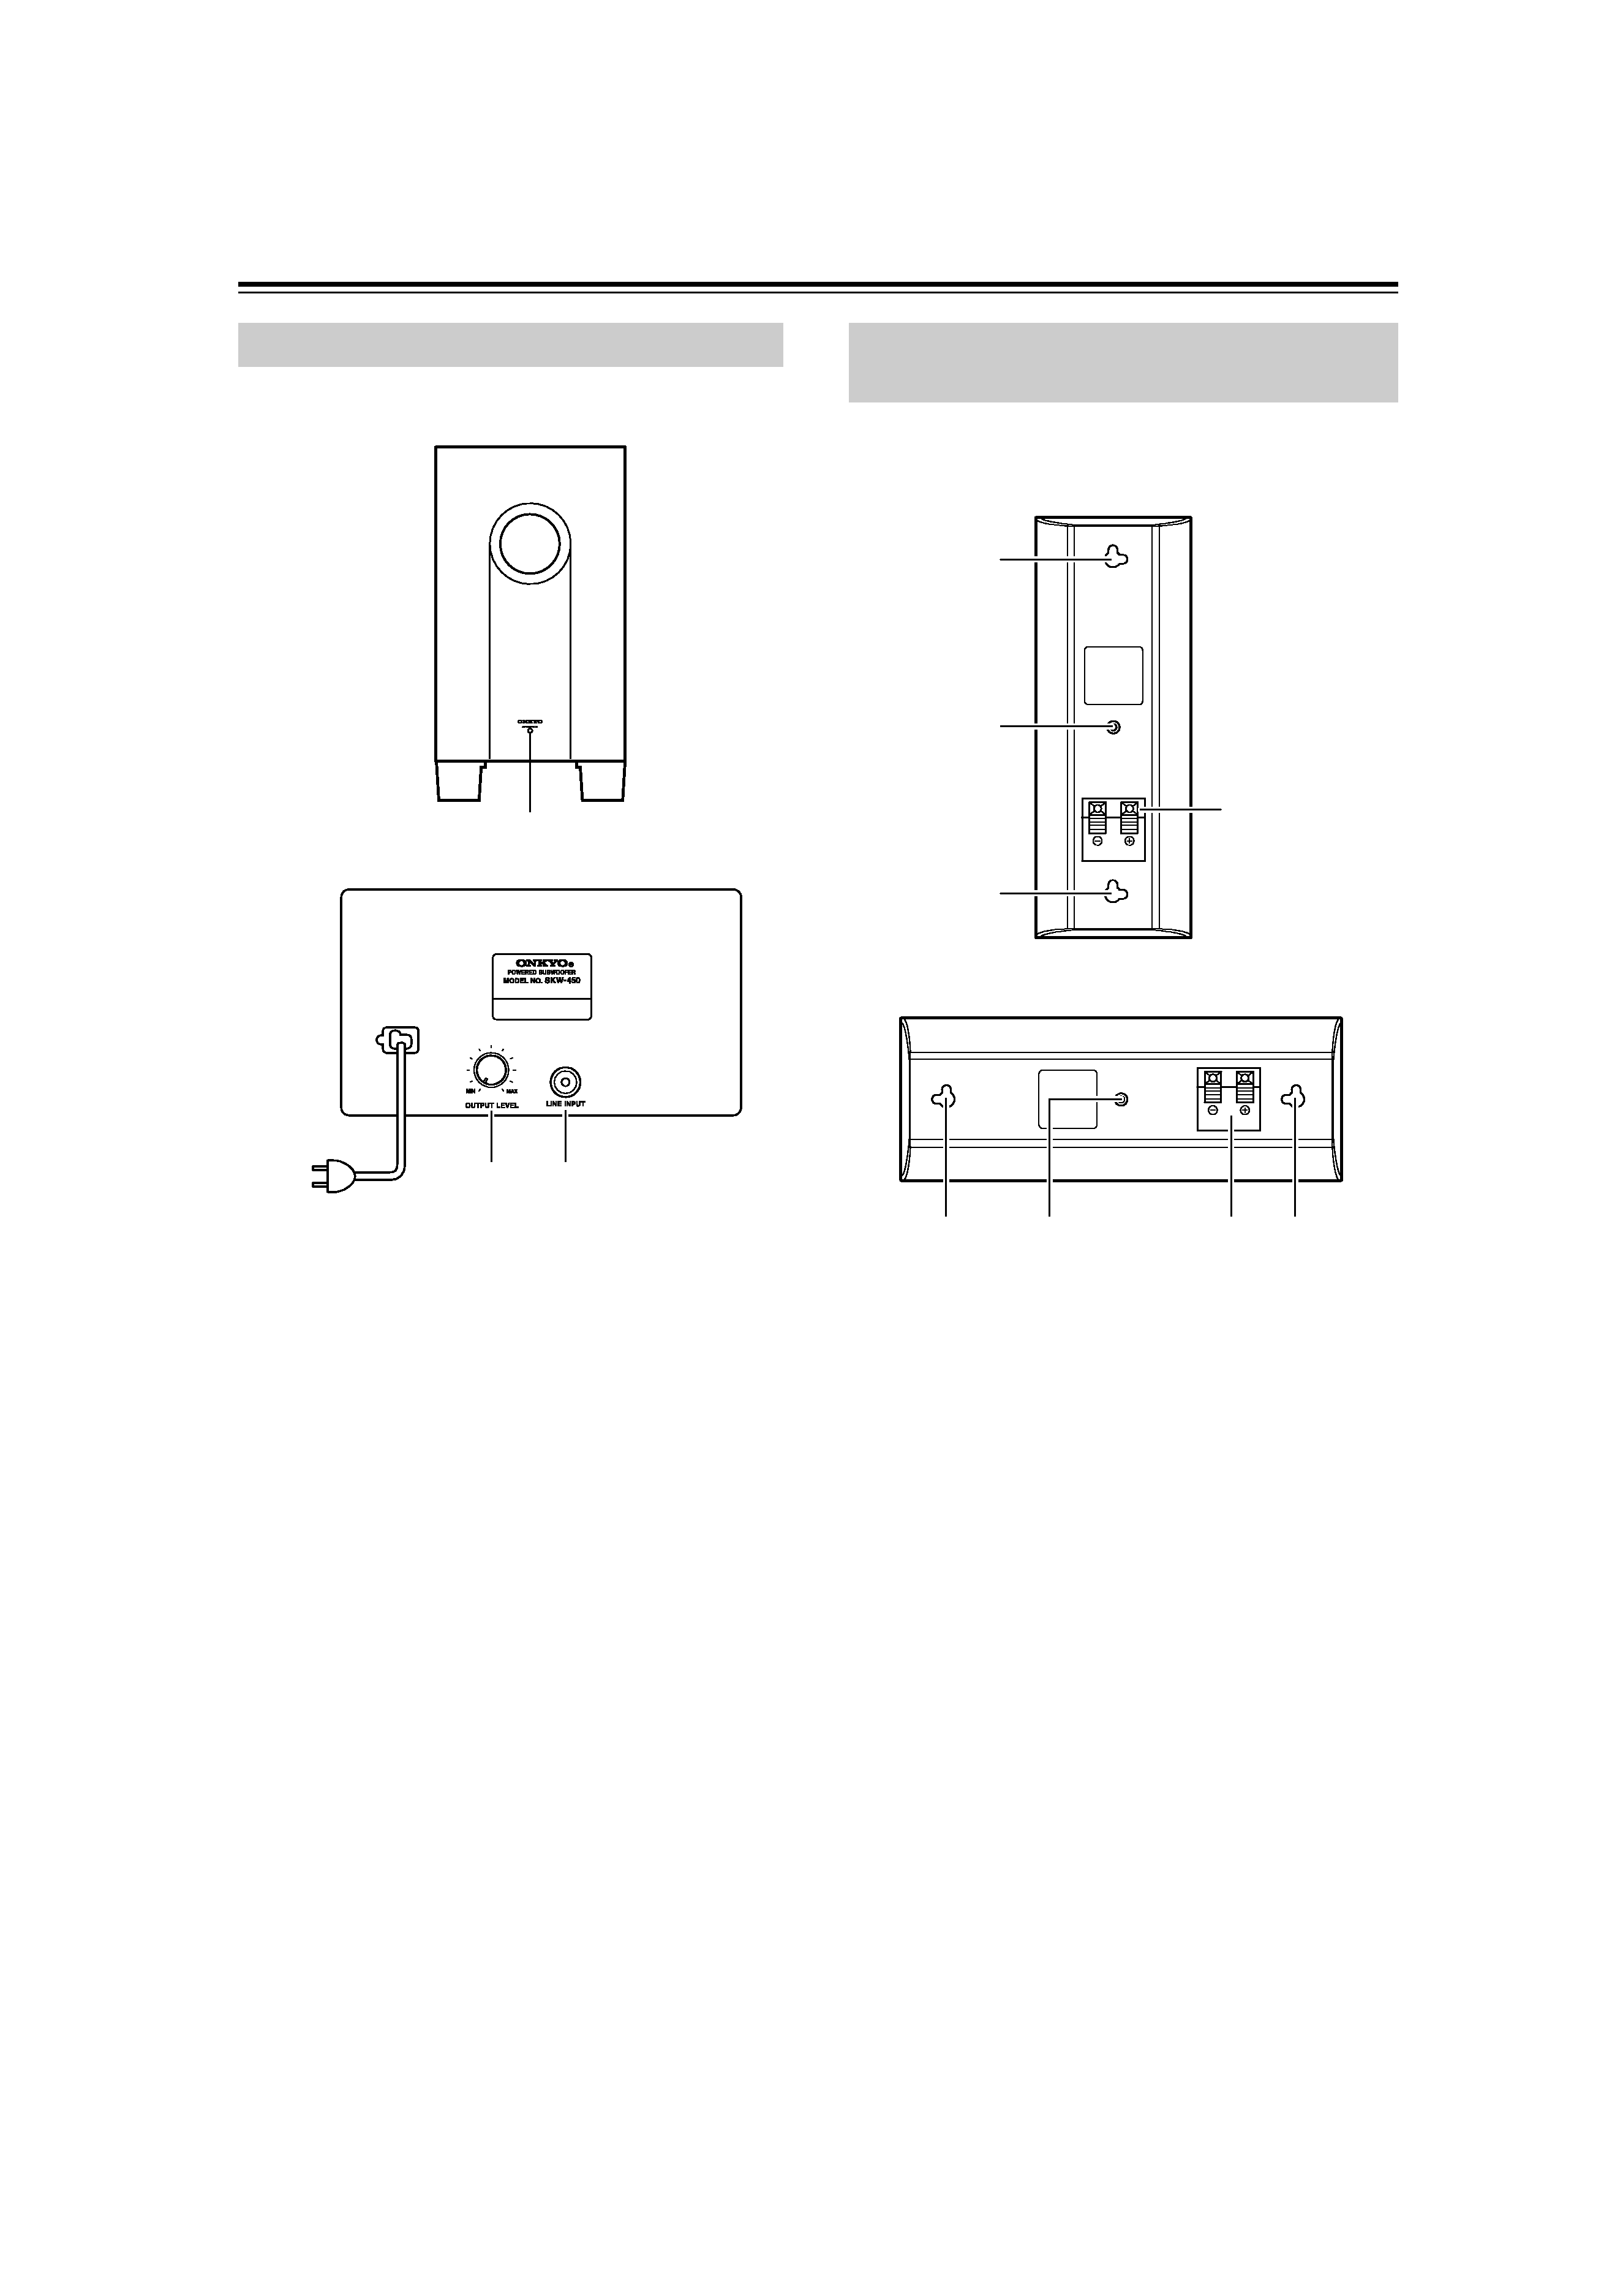
A STANDBY/ON indicator
Red:
Subwoofer in standby mode
Green: Subwoofer on
With the Auto Standby function, the SKW-450
automatically turns on when an input signal is
detected in Standby mode. When there's no input
signal for a while, the SKW-450 automatically
enters Standby mode.
B OUTPUT LEVEL control
This control is used to adjust the volume of the sub-
woofer.
C LINE INPUT
This RCA input should be connected to the sub-
woofer pre out on your AV receiver with supplied
RCA cable.
Note:
The Auto Standby function turns the subwoofer on when
the input signal exceeds a certain level. If the Auto
Standby function does not work reliably, try slightly
increasing or decreasing the subwoofer output level on
your AV receiver.
A Speaker terminals
These push terminals are for connecting the speaker
to the AV receiver. with the supplied speaker cables.
The supplied speaker cables are color-coded for
easy identification. Simply connect each cable to the
same-colored positive speaker terminal.
B Keyhole slots
These keyhole slots can be used to wall-mount the
speaker.
C Speaker mount/bracket inserts
These threaded inserts can be used to attach the
speaker to a speaker mount or bracket.
Note:
Use commercially available machine screws to
attach the speaker to a speaker mount or bracket.
North American models require 1/4-inch screws.
Other models require M5 (5 mm) screws.
Caution:
The front grilles are not designed to be removed so
do not attempt to remove them forcibly, as this will
damage them.
Subwoofer (SKW-450)
23
1
Rear
To AC outlet
Front
Front, Center & Surround speakers
(SKF-450F, SKC-450C, SKM-450S)
3
2
2
1
3
1
22
Rear
SKF-450F
SKM-450S
SKC-450C

En-
5
Connecting the Speakers
Read the following before connecting your speakers:
·Turn off the AV receiver before making any connec-
tions.
· Pay close attention to speaker wir-
ing polarity. Connect positive (+)
terminals to only positive (+) ter-
minals, and negative () terminals
to only negative () terminals. If
the speakers are wired incorrectly,
the sound will be out of phase and
will sound unnatural.
· Be careful not to short the positive and negative wires.
Doing so may damage the AV receiver.
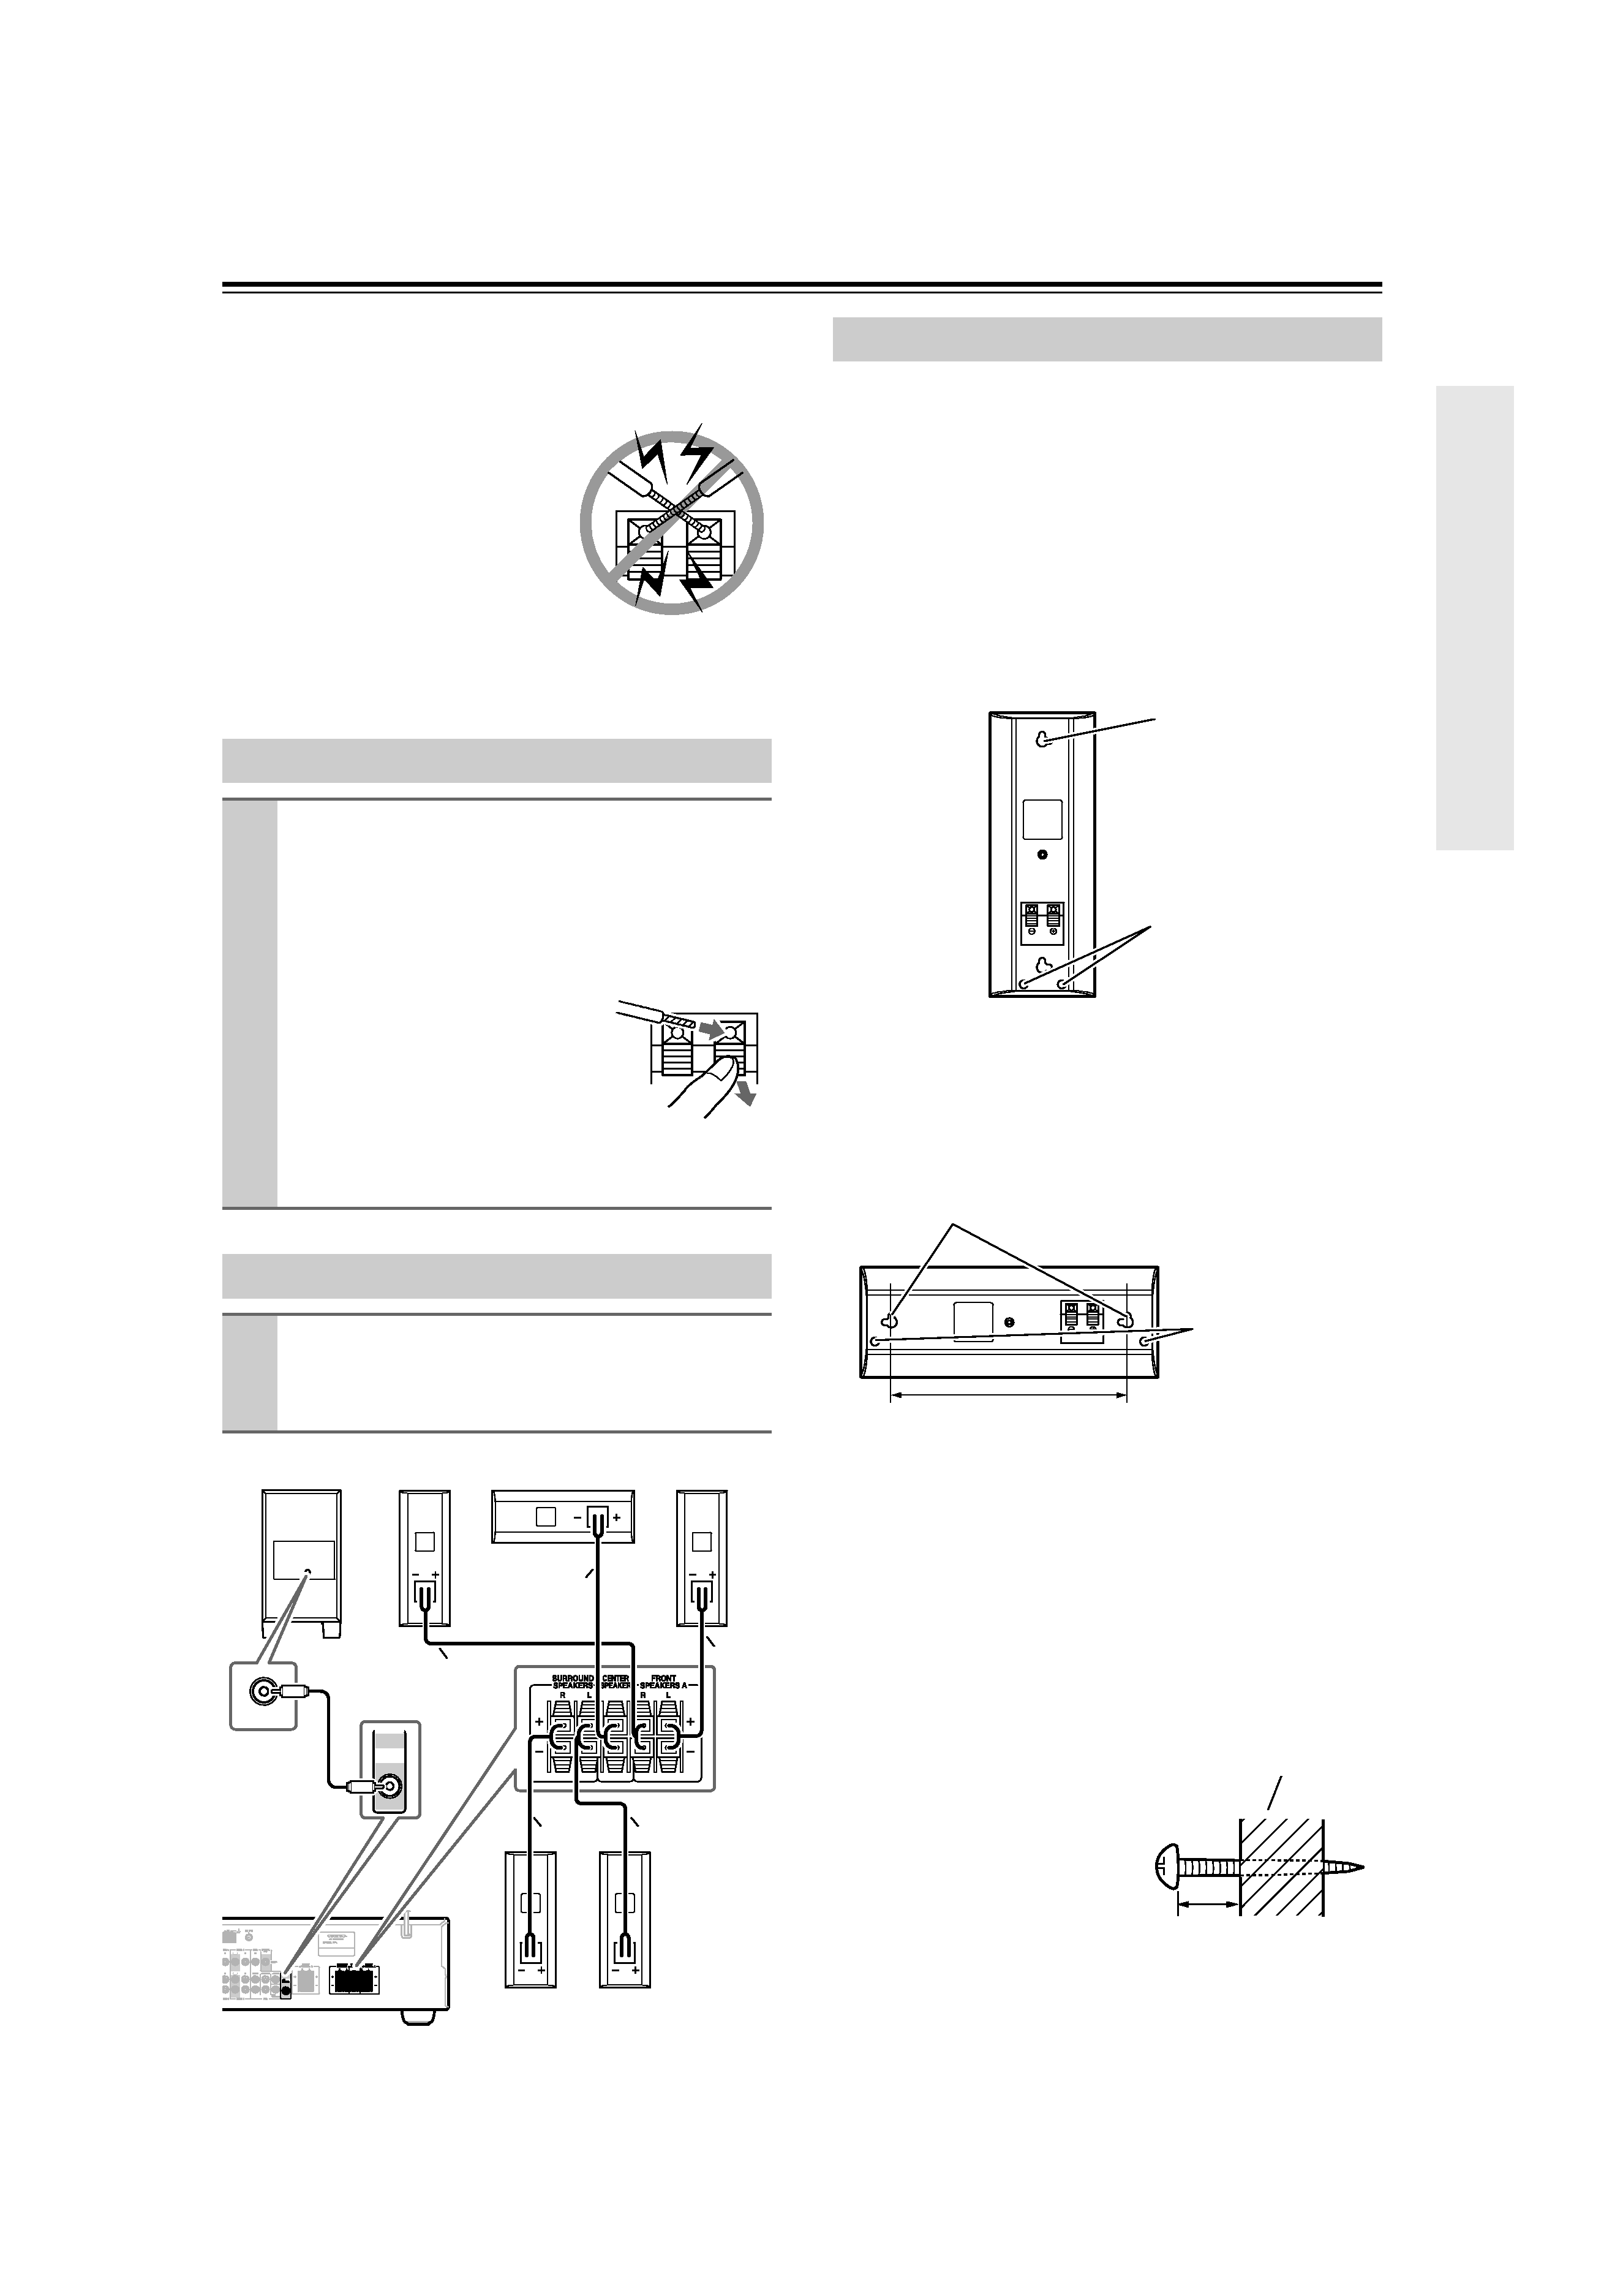
The speakers can easily be wall mounted by using the
keyhole slots. To prevent the speaker from vibrating
against the wall, attach two of the supplied thick rubber
stoppers to the rear of each speaker.
To mount the front or surround speakers vertically, use
the keyhole slot shown to hang each speaker on a screw
that's securely screwed into the wall.
Front speaker (SKF-450F)
Surround speaker (SKM-450S)
To mount the center speaker horizontally, use the two
keyhole slots shown to hang each speaker on two screws
that are securely screwed into the wall.
Center speaker (SKC-450C)
Caution:
A mounting screw's ability to support a speaker depends
on how well it's anchored to the wall. If you have hollow
walls, screw each mounting screw into a stud. If there are
no studs, or the walls are solid, use suitable wall anchors.
Use screws with a head diameter of 5/16" (9 mm) or less
and a shank diameter of 1/8" (4 mm) or less. With hollow
walls, use a cable/pipe detector to check for any power
cables or water pipes before making any holes.
Leave a gap of between 3/16"
(5 mm) and 7/16" (10 mm)
between the wall and the base
of the screw head, as shown.
(We recommend that you
consult a home installation
professional.)
Connecting the Speaker Cables
1 Use the supplied cables to connect each
speaker's input terminals to the corre-
sponding speaker output terminals on the
AV receiver.
Match the color of each cable to the correspond-
ing speaker terminal.
To make a connection, while
pressing the terminal lever,
insert the wire into the hole, and
then release the lever.
Make sure that the terminals are
gripping the bare wires, not the
insulation.
Connecting the Subwoofer
1 Using the supplied RCA cable, connect
the subwoofer's LINE INPUT to your AV
receiver's SUBWOOFER PRE OUT.
PRE OUT
SUB
WOOFER
LINE INPUT
Red
Green
White
Blue
Gray
Subwoofer
Front Right
Center
Front Left
Surround
Right
Surround
Left
Wall Mounting
Keyhole slot for
wall mounting
Thick rubber stoppers
8-9/16" (217 mm)
Keyhole slots for wall
mounting
Thick rubber
stoppers
3/16" 7/16"
(5 mm) (10 mm)
Wall
