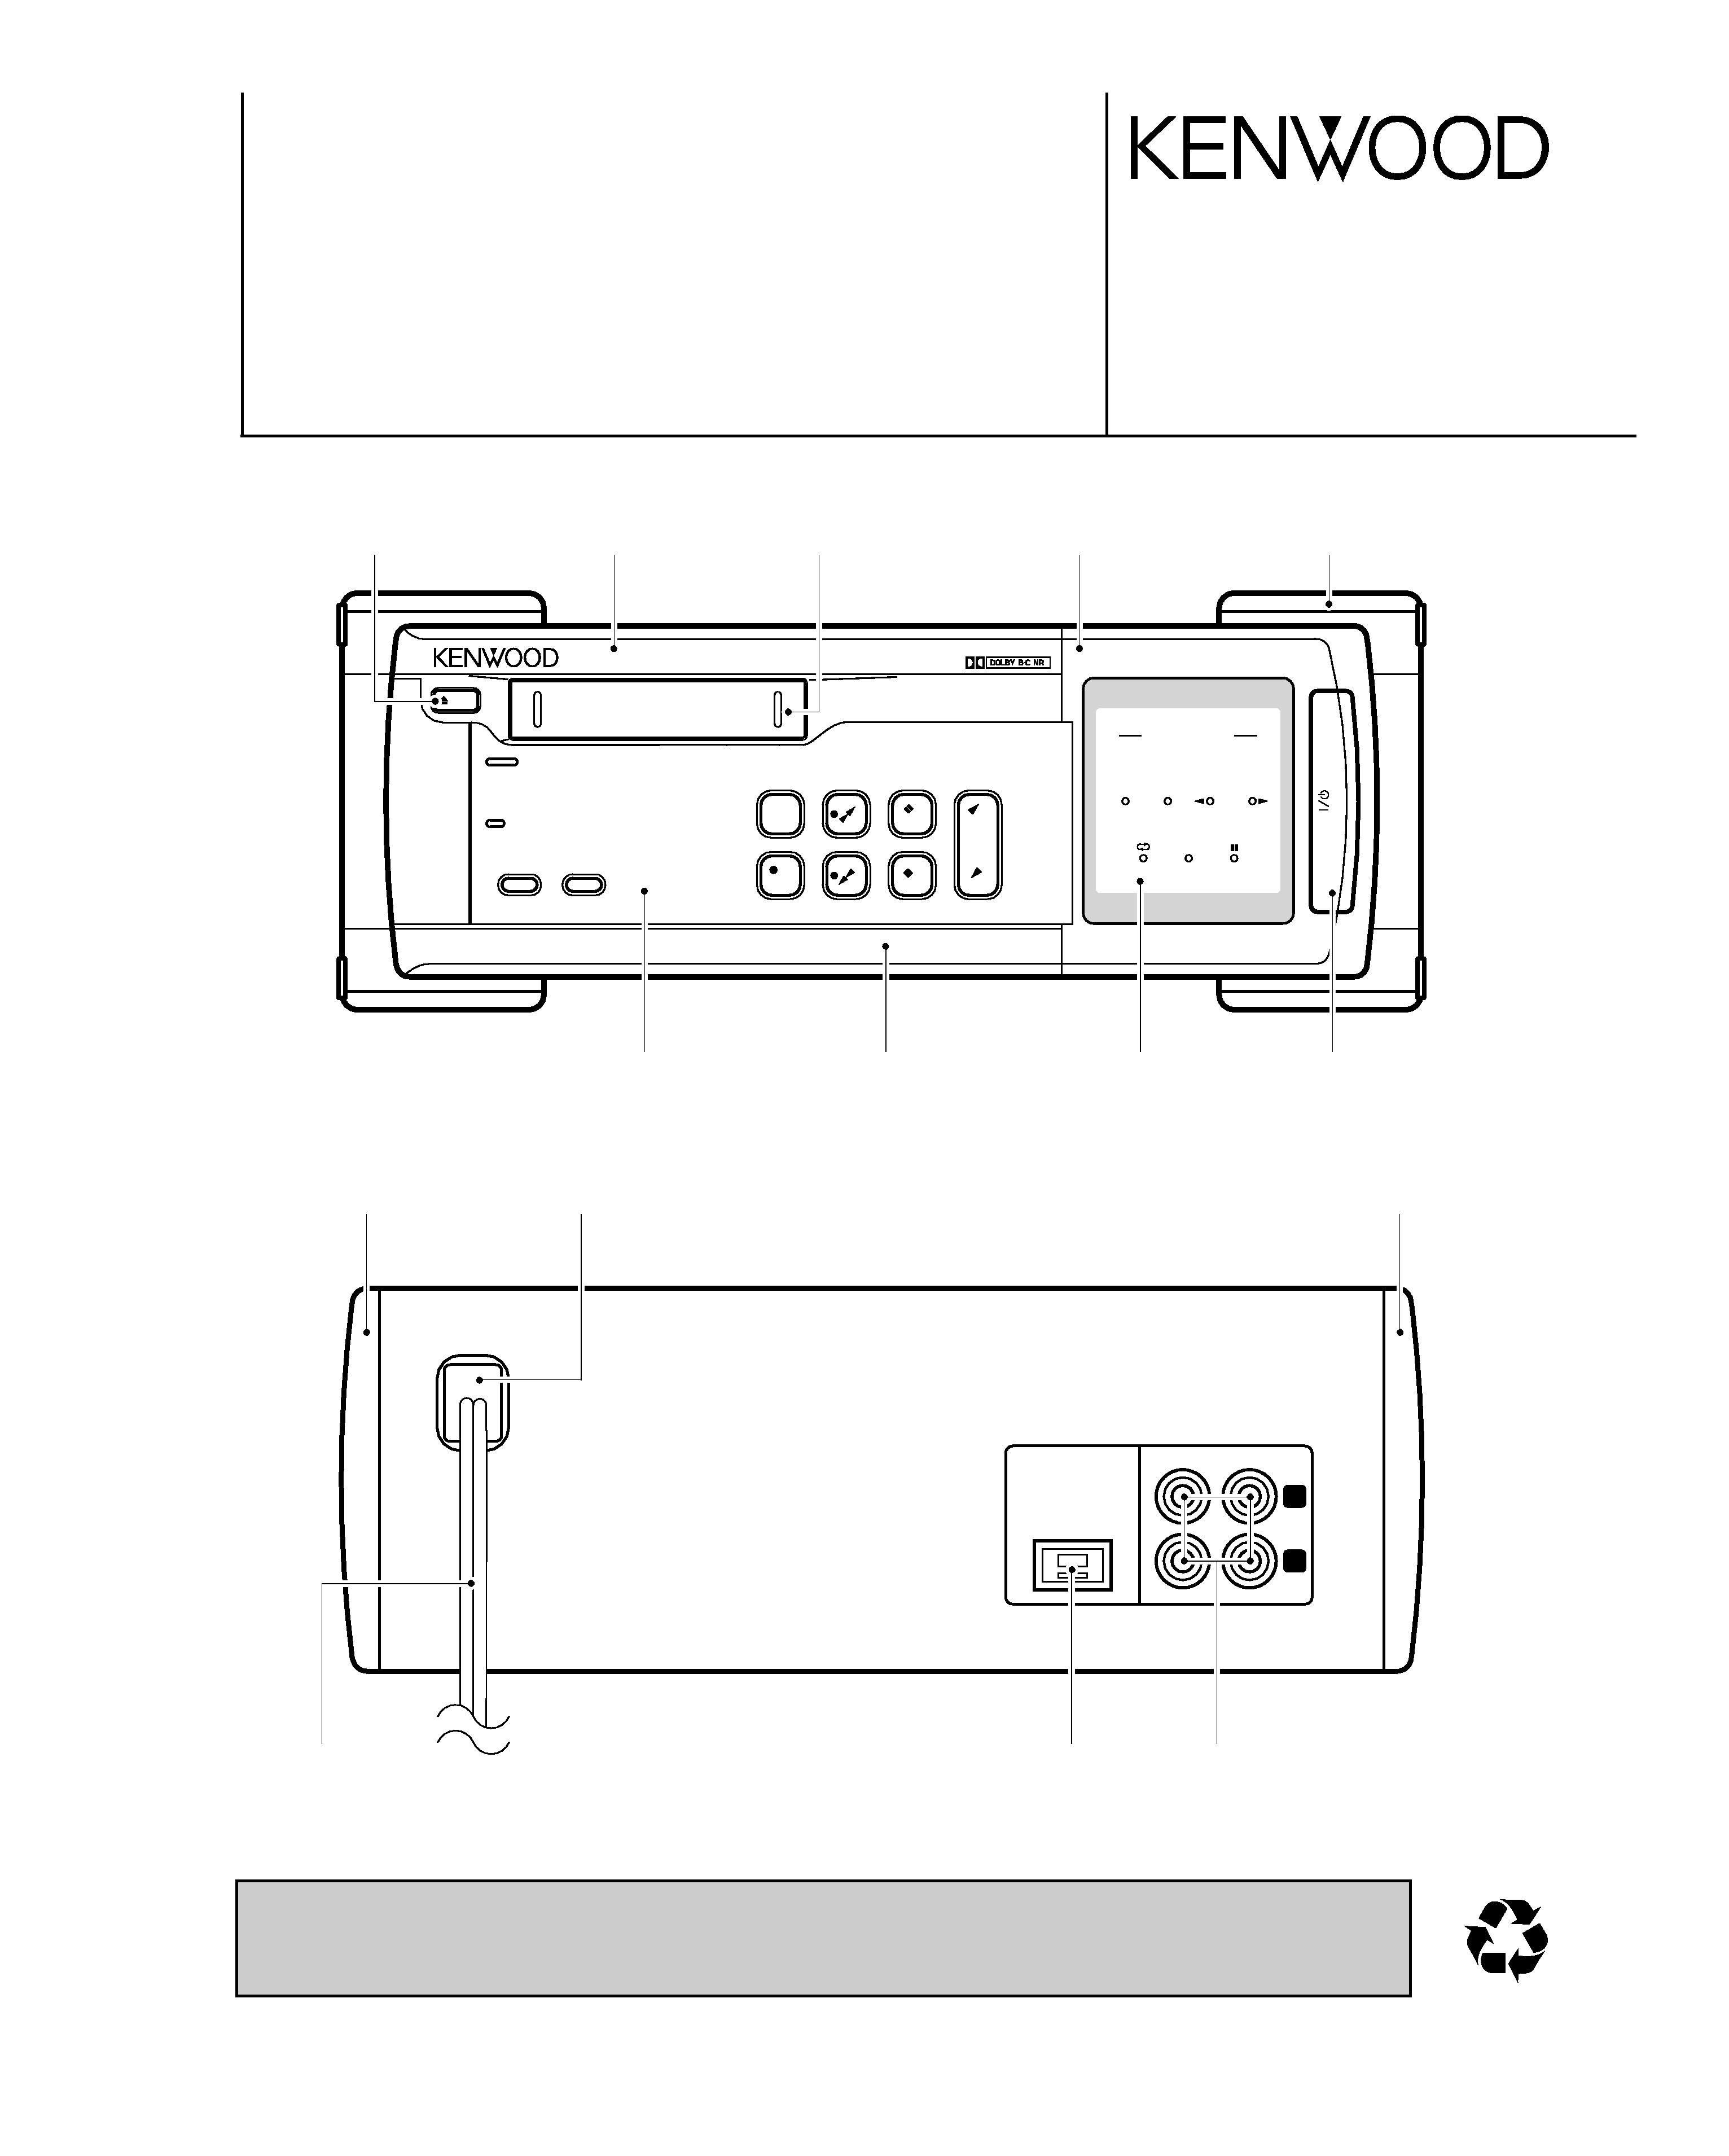
STEREO AUTO REVERSE CASSETTE DECK
X-VH7
SERVICE MANUAL
(VH-700)
© 1999-5/B51-5532-00 (K/K) 3632
Refer to X-E9 and X-SA7 service manuals (B51-4926-00/B51-5214-00),
if you require in detail.
646
610
607
605
660
606
604
616
661
recording
function indicator
Dolby NR
B-type
crls
C-type
direction
eject
standby
on/standby
fwd
rev
rec
/arm
crls
stop
pause
tape loading mechanism
rev.mode
Dolby NR
auto reverse cassette deck X-VH7
pause
forward
reverse
rev.mode
609
654
608
J3
J2
633
SYSTEM
CONNECTOR
L
R
REC IN
REC OUT
Knob (EJECT)
(K29-7554-04)
Side plate
(A50-1326-02)
Side plate
(A50-1327-02)
ACcord bushing
(J42-0083-05)
Dressing panel
(A21-3764-02)
Panel
(A29-1052-14)
Panel
(A60-1648-01)
Insulator assy
(J02-1444-04)
Knob (POWER) *
(K29-)
Front glass
(B10-3488-03)
Dressing panel
(A21-3758-02)
Dressing panel
(A21-3765-03)
AC cord *
(E30-)
Phono jack
(E63-0136-15)
Rectangular receptacle
(E08-0311-05)
* Refer to parts list on page 13.
70%
X-VH7(K) COVER1,1P( 99.11.1 11:14 AM y[W 2
X-VH7
2
CONTENTS / ACCESSORIES
DISASSEMBLY FOR REPAIR
CONTENTS / ACCESSORIES .................................. 2
DISASSEMBLY FOR REPAIR....................................2
CIRCUIT DESCRIPTION ............................................3
ADJUSTMENT ............................................................6
PC BOARD ................................................................ 7
SCHEMATIC DIAGRAM ............................................ 9
EXPLODED VIEW ....................................................12
PARTS LIST..............................................................13
SPECIFICATIONS ......................................Back cover
Contents
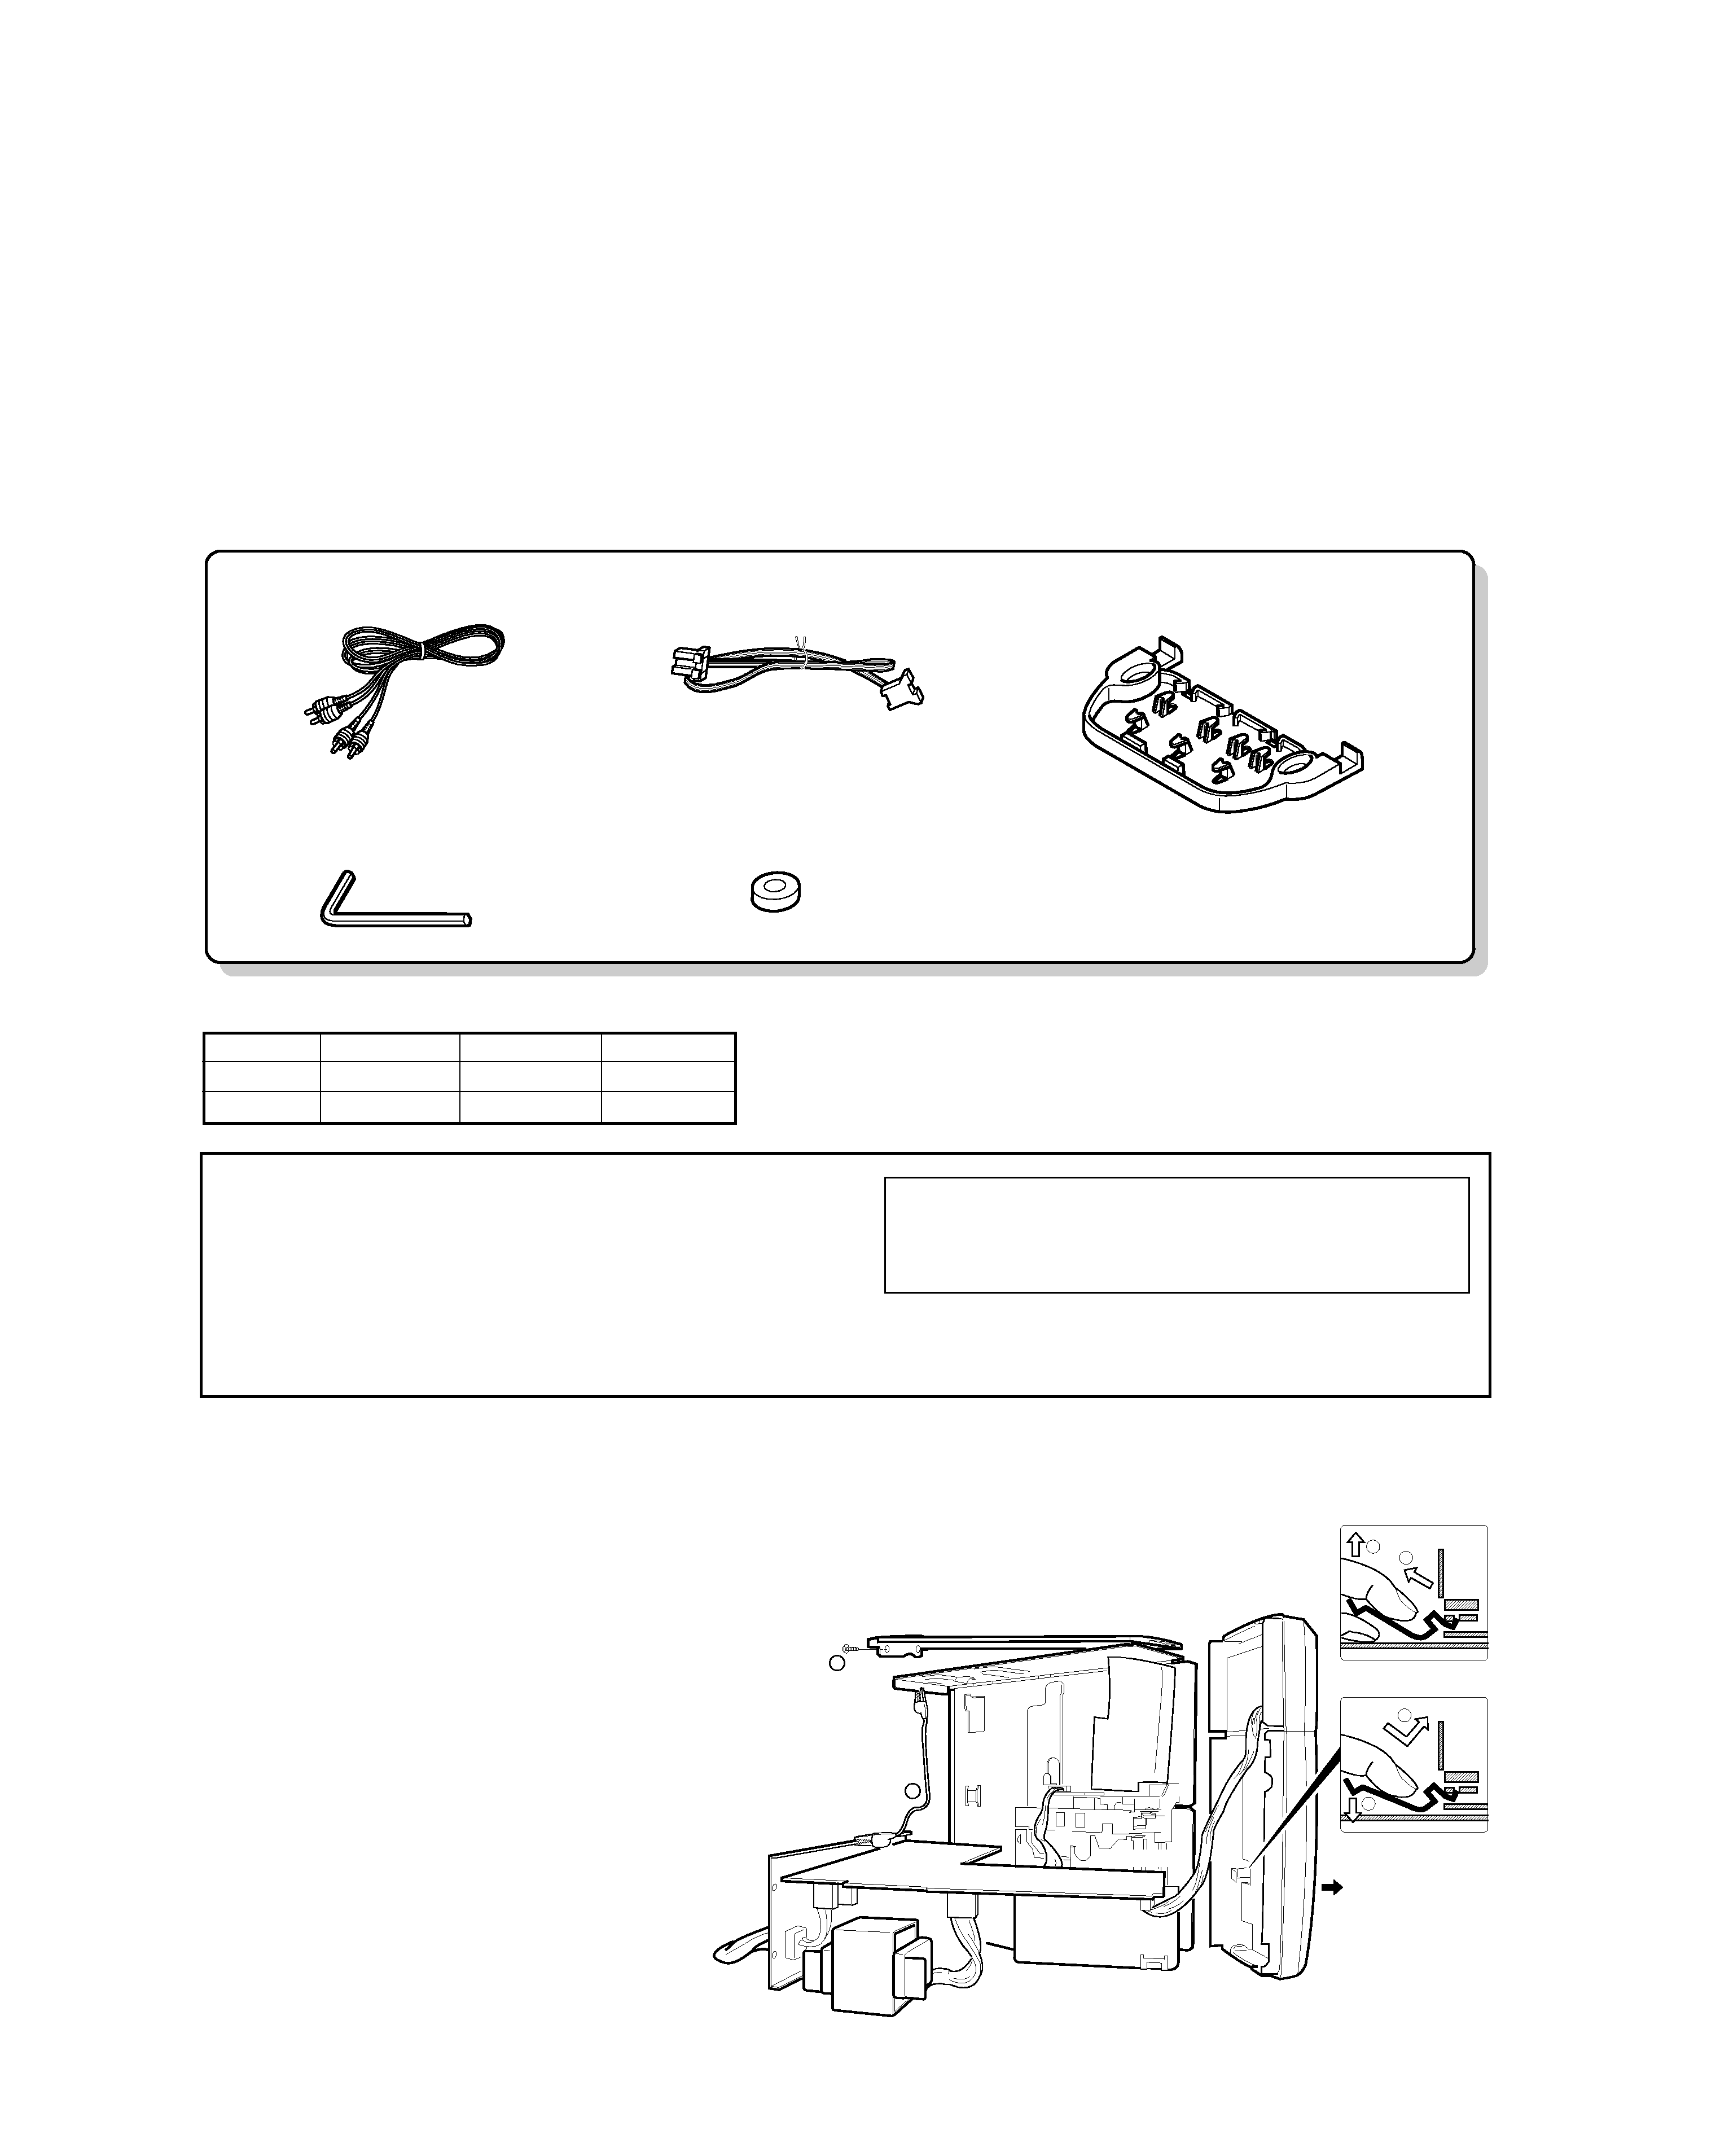
Accessories
Audio cord (2)
(E30-0615-05)
Front feet replacement tool (1)
(Allen wrench)
(W01-0084-05)
Replancement front feet (2)
(J02-0130-05)
System control cord (1)
(E30-2628-05)
Spacer for stacked installation (1)
(J19-5996-02)
REMOVE EARTH METAL
3
4
1
FRONT
X28 (A/4)
x2
2
DECK MECHA
ASSEMBLY EARTH METAL
6
5
ELECTRIC CHECK
1) Remove insulator a'ssy, then remove some
screw of L,R side board(
1). Next remove the
top and the bottom boards, then remove the
power transformer and the rear panel assem-
bling PCB.
2) Connect GND between PCB and the deck
mechanism with a alligator clip lead weir (
2).
REMOVE EARTH METAL
Support the earth metal by your finger to
keep the shape, then pull up (
3) and remove
(
4) the earth metal .
ASSEMBLE EARTH METAL
Insert the tip of the earth metal (
5), then sup-
port the earth metal by your finger, push
down it (
6).
System configurations
SYSTEM
RECEIVER
CASSETTE SPEAKER
VH-600
RD-VH7
-
LS-VH7
VH-700
RD-VH7
X-VH7
LS-VH7
Operation to reset
The microcomputer may fall into malfunction (impossi-
bility to operate, erroneous display,
etc.) when the
power cord is unplugged while power is ON or due to
an external factor. In this case, execute the following
procedure to reset the microcomputer and return it to
normal condition.
¶ Please note that resetting the microcomputer clears the contents
stored in it returns it to condition when it left the factory.
Unplug the power cord from the AC outlet and, while
holding the "
0
0eject" key depressed, plug the power
cord again.
¶ If a tape is loaded in the deck, it will be ejected now.
X-VH7(K) COVER1,1P( 99.11.1 11:14 AM y[W 3
1-1 Features
1) Single loading cassette deck.
2) Equipped with DPSS. UP search, DOWN search, 1 tune
repeat, RWD play, dash and play, REREC standby.
3) Dolby NR B/C
4) One touch edit.(only remocon)
5) CRLS
6) One touch operation
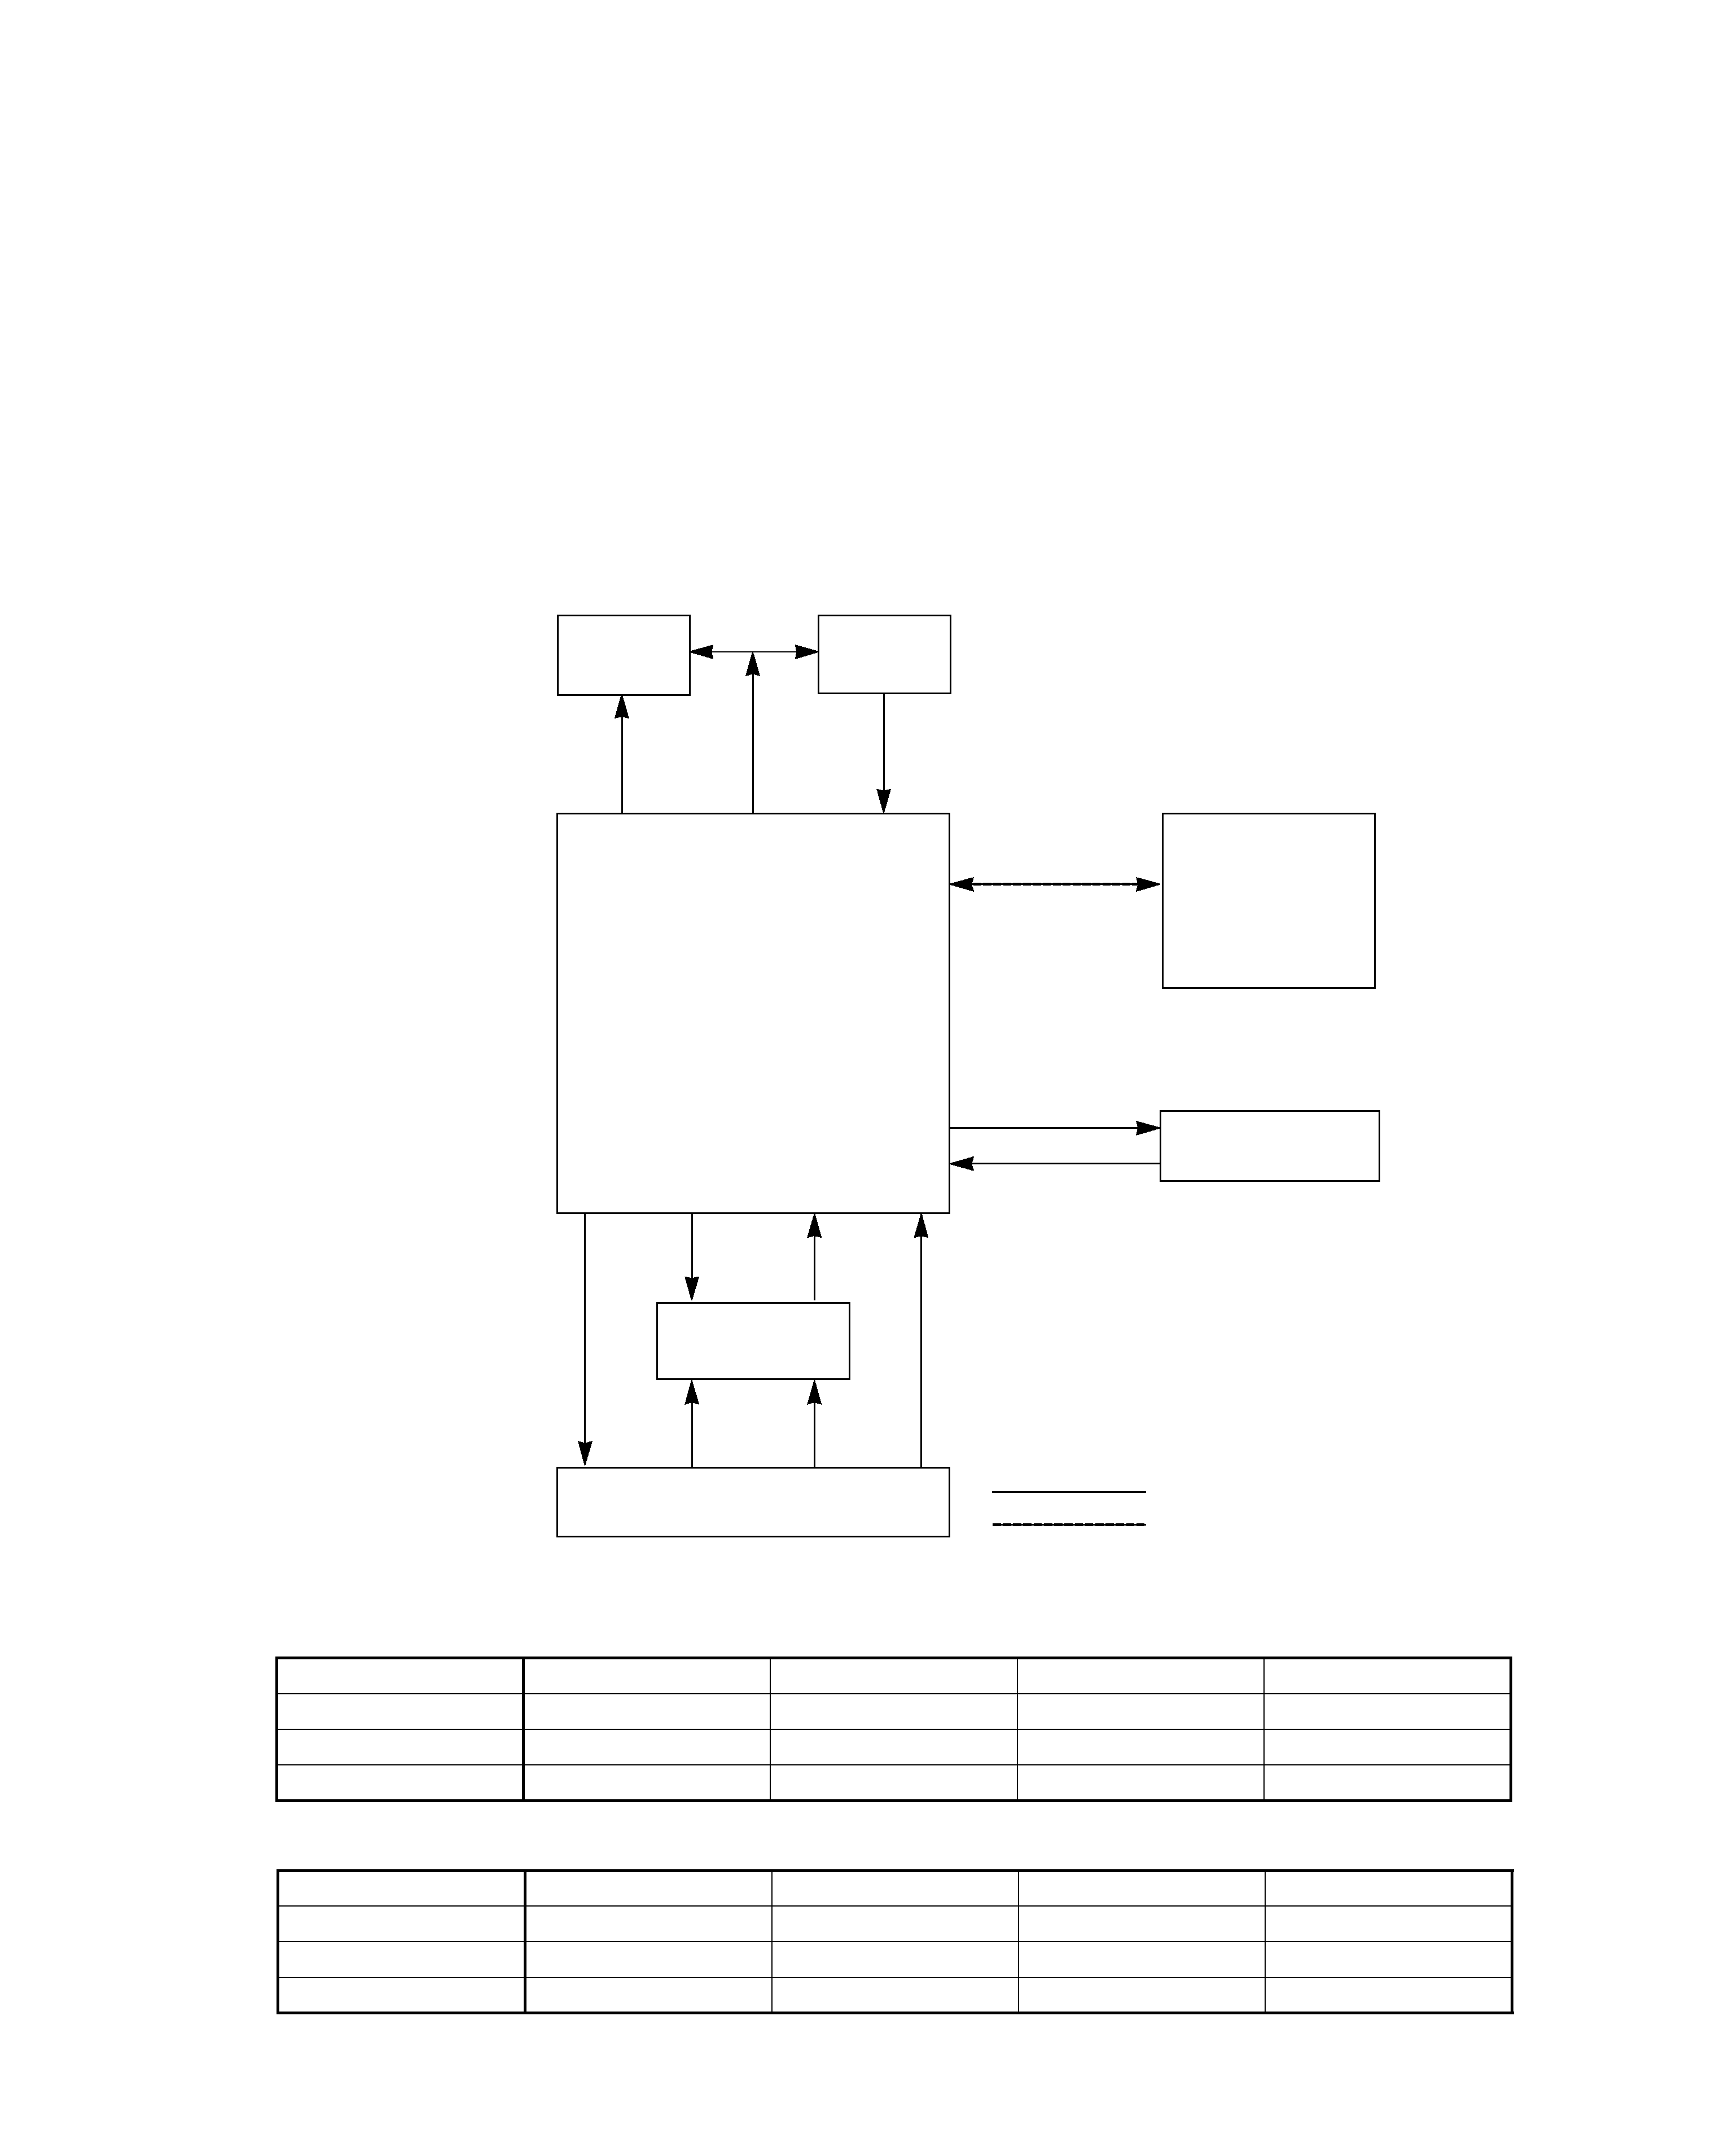
1-2 Microprocessor periphery block diagram
1-3 KEY matrix, LED matrix
1-3-1 KEY matrix
KS0(6)
KS1(7)
KS2(9)
KS3(8)
KR0(15)
POWER
7
REV. MODE
CRLS
KR1(16)
21
0
KR2(14)
38
DOLBY
¡
KS0(6)
KS1(7)
KS2(9)
KS3(8)
LED0(19)
EJECT
STANDBY
DOLBY B
RECORDING
LED1(20)
PAUSE
CRLS
REV. MODE
DOLBY C
LED2(18)
- - - - - - - -
REVERSE
FORWARD
- - - - - - - -
1-3-2 LED matrix
{( )u-COM IC PORT}
LED
DECK MECHA
(ADR-2176ST)
KEY
MATRIX
IC2
SYSTEM IC
HA12167FB
SLOT
MECHANISM
3
10
7
21
3
4
3
CXP84124-150
uCOM (IC1)
2
2
REC /PB CIRCUIT
SERIAL COMMUNICATION LINE
SIGNAL LINE/ CONTROL LINE
3
CIRCUIT DESCRIPTION
X-VH7
1. Deck Microprocessor :
CXP 84124-150 (X28 : IC1)
X-VH7(K) COVER1,1P( 99.11.1 11:14 AM y[W 6
4
CIRCUIT DESCRIPTION
X-VH7
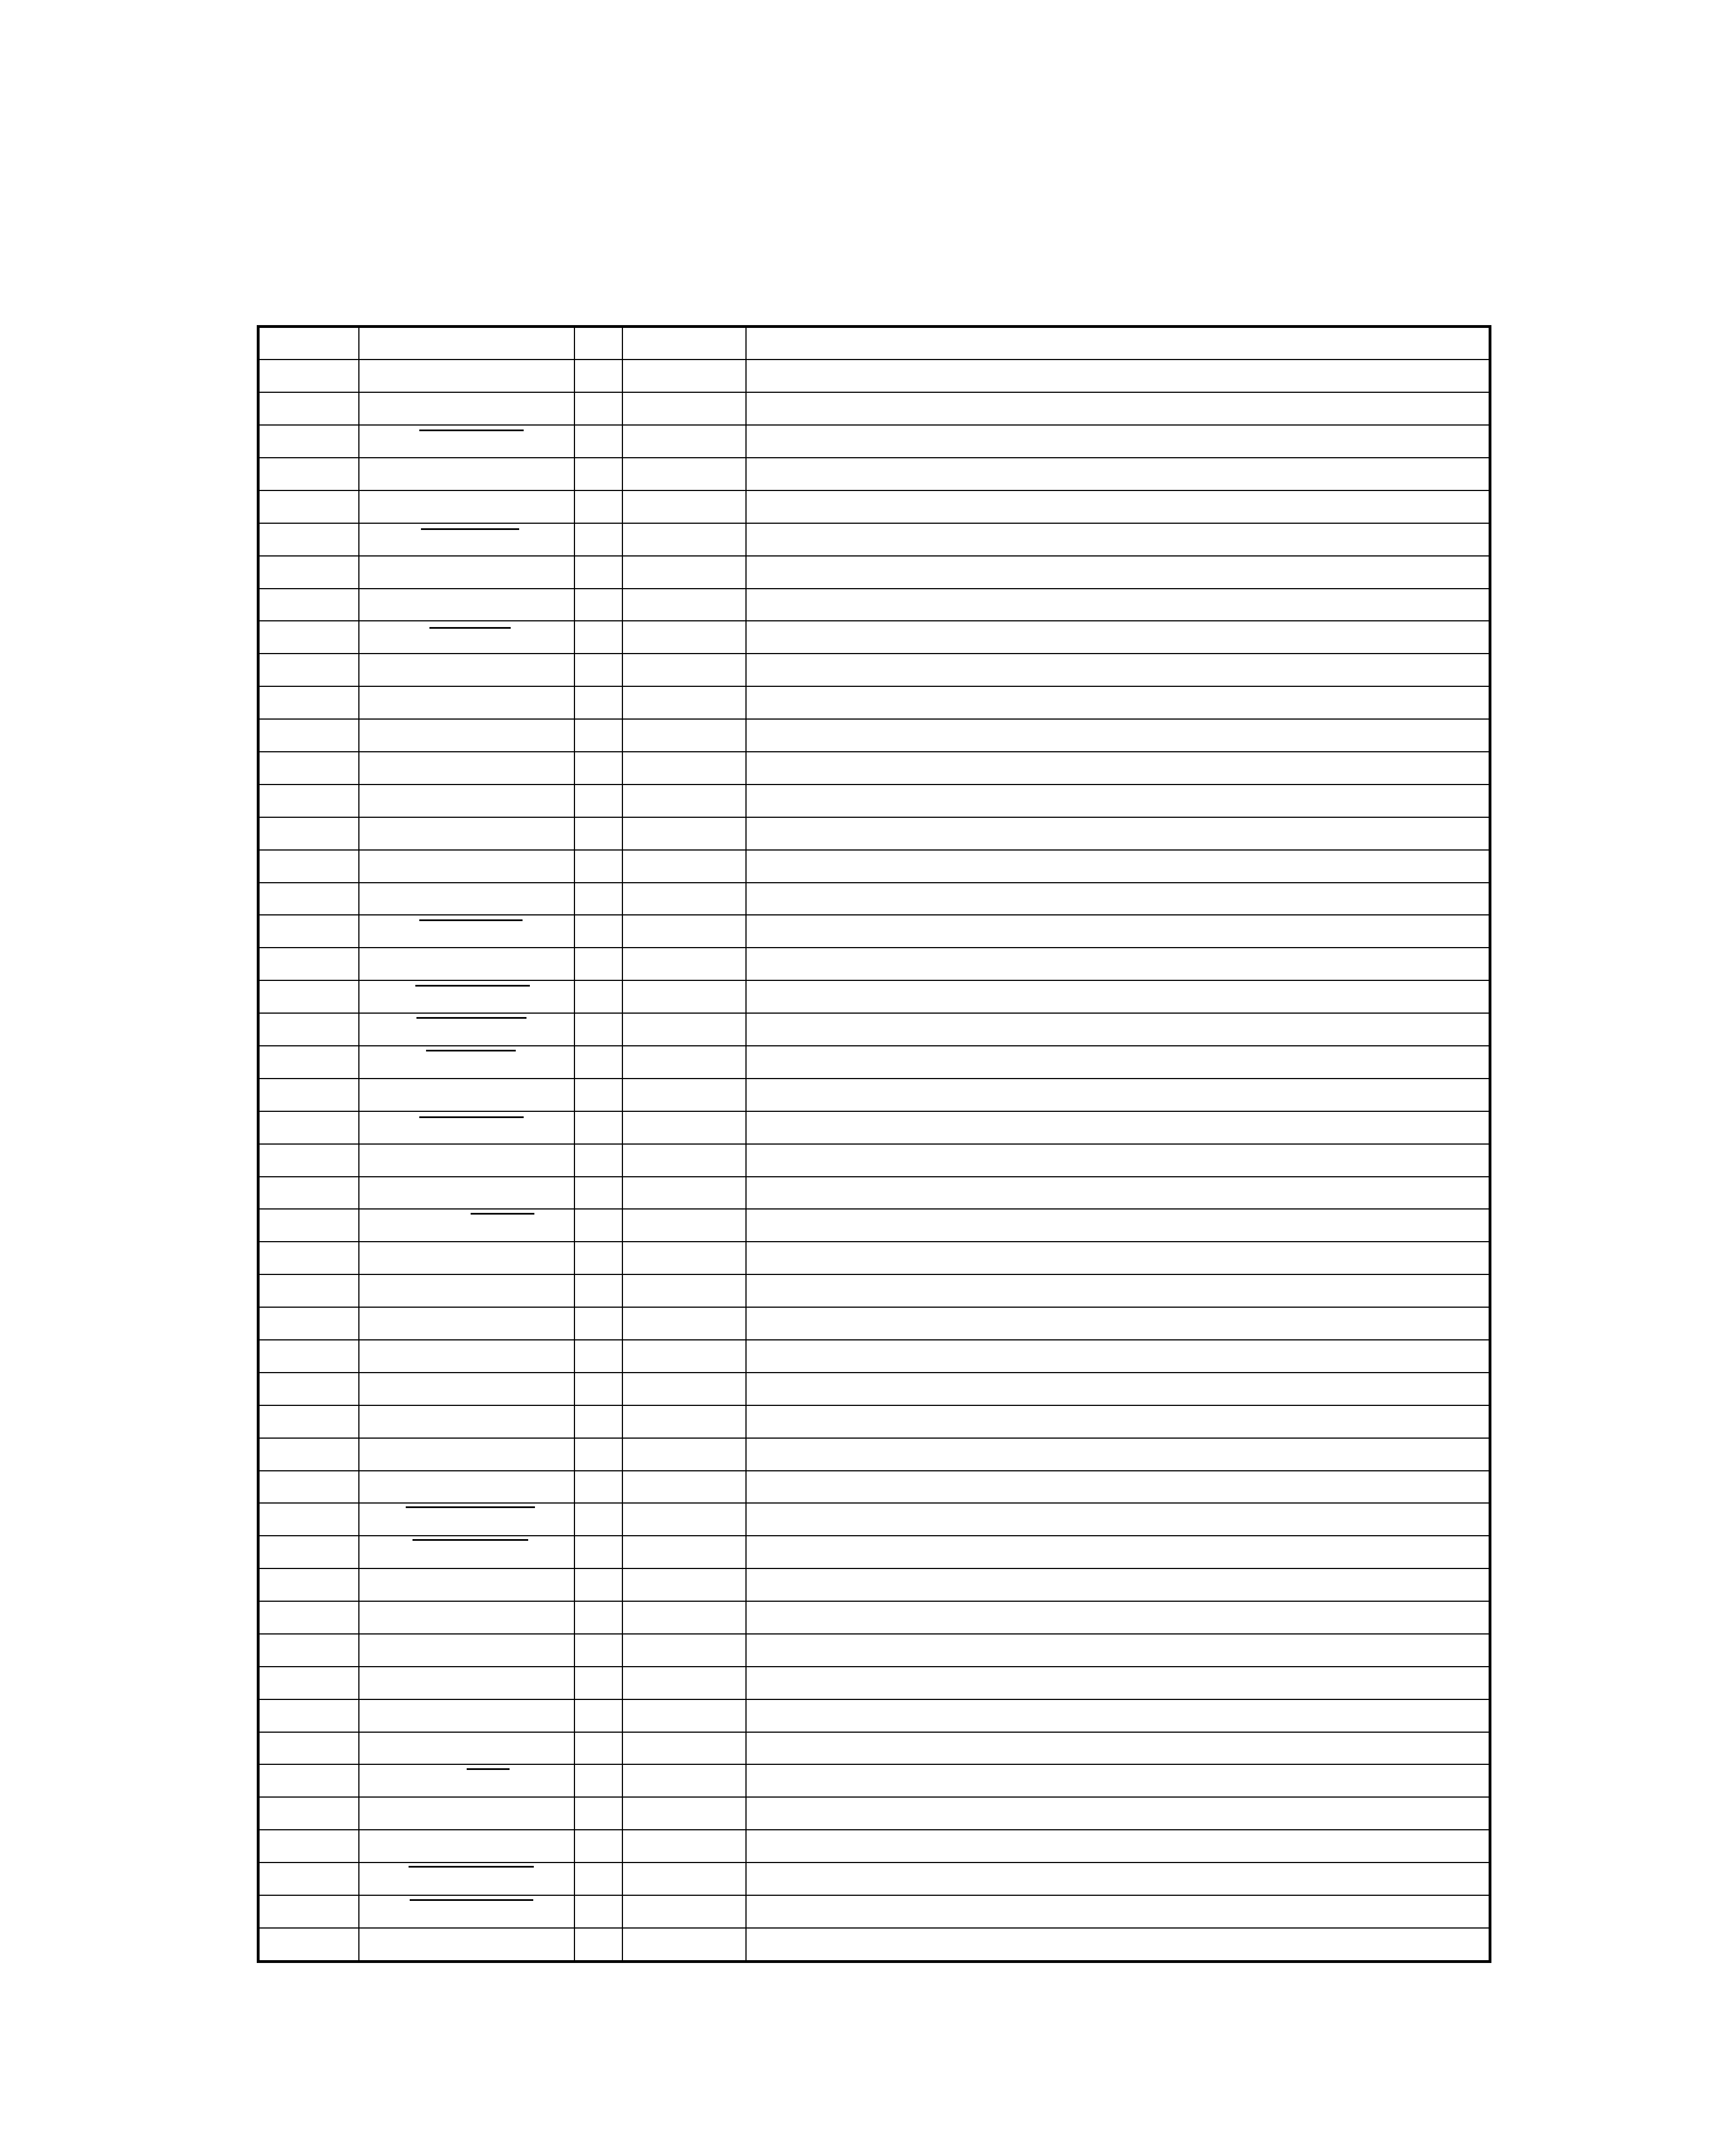
Pin
Name
I/O
Connect
Description
1
S.BUSY
I/O
OPEN
Serial communication BUSY signal
H: BUSY
L: READY
2~5
--
I
OPEN
No used
6~9
KS0,1,3,2
O
PU
KEY SCAN 0,1,3,2
14~16
KR2,0,1
I
PD
KEY RETURN 2,0,1
17
--
I
OPEN
No used
18~20
LED2,0,1
O
OPEN
LED drive output2,0,1
L: ON
21
BACKLIGHT_ON
O
PD
BACK LIGHT LED drive output
H: ON
22~29
--
O
OPEN
No used
30
RESET
I
PU
u-com RESET signal detect
L: RESET
31
EXTAL
I
OPEN
MAIN CLOCK(10MHz)
32
XTAL
--
OPEN
33
VSS(GND)
--
GND
GND
34
TX
--
OPEN
No used
35
TEX(GND)
I
GND
GND
36
AVSS(GND)
--
GND
A/D converter GND
37
AVREF
I
+5V
A/D converter reference voltage
38
SOL
O
PD
MECHA solenoid control
H: ON
39
R_INH_F
I
PU
FWD REC permission detect signal input L: REC
40
PHOTO SW
I
PU
REAL drive pulse input
41
HALF_SW
I
PU
Cassette half detect signal input
L: CASSETTE EXIST
42
PLAY SW
I
PU
MECHA HEAD position detect
L: ON
43
TYPE II
I
PU
TYPE Ödetect signal input
L: TYPE II
44,45
LEVEL L/R
I
PD
Lch/Rch level input
46
R_INH_R
I
PU
RVS. REC permission detect signal input L: REC
47
CPM
O
PD
Capstan motor control
H: ON
48
CLOCK
O
OPEN
System IC CLOCK output
49
REC/PLAY
O
OPEN
REC/PLAY changeover
H: REC
L: PLAY
50
ERASE
O
PD
ERASE HEAD control output
H: ON
51
DATA
O
OPEN
System IC DATA output
52
STB
O
OPEN
System IC STROBE signal output
53~59
--
O
OPEN
No used
60
BIAS NOR
O
PD
BIAS CONTROL
H: NORMAL TAPE
61~63
--
I
OPEN
No used
64
SLOT OPEN
O
OPEN
SLOT OPEN motor control
H: ON
65
SLOT CLOSE
O
OPEN
SLOT CLOSE motor control
H: ON
66
CLOSE SW
O
PU
SLOT CLOSE detect SW input
L: ON
67
OPEN SW
O
PU
SLOT OPEN detect SW input
L: ON
68
--
O
OPEN
No used
69
CE
O
PU
AC OFF detect signal input
L: AC OFF
70
DOLBY_RESET
O
OPEN
DOLBY IC RESET control
L: RESET
71
--
O
OPEN
No used
72
VDD(+5V)
--
+5V
power supply
73
--
--
+5V
No used(Connect to VDD(+5V))
74
70/120
O
PD
PLAY equalizer control output
H: 70µs
L: 120µs
75,76
--
O
OPEN
No used
77
AVR_OFF
O
PD
Circuit AVR ON/OFF control
H: AVR ON
78
LINE MUTE
O
PD
LINE MUTE control output
L: MUTE ON
79
REC MUTE
O
PD
REC MUTE control output
L: MUTE ON
80
S.DATA
I/O
OPEN
Serial communication DATA signal
1-4 Pin description
X-VH7(K) COVER1,1P( 99.11.1 11:14 AM y[W 5
5
X-VH7
CIRCUIT DESCRIPTION
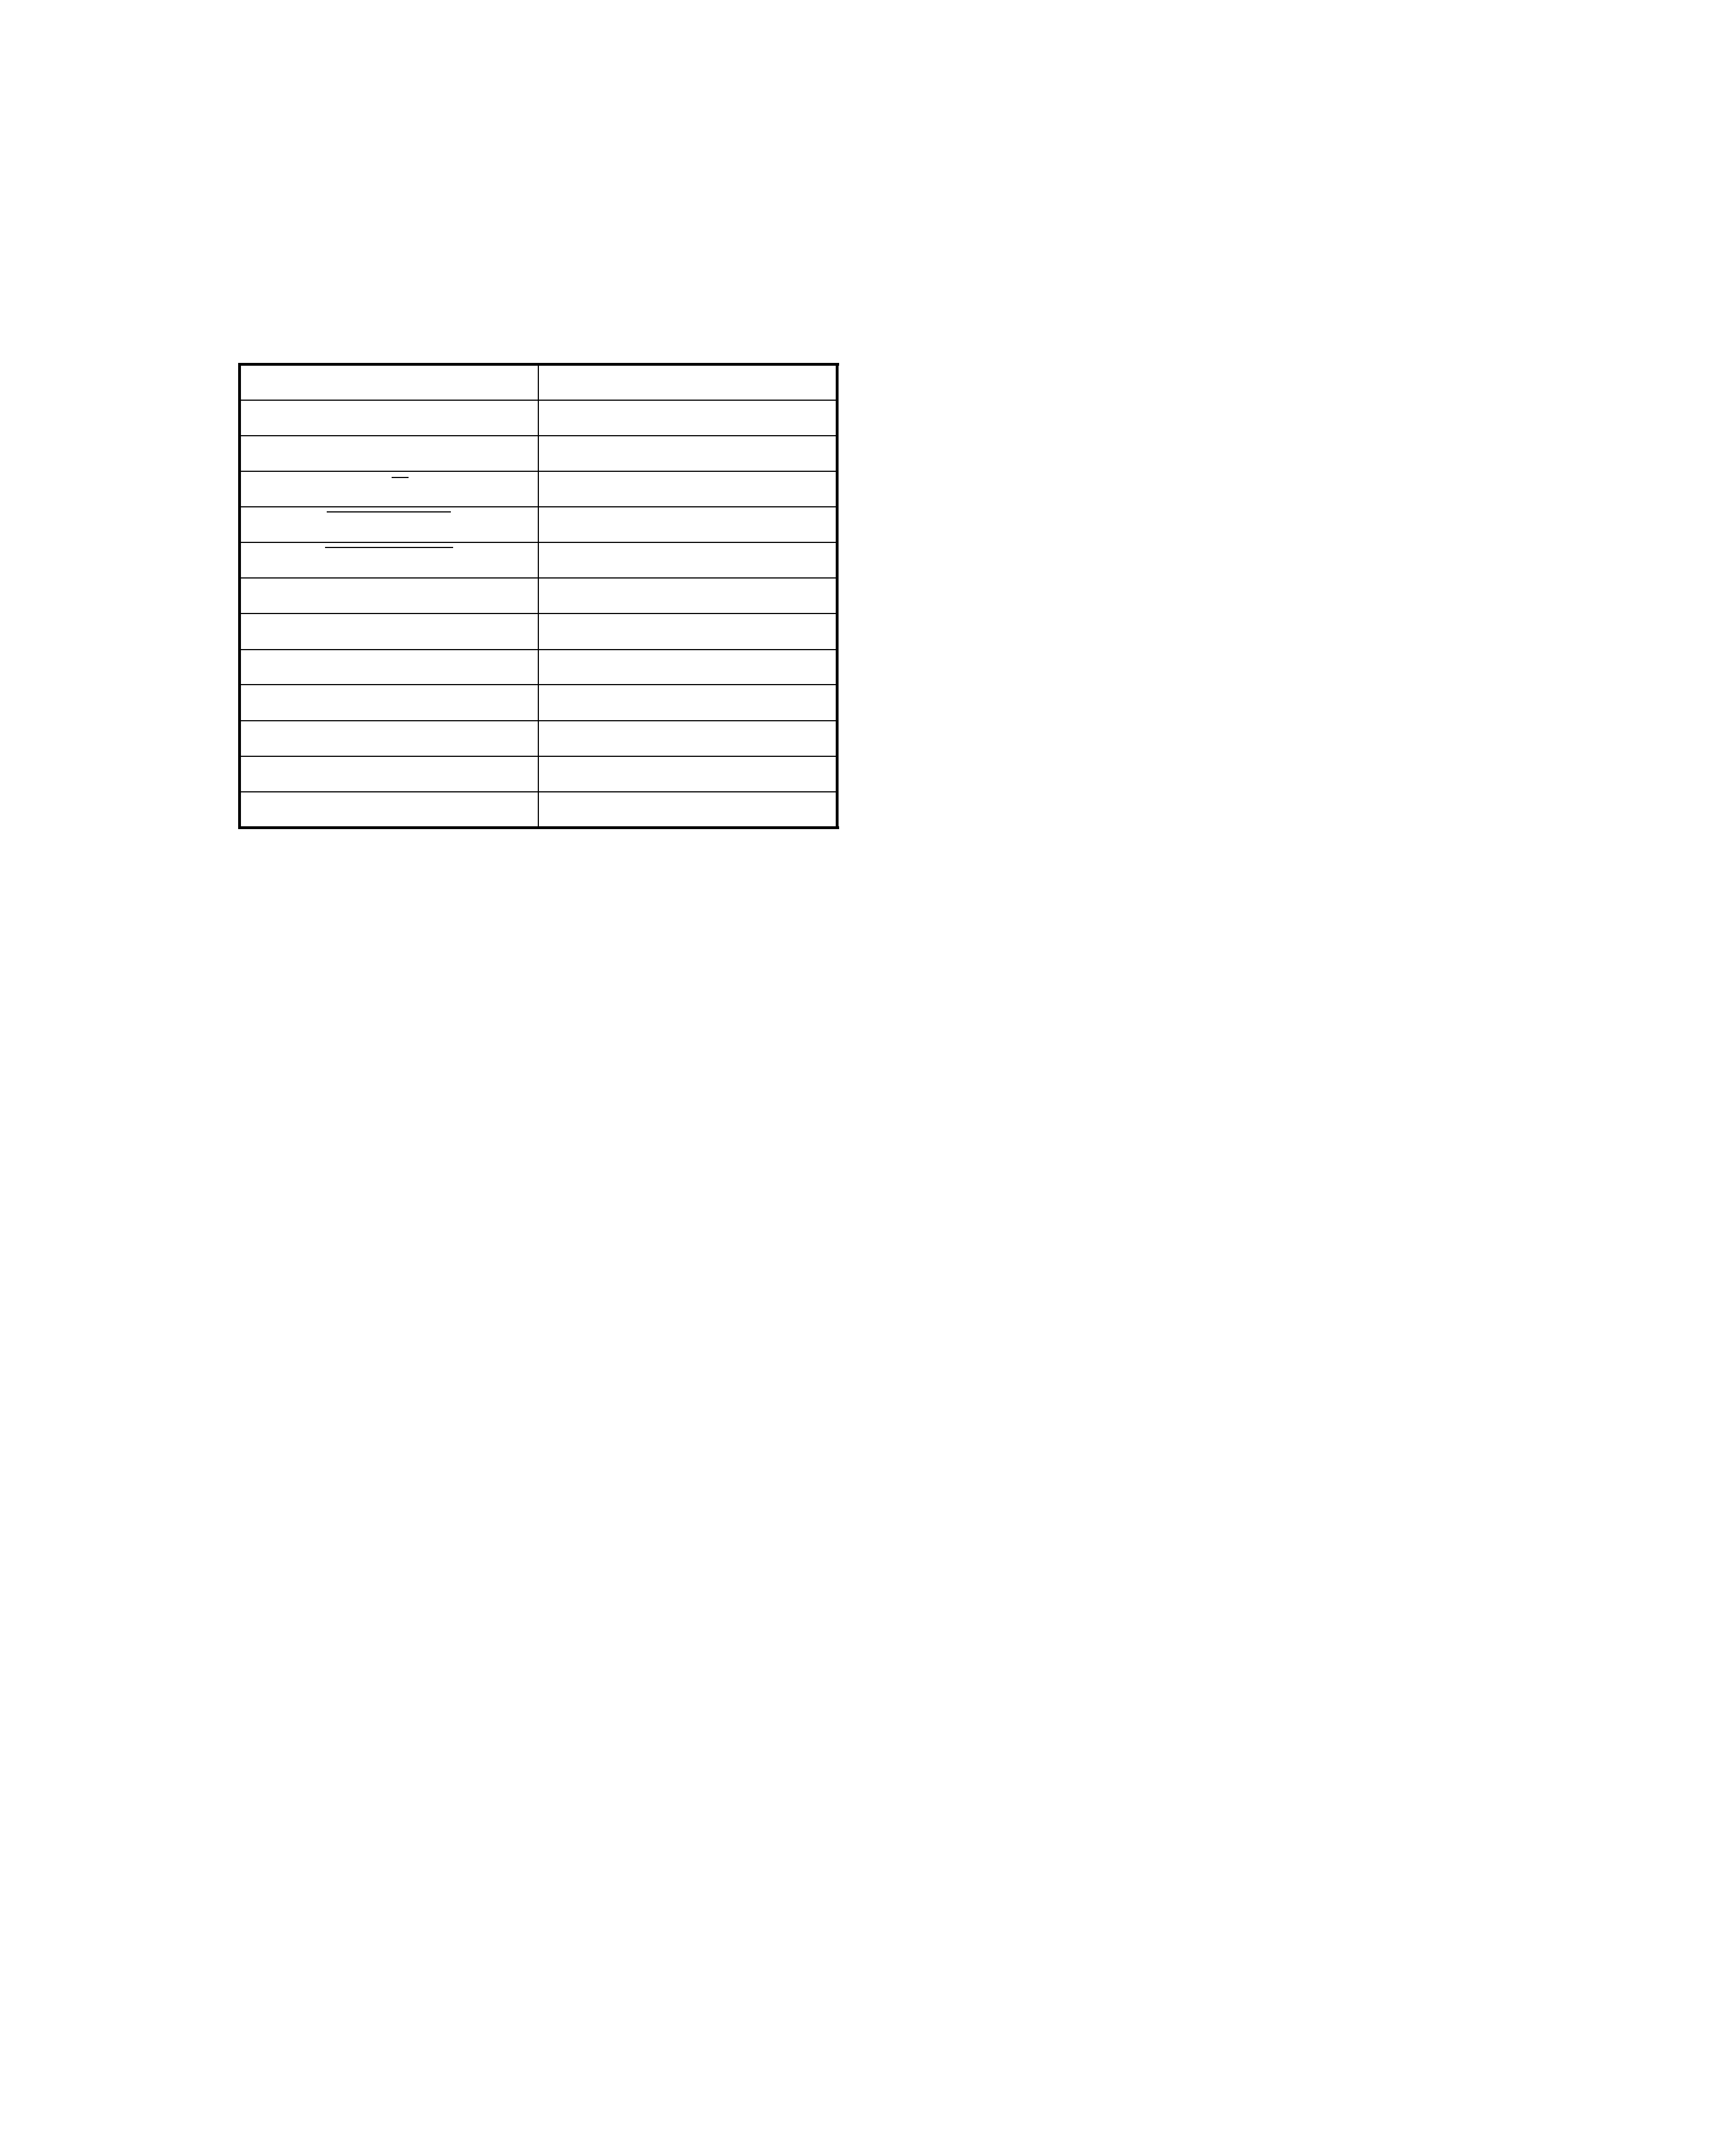
ITEM
STATE
POWER
OFF
DOLBY
OFF
R/P
PLAY
REC MUTE
ON
LINE MUTE
ON
BIAS
OFF
ERASE
OFF
REC LEVEL(E. VOL)
-15dB
SOL
OFF
CPM
ON(500ms) î OFF
DIRECTION
FORWARD
REVERSE MODE
ENDLESS MODE
2. DEFAULT STATES
2-1 Main unit default states
3. TEST MODE
3-1 Setting method
While pressing the FWD key, plug the power cord to the
AC wall outlet.(Setting up: MUTE ON)
Set up REC level : -15dB
All LED lighting, then be cancelled to press a key and
insert a tape.
Insert a tape or press the STOP key, then LEDs display
the leaf SW movement of the mechanism.
(ON:LED lighting, OFF:No LED lighting)
DOLBY-B: Mistake REC FWD
DOLBY-C: Mistake REC REV
REV-MODE: PACK DETECT SW
CRLS: CrO2 DETECT SW
3-2 Initializing method
While pressing the EJECT key, plug the power cord to
the AC wall outlet.
Jump out a tape compulsion, then LED STANDBY be
blinked and lighted .
3-3 Cancel test mode
1) AC power OFF: initialize and cancel the test mode.
2) Press the PAUSE key ,then be stopped the mecha-
nism and be cancelled the test mode on POWER ON.
(No jump out a tape compulsion)
3-4 TEST MODE specifications
1) The keys are activated normal except the test mode
indicating key .
2) No mute control by the mode changeover. But mute on
by POWER ON/OFF.
3-5 Set inspection test mode
3-5-1 REC/PB inspection
Press the REC key:
1REC(4sec.)î 2REVERSE(4sec.)
î 3Start PLAY automatically.
But press the REC key with recording again, the record-
ing time be extended for 4 sec per one press.
3-5-2 Test mode initializing condition
Press the STOP key,then be stopped the mechanism
movement.
(But no change of the system IC/IC2 setting up)
And LEDs display normal with the leaf SW.
3-5-3 REC level changeover
Press the CRLS key, changeover REC level.
·
LEVEL display: -15dB(LED CRLS blinking)íî0dB(LED
REV.MODE blinking)
X-VH7(K) COVER1,1P( 99.11.1 11:14 AM y[W 7
