KS-8200HT
KS-8200EX
B61-1248-00 02 (K, P, E) KW 0410
KENWOOD CORPORATION
ENGLISH
FRANÇAIS
DEUTSCH
NEDERLANDS
IT
ALIANO
ESP
AÑOL
SPEAKER SYSTEM
INSTRUCTION MANUAL
SYSTEME DE ENCEINTE
MODE D'EMPLOI
SISTEMA DE ALTAVOCES
MANUAL DE INSTRUCCIONES
LAUTSPRECHERSYSTEM
BEDIENUNGSANLEITUNG
SISTEMA DIFFUSORI
ISTRUZIONI PER L'USO
LUIDSPREKERSYSTEEM
GEBRUIKSAANWIJZING
LA DICHIARAZIONE DI CONFORMITA' "CE" DI
QUESTO
PRODOTTO E' DEPOSITATA PRESSO:
KENWOOD ELECTRONICS EUROPE B.V.
AMSTERDAMSEWEG 37
1422 AC UITHOORN
THE NETHERLANDS
This instruction manual is for some models. Model availability may differ de-
pending on the country and sales area.
Ce mode d'emploi couvre plusieurs modèles qui sont mentionnés ci-dessus. La
disponibilité des modèles peut différer selon les pays et les zones de vente.
Diese Bedienungsanleitung enthält Beschreibungen der oben aufgelisteten
Modelle. Die Verfügbarkeit der Modelle ist je nach Land bzw. Verkaufsgebiet
verschieden.
Deze gebruiksaanwijzing is geschreven voor de hierboven vermelde modellen.
Of een bepaald model verkrijgbaar is kan verschillen per land of exportgebied.
Questo manuale vale per tutti i modelli elencati qui sopra. La loro disponibilità
dipende dal paese di residenza.
Este manual de instrucciones se utiliza para describir los modelos indicados
arriba. La disponibilidad del modelo puede cambiar según el país o área de venta.
ENGLISH
2 EN
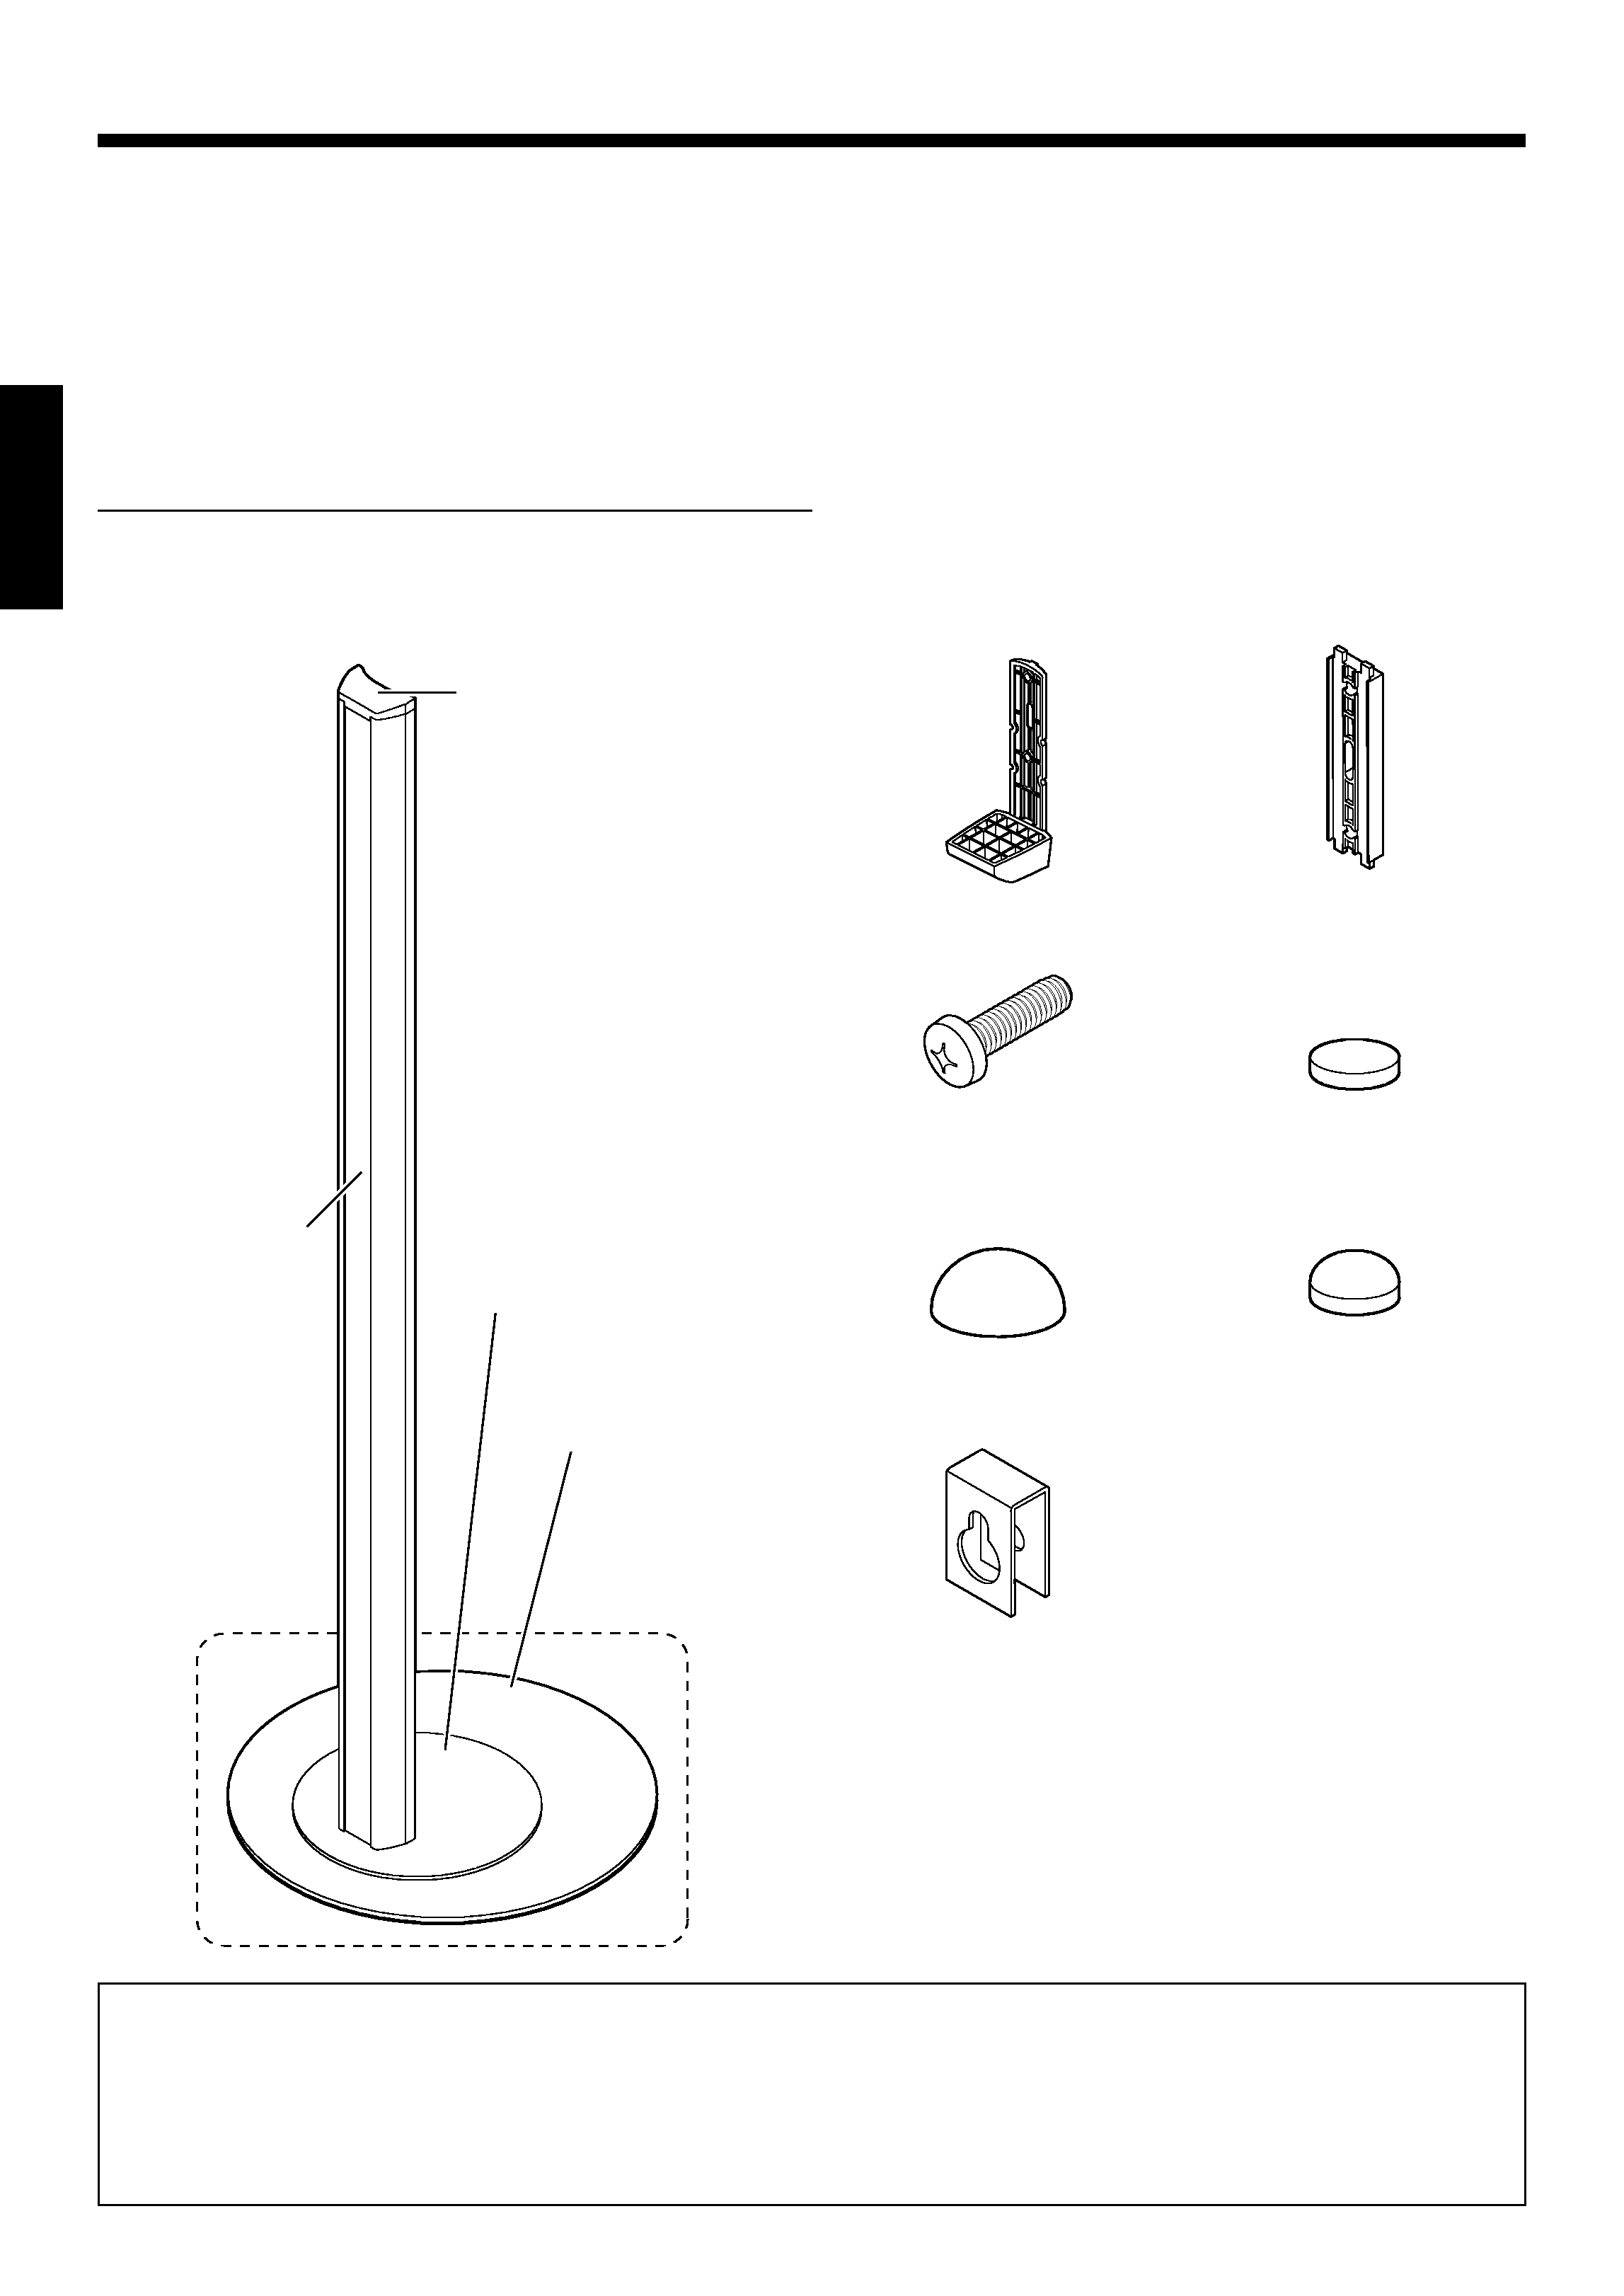
Included parts list
1Pole assembly ............. 2
Introduction
Thank you for selecting our speakers as part of your high-fidelity system. We at KENWOOD are confident that your choice will bring you
years of rich listening pleasure. Please take the time to read through this booklet carefully. It will help you to obtain the peak performance
for which the speakers were designed.
For your records
Record the serial number, found on the back of the unit, in the spaces designated on the warranty card, and in the space provided below.
Refer to these model and serial numbers whenever you call upon your KENWOOD dealer for information or service on this product.
Model KS-8200HT is composed of the front speakers, center speaker and surround speakers.
Model KS-8200EX is composed of the front speakers, center speaker, surround speakers and surround back speaker.
Model
Serial number
2Holder A ...................... 4
3Holder B ..................... 2
4Screw .......................... 4
5Cushion A (Black)
KS-8200HT ............... 10
KS-8200EX ............... 14
6Cushion B ................... 2
7Cushion C ................... 8
(Black)
(Gray)
8Bracket ........................ 6
9Speaker wire
Red ................................................................. 4.5 m (14 ft)
White ............................................................. 4.5 m (14 ft)
Blue .................................................................. 10 m (32 ft)
Gray .................................................................. 10 m (32 ft)
Brown (KS-8200EX only) .................................. 10 m (32 ft)
Green .................................................................. 3 m (9 ft)
Introduction .................................... 2
Important safeguards .................... 3
Installation Locations .................... 3
Contents
Installation Methods ............................... 4
Connections ............................................. 8
Specifications .......................................... 9
Cap
Dressing sheet
Plate (small)
Plate (large)
Bottom plate
3 EN
ENGLISH
Important Safeguards
Caution: Read this item carefully to keep your safety.
Installation Locations
Positioning For Optimal Surround Sound
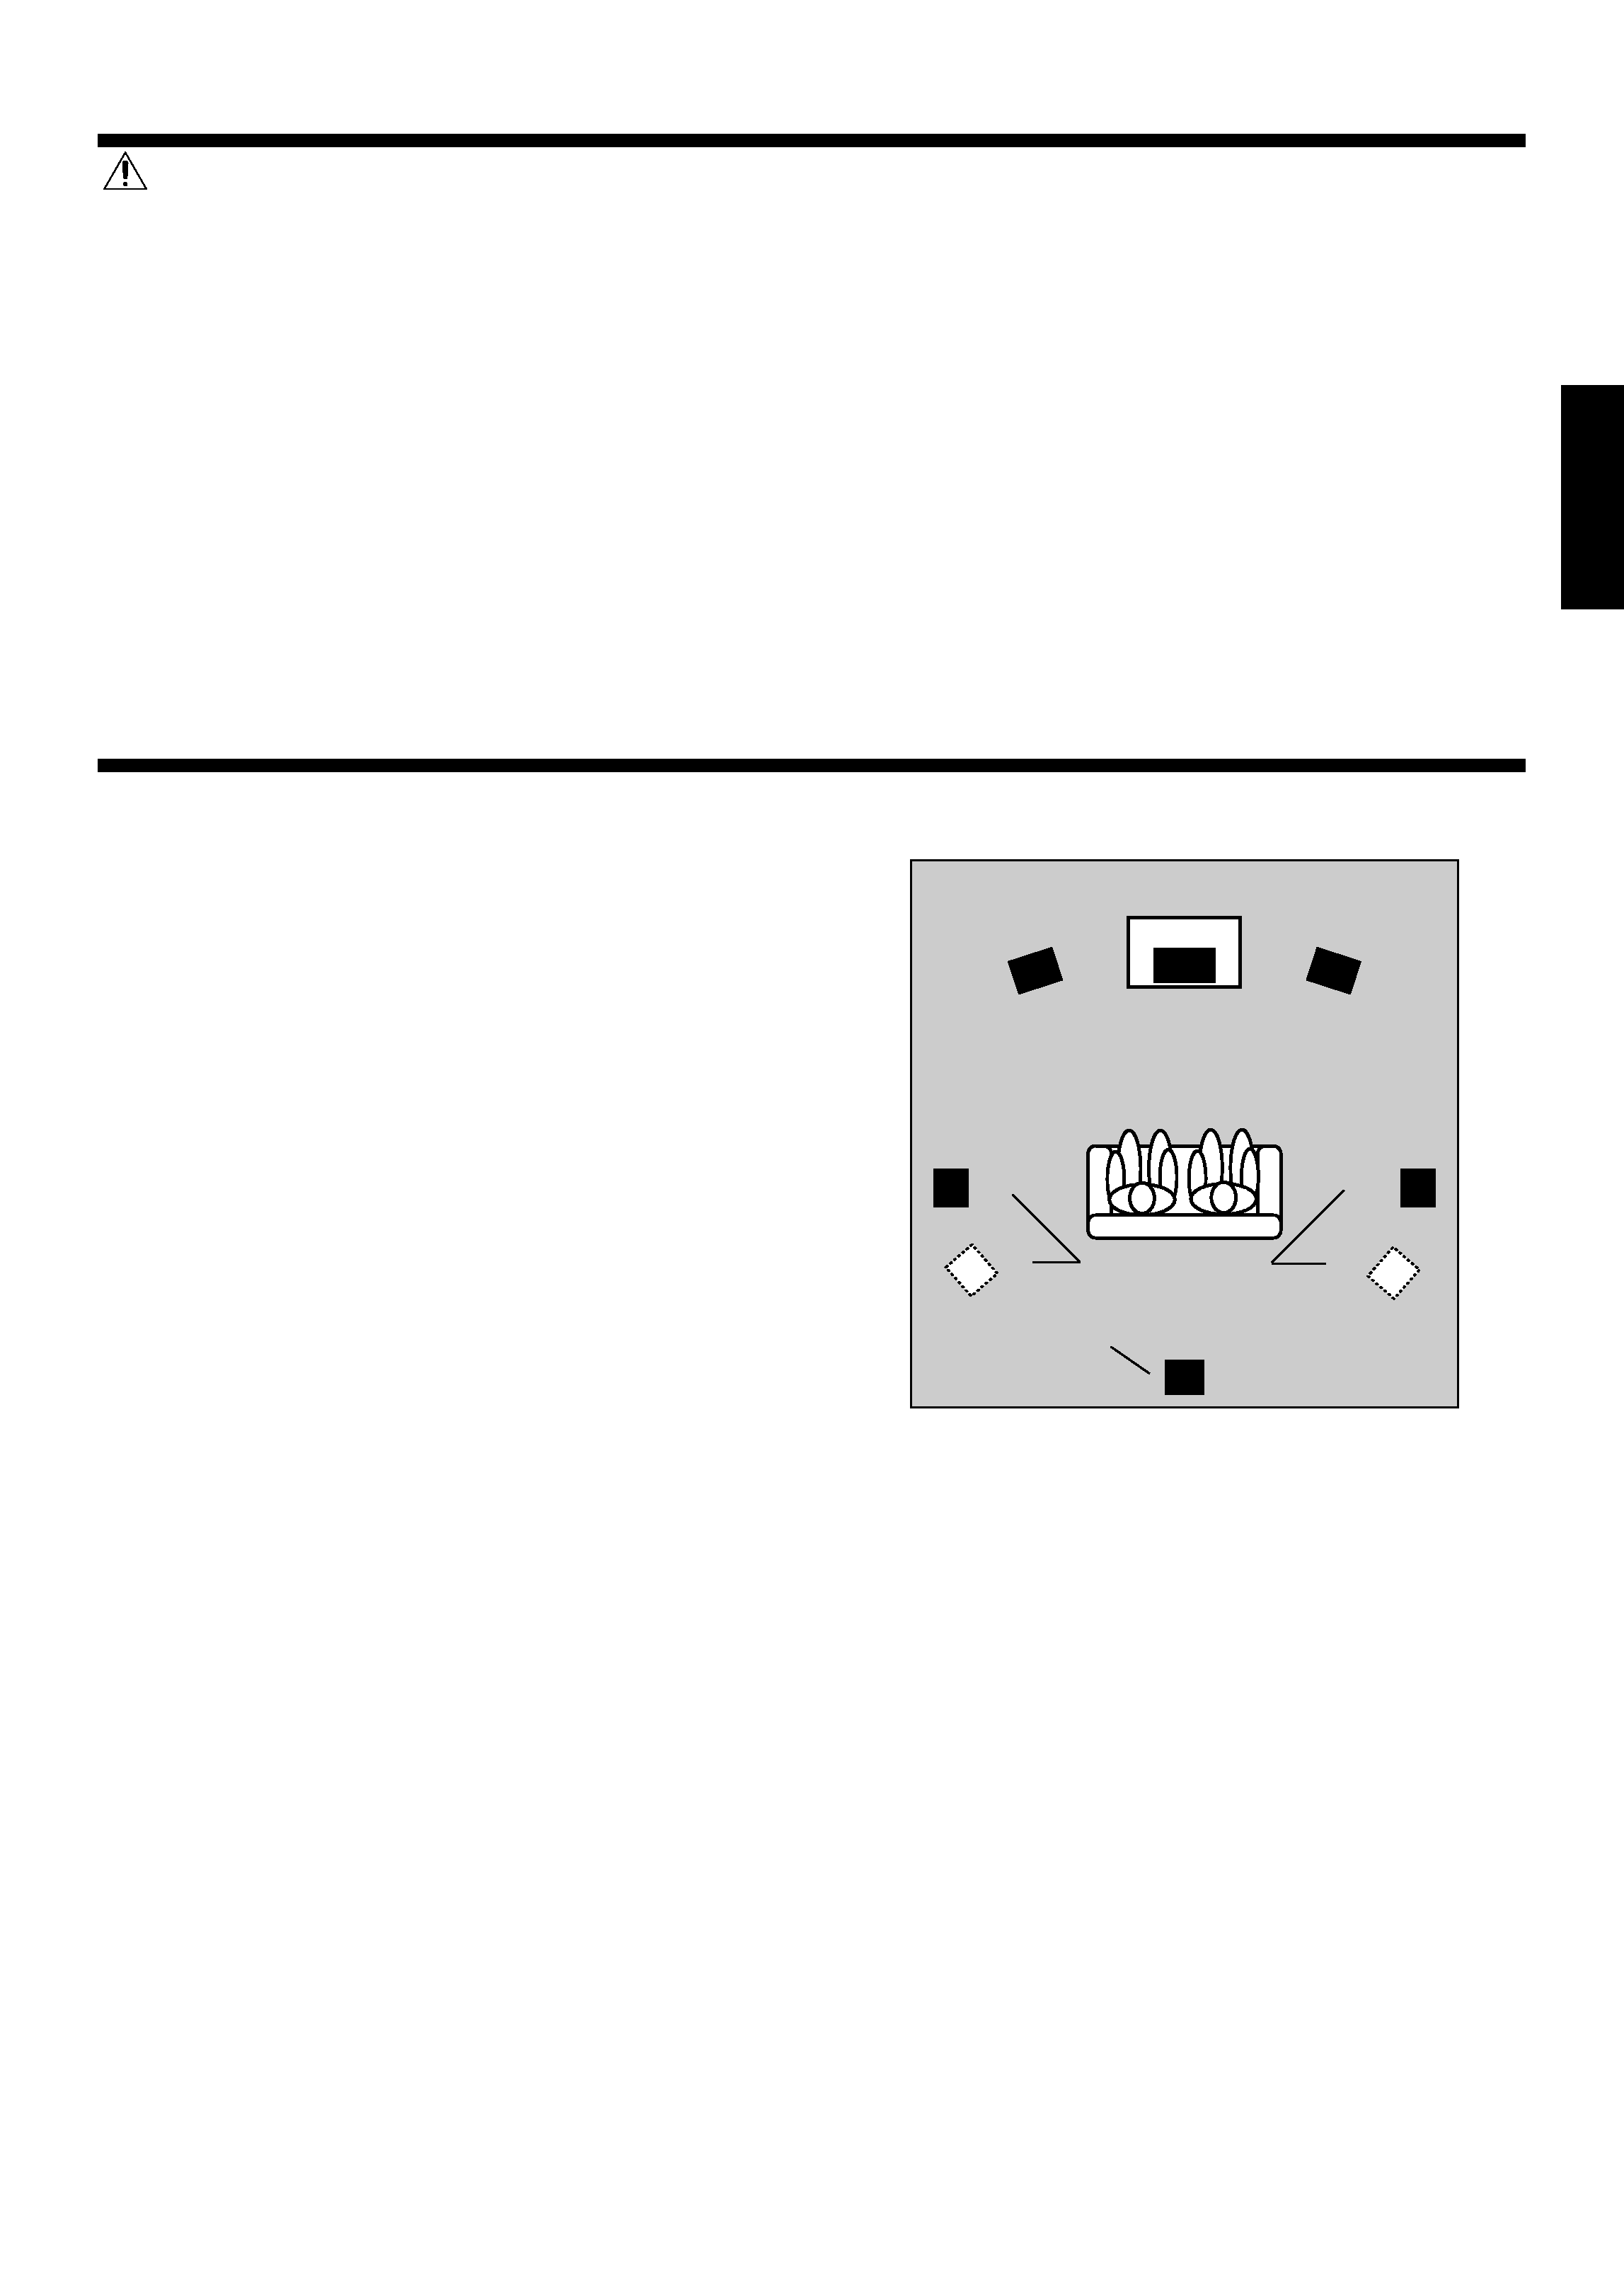
This speaker system can provide full Surround sound. To enjoy
the full effect of the Surround sound field, please position the
speakers as described below.
· Place the left and right speakers at each side of your TV.
Angle the speakers towards the listening area to enhance
the stereo effect.
· Place the center speaker on the center between the front
left and right speakers. Tilt the speaker upward or down-
ward so that it is directly facing the listening area.
· Place the surround speakers as high as possible, either
directly to the sides of the listening area or else slightly
behind the listening area. Adjust the angles so that these
speakers are facing directly towards the listeners.
· Place the surround back speaker behind the listining posi-
tion, at the same height as the left and right surround speak-
ers.
About Using Speakers Near a TV
This speaker include magnetic shielding and can therefore be installed close to a TV set. Note, however, that placing speakers too
close to a TV may in some cases produces distortion in the color reception. In such case, turn on the TV and check that color
reproduction is normal. If color is distorted, turn the TV off for 15 to 30 minutes, then turn it back on and check again. (This allows
the TV's degaussing circuitry to correct for the magnetic field from the speakers.) If distortion is still present, move the speakers
further from the TV.
Left
speaker
Center
speaker
Right
speaker
Surround speakers
Right
Left
Separately sold option speaker
Surround back speaker ................................ KS-3200EX
Surround back speaker (KS-8200EX only)
1.
Suffocation After taking the unit out of the polyethylene
bag, be sure to dispose of the polyethylene bag out of the
reach of children. Otherwise, they may play with the bag,
which could cause hazard of suffocation.
2.
Water and moisture The appliance should not be used
near water - for example, near a bathtub, washbowl, kitchen
sink, laundry tub, in a wet basement, or near a swimming
pool, etc.
3.
Heat Do not install the unit near a source of heat, such
as radiators, or under direct sunlight.
4.
Modification Do not attempt to open or modify the unit,
for this could cause fire hazard or malfunction.
5.
Cleaning Do not use volatile solvents such as alcohol,
paint thinner, gasoline, or benzine, etc. to clean the cabi-
net. Use a clean dry cloth.
6.
Abnormal smell If an abnormal smell or smoke is de-
tected, immediately turn the power OFF and unplug the
appliance from the wall outlet. Contact your dealer or near-
est service center.
ENGLISH
4 EN
Installation Methods
On the supplied speaker stand (Front speaker, Surround speaker)
The supplied speaker stands can be used to install either the front or surround speakers.
÷ The round encircled numerals in the following text refer to the items listed on the "Included parts list" page.
÷ The supplied speaker wires are color-coded according to the speakers to be connected. See the description in "Connections"
for details.
Note : Be sure to place the speaker stand in a flat, horizontal place.
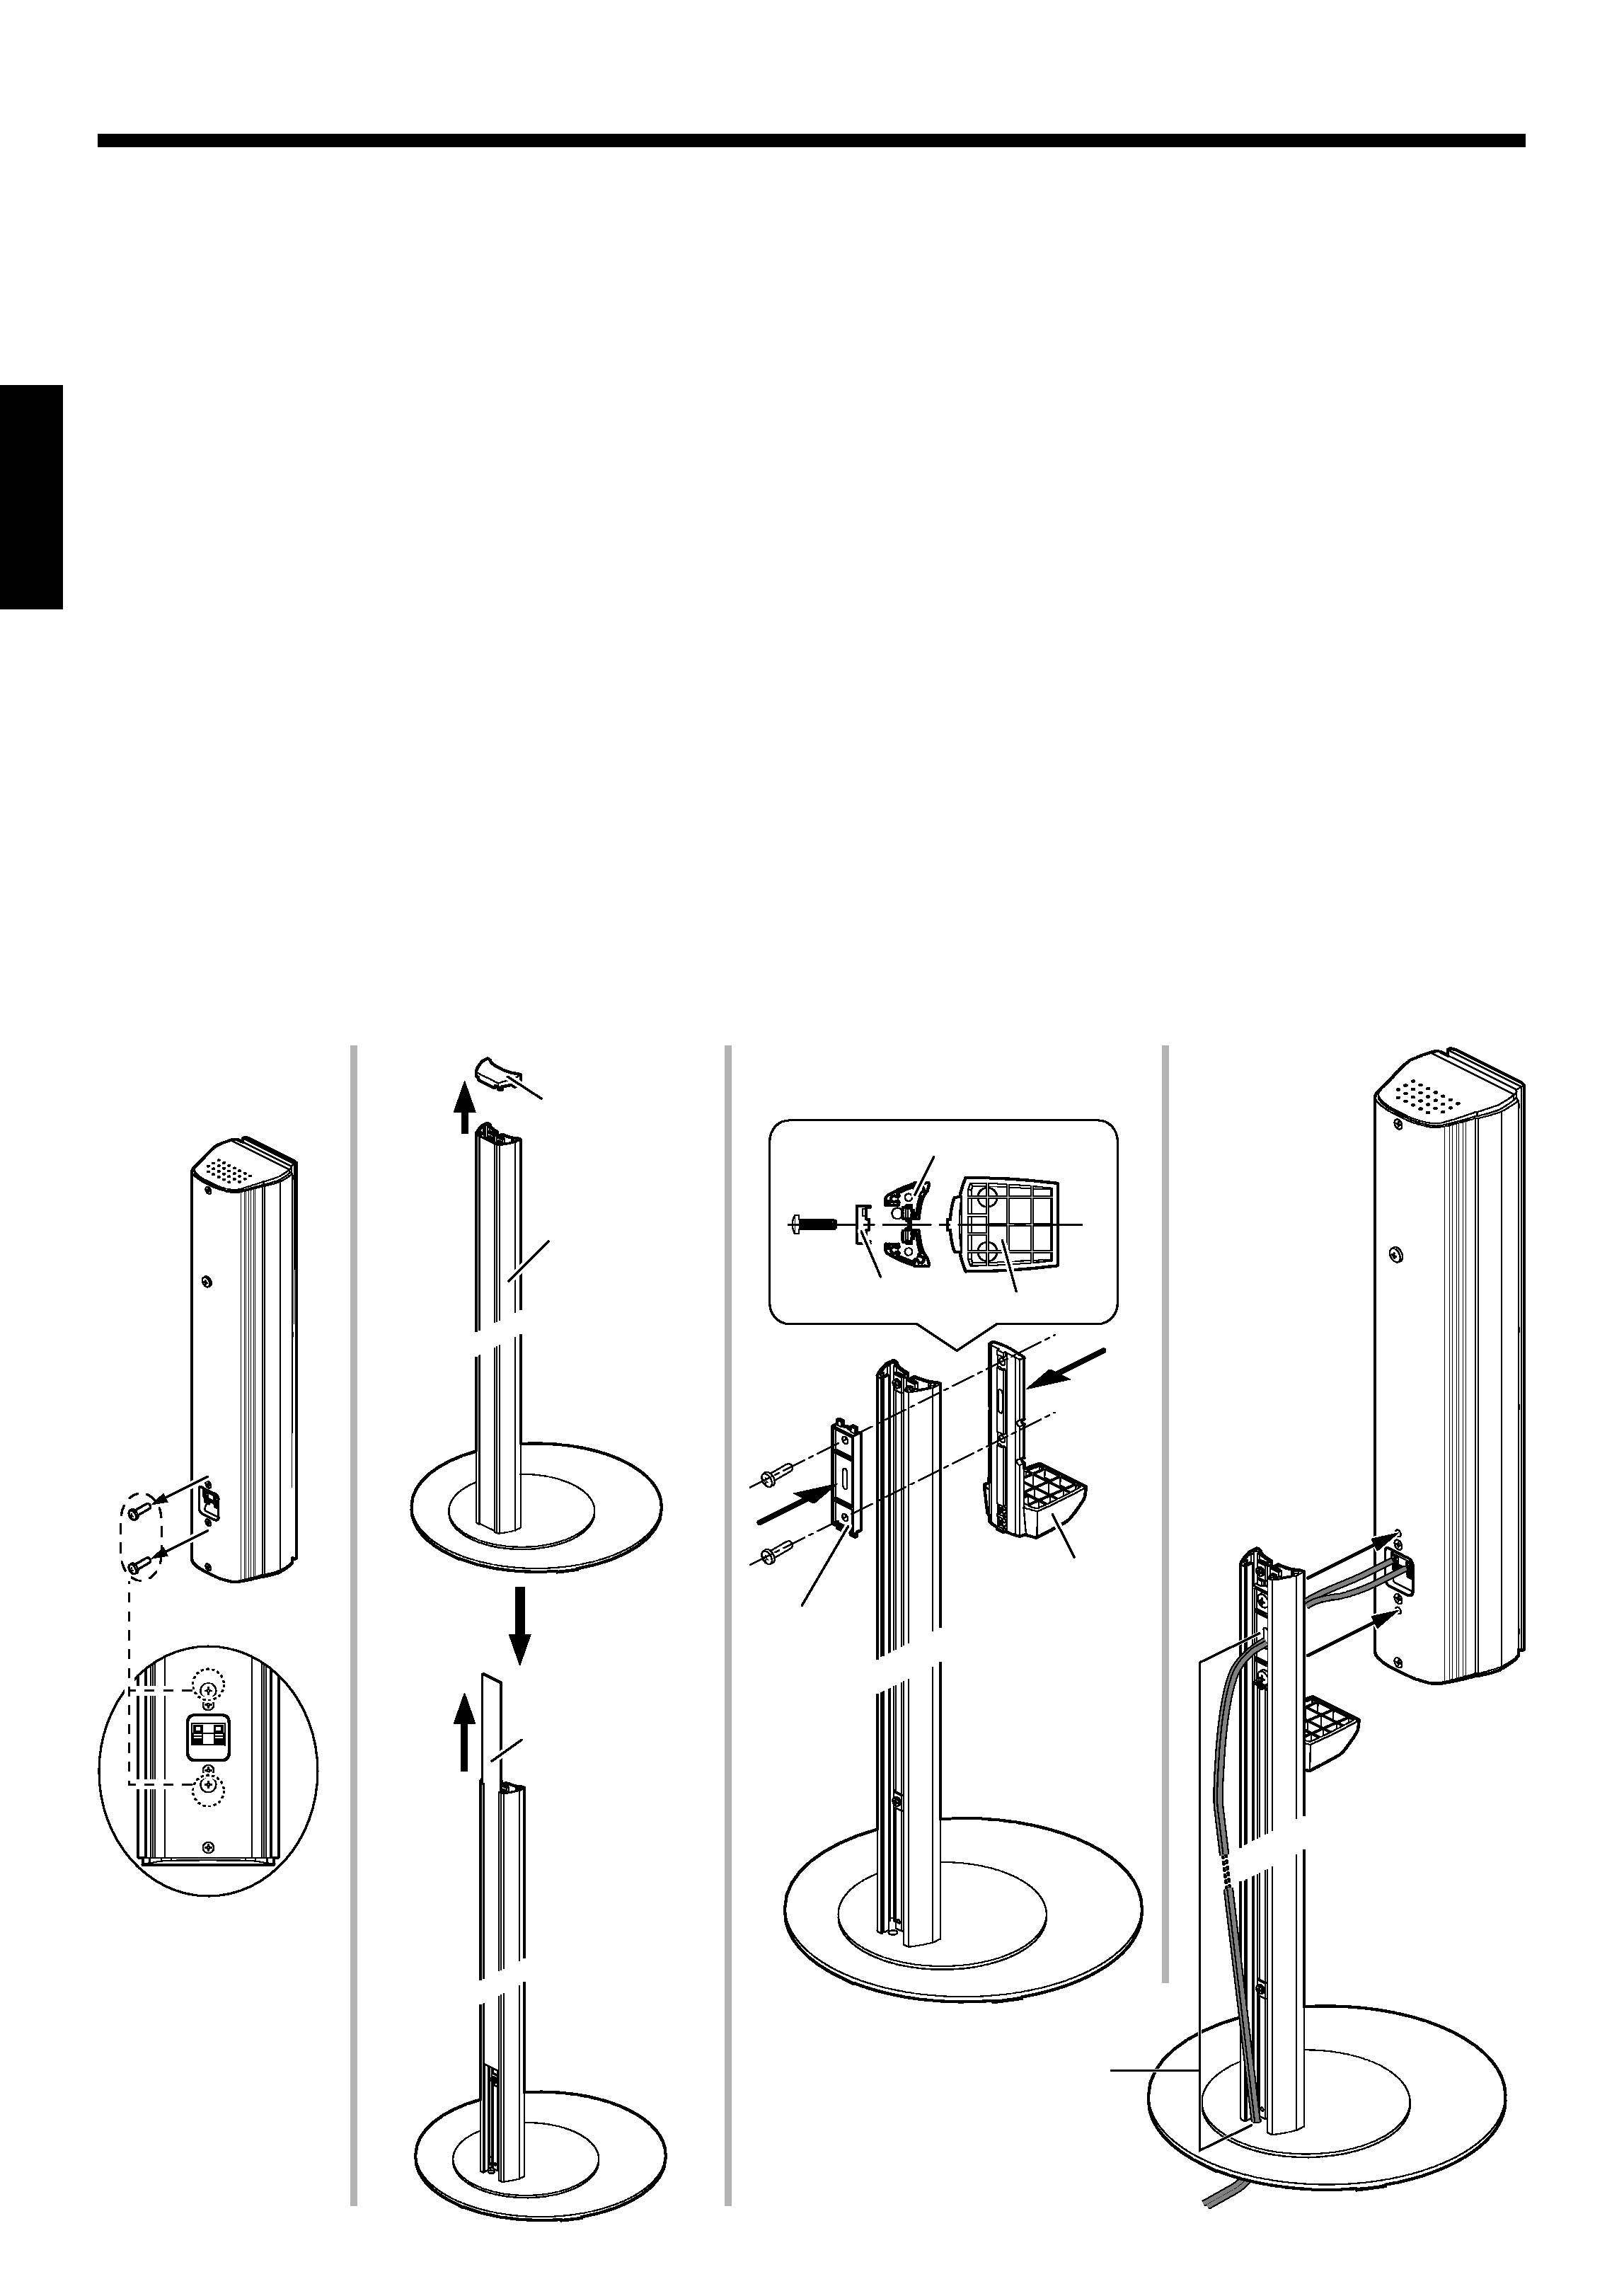
Using the supplied speaker stands with the front speakers
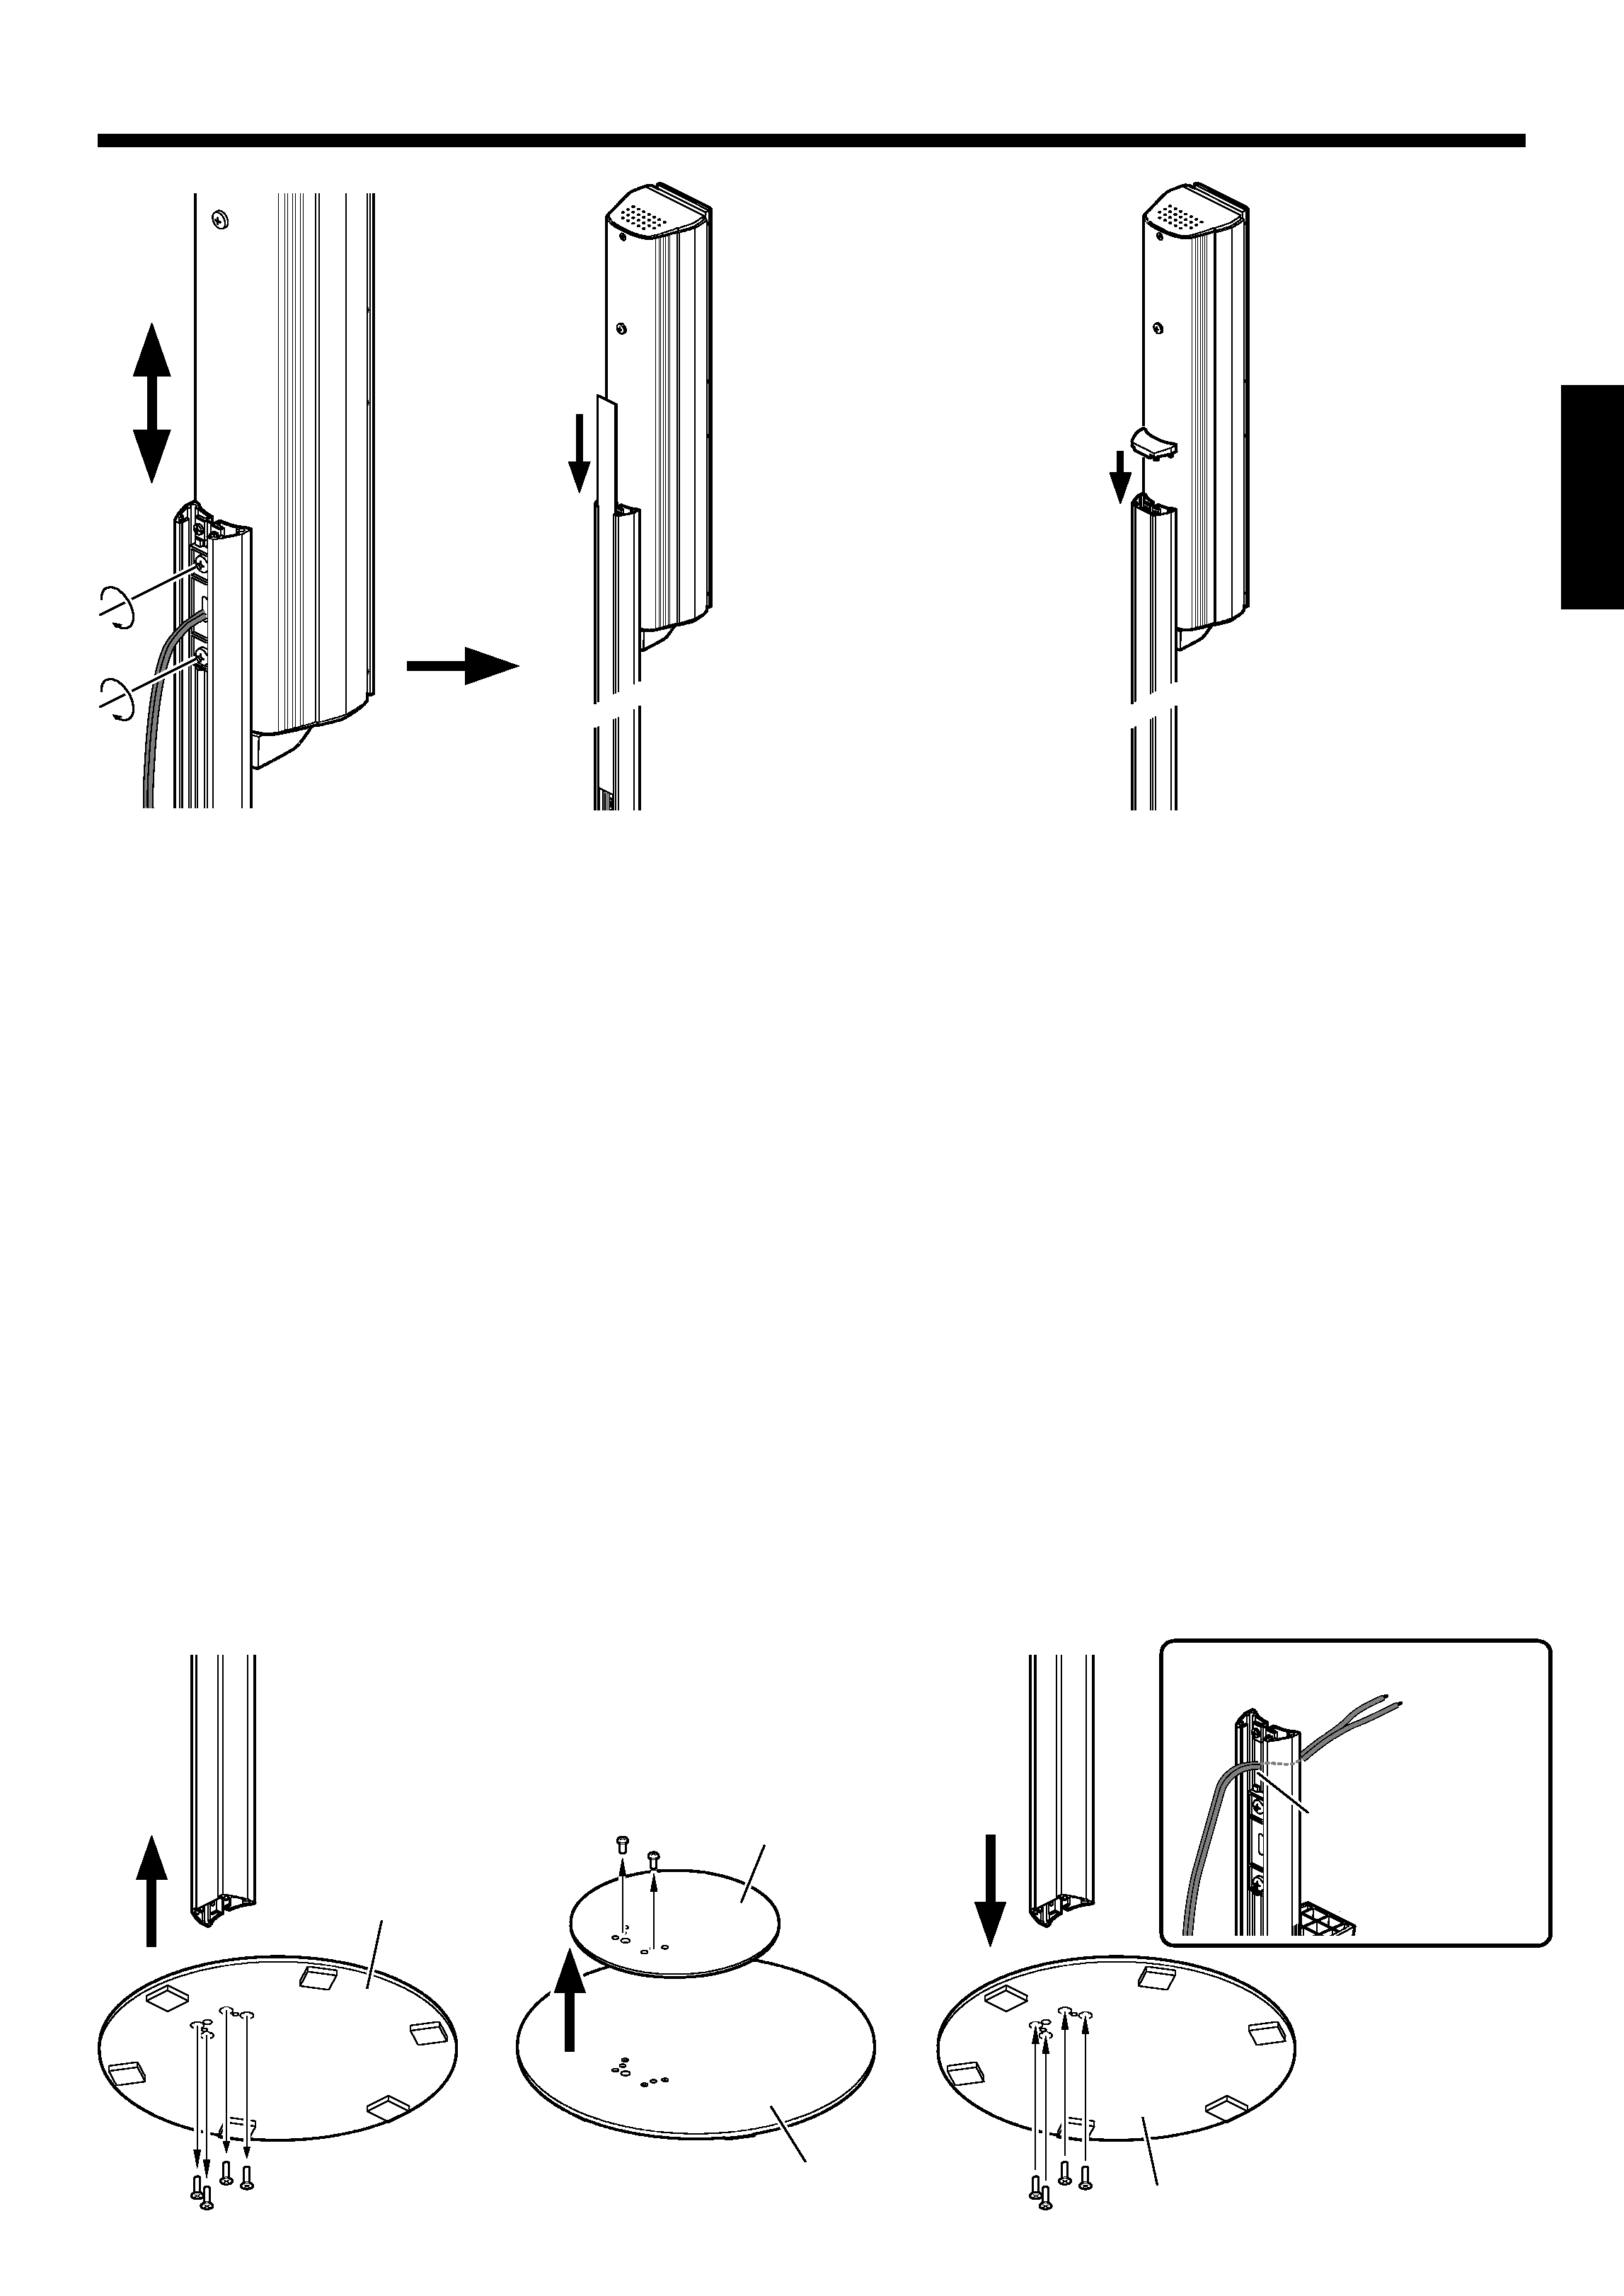
1 Remove the two screws from the rear of each speaker.
2 Remove the cap and dressing sheet from the pole assembly 1.
3 Attach holder A 2 and holder B 3 to both sides of the pole assembly 1 as if sandwiching it, and insert the screws removed
from the speaker into the holes on the holders through them and the pole as shown in the figure. Make sure you attach the
holders correctly in the correct orientations.
4 Distribute the provided speaker wire through the hole on the holders and the hole on the bottom plate of the pole assembly 1
, and connect the speaker wire to the terminal on the speaker. Be sure to observe the polarity of the wire's conductors and
terminals when connecting. Next, insert the screws into the screw holes on the rear of the speaker and tighten them a little so
that they clamp the speaker loosely and that speaker can still be slid up and down.
5 After adjusting the speaker height by sliding it up or down, clamp the speaker by the screws completely. Then, insert the
dressing sheet into the groove on the pole from above.
6 Attach the cap to the top of the pole .
1
Screw
4
3
2
Cap
Dressing sheet
2
1
3
Screw
Top view
1
2
3
Screw
Insert the speaker cord
here.
5 EN
ENGLISH
Installation Methods
56
12
3
Plate (small)
Plate (large)
Bottom plate
Screw
Screw
Screw
Plate (large)
How to distribute the speaker
wire
Insert the speaker
wire here.
Using the supplied speaker stands with the surround speakers
The method of mounting the surround speakers on the stands is variable depending on the front speaker installation
method.
When installing the front speakers on the desktop or shelf, remove the plates (small) from the speaker stands as described in the
following procedure before mounting the surround speakers on the stands. The removed plates (small) should be attached to the
front speakers (for the attaching method, see the description in "On the Desktop or Shelf" on page 6).
When installing the front speakers on the wall, it is not necessary to remove the plates (small) from the speaker stands. Simply
mount the surround speakers on the stands by following steps
2 to 6 in the procedure in "Using the supplied speaker stands
with the front speakers" on page 4. In doing this, however, the screws used in step
3 of this procedure should be supplied
screws. Do not pass the speaker wire through the hole on the holder but distribute it above the holder as shown below.
÷ The round encircled numerals in the following text refer to the items listed on the "Included parts list" page.
1 Disassemble the pole assembly into the bottom plate and pole by removing the retaining screws.
2 Disassemble the bottom plate into the plate (small) and plate (large) by removing the retaining screws.
3 Using the screws removed in step 1, attach only the plate (large) to the pole.
4 Mount the speaker on each stand by following steps 2 to 6 in the procedure in "Using the supplied speaker stands with
the front speakers" on page 4. The screws used in step
3 of this procedure should be supplied screws. Do not pass the
speaker wire through the hole on the holder but distribute it above the holder as shown below.
