1
KR-V888D (En/T)
Preparations
Operations
Remote
Control
Other
B60-3017-10 CH (T) WS
98/12 11 10 9 8 7 6 5 4 3 2 1 97/12 11 10 9 8 7 6 5 4 3
AUDIO VIDEO SURROUND RECEIVER
KR-V888D
INSTRUCTION MANUAL
KENWOOD CORPORATION
About the supplied remote control . . .
Compared to standard remote controls, the remote control supplied with this receiver has several
operation modes. These modes enable the remote control to perform on screen operations and control
other audio/video components. In order to effectively use the remote control it is important to read the
operating instructions and obtain a proper understanding of the remote control and how to switch its
operation modes (etc.).
Using the remote control without completely understanding its design and how to switch the operation
modes may result in incorrect operations.

2
KR-V888D (En/T)
Preparations
Operations
Other
Units are designed for operation as follows.
U.K. and Europe ....................................................................... AC 230 V only
WARNING :
TO PREVENT FIRE OR ELECTRIC SHOCK, DO NOT EXPOSE THIS APPLIANCE TO RAIN
OR MOISTURE.
CAUTION: TO REDUCE THE RISK OF ELECTRIC SHOCK, DO NOT REMOVE COVER (OR
BACK). NO USER-SERVICEABLE PARTS INSIDE, REFER SERVICING TO QUALIFIED SERVICE
PERSONNEL.
THE LIGHTNING FLASH WITH ARROWHEAD SYMBOL, WITHIN AN EQUILATERAL TRIANGLE, IS INTENDED TO ALERT THE
USER TO THE PRESENCE OF UNINSULATED "DANGEROUS VOLTAGE" WITHIN THE PRODUCT'S ENCLOSURE THAT MAY BE
OF SUFFICIENT MAGNITUDE TO CONSTITUTE A RISK OF ELECTRIC SHOCK TO PERSONS.
THE EXCLAMATION POINT WITHIN AN EQUILATERAL TRIANGLE IS INTENDED TO ALERT THE USER TO THE PRESENCE OF
IMPORTANT OPERATING AND MAINTENANCE (SERVICING) INSTRUCTIONS IN THE LITERATURE ACCOMPANYING THE
APPLIANCE.
CAUTION
RISK OF ELECTRIC SHOCK
DO NOT OPEN
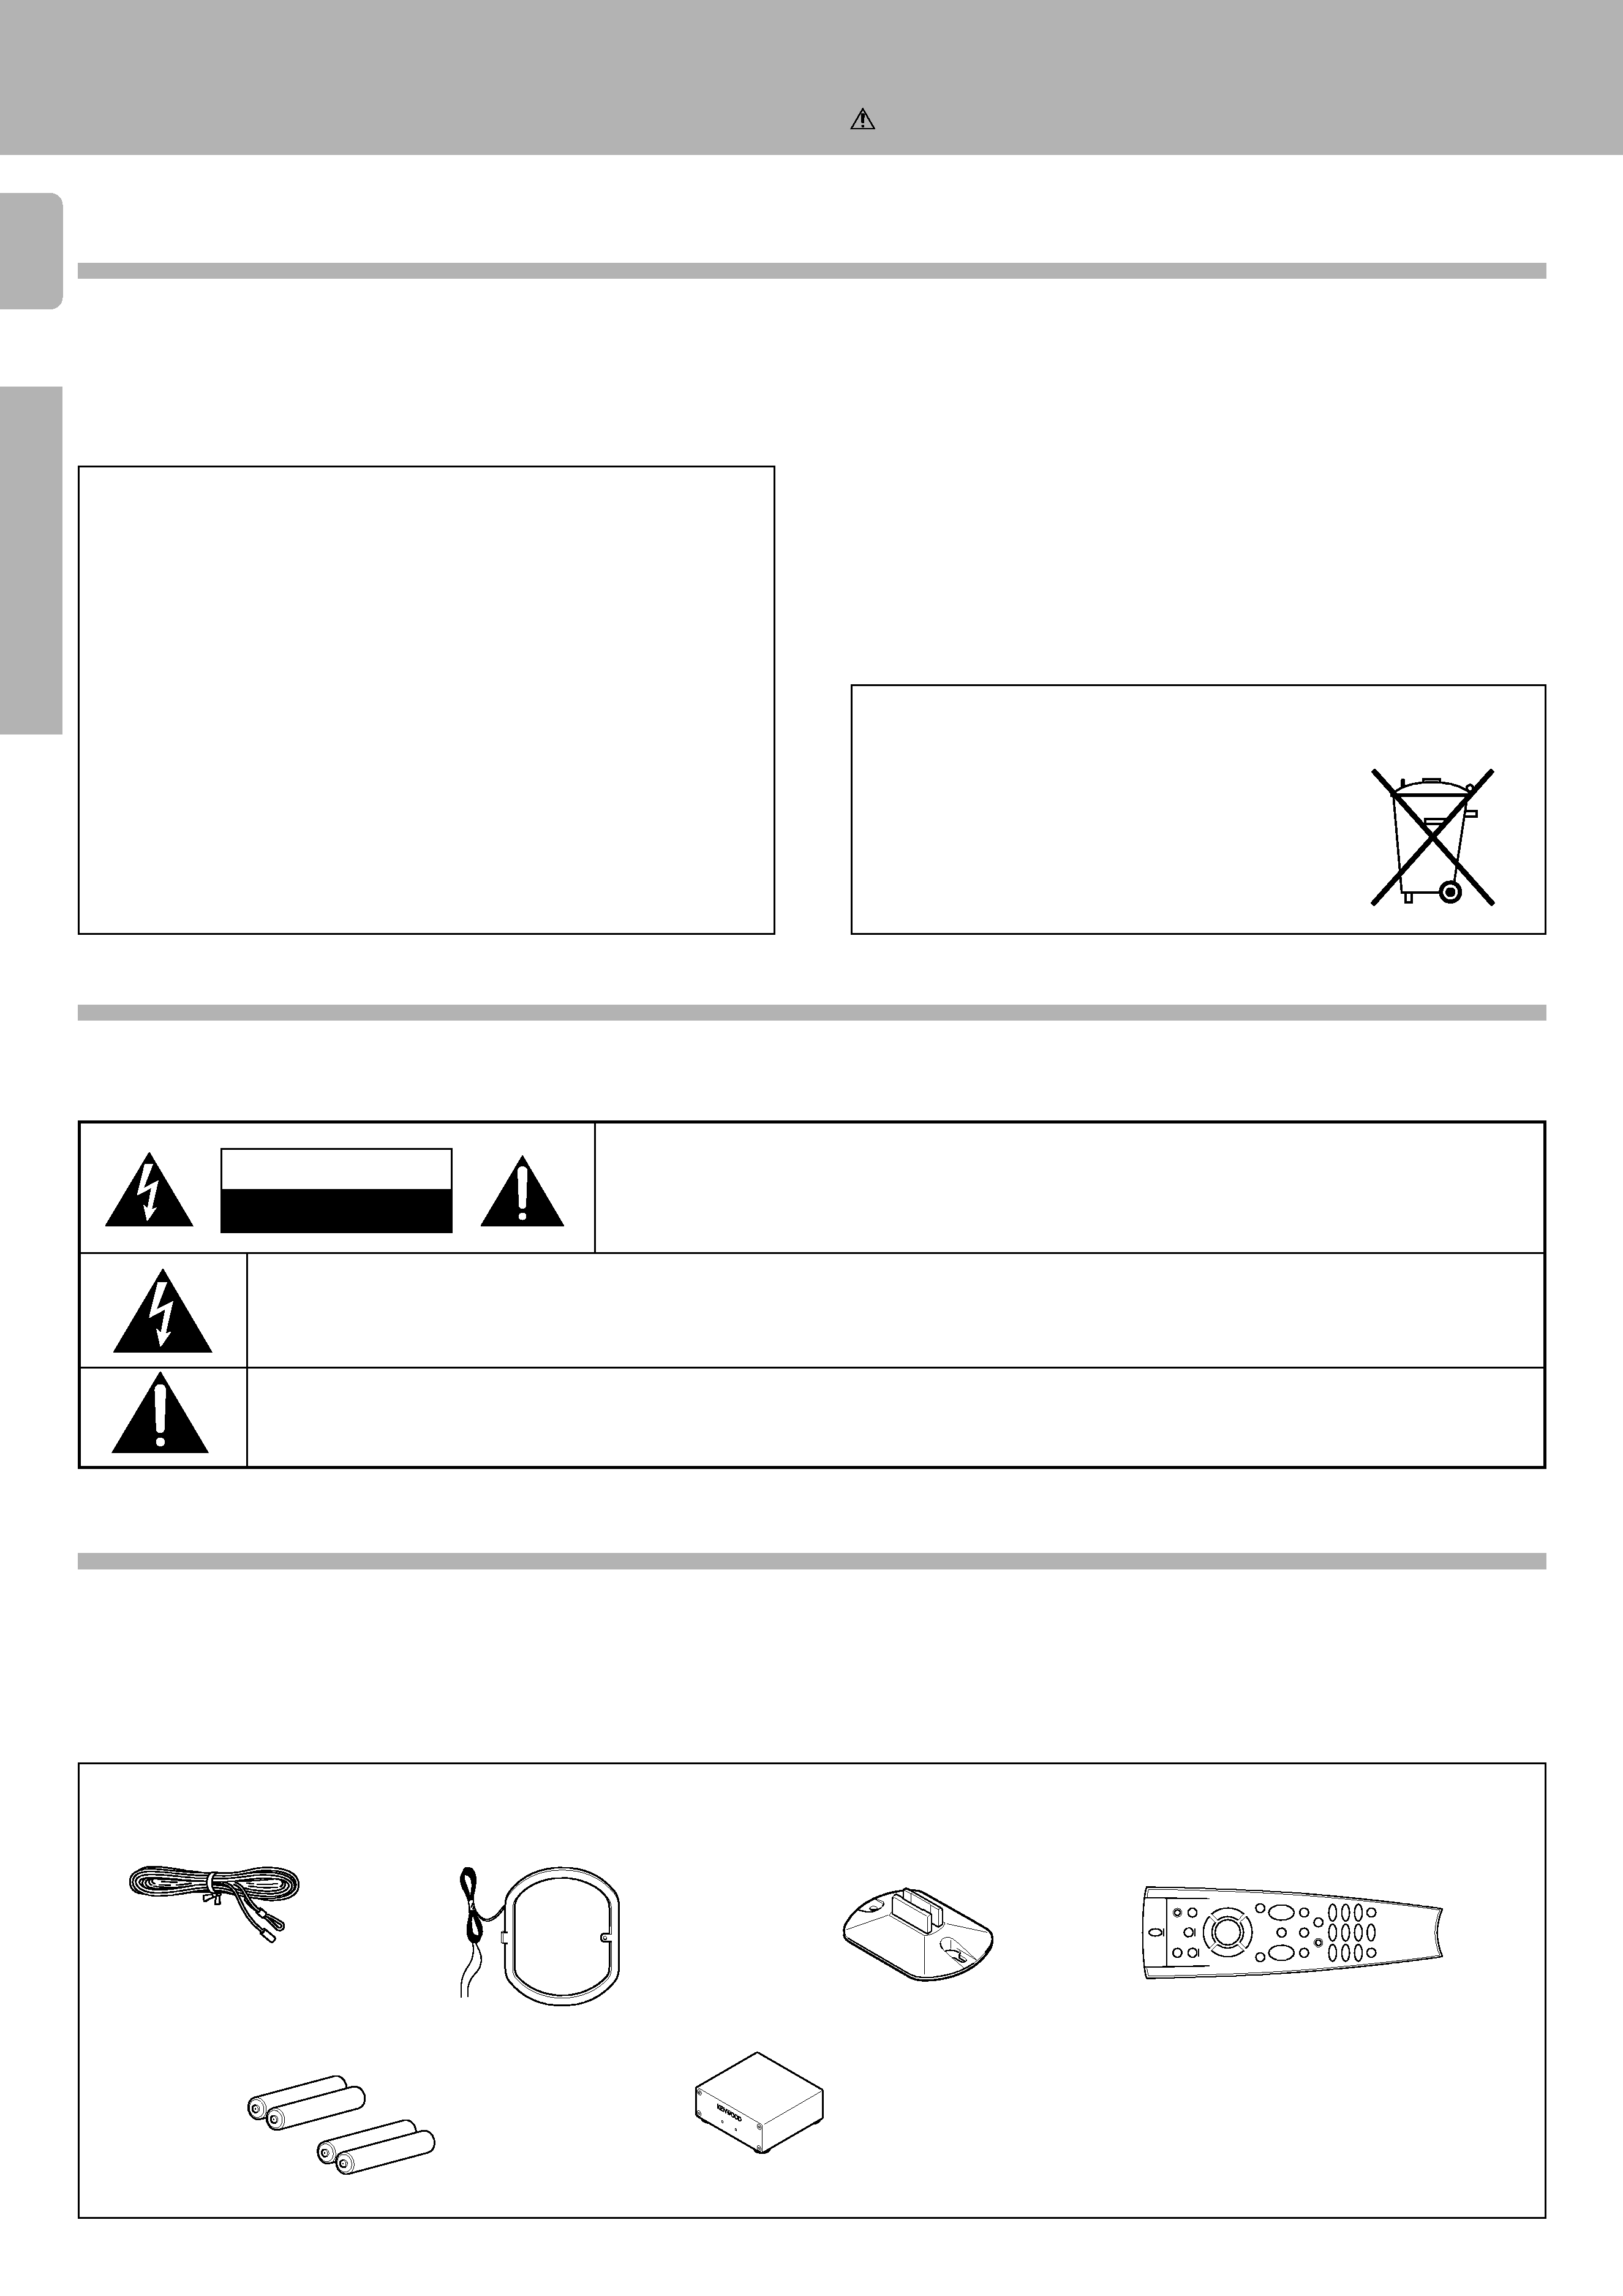
Unpack the unit carefully and make sure that all accessories are put aside so they will not be lost.
Examine the unit for any possibility of shipping damage. If your unit is damaged or fails to operate, notify your dealer immediately. If your
unit was shipped to you directly, notify the shipping company without delay. Only the consignee (the person or company receiving the
unit) can file a claim against the carrier for shipping damage.
We recommend that you retain the original carton and packing materials for use should you transport or ship the unit in the future.
Before applying the power
Getting started
Caution : Read this page carefully to ensure safe operation.
Safety precautions
Unpacking
Accessories
FM indoor antenna (1)
Loop antenna stand (1)
AM loop antenna (1)
Remote control unit (1)
Batteries (R03/AAA) (4)
RF DEMODULATOR (1)
POWER
LOCK
LASER
DISC
RF
DEMODULATOR
DEM-999D
AC adaptor (1)
Power cord (1)
RCA pin cord (2)
For the United Kingdom
REQUIREMENT BY NEDERLAND GAZETTE
Batteries are supplied with this product. When
they empty, you should not throw away. In-
stead, hand them in as small chemical waste.
Factory fitted moulded mains plug
1.The mains plug contains a fuse. For replacement, use only a 13-Amp
ASTA-approved (BS1362) fuse.
2.The fuse cover must be refitted when replacing the fuse in the
moulded plug.
3.Do not cut off the mains plug from this equipment. If the plug fitted
is not suitable for the power points in your home or the cable is too
short to reach a power point, then obtain an appropriate safety
approved extension lead or adapter, or consult your dealer.
If nonetheless the mains plug is cut off, remove the fuse and dispose
of the plug immediately, to avoid a possible shock hazard by
inadvertent connection to the mains supply.
IMPORTANT
The wires in the mains lead are coloured in accordance with the
following code:
Blue
: Neutral
Brown : Live
Do not connect those leads to the earth terminal of a three-pin
plug.

3
KR-V888D (En/T)
Preparations
Operations
Remote
Control
Other
Caution : Read the pages marked
carefully to ensure safe operation.
Contents
Getting started
2
Before applying the power ........................................................................................... 2
Safety precautions ........................................................................................................ 2
Unpacking ...................................................................................................................... 2
Special features
4
How to use this manual ................................................................................................ 5
Names and functions of parts
6
Setting up the system
8
Connecting the antennas .............................................................................................. 8
Connecting audio components ..................................................................................... 9
Connecting video components ................................................................................... 10
Digital connections ...................................................................................................... 11
Connecting the system control ................................................................................... 12
Connecting the speakers ............................................................................................ 13
Preparing the remote control ...................................................................................... 14
Preparing for surround sound
15
Using the on-screen display ........................................................................................ 15
Surround setup ............................................................................................................ 16
Normal playback
18
Listening to a source component ............................................................................... 18
Adjusting the sound .................................................................................................... 19
Recording
22
Recording audio .......................................................................................................... 22
Recording video .......................................................................................................... 22
Listening to radio broadcasts
23
Tuning (non-RDS) radio stations ................................................................................. 23
Tuning radio stations by frequency (DIRECT tuning) ................................................. 24
Using RDS (Radio Data System) ................................................................................. 25
Using the DISPLAY key .............................................................................................. 25
Presetting RDS stations (RDS AUTO MEMORY) ....................................................... 26
Receiving preset RDS stations ................................................................................... 26
Presetting radio stations manually .............................................................................. 27
Receiving preset stations ........................................................................................... 27
Receiving preset stations in order (P.CALL) ............................................................... 27
Tuning by program type (PTY search) ......................................................................... 28
Reserving the desired information ............................................................................. 30
Ambience effects
32
Sound modes .............................................................................................................. 32
Surround play .............................................................................................................. 34
Getting the most from your remote control
38
Registering setup codes for other components ......................................................... 38
Operating other components ...................................................................................... 40
Changing (confirming) the operation mode ................................................................ 41
Preparing for automatic operations (MACRO play) .................................................... 42
Executing an automatic operation .............................................................................. 44
Setup code correlation ................................................................................................ 45
FutureSet upgrade option ........................................................................................... 46
Set up code chart
48
In case of difficulty
54
Specifications
56
Remote operation of other components
57
Other
Remote Control
Operations
Preparations

4
KR-V888D (En/T)
Preparations
Operations
Other
Special features
True home theater sound
This receiver incorporates a wide variety of surround modes to bring you maximum enjoyment from your video software. Select
a surround mode according to your equipment or the software you are going to play and enjoy!
¤
Dolby Digital (AC-3)
The DOLBY DIGITAL (AC-3) mode lets you enjoy full digital surround from software processed in the Dolby Digital (AC-3)
format. Dolby Digital (AC-3) provides up to 5.1 channels of independent digital audio for better sound quality and more
powerful presence than conventional Dolby Surround.
Dolby Pro Logic & Dolby 3 Stereo
This surround system reproduces theater-like surround sound from video software marked
.
The PRO LOGIC mode uses the built-in directivity enhancer circuit to control the Left, Center, Right and Surround channel
audio signals and reproduce a real sense of sound motion .
The 3 STEREO mode uses the directivity enhancer circuit to provide proper acoustic positioning and a real sense of sound
motion even when only the front and center speakers are used.
New DSP surround modes
The DSP (Digital Signal Processor) used for this receiver incorporates a variety of high quality adjustable sound fields, like
"ARENA", "JAZZ CLUB", "STADIUM", "CHURCH" and "THEATER", to add the "presence" associated with an arena, jazz club
or stadium (etc.) to the original signal. It is compatible with almost any kind of program source.
Universal IR (InfraRed) remote control
In addition to the basic receiver and OSD operations, the remote control supplied with this receiver can also operate almost
all of your remote controllable audio and video components. Just follow the simple setup procedure to register the
components you have connected.
°
Dual IR emitters
This remote control has two IR emitters: one to send commands in a straight line over long distances, allowing you to control
the receiver and your other components from farther away; and one for wide dispersion of commands in a closer proximity,
for near-field operation even when the remote control is not pointed directly at the respective component.
$
MACRO play
The MACRO function lets you perform a series of operations automatically, like turning ON the power of the receiver and
connected components, switching the input selectors, and starting playback. (Be sure to register your components before
starting the macro set up procedure.)
w
FutureSet, automatic update feature
This function lets you update the remote control so it can operate new components which do not appear in the setup code
list at the end of the manual. Therefore, the remote control will always be compatible.
y
Easy surround setup and operation with OSD (On Screen Display)
This function takes advantage of your monitor TV to simplify the surround setup procedures so you can quickly and easily
match the surround processing to your speaker system, and your listening environment.
You can also use OSD during playback to customize the DSP surround modes, etc.
%

5
KR-V888D (En/T)
Preparations
Operations
Remote
Control
Other
Special features
RDS (Radio Data System) tuner
The receiver is equipped with a RDS tuner that provides several convenient tuning functions: RDS Auto Memory, to
automatically preset up to 40 RDS stations broadcasting different programs; station name display, to show you the name
of the current broadcast station; and PTY search to let you tune stations by program type.
On screen Radio Text
Although most RDS compatible tuners and receiver's can display the name of the current broadcast station, this receiver
goes one step further by allowing you to display the station name, as well as any other text messages broadcast from the
current station, in large easy to read characters on the screen of your monitor TV. You can even display radio text from an
RDS station while enjoying a different source component!
fl
PTY (Program TYpe) search
Lets you tune stations by specifying the type of program you want to hear.
·
EON (Enhanced Other Networks) reservation
The EON function lets you monitor information on other stations so you can receive traffic, news, or information programs
as soon as they are broadcast, even they are broadcast on a station different from the one you are currently listening to.
When the broadcast ends, the receiver returns to the original station. When listening to KENWOOD source components
connected with system control cords, the input selector on the receiver automatically switches to the tuner when a
program you desire is broadcast.
º
New TRAITR transistor adopted in the final stage
A new TRAITR transistor which features superior temperature tracking characteristics has been adopted in the final stage
of the power amplifier block. This new TRAITR transistor combines a temperature compensation resistor with an emitter
resistor and final transistor to provide ideal temperature compensation characteristics and minimize distortion caused by
temperature variations.
How to use this manual
This manual is divided in to four sections, Preparations, Operations, Remote Control, and Other.
Preparations
Shows you how to connect your audio and video components to the receiver and prepare the surround processor.
We've tried to make setting up your system as easy as possible. However, since this receiver works with all of your audio and video
components, connecting the system can be fairly complex.
Operations
Shows you how to operate the various functions available from the receiver.
Remote Control
Shows you how to operate the various functions available from the remote control.
We've designed this remote control to integrate your entire audio/video system and let you operate all of your entertainment components
-- your TV, VCR, LD player, CD player, etc. Remember that before you can use the remote control to operate these components, they
must be registered with a proper setup code.
Other
Includes additional information such as; a list of setup codes for registering your other components, a troubleshooting guide,
specifications, and a reference guide to the remote operations available for registered components.
