KNA-VC300
VOICE CONTROL MICROPHONE
INSTALLATION MANUAL
MICROPHONE DE COMMANDE VOCALE
MANUEL D'INSTALLATION
SPRACHSTEUERUNGSMIKROFON
INSTALLATION-HANDBUCH
SPRAAKSTURINGSMICROFOON
INSTALLATIE HANDLEIDING
MICROFONO DI CONTROLLO DELLA VOCE
MANUALE DI INSTALLAZIONE
MICRÓFONO DE CONTROL POR VOZ
MANUAL DE INSTALACIÓN
© PRINTED IN JAPAN B64-2619-00/00 (W)(N)
KNA-VC300_6L r3
03.7.25
9:56 AM
Page 3

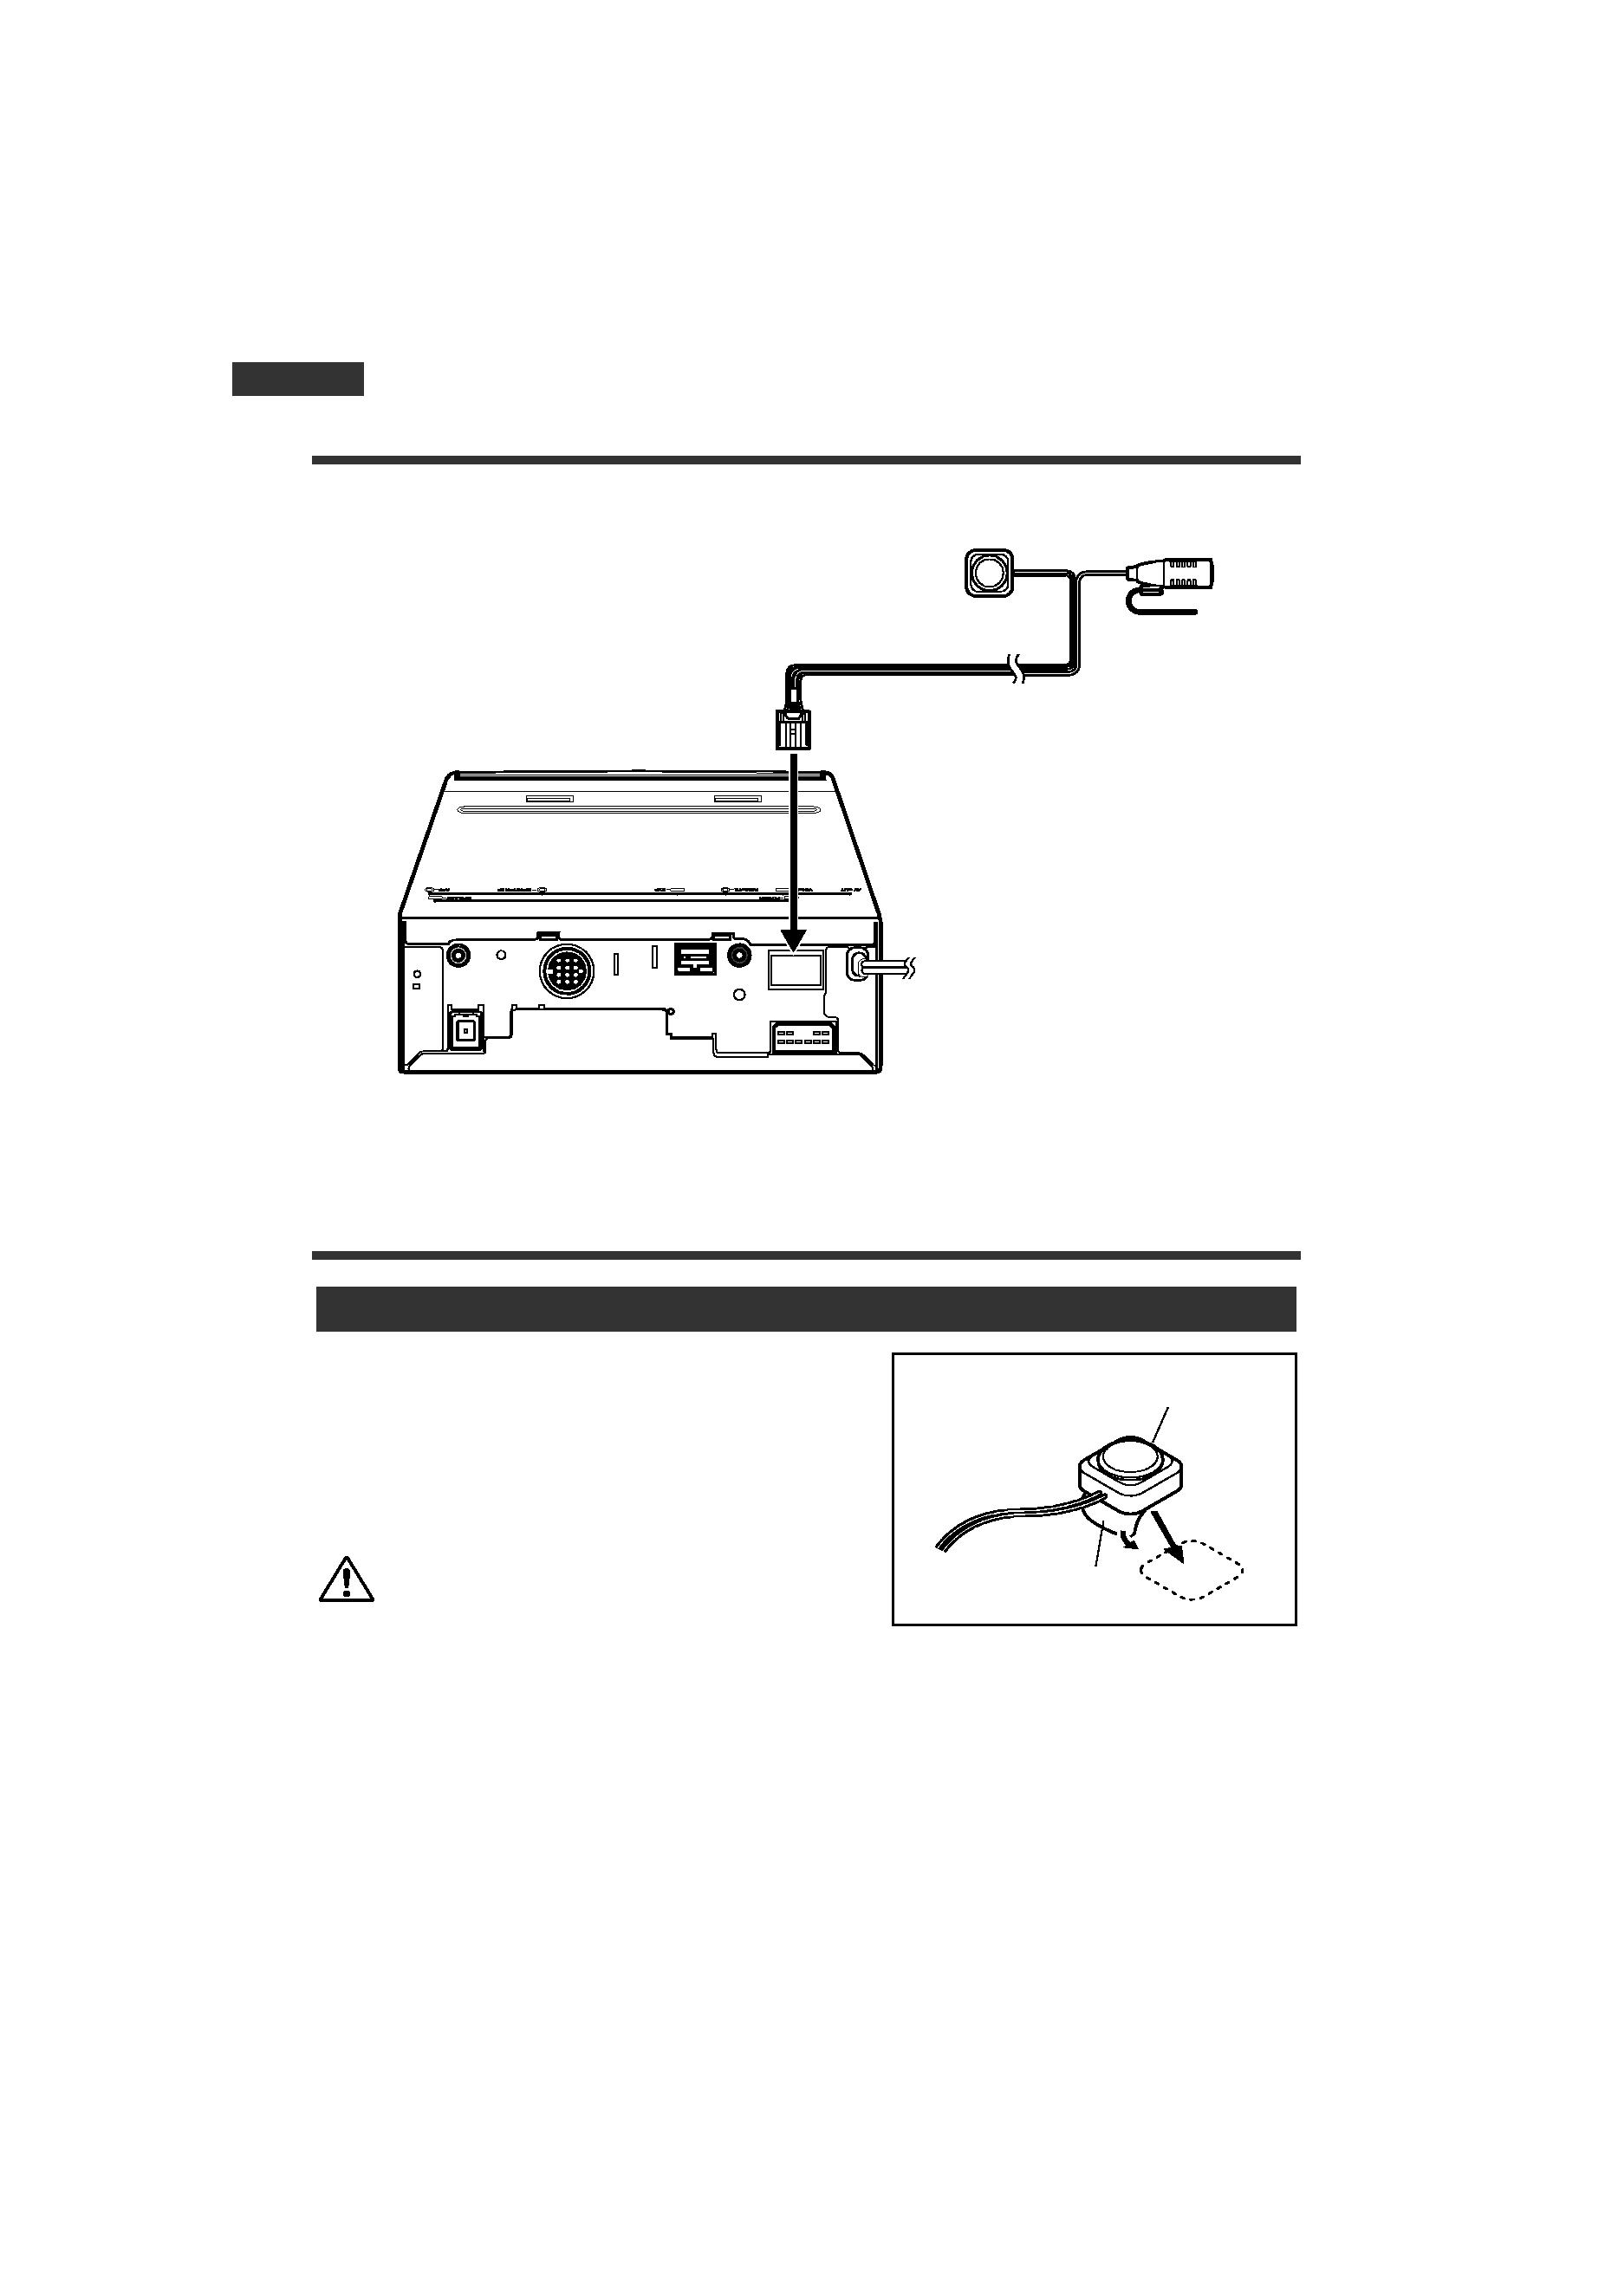
Connection
Installation
Remove the backing paper from the
double-sided sticking tape on the talk
button's rear surface, and then secure
this switch in a location where it will not
hinder operation of the vehicle.
Positioning this component, as failure
to do so will impair the tape's ability to
stick securely.
Talk Button Mounting
Voice control microphone
(6.5 m)
Navigation unit
Talk switch
Backing paper
English
KNA-VC300_6L r3
03.7.25
9:56 AM
Page 4

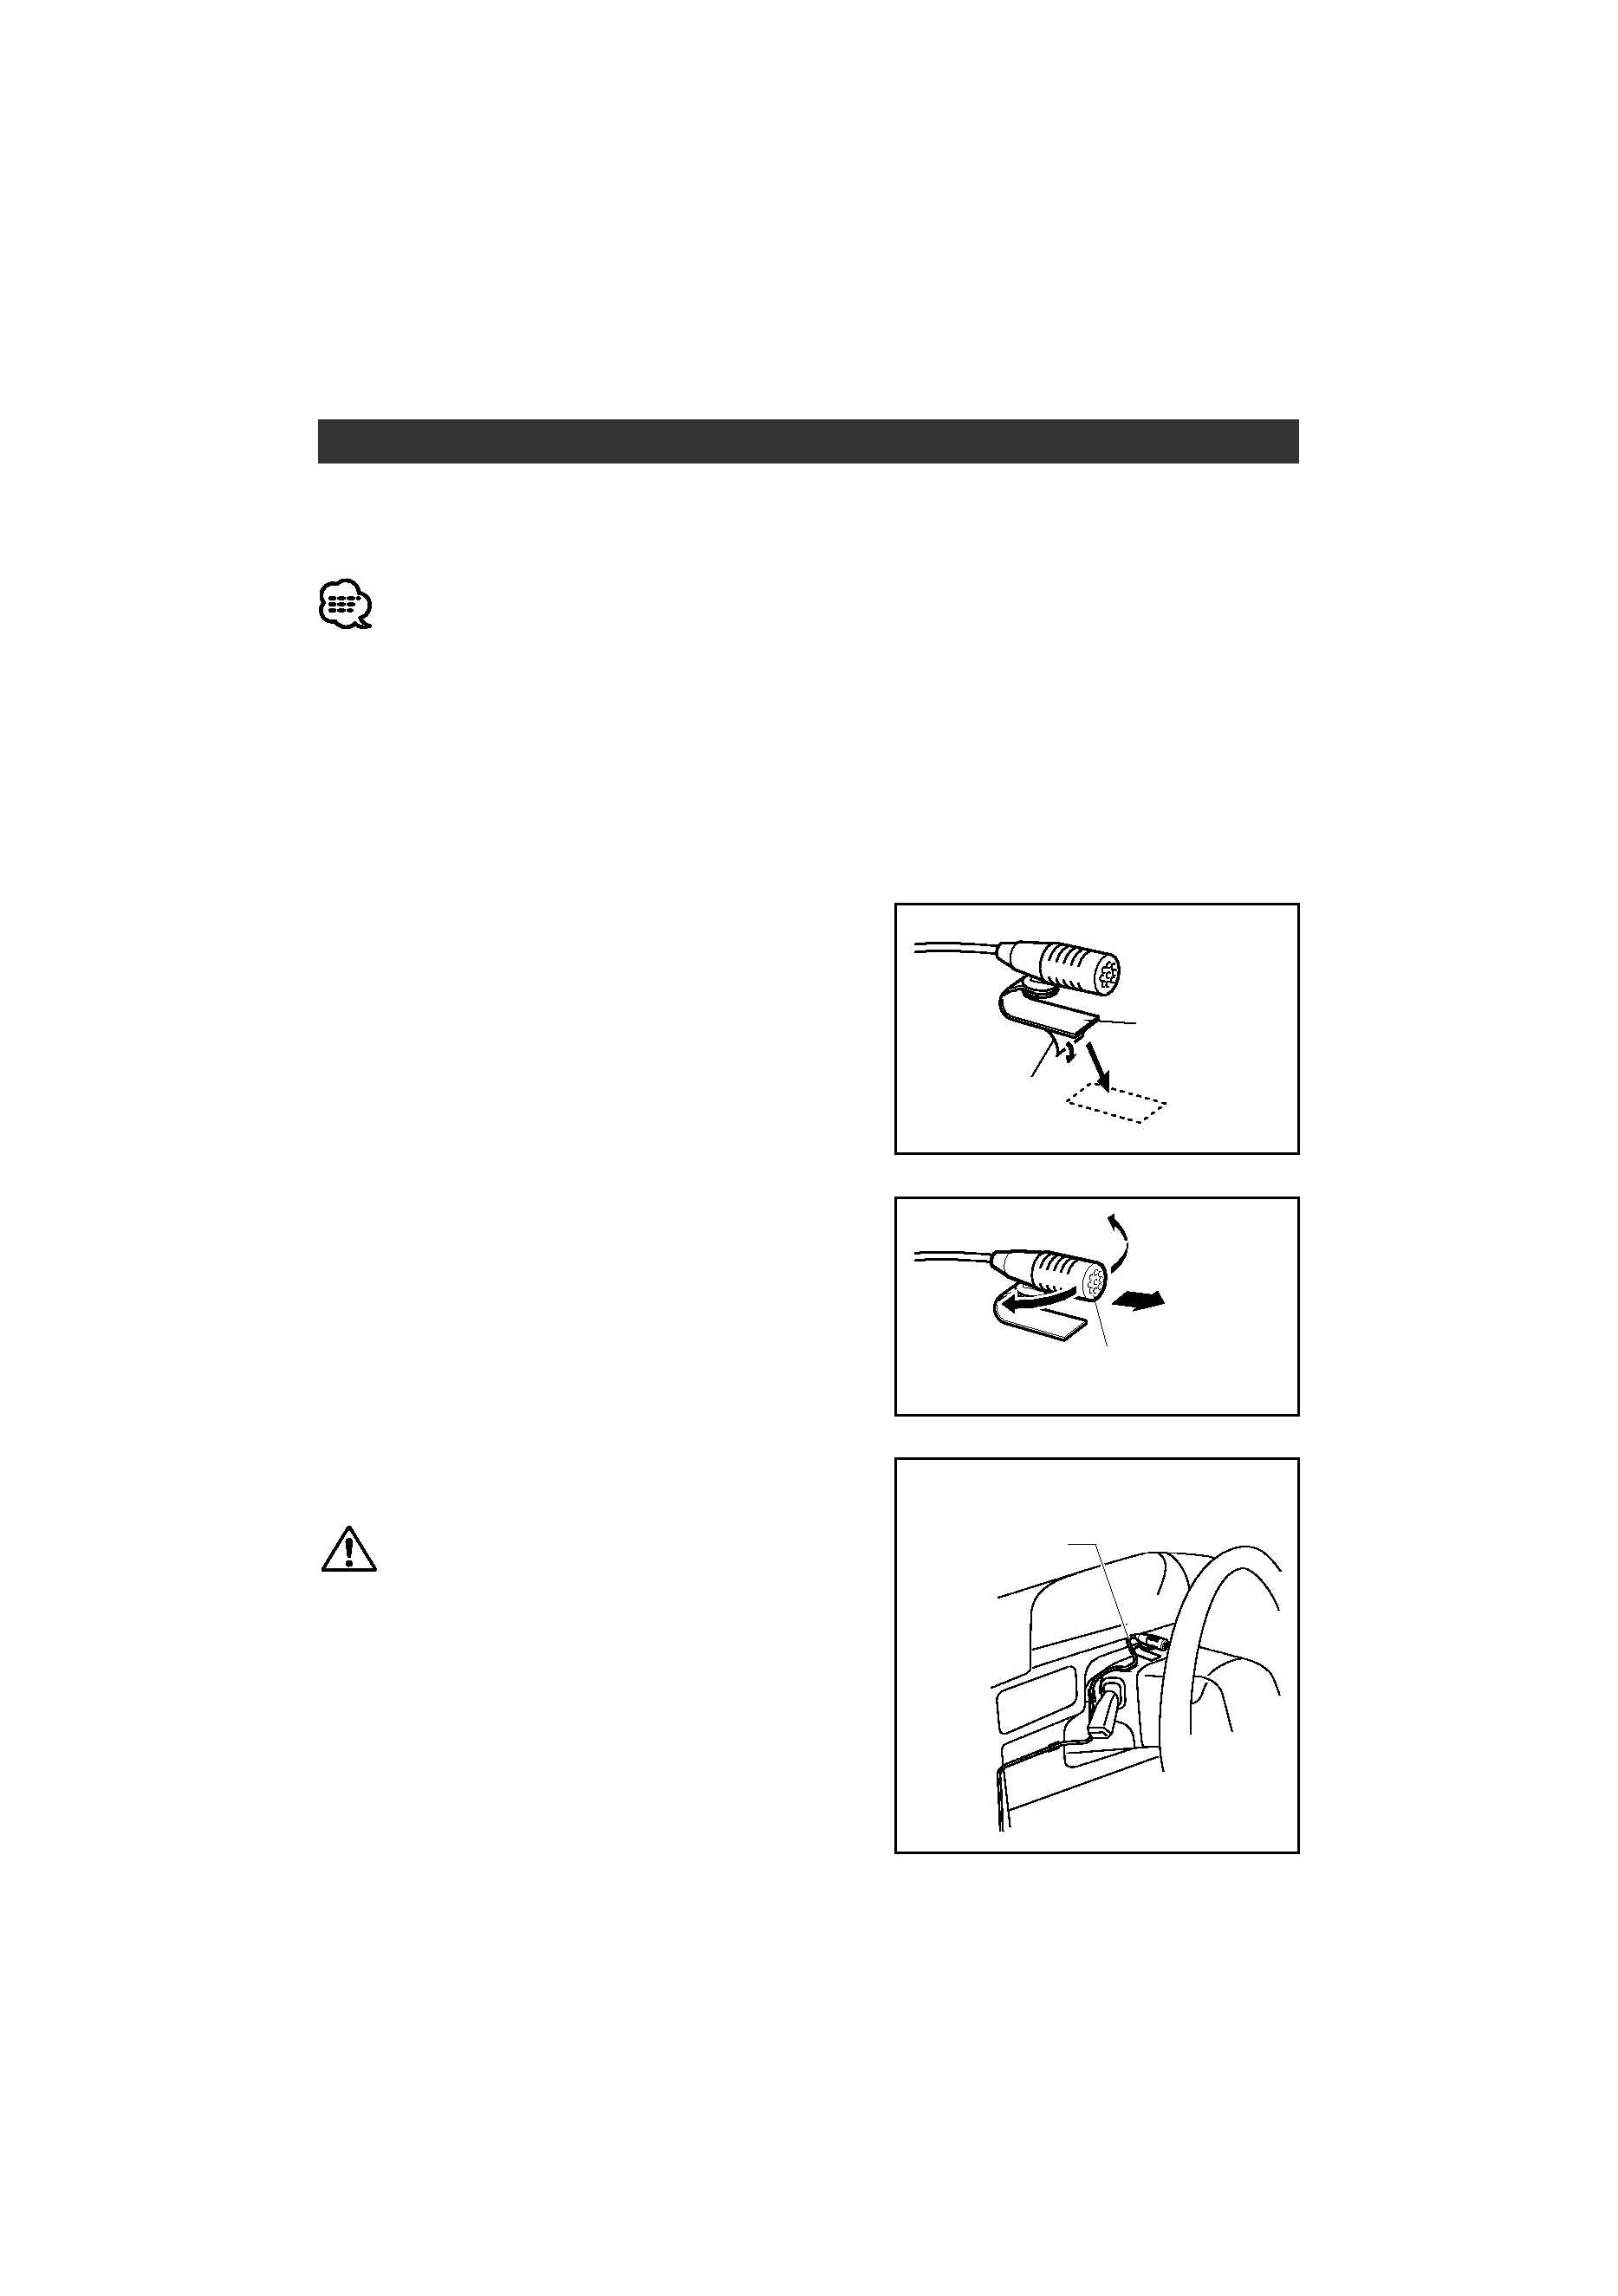
The microphone should be mounted on the steering post or at some
other location where it may clearly pickup the driver's voice.
· This microphone has directional characteristics: Please ensure that the
microphone surface is facing the driver.
· In order to ensure good voice recognition, please ensure that the holes
on the sides of the microphone are not covered in the installation
position.
· Please avoid installation of the microphone in the vicinity of air-
conditioner vents or in locations that are exposed to air blown in from the
windows.
· The microphone should be located between 20 and 40 cm (8 and 16 in.)
from the position of the driver's mouth.
1 Remove the backing paper from the
double-sided sticking tape on the
microphone clip's rear surface, and
then secure this clip on the steering
post or at some other location where
it will not hinder operation of the
vehicle.
2 Adjust the horizontal orientation of
the microphone in such a way that it
faces towards the driver.
3 Position the microphone cord.
Be sure to remove any grease or dirt
from the mounting surface before
positioning this component as failure to
do so will impair the tape's ability to
stick securely.
Microphone Mounting
Microphone
clip
Direction
of the
driver
Microphone
surface
Microphone
cable
<Typical installation>
Backing
paper
KNA-VC300_6L r3
03.7.25
9:56 AM
Page 5

· If repairs should be necessary, consult your Kenwood
dealer.
· Please install the voice control microphone, the talk
switch, and the necessary wiring in such a way that they
will not hinder driving of the vehicle.
· When connecting, fix the cable of Voice Control
Microphone using the component such as a clamper not to
disturb your safe drive.
Please refer to the navigation system's instruction manual
for details regarding usage of the voice control microphone.
· Si une réparation quelconque est nécessaire, consultez
votre agent Kenwood.
· Veuillez installer le microphone de commande vocale, le
commutateur de commande du microphone et le câblage
nécessaire de façon à ce qu'il n'y ne présentent aucune
interférence avec la conduite du véhicule.
· Lors de la connexion, fixez le câble du microphone de
commande vocale par exemple à l'aide d'un attache-fils
afin de ne pas perturber la conduite du véhicule.
Veuillez-vous référer au manuel d'utilisation du système de
navigation pour les détails concernant l'utilisation du
microphone de commande vocale.
· Sollten Reparaturen erforderlich sein, wenden Sie sich an
Ihren Kenwood-Händler.
· Montieren Sie bitte das Sprachsteuerungsmikrofon und
den Sprechschalter so, dass die Fahrsicherheit nicht
beeinträchtigt wird.
· Befestigen Sie das Kabel des Sprachsteuerungs-Mikrofons
beim Anschluss unter Verwendung einer Komponente wie
beispielsweise einer Klammer, damit Ihre Fahrt nicht
gestört wird.
Einzelheiten über die Benutzung des
Sprachsteuerungsmikrofons finden Sie im
Bedienungshandbuch des Navigationssystems.
ANMERKUNG
2WARNUNG
REMARQUE
2AVERTISSEMENT
NOTE
2WARNING
KNA-VC300_6L r3
03.7.25
9:56 AM
Page 6

· Neem voor reparaties contact op met uw Kenwood-dealer.
· Installeer de spraaksturingsmicrofoon, de spreekschakelaar
en de vereiste bedrading zodanig dat zij niet in de weg
staan.
· Zet bij het aansluiten de kabel van de
stemcontrolemicrofoon vast met een kabelklem of iets
dergelijks, zodat hij niet kan hinderen tijdens het rijden.
Zie de handleiding van het navigatiesysteem voor meer
informatie over het gebruik van de spraaksturingsmicrofoon.
· Se è necessario effettuare delle riparazioni, rivolgersi al
rivenditore Kenwood.
· Installare il microfono di controllo delle voci, l'interruttore di
voce e il cablaggio necessario in modo tale da non ostruire
la guida del veicolo.
· Quando collegate, fissate il cavo del microfono di controllo
della voce utilizzando un componente tipo a morsetto per
non disturbarvi da una guida sicura.
Fate riferimento al manuale delle istruzioni del sistema di
navigazione per ulteriori informazioni sull'uso del microfono
di controllo delle voci.
· Si fuera necesaria una reparación, consulte a su
distribuidor Kenwood.
· Instale el micrófono de control por voz, el interruptor de
voz y el cableado necesario de modo tal que no interfieran
con la conducción del vehículo.
· Cuando realice la conexión, fije el cable del micrófono de
control de voz utilizando un accesorio tal como un fijardor
para no perturbarlo mientras conduce.
Consulte el manual de instrucciones del sistema de
navegación respecto de los detalles de uso del micrófono de
control por voz.
NOTA
2ADVERTENCIA
NOTA
2AVVERTENZA
OPMERKING
2WAARSCHUWING
KNA-VC300_6L r3
03.7.25
9:56 AM
Page 7
