Take the time to read through this instruction manual.
Familiarity with installation and operation procedures will help you obtain the best performance from your new Digital
Media-receiver.
For your records
Record the serial number, found on the back of the unit, in the spaces designated on the warranty card, and in the space provided
below. Refer to the model and serial numbers whenever you call upon your Kenwood dealer for information or service on the product.
Model KIV-BT901/ KIV-701 Serial number
US Residents Only
Register Online
Register your Kenwood product at www.Kenwoodusa.com
11ORD_IM337_Ref_K_en_00
© 2011 Kenwood Corporation All Rights Reserved.
KIV-BT901
KIV-701
DIGITAL MEDIA RECEIVER
INSTRUCTION MANUAL
Before reading this manual, click the button below to check
the latest edition and the modified pages.
Check the latest edition

2 | KIV-BT901/ KIV-701
Contents
Before Use
3
Component Names and
Functions
4
General Operation
5
Exit of the Demonstration Mode
Power and Source Select
Volume
Menu List Operation
iPod/iPhone Operation
6
Basic Operation
Selecting a Song by Browsing iPod
Play Mode
iPod Setting
Selecting the Search Mode
Direct Search
Related Search
Alphabet Search
Skip Search
My Playlist
PANDORA® internet radio
Operation
14
Basic Operation
Station Search
Bookmark Registration
Search and New Station Registration
Deletion of Station
USB device/ Zune/ Internal
Memory Operation
16
Basic Operation
File Search
Skip Search
Play Mode
Direct Music Search
USB Setting
Copying from USB device
Deleting Files in Memory
Picture File Viewing
Wallpaper Downloading
Disc Changer Control
(Optional)
24
Basic Operation
Play Mode
Direct Music Search
Direct Disc Search
Tuner Operation
26
Basic Operation
Tuner Setting
Station Preset Memory
Auto Memory Entry
Preset Tuning
Direct Access Tuning
iTunes Tagging
PTY (Program Type)
Program Type Preset
Rear view camera (Optional) 30
Getting Started
Rear view camera
Bluetooth Audio Operation 31
Connecting a Bluetooth Device
Basic Operation
Operation of Hands-Free
Phoning
32
Getting Started
Receiving a Call
During a Call
Call Waiting
Clearing the Disconnection Message
Making a Call
Speed Dialing (Preset Dial)
Calling a Number in the Phone Book
Calling a Number in the Call log
Dial a Number
Make a Voice Dialing Call
Registering to the Preset Dial Number
List
Display of Phone Number Type
(category)
Display Settings
38
Basic Operation
Display Setting
Illumination Color Selection
Customization of Clock Display
Customization of Display
Auxiliary Input Display Setting
Clock and Other Functions 42
Clock and Date Adjustment
Initial Settings
Demonstration Mode Setting
Muting Volume upon Reception of
Phone Call
Audio Adjustments
46
Audio Control
Preset Equalizer Curve Select
Manual Equalizer Control
Listening Position Selection
Listening Position Fine Adjustments
Dual Zone System
DSP Setup
50
Car Type Selection
Speaker Setting
Car Type Fine Adjustments
X'Over Setting
Audio Preset Memory
Audio Preset Recall
Bluetooth Setup
54
Easy pairing function
Bluetooth Setting
Registering Bluetooth Device (Pairing)
Registering PIN Code
Selecting the Bluetooth Device You
Wish to Connect
Deleting a Registered Bluetooth
Device
Downloading the Phone Book
Adding a Voice Dialing Command
Setting a Voice Command for
Category
SMS (Short Message Service)61
Downloading the SMS
Display the SMS
Satellite Radio Tuner Control
(Optional)
62
Basic Operation
Satellite Radio Setting
Category and Channel Search
Preset Memory
Preset Tuning
Channel Scan
Direct Access Tuning
HD RadioTM Tuner Control
(Optional)
64
Basic Operation
Station Preset Memory
Auto Memory Entry
Preset Tuning
HD RadioTM Setting
Direct Access Tuning
iTunes Tagging
Basic Operations of Remote
Control
68
General control
In Tuner source
In USB/ Internal Memory source
In iPod source
In Satellite Radio tuner source
In HD Radio source
Hands-free phone control
Preparing the remote control unit
Changing the battery of the remote
control unit
Appendix
70
About Audio file
About Video files
About Picture files
iPod/iPhone that can be connected
to this unit
About PANDORA® internet radio
About USB device
About USB hub
About "KENWOOD Music Editor"
About the Cell-Phone
About Satellite Radio tuner (Optional)
About HD Radio Reception (Optional)
Menu List
Display Indicator items
Time zone list
Accessories/ Installation
Procedure
79
Connecting Wires to
Terminals
80
Installation/Removing the
Unit
81
Troubleshooting Guide
82
Specifications
86

English
|
3
Before Use
2
WARNING
To prevent injury or fire, take the following
precautions:
· Do not watch or fix your eyes on the unit's display
when you are driving for any extended period.
· To prevent a short circuit, never put or leave any
metallic objects (such as coins or metal tools) inside
the unit.
Do not use this unit before canceling
Demonstration mode
This unit is initially set on the Demonstration mode.
When using this unit for the first time, cancel
the Demonstration mode. Refer to <Exit of the
Demonstration Mode> (page 5).
· The demonstration is an operation image. It may be
different from actual operation.
How to reset your unit
If this unit or the connected unit (auto disc changer,
etc.) fails to operate properly, reset the unit. While
pressing the [Volume] knob and the [MENU] button,
press the [SRC] button for at least 3 seconds. The unit
returns to factory settings when the reset operation
is complete.
SRC MENU Volume
Cleaning the Unit
If the faceplate of this unit is stained, wipe it with a
dry soft cloth such as a silicon cloth.
If the faceplate is stained badly, wipe the stain off with
a cloth moistened with neutral cleaner, then wipe it
again with a clean soft dry cloth.
¤
· Applying spray cleaner directly to the unit may affect its
mechanical parts. Wiping the faceplate with a hard cloth or
using a volatile liquid such as thinner or alcohol may scratch
the surface or erases characters.
Notes
· If you experience problems during installation,
consult your Kenwood dealer.
· When you purchase optional accessories, check with
your Kenwood dealer to make sure that they work
with your model and in your area.
· Characters that conform to ISO 8859-1 can be
displayed.
· The Radio Data System feature won't work where
the service is not supported by any broadcasting
station.
· The illustrations of the display and the panel
appearing in this manual are examples used to
explain more clearly how the controls are used.
Therefore, what appears on the display in the
illustrations may differ from what appears on the
display on the actual equipment, and some of the
illustrations on the display may be inapplicable.

4 | KIV-BT901/ KIV-701
Component Names and Functions
AUX
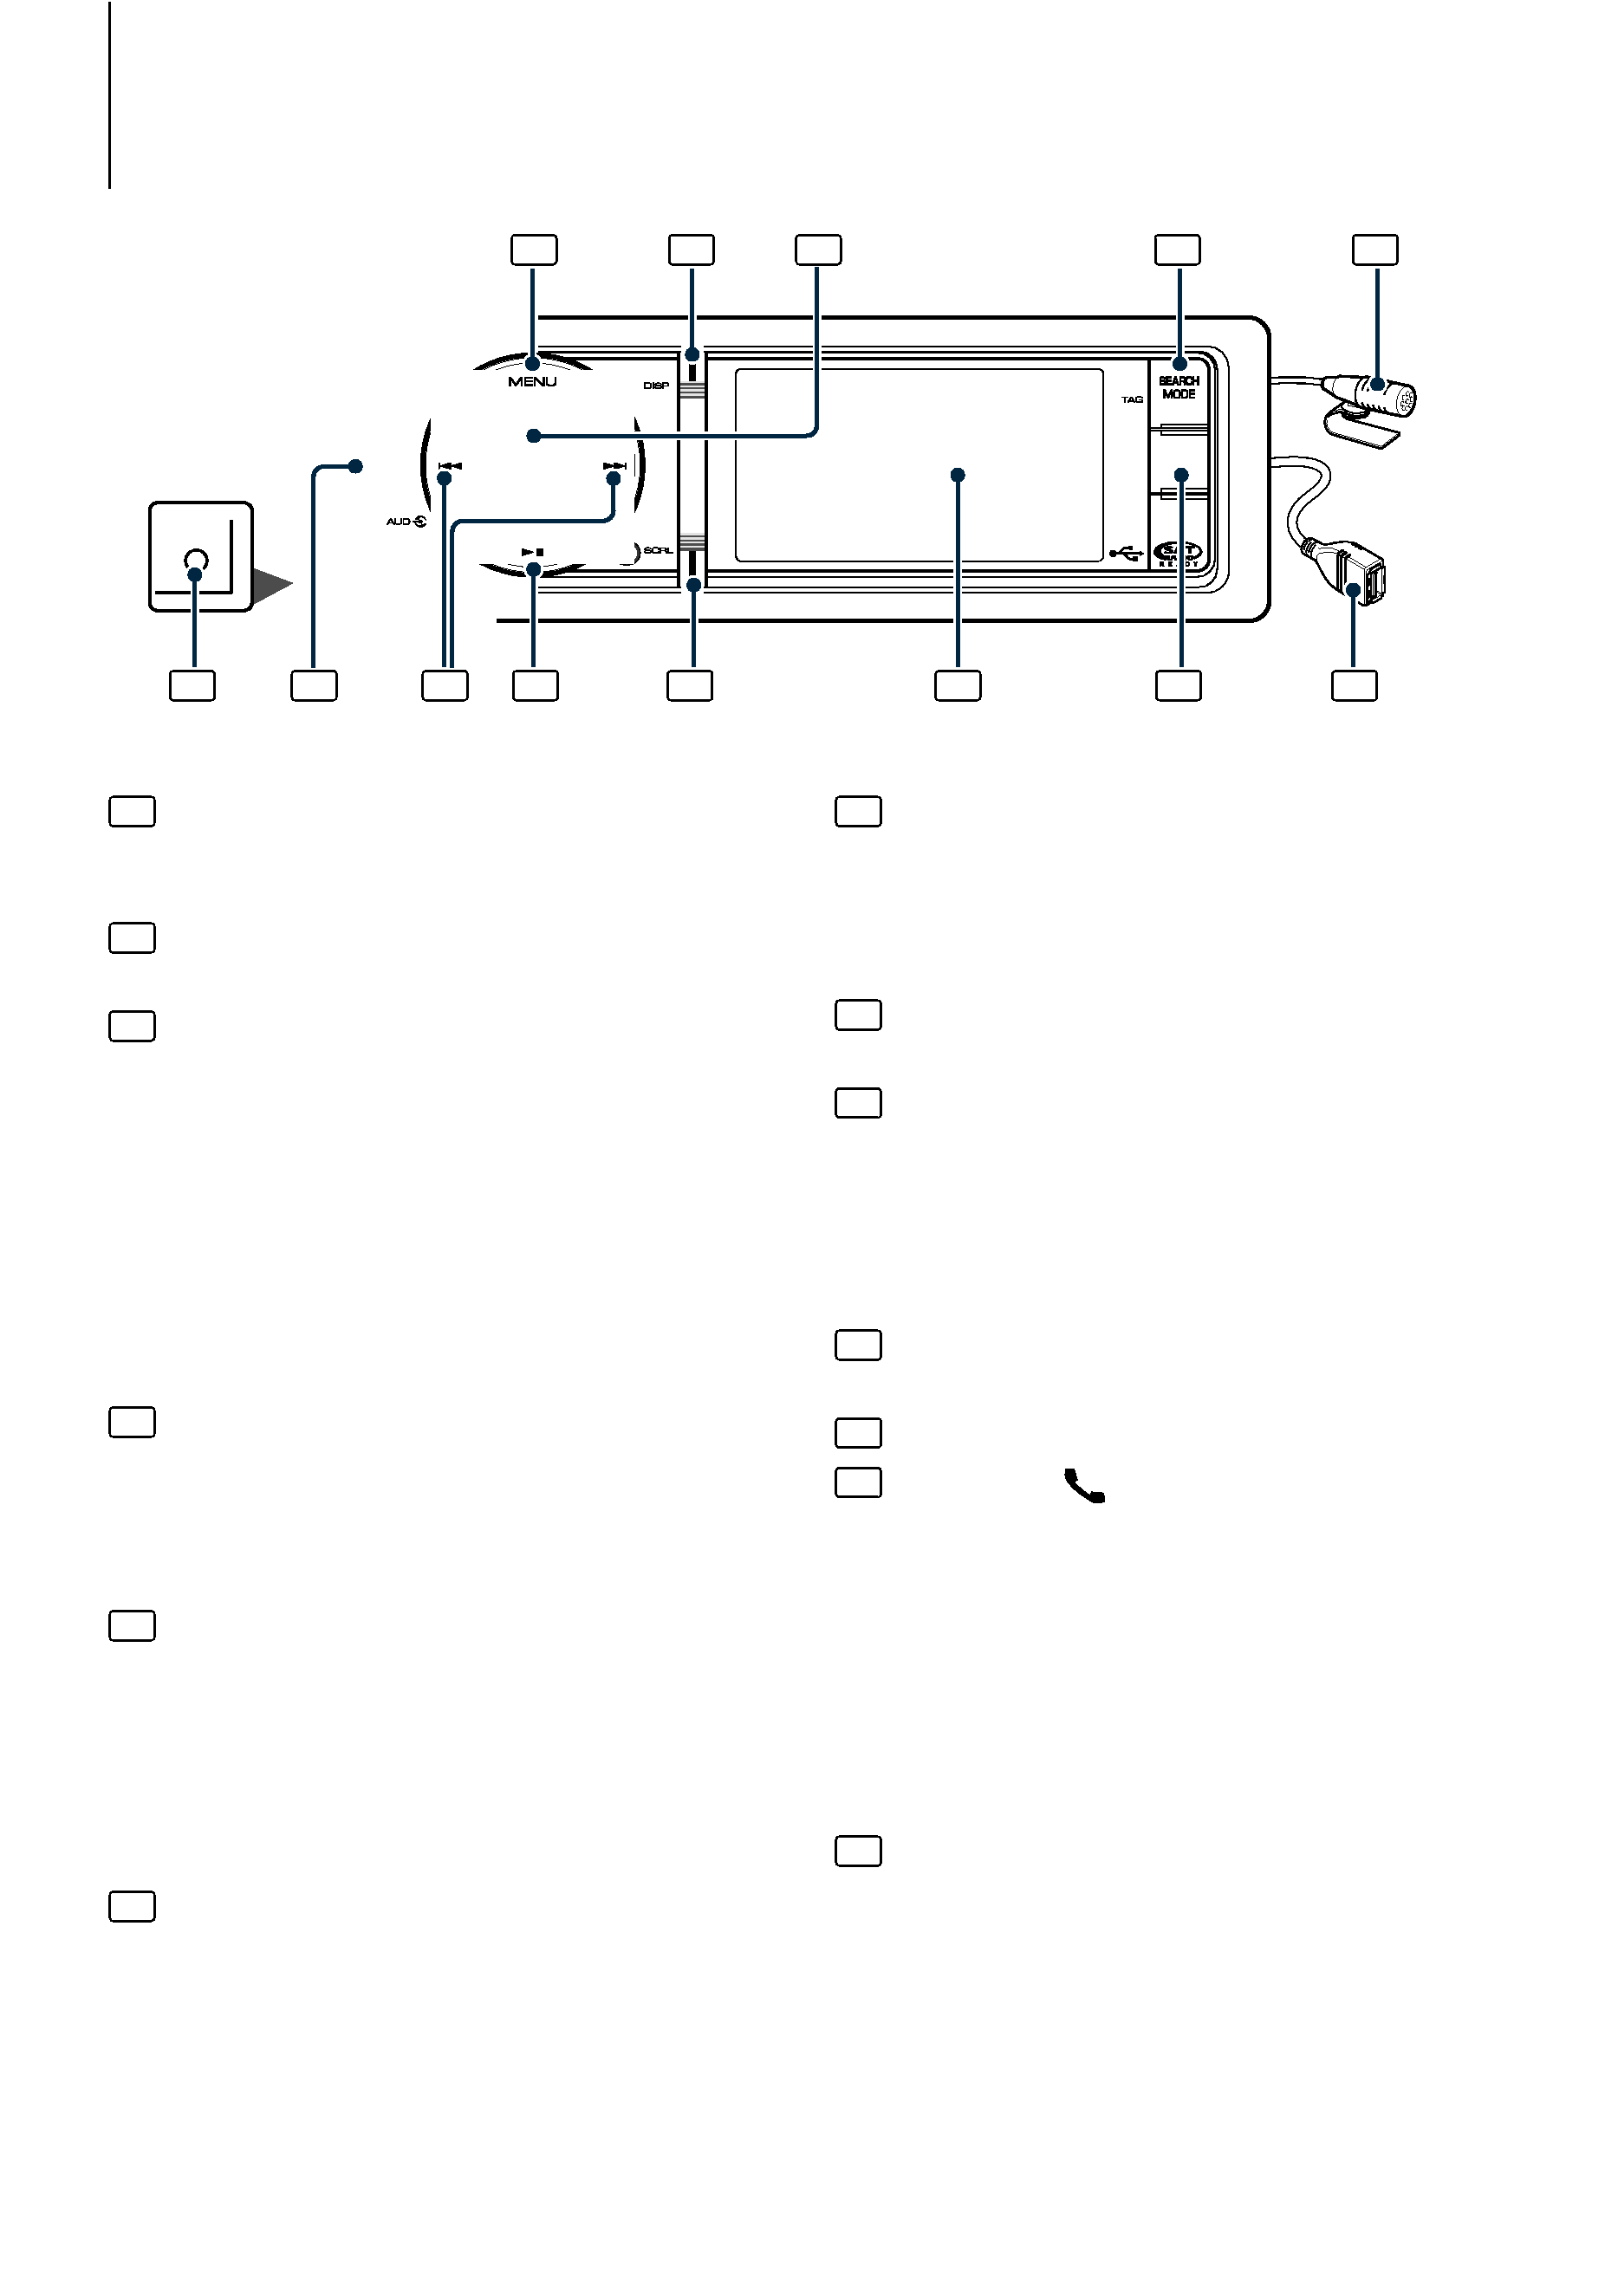
1 [MENU] button
To select a song or set functions. See <Menu List
Operation> (page 5).
2 [DISP] button
To change display item (press the button).
3 [Volume] knob
To adjust volume (turn the knob).
To select menu setting item (turn and press the
knob). See <Menu List Operation> (page 5) for
details.
KIV-BT901 : To display Play mode in the Menu List
(press the knob at least 1 second).
KIV-701 : To make a voice dialing call (press the
knob at least 1 second). *1 See <Make a Voice
Dialing Call> (page 35).
4 [SEARCH MODE] button
To enter Search mode (iPod), move between
folders (Audio file), etc. For more details, see
operations of each source described in page 6
or later.
5 Microphone (KIV-BT901)
The microphone for hands free phone is
supplied.
When your voice cannot be recognized due
to the low microphone volume or noises in
the vehicle, adjust the microphone settings by
<Bluetooth Setting> (page 54).
6 Auxiliary Input Terminal
Portable audio device can be connected with the
mini-plug (3.5 mm ø).
· Use the mini-plug cable which is stereo type and does
not have any resistance.
7 [SRC] button
To turn on this unit and select the Source (press
the button).
To turn off this unit (press the button at least 1
second).
8 [
4] / [¢] buttons
To select a station and song. (press the button).
9 [
38] button
To start or interrupt playback for audio file and
iPod. (press the button).
To select the remove mode, and remove the USB
device or an iPod (press the button at least 2
seconds or more).
10 [SCRL] button
Scrolls the display text (press the button).
11 Display window
12 KIV-BT901: [
] button
To enter Bluetooth mode (press the button).
To enter Bluetooth easy pairing mode (press
the button at least 1 second). See <Easy pairing
function> (page 54).
KIV-701: [iPod] button
To select iPod source (press the button).
To enter Bluetooth mode (press the button at
least 1 second). *1
13 USB Terminal
A USB device or an iPod can be connected.
/
*1 Only with KCA-BT300/BT200 (optional accessory)
connected.
1
2
3
4
5
6
7
8
9
10
11
12
13
Rear view

English
|
5
Exit of the Demonstration Mode
Turn off the demonstration mode when you use it
for the first time after installation.
1 Press the [Volume] knob to quit the
demonstration mode when the message "To
Cancel DEMO Press the volume knob" is displayed
(approx. 15 seconds).
2 Turn the [Volume] knob to select"YES"and then
press the [Volume] knob.
Power and Source Select
Turns the power ON by pressing the [SRC]
button.
When the power is ON, select a source.
· SRC Select mode 1: Pressing the [SRC] button
each time switches between sources.
Tuner (" TUNER" or " HD RADIO") USB
(" USB"), iPod (" iPod") or Zune (" Zune")
Pandora (" Pandora") Internal Memory
(" Int.Mem.") Auxiliary Input (" AUX")
Standby (" STANDBY")
· SRC Select mode 2: Press the [SRC] button and
then turn the [Volume] knob. To determine the
selected source, press the [Volume] knob.
Keeping pressing the [SRC] button for at least 1
second turns the power OFF.
/
· The SRC Select mode can be set in "Source Select" of <Initial
Settings> (page 43).
· Auxiliary input source is initially set to "OFF". Set "Built in
AUX" described in <Initial Settings> (page 43) to "ON".
· To use the Pandora source, set "Pandora Source" in <Initial
Settings> (page 43) to "ON".
· When an optional accessory is connected, the source name
for each device appears.
· When connection of the iPod or Zune is recognized, the
source display changes from "USB" to "iPod", "Zune".
Volume
Turning the [Volume] knob adjusts the sound
volume.
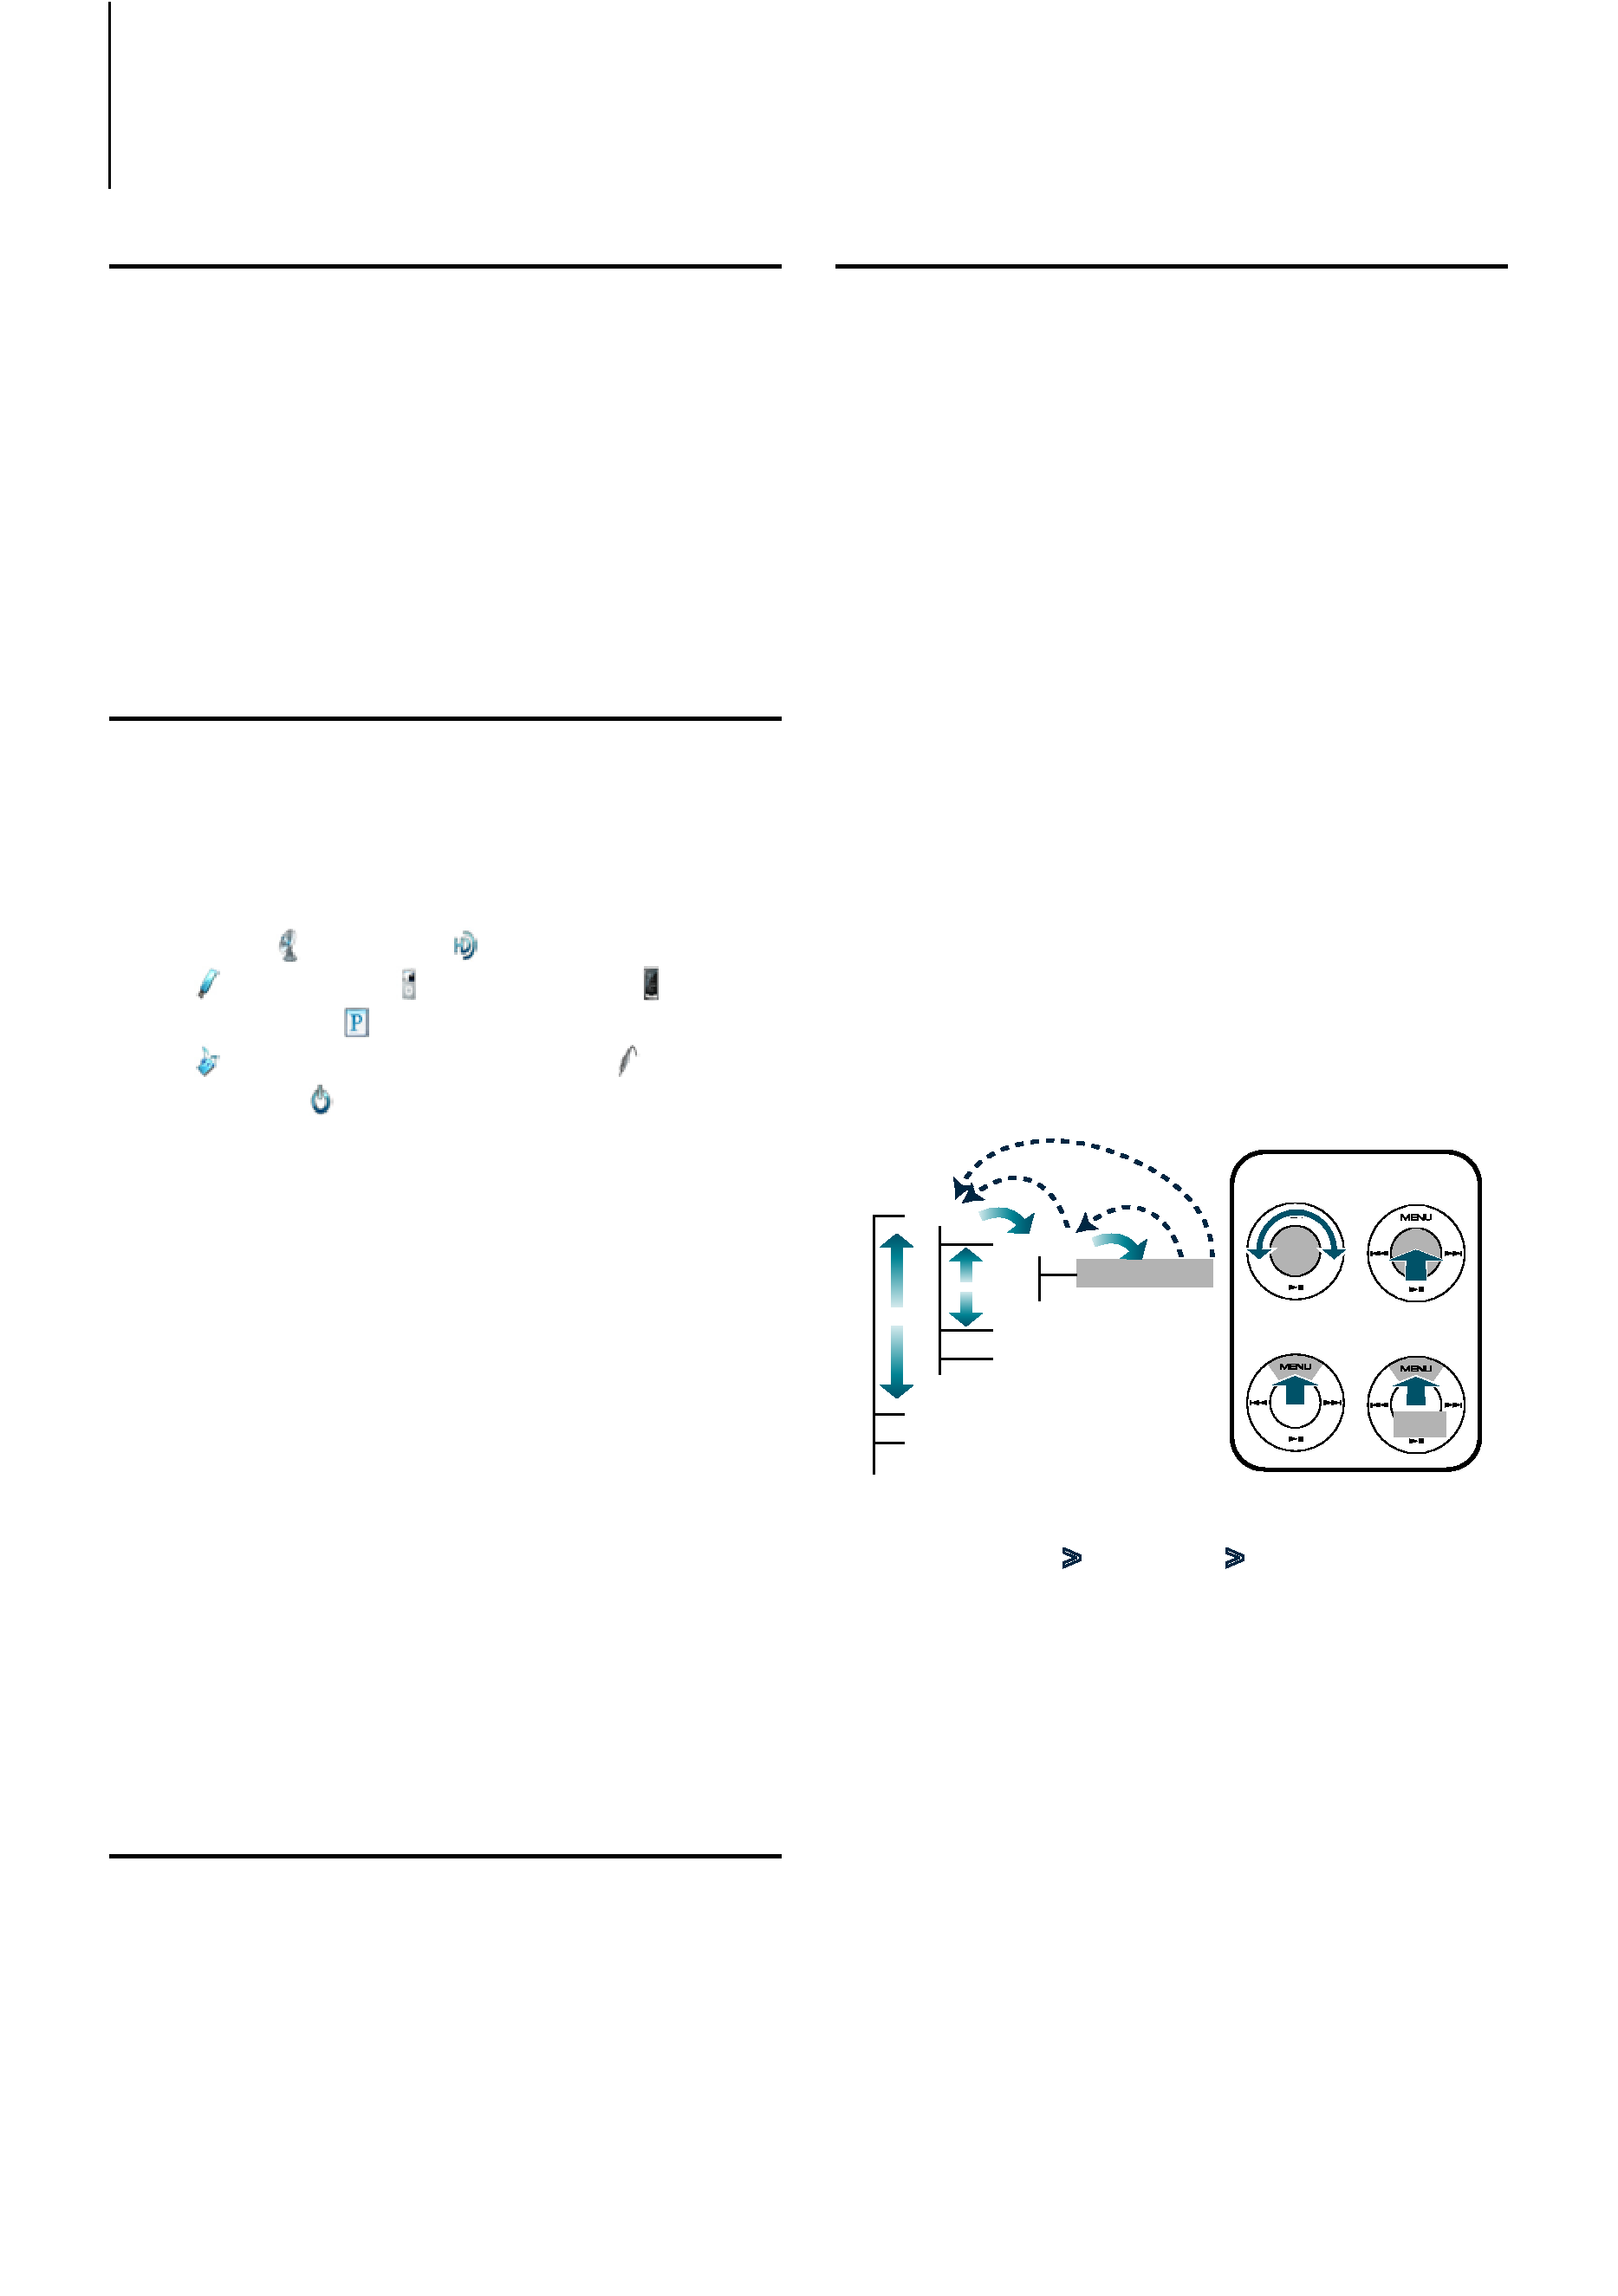
Menu List Operation
The basic operating procedure for using this
function is described below. The individual function
items are covered in the operating procedures.
1 Select the source
Press the [SRC] button repeatedly also switches
source.
Function items vary from source to source. For a list
of the function items, refer to <Menu List> (page 72).
SRC Select mode 2: Press the [SRC] button. Turn
the [Volume] knob and press it when the desired
item is displayed.
2 Enter Menu List mode
Press the [MENU] button.
3 Select the setting item
Turn the [Volume] knob and press it when the
desired item is displayed.
Repeat the operation until your desired setup item
is selected.
Press the [MENU] button to return to the
previous item.
Operation example:
Music
Playlists
My
...
Artists
Albums
...
Videos
Play Mode
...
[Volume]
[MENU]
[Volume]
[MENU]
1
1
2
3
4
2
2
3
4
3
1
1 sec.
In this manual, the above selection is indicated as
Select "Music"
> "Playlists" > "My Best 25".
4 Make a setting
Turn the [Volume] knob to select a setting
value, and then press the [Volume] knob.
5 Exit Menu Setting mode
Press the [MENU] button for at least 1 second to
return to the first hierarchy.
Press the [MENU] button in the first hierarchy to
exit the Menu List mode.
General Operation
