KAC-X41
FOUR CHANNEL POWER AMPLIFIER
INSTRUCTION MANUAL
© B64-4200-00/00 (MV)
KAC-X41_M_1English.indd 1
08.10.21 3:48:31 PM

English
Safety precautions
WARNING
To prevent injury or fire, take the following precautions:
· Mountingandwiringthisproductrequiresskillsandexperience.Forsafety's
sake,leavethemountingandwiringworktoprofessionals.
· Whenextendingtheignition,battery,orgroundwires,makesuretouse
automotive-gradewiresorotherwireswiththerangeof14mm2(AWG6)
to21mm2(AWG4)topreventwiredeteriorationanddamagetothewire
coating.
· Topreventashortcircuit,neverputorleaveanymetallicobjects(suchas
coinsormetaltools)insidetheunit.
· Iftheunitstartstoemitsmokeorstrangesmells,turnoffthepower
immediatelyandconsultyourKenwooddealer.
· Donottouchtheunitduringusebecausethesurfaceoftheunitbecomes
hotandmaycauseburnsiftouched.
CAUTION
To prevent damage to the machine, take the following
precautions:
· Besuretheunitisconnectedtoa12VDCpowersupplywithanegative
groundconnection.
· Donotopenthetoporbottomcoversoftheunit.
· Donotinstalltheunitinaspotexposedtodirectsunlightorexcessiveheat
orhumidity.Alsoavoidplaceswithtoomuchdustorthepossibilityofwater
splashing.
· Whenreplacingafuse,onlyuseanewonewiththeprescribedrating.Usinga
fusewiththewrongratingmaycauseyourunittomalfunction.
· Topreventashortcircuitwhenreplacingafuse,firstdisconnectthewiring
harness.
NOTE
· Ifyouexperienceproblemsduringinstallation,consultyourKenwooddealer.
· Iftheunitdoesnotseemtobeworkingright,consultyourKenwooddealer.
Cleaning the unit
Ifthefrontpanelgetsdirty,turnoffthepowerandwipethepanelwithadry
siliconclothorsoftcloth.
CAUTION
Donotwipethepanelwithahardclothoraclothdampenedbyvolatile
solventssuchaspaintthinnerandalcohol.Theycanscratchthesurfaceofthe
paneland/orcausetheindicatorletterstopeeloff.
To prevent battery rise
WhentheunitisusedintheACCONpositionwithoutturningtheengineON,it
depletesthebattery.Useitafterstartingtheengine.
Protection function
Theprotectionfunctionisactivatedinthefollowingsituations:
Thisunitisequippedwithaprotectionfunctionforprotectingthisunitandyour
speakersfromvariousaccidentsorproblemsthatcanoccur.
Whentheprotectionfunctionistriggered,thePROTECTIONindicatorlightsand
theamplifierstopsoperating.
· Whenaspeakerwiremaybeshort-circuited.
· Whenaspeakeroutputcontactsground.
· WhentheunitmalfunctionsandaDCsignalissenttothespeakeroutput.
Wiring
· Takethebatterywireforthisunitdirectlyfromthebattery.Ifit'sconnectedto
thevehicle'swiringharness,itcancauseblownfusesetc.
· Ifabuzzingnoiseisheardfromthespeakerswhentheengineisrunning,
connectalinenoisefilter(optional)toeachofthebatterywire.
· Donotallowthewiretodirectlycontacttheedgeoftheironplatebyusing
Grommets.
· Connectthegroundwiretoametalpartofthecarchassisthatactsasan
electricalgroundpassingelectricitytothebattery`snegative-terminal.Do
notturnthepoweronifthegroundwireisnotconnected.
· Besuretoinstallaprotectivefuseinthepowercordnearthebattery.The
protectivefuseshouldbethesamecapacityastheunit'sfusecapacityor
somewhatlarger.
· Forthepowercordandground,useavehicletype(fireproof )powerwring
cordwithacurrentcapacitygreaterthantheunit'sfusecapacity.(Useapower
wiringcordwiththerangeof14mm2(AWG6)to21mm2(AWG4).
· Whenmorethanonepoweramplifieraregoingtobeused,useapower
supplywiringwireandprotectivefuseofgreatercurrent-handlingcapacity
thanthetotalmaximumcurrentdrawnbyeachamplifier.
Speaker Selection
· Theratedinputpowerofthespeakersthataregoingtobeconnectedshould
begreaterthanthemaximumoutputpower(inWatts)oftheamplifier.Useof
speakershavinginputpowerratingsthatarelessthantheoutputpowerof
theamplifierwillcausesmoketobeemittedaswellasdamage.
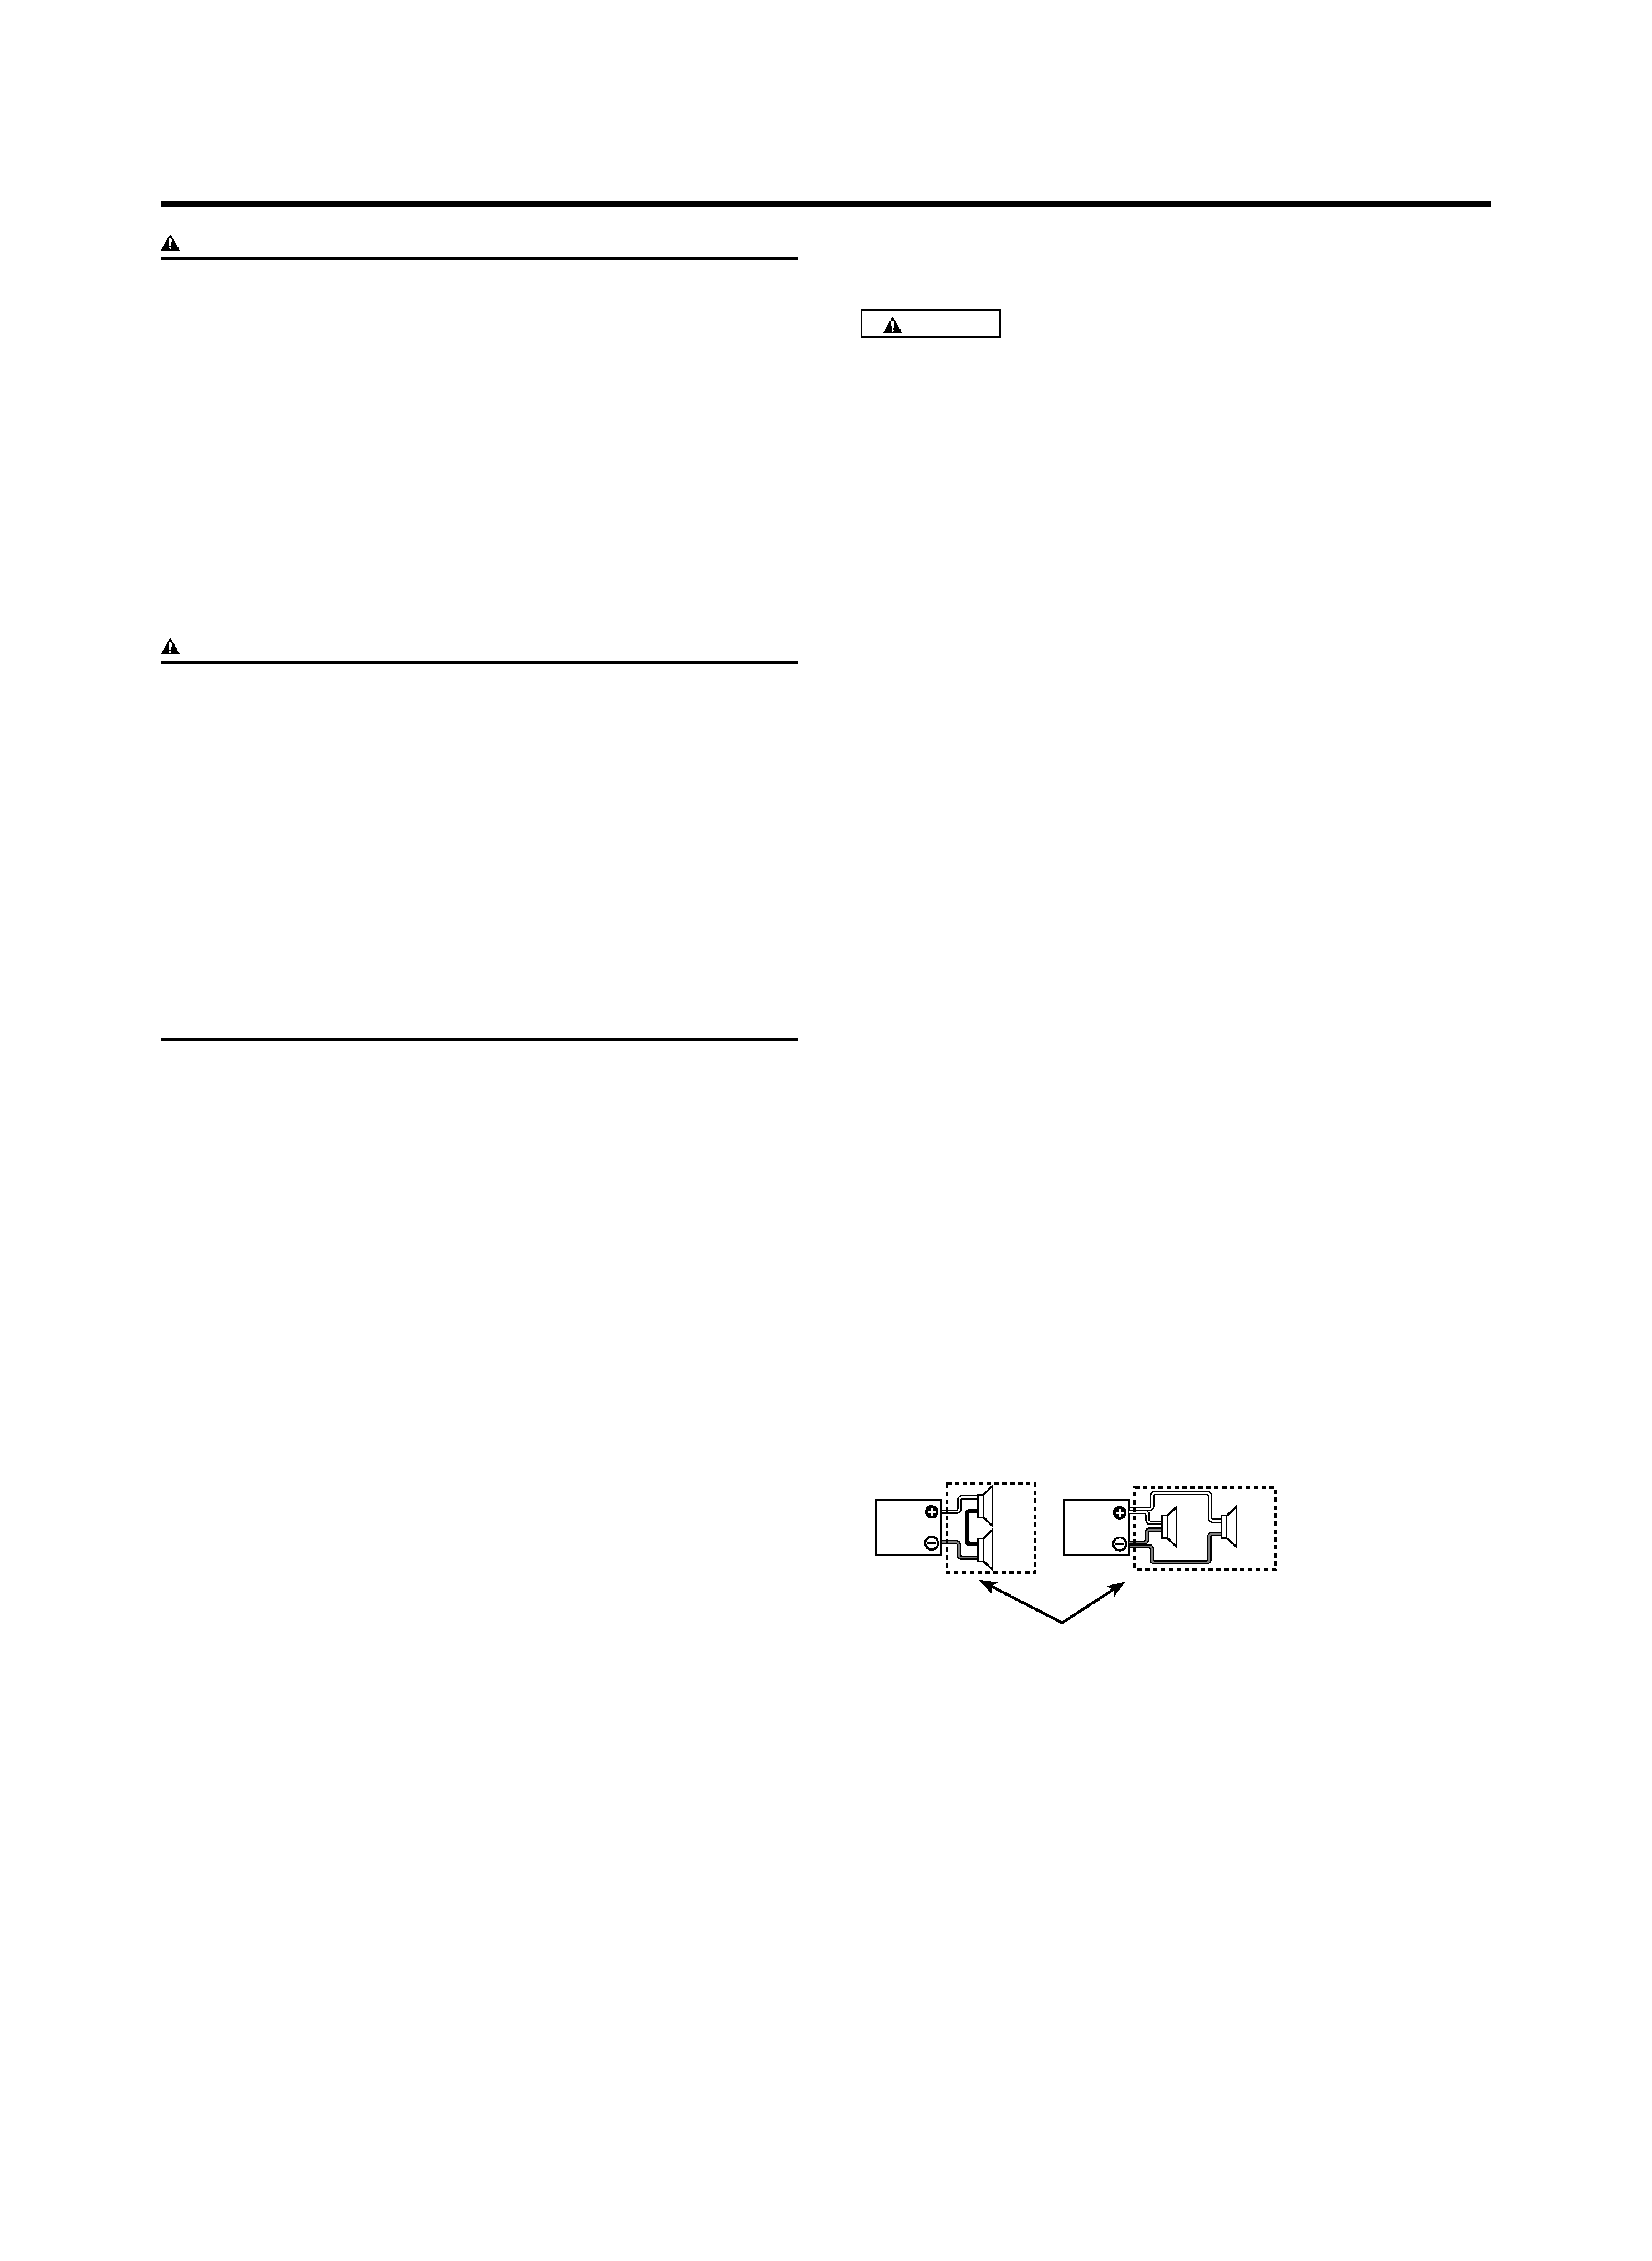
· Usespeakersthathaveanimpedanceof2orgreater.Whenmorethanone
setofspeakersaregoingtobeused,calculatethecombinedimpedanceof
thespeakersandthenconnectsuitablespeakerstotheamplifier.
4
4
8
2
2
4
4
4
4
4
4
4
4
4
8
4
4
4
4
4
4
4
4
4
Combinedimpedance
KAC-X41_M_1English.indd 2
08.10.21 3:48:32 PM

English
Installation
Accessories
Part name
External View Number of Items
Self-tappingscrews
(ø5×18mm)
4
HexagonWrench(Large)
1
HexagonWrench(Small)
1
Terminalcover(Powerterminal)
1
Installation procedure
Sincetherearelargevarietyofsettingsandconnectionspossibleaccordingto
applications,readtheinstructionmanualwelltoselectthepropersettingand
connection.
1. Removetheignitionkeyanddisconnectthenegative
·terminalofthe
batterytopreventshortcircuits.
2. Settheunitaccordingtotheintendedusage.
3. RemovetheDressingcover.
4. Connecttheinputandoutputwiresoftheunits.
5. Connectthespeakerwires.
6. Connectthepowerwire,powercontrolwireandgroundingwirefollowing
thisorder.
7. Installtheinstallationfittingsintheunit.
8. Attachtheunit.
9. AttachtheDressingcover.
10.Connectthenegative
·terminalofthebattery.
CAUTION
· Donotinstallinthebelowlocations;
(Unstablelocation,Inalocationthatinterfereswithdriving,Inalocation
thatgetswet,Inadustylocation,Inaplacethatgetshot,Inaplacethat
getsdirectsunlight,Inalocationthatgetshitbyhotair)
· Donotinstalltheunitunderthecarpet.Otherwiseheatbuild-upoccurs
andtheunitmaybedamaged.
· Installthisunitinalocationwhichallowsheattoeasilydissipate.
Onceinstalled,donotplaceanyobjectontopoftheunit.
· Thesurfacetemperatureoftheamplifierwillbecomehotduringuse.Install
theamplifierinaplacewherepeople,resins,andothersubstancesthatare
sensitivetoheatwillnotcomeintocontactwithit.
· Thisunithascoolingfantodecreasetheinternaltemperature.Donot
mounttheunitinaplacewherethecoolingfanandductsoftheunitare
blocked.Blockingtheseopeningswillinhibitthecoolingoftheinternal
temperatureandresultinmalfunction.
· Whenmakingaholeunderaseat,insidethetrunk,orsomewhereelsein
thevehicle,checkthatthereisnothinghazardousontheoppositeside
suchasagasolinetank,brakepipe,orwiringharness,andbecarefulnotto
causescratchesorotherdamage.
· Donotinstallnearthedashboard,reartray,orairbagsafetyparts.
· Theinstallationtothevehicleshouldsecurelyfastentheunittoaplacein
whichitwillnotobstructdriving.Iftheunitcomesoffduetoashockand
hitsapersonorsafetypart,itmaycauseinjuryoranaccident.
· Afterinstallingtheunit,checktomakesurethatelectricalequipment
suchasthebrakelamps,turnsignallampsandwindshieldwipersoperate
normally.
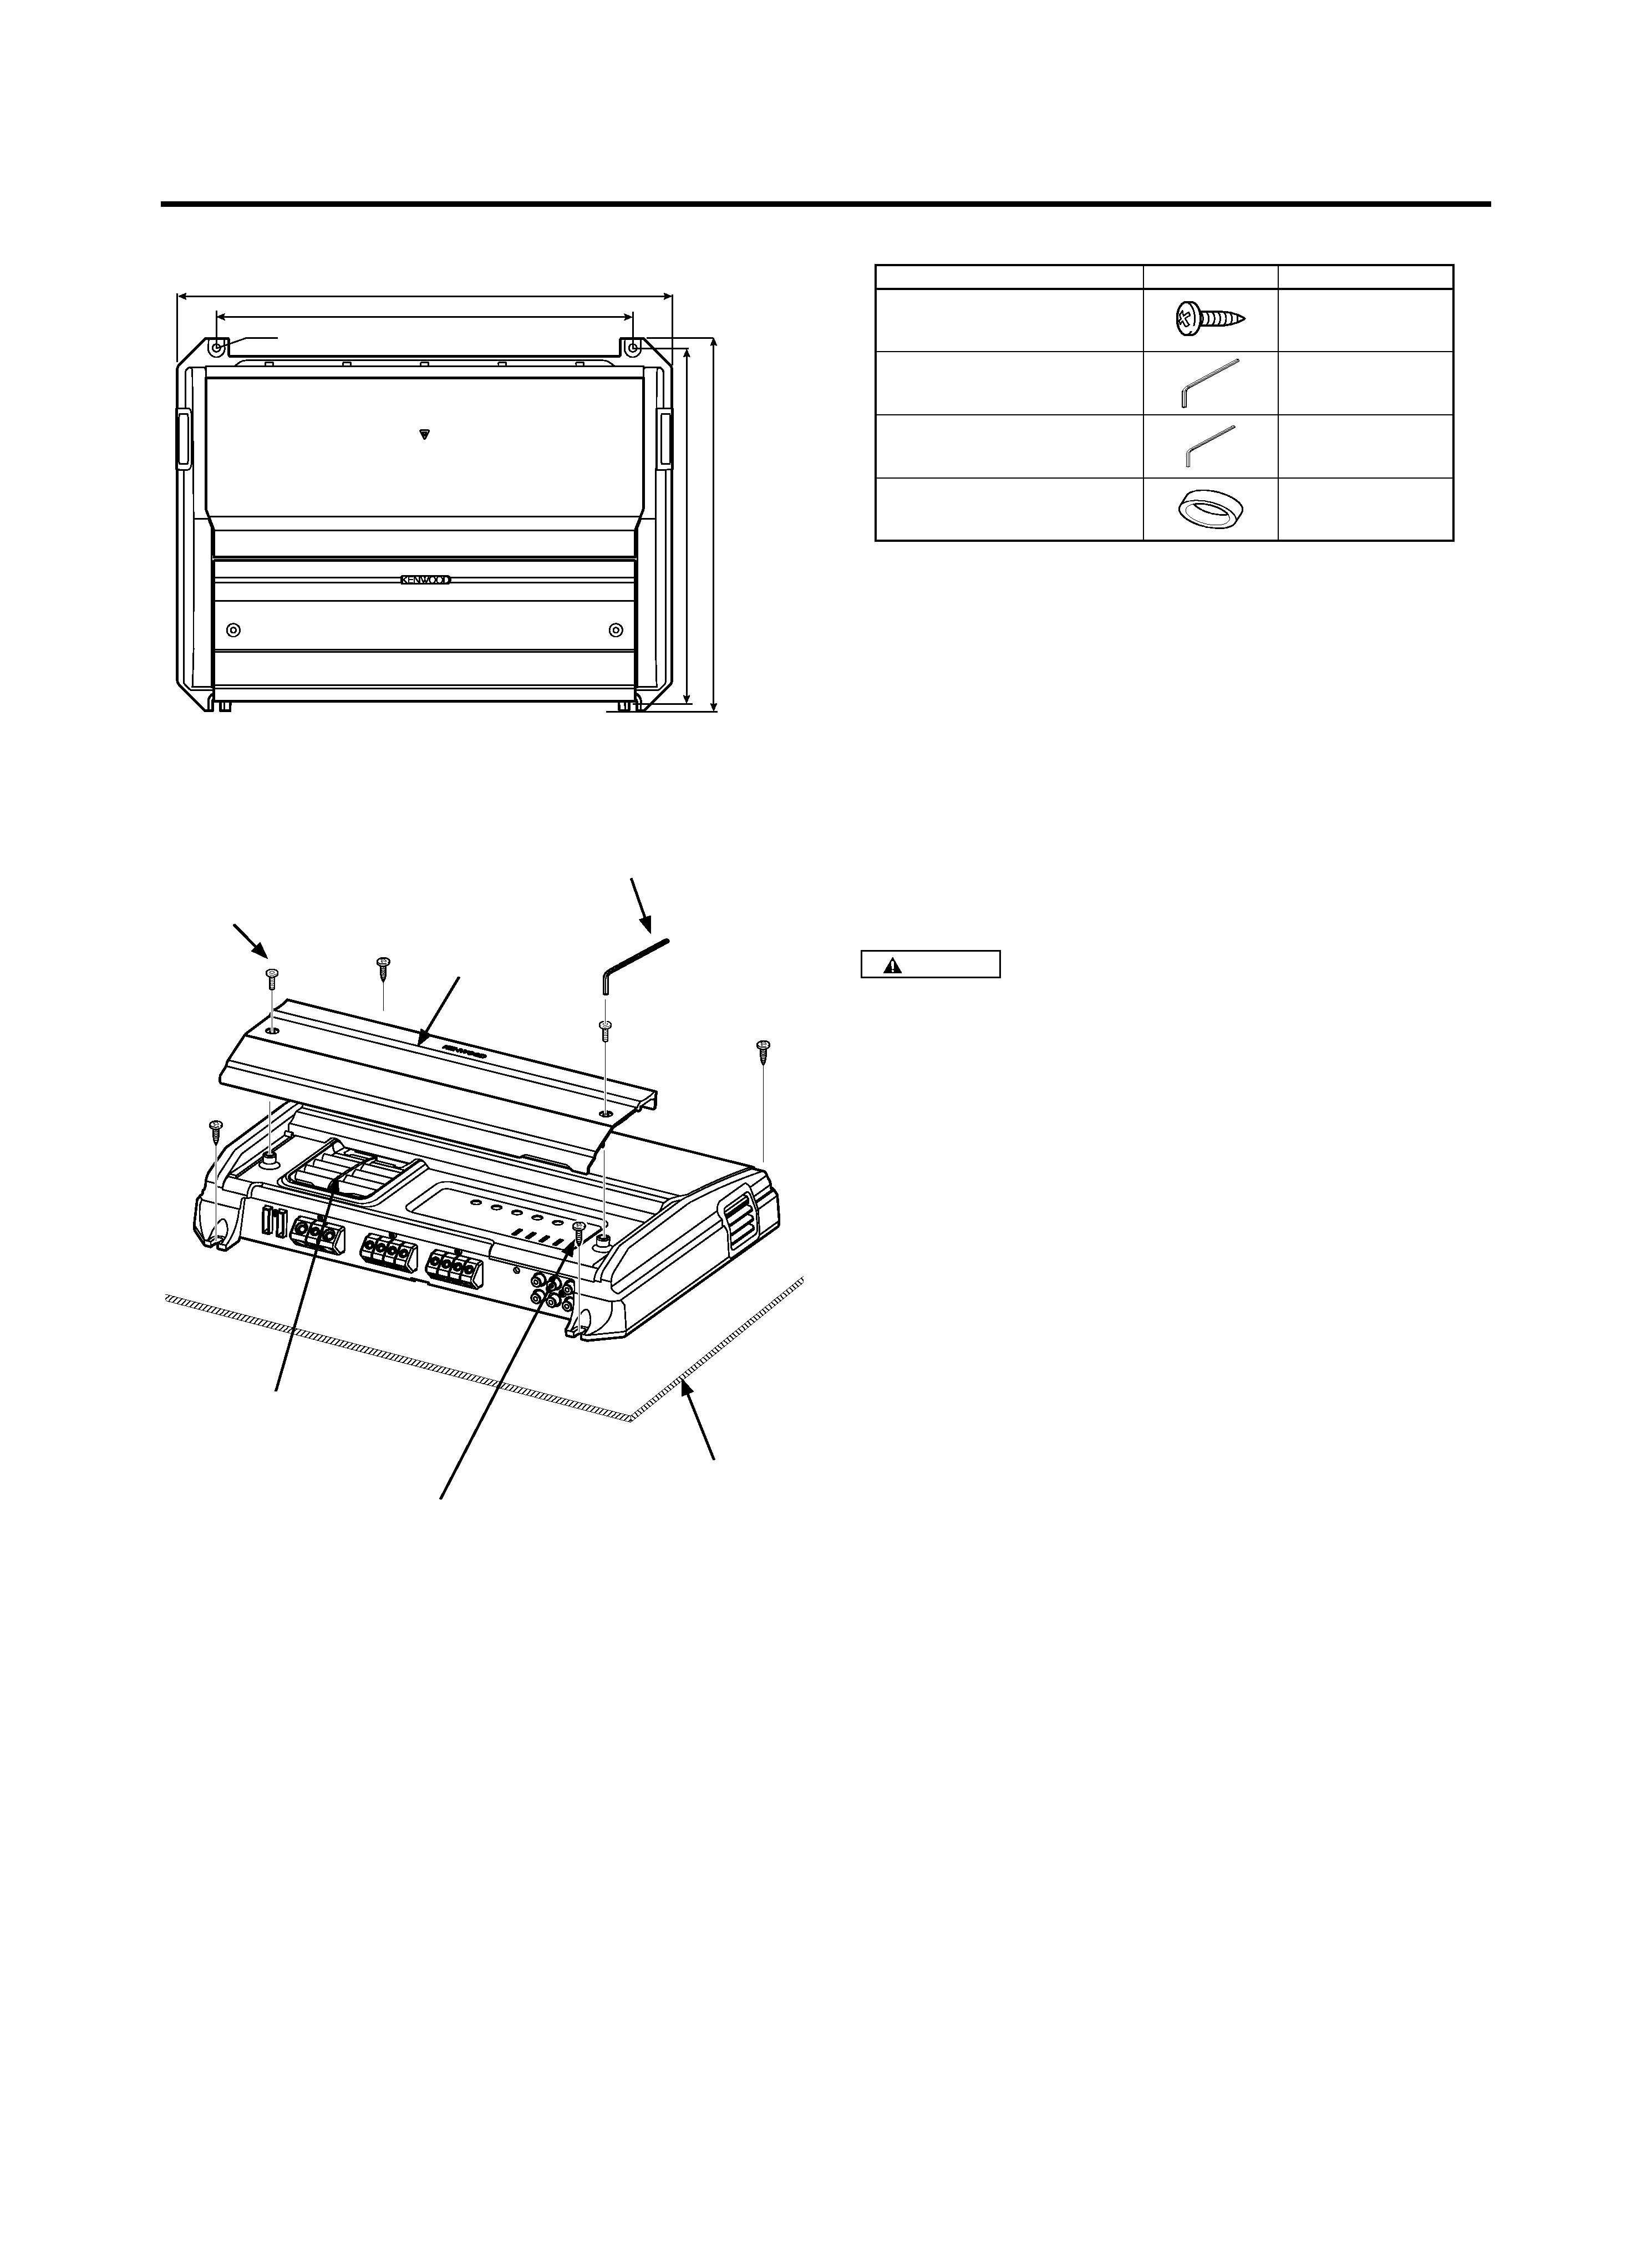
380 mm
320 mm
ø 6
286
mm
272
mm
Installationboard,etc.
(thickness:15mmormore)
Self-tappingscrew
(ø5×18mm)
Hexagonsocket
headcapscrew
(M4×8mm)
HexagonWrench
(Small)
Coolingfan
Dressingcover
KAC-X41_M_1English.indd 3
08.10.21 3:48:34 PM

English
P.CON
SPEAKER OUTPUT
BRIDGED
LEFT
RIGHT
FUSE [30Ax2]
GND
BATT.
+
LINE OUT
LINE IN
L
R
A
A
SPEAKER OUTPUT
BRIDGED
B
B
A
B
SPEAKER OUTPUT
BRIDGED
SPEAKER OUTPUT
BRIDGED
LEFT
RIGHT
LEFT
RIGHT
A
B
LEFT
RIGHT
CAUTION
· Ifsoundisnotoutputnormally,immediately
turnpoweroffandcheckconnections.
· Besuretoturnthepoweroffbefore
changingthesettingofanyswitch.
· Ifthefuseblows,checkwiresforshorts,then
replacethefusewithoneofthesamerating.
· Checkthatnounconnectedwiresor
connectorsaretouchingthecarbody.Do
notremovecapsfromunconnectedwiresor
connectorstopreventshortcircuits.
· Connectthespeakerwirestoappropriate
speakerconnectorsseparately.Sharingthe
negativewireofthespeakerorgrounding
speakerwirestothemetalbodyofthecar
cancausethisunittofail.
· Afterinstallation,checkthatthebrake
lamps,winkers,andwipersworkproperly.
*Commerciallyavailableparts
WARNING
Topreventfirecausedbyashortinthe
wiring,connectafusiblelinkorbreaker
nearbythebattery'spositiveterminal.
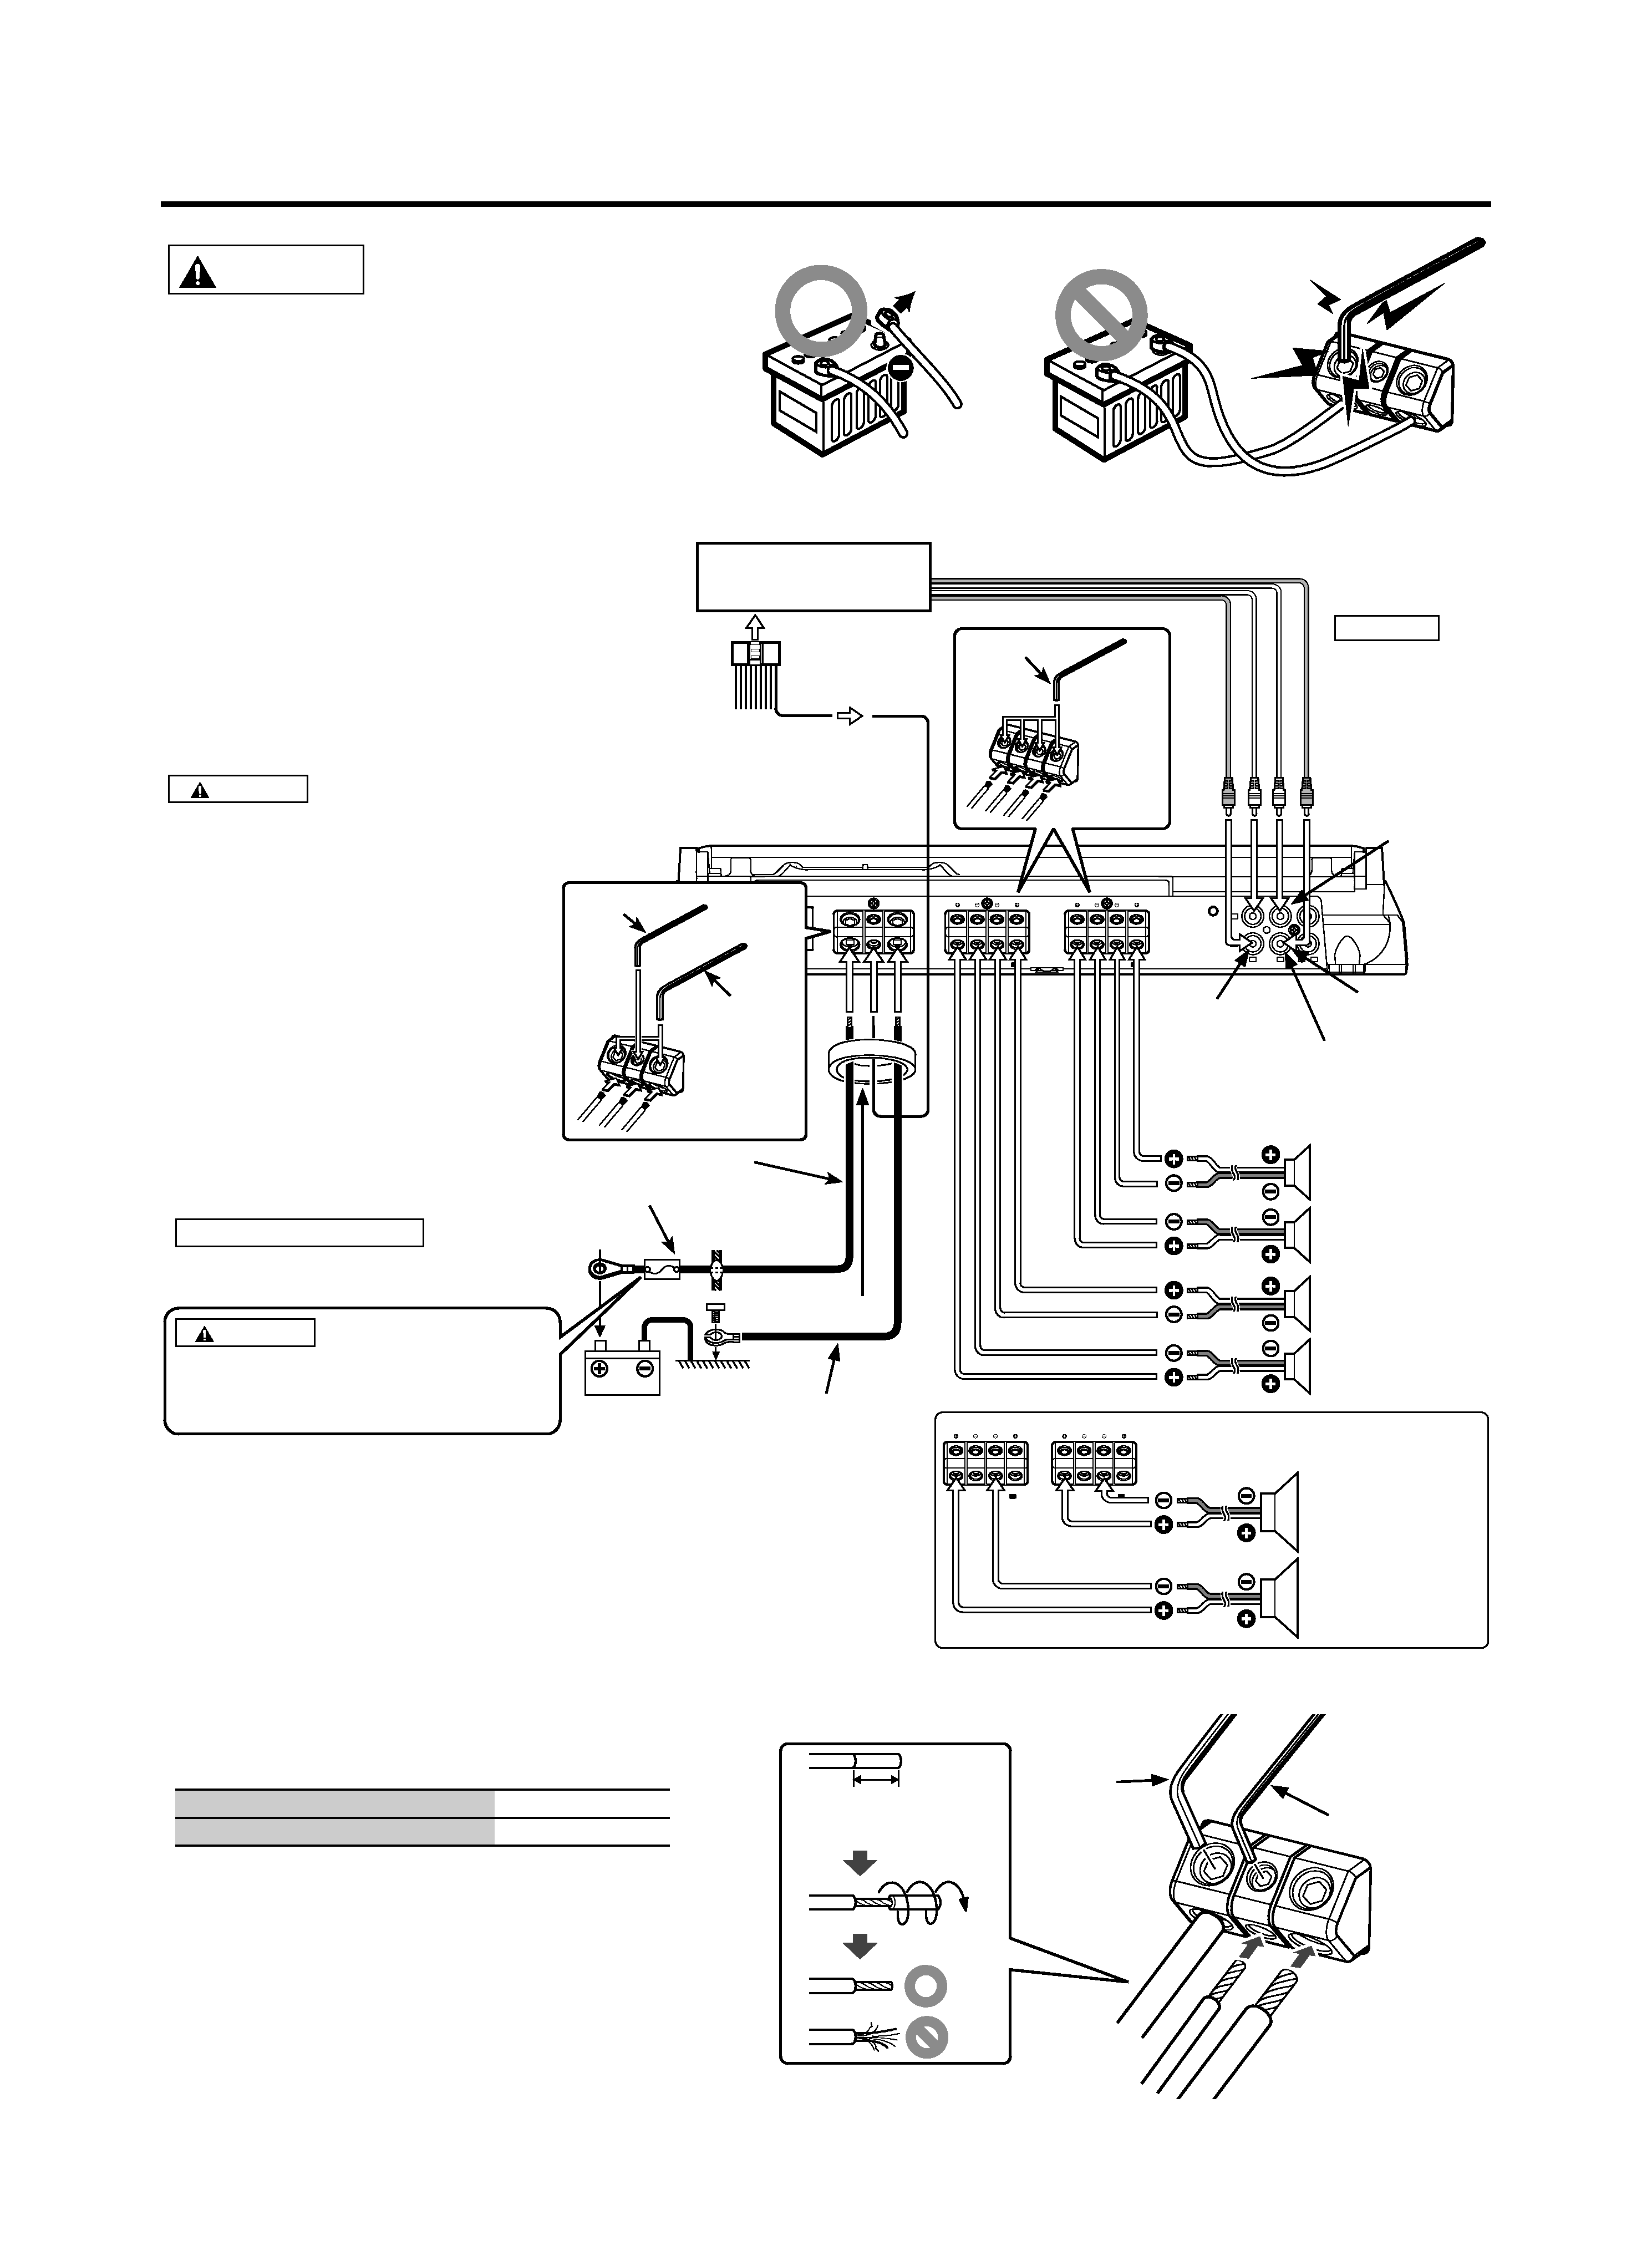
Connection
Groundwire*
Powercontrolwire*
Bchannel
Rightspeaker
Batterywire*
ProtectiveFuse*
CENTERUNIT
(CDreceiver,etc.)
RCAcable*
Leftinput
Rightinput
Battery
Bridged Connections
Bchannel
Leftspeaker
Achannel
Rightspeaker
Achannel
Leftspeaker
Bchannel
Speaker(Bridged)
Achannel
Speaker(Bridged)
Achannelinput
Bchannelinput
HexagonWrench
(Small)
Hexagon
Wrench(Large)
HexagonWrench
(Small)
Use the
attached
Hexagon
Wrench.
Use the
attached
Hexagon
Wrench.
WARNING
Remove the ignition key and
disconnect the negative
· terminal of
the battery to prevent short circuits.
HexagonWrench
(Small)
Hexagon
Wrench
(Large)
Terminalcover
NOTE
UseaRCAcable
withastraight
terminal.IfaRCA
cablewithLtype
terminalisused,it
maynotbeableto
connect.
About the Lead Terminals
1. Wire Thicknesses
Youcanusewireswiththefollowingthicknesses:
Batterywireandgroundwire
AWG4AWG6
Speakerwire
AWG8AWG12
2. Strip the wire
Makeacutinthewiresheath(insulatormadefromvinyl,etc.)atthe
position10-13mmawayfromtheendofthewire,andthenremovethe
unnecessaryportionofthesheathbytwistingit.
3. Install the wire
Loosenthescrewusingthesuppliedhexagonwrench.Insertthe
conductorofthewireintheterminalhole,andthentightenthescrew.
10-13mm
(3/8"-1/2")
KAC-X41_M_1English.indd 4
08.10.21 3:48:36 PM

English
INPUT
SENSITIVITY[V]
BASS BOOST
LEVEL[dB]
HPF/LPF
FREQUENCY[Hz]
0.2 [MAX]
0.3
0.5
200
B ch
FILTER
LPF
150
100
70
10
18
0
15
2
4
6
50
60
1
2
3
4
[MIN]
5
[Lch]
INPUT
SENSITIVITY[V]
0.2 [MAX]
0.3
0.5
1
2
3
4
[MIN]
5
BASS BOOST
FREQUENCY[Hz]
70
100
40
90
80
50
60
HPF
A ch
FILTER
LPF
HPF
INPUT
SELECTOR
A
OPERATION
MONO
STEREO
OFF
OFF
A ch
A B
B ch
HPF/LPF
FREQUENCY[Hz]
200
150
100
70
50
60
INPUT
SENSITIVITY[V]
BASS BOOST
LEVEL[dB]
HPF/LPF
FREQUENCY[Hz]
0.2 [MAX]
0.3
0.5
200
B ch
FILTER
LPF
150
100
70
10
18
0
15
2
4
6
50
60
1
2
3
4
[MIN]
5
[Lch]
INPUT
SENSITIVITY[V]
0.2 [MAX]
0.3
0.5
1
2
3
4
[MIN]
5
BASS BOOST
FREQUENCY[Hz]
70
100
40
90
80
50
60
HPF
A ch
FILTER
LPF
HPF
INPUT
SELECTOR
A
OPERATION
MONO
STEREO
OFF
OFF
A ch
A B
B ch
HPF/LPF
FREQUENCY[Hz]
200
150
100
70
50
60
L
R
L
R
L
R
L
R
L
R
A
B
L
R
L
R
L
R
L
R
A
B
L
R
L
R
L
R
L
R
A
B
L
R
L
R
L
R
L
R
A
B
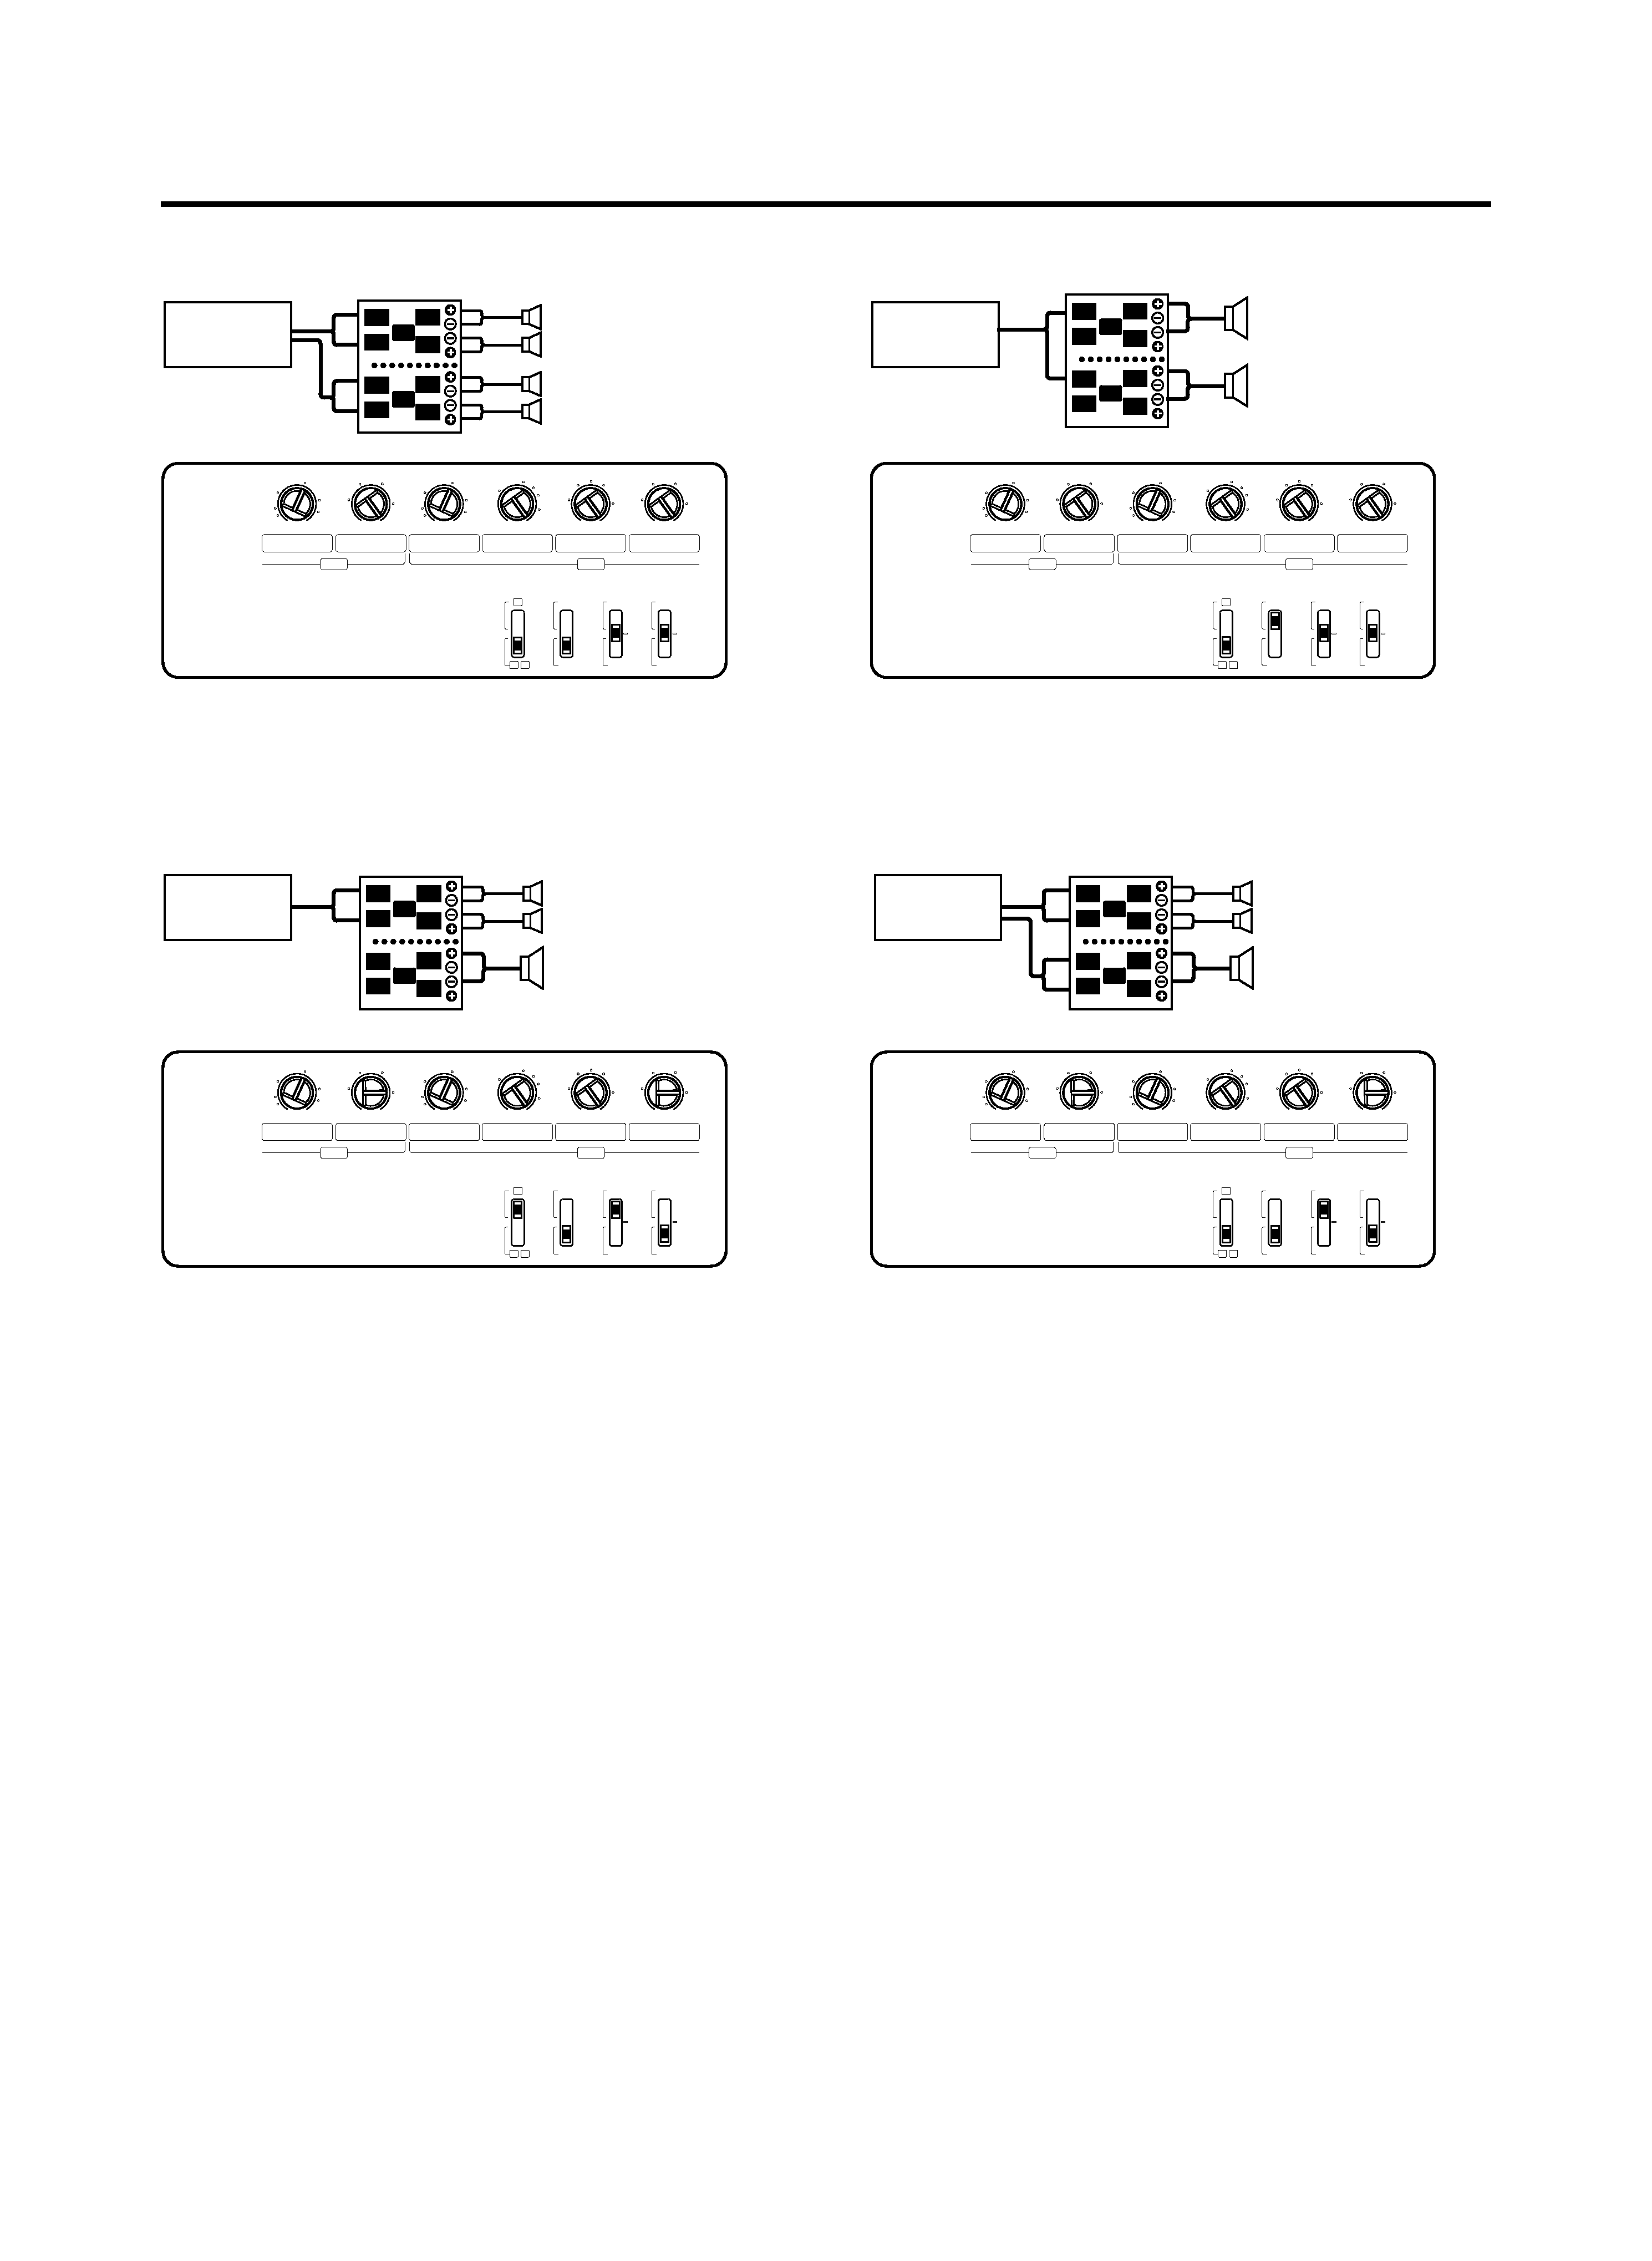
System examples
CENTERUNIT
-channel system
High-power -channel system
Rightspeaker(Bridged)
Leftspeaker(Bridged)
-channel + Subwoofer system (1)
Subwoofer
(Bridged)
CENTERUNIT
CENTERUNIT
Rightspeaker(Highpass)
Leftspeaker(Highpass)
FrontRightspeaker
FrontLeftspeaker
RearRightspeaker
RearLeftspeaker
-channel + Subwoofer system ()
Subwoofer
(Bridged)
CENTERUNIT
Rightspeaker(Highpass)
Leftspeaker(Highpass)
KAC-X41_M_1English.indd 5
08.10.21 3:48:37 PM
