LYT1256-001A
MasterPage: FrontCover
EN
ENGLISH
GR-D71
Please visit our Homepage on the World Wide Web for
Digital Video Camera:
For Accessories:
http://www.jvc.co.jp/english/cyber/
http://www.jvc.co.jp/english/accessory/
INSTRUCTIONS
GETTING STARTED
5
VIDEO RECORDING &
PLAYBACK
11
DIGITAL STILL CAMERA
(D.S.C.) RECORDING &
PLAYBACK
18
ADVANCED FEATURES
25
REFERENCES
38
TERMS
54
For Customer Use:
Enter below the Model No. and Serial
No. which is located on the bottom of
the camcorder. Retain this information
for future reference.
Model No.
Serial No.
To deactivate the demonstration, set
"DEMO MODE" to "OFF".
(
pg. 25, 27)
DIGITAL VIDEO CAMERA
Dear Customer,
Thank you for purchasing this digital
video camera. Before use, please read
the safety information and precautions
contained in the pages 2 3 to ensure
safe use of this product.
GR-D71US_01Cover.fm Page 1 Wednesday, November 26, 2003 10:39 AM

2 EN
MasterPage: Safety_Left
SAFETY PRECAUTIONS
WARNING: TO PREVENT FIRE OR SHOCK HAZARD,
DO NOT EXPOSE THIS UNIT TO RAIN OR MOISTURE.
NOTES:
The rating plate (serial number plate) and safety caution
are on the bottom and/or the back of the main unit.
The rating information and safty caution of the AC
Adapter are on its upper and lower sides.
CAUTIONS:
This camcorder is designed to be used with NTSC-type
color television signals. It cannot be used for playback
with a television of a different standard. However, live
recording and LCD monitor/viewfinder playback are
possible anywhere.
Use the JVC BN-V408U/V416U/V428U battery packs
and, to recharge them or supply power to the camcorder
from an AC outlet, use the provided multi-voltage AC
Adapter. (An appropriate conversion adapter may be
necessary to accommodate different designs of AC
outlets in different countries.)
Caution on Replaceable lithium battery
The battery used in this device may present a fire or
chemical burn hazard if mistreated.
Do not recharge, disassemble, heat above 100°C (212°F)
or incinerate.
Replace battery with Panasonic (Matsushita Electric),
Sanyo, Sony or Maxell CR2025.
Danger of explosion or Risk of fire if the battery is
incorrectly replaced.
Dispose of used battery promptly.
Keep away from children.
Do not disassemble and do not dispose of in fire.
CAUTION
RISK OF ELECTRIC SHOCK
DO NOT OPEN
CAUTION:
TO REDUCE THE RISK OF ELECTRIC SHOCK,
DO NOT REMOVE COVER (OR BACK).
NO USER-SERVICEABLE PARTS INSIDE.
REFER SERVICING TO QUALIFIED SERVICE PERSONNEL.
The lightning flash with arrowhead symbol, within an
equilateral triangle, is intended to alert the user to the
presence of uninsulated "dangerous voltage" within the
product's enclosure that may be of sufficient magnitude
to constitute a risk of electric shock to persons.
The exclamation point within an equilateral triangle is
intended to alert the user to the presence of important
operating and maintenance (servicing) instructions in
the literature accompanying the appliance.
This product has a fluorescent lamp that contains a small
amount of mercury. Disposal of these materials may be
regulated in your community due to environmental
considerations.
For disposal or recycling information please contact your
local authorities, or the Electronics Industries Alliance:
<http://www.eiae.org>
When the equipment is installed in a cabinet or on a shelf,
make sure that it has sufficient space on all sides to allow
for ventilation (10 cm (3-15/16") or more on both sides, on
top and at the rear).
Do not block the ventilation holes.
(If the ventilation holes are blocked by a newspaper, or
cloth etc. the heat may not be able to get out.)
No naked flame sources, such as lighted candles, should
be placed on the apparatus.
When discarding batteries, environmental problems must
be considered and the local rules or laws governing the
disposal of these batteries must be followed strictly.
The apparatus shall not be exposed to dripping or
splashing.
Do not use this equipment in a bathroom or places with
water.
Also do not place any containers filled with water or liquids
(such as cosmetics or medicines, flower vases, potted
plants, cups etc.) on top of this unit.
(If water or liquid is allowed to enter this equipment, fire or
electric shock may be caused.)
Do not point the lens or the viewfinder directly into the sun.
This can cause eye injuries, as well as lead to the
malfunctioning of internal circuitry. There is also a risk of
fire or electric shock.
CAUTION!
The following notes concern possible physical damage to
the camcorder and to the user.
When carrying, be sure to always securely attach and use
the provided strap. Carrying or holding the camcorder by
the viewfinder and/or the LCD monitor can result in
dropping the unit, or in a malfunction.
Take care not to get your finger caught in the cassette
holder cover. Do not let children operate the camcorder, as
they are particularly susceptible to this type of injury.
Do not use a tripod on unsteady or unlevel surfaces. It
could tip over, causing serious damage to the camcorder.
CAUTION!
Connecting cables (Audio/Video, S-Video, etc.) to the
camcorder and leaving it on top of the TV is not
recommended, as tripping on the cables will cause the
camcorder to fall, resulting in damage.
GR-D94US.book Page 2 Monday, November 17, 2003 2:12 PM

EN
3
MasterPage: Safety_Right
IMPORTANT SAFTY INSTRUCTIONS
1. Read these instructions.
2. Keep these instructions.
3. Heed all warnings.
4. Follow all instructions.
5. Do not use this apparatus near water.
6. Clean only with dry cloth.
7. Do not block any ventilation openings. Install in
accordance with the manufacturer's instructions.
8. Do not install near any heat sources such as radiators,
heat registers, stoves, or other apparatus (including
amplifiers) that produce heat.
9. Only use attachments/accessories specified by the
manufacturer.
10. Use only with the cart, stand,
tripod, bracket, or table
specified by the manufacturer,
or sold with the apparatus.
When a cart is used, use
caution when moving the cart/
apparatus combination to
avoid injury from tip-over.
11. Unplug this apparatus during
lightning storms or when
unused for long periods of time.
12. Refer all servicing to qualified service personnel.
Servicing is required when the apparatus has been
damaged in any way, such as power-supply cord or plug
is damaged, liquid has been spilled or objects have fallen
into the apparatus, the apparatus has been exposed to
rain or moisture, does not operate normally, or has been
dropped.
This camcorder is designed exclusively for the digital video
cassette, SD Memory Card and MultiMediaCard. Only
cassettes marked "" and memory cards marked
"" or "" can be used with this unit.
Before recording an important scene...
...make sure you only use cassettes with the Mini DV mark
.
...make sure you only use memory cards with the mark
or
.
...remember that this camcorder is not compatible with other
digital video formats.
...remember that this camcorder is intended for private
consumer use only. Any commercial use without proper
permission is prohibited. (Even if you record an event such as
a show, performance or exhibition for personal enjoyment, it
is strongly recommended that you obtain permission
beforehand.)
GR-D94US.book Page 3 Monday, November 17, 2003 2:12 PM

4 EN
MasterPage: Heading0_Left
CONTENTS
GETTING STARTED
5
Provided Accessories ....................................................5
Power .............................................................................6
Grip Adjustment .............................................................7
Operation Mode .............................................................8
Date/Time Settings ........................................................8
Viewfinder Adjustment ...................................................9
Brightness Adjustment Of The Display ..........................9
Tripod Mounting .............................................................9
Loading/Unloading A Cassette ....................................10
Loading/Unloading A Memory Card ................................... 10
VIDEO RECORDING & PLAYBACK
11
VIDEO RECORDING ........................................................11
Basic Recording ...........................................................11
LCD Monitor And Viewfinder ........................................12
Tape Remaining Time ..................................................12
Zooming .......................................................................12
Journalistic Shooting ....................................................13
Self Recording .............................................................13
Time Code ...................................................................13
Recording From The Middle Of A Tape .......................13
VIDEO PLAYBACK ...........................................................14
Normal Playback ..........................................................14
Still Playback ................................................................14
Shuttle Search .............................................................14
Blank Search ................................................................14
Playback Using The Remote Control ............................... 15
Connections To A TV Or VCR .....................................17
DIGITAL STILL CAMERA (D.S.C.) RECORDING &
PLAYBACK
18
D.S.C. RECORDING .........................................................18
Basic Shooting (D.S.C. Snapshot) ...............................18
Dubbing Still Images Recorded On A Tape To A Memory
Card .........................................................................19
D.S.C. PLAYBACK ...........................................................20
Normal Playback Of Images ........................................20
Auto Playback Of Images ............................................20
Index Playback Of Files ...............................................20
Viewing File Information ...............................................21
Removing On-Screen Display ......................................21
ADDITIONAL FEATURES FOR D.S.C. ..................................22
Protecting Files ............................................................22
Deleting Files ...............................................................22
Setting Print Information (DPOF Setting) .....................23
Resetting The File Name .............................................24
Initializing A Memory Card ...........................................24
ADVANCED FEATURES
25
MENUS FOR DETAILED ADJUSTMENT .............................. 25
Changing The Menu Settings ...................................... 25
Recording Menus ........................................................ 26
Playback Menus .......................................................... 28
FEATURES FOR RECORDING ........................................... 29
White LED Light .......................................................... 29
Night Alive ................................................................... 29
Wipe Or Fader Effects ................................................. 30
Program AE With Special Effects ................................ 30
Snapshot (For Video Recording) ................................. 31
Auto Focus .................................................................. 31
Manual Focus .............................................................. 32
Exposure Control ......................................................... 32
Iris Lock ....................................................................... 32
Backlight Compensation .............................................. 33
White Balance Adjustment .......................................... 33
Manual White Balance Adjustment ............................. 33
EDITING ........................................................................ 34
Dubbing To Or From A VCR ....................................... 34
Dubbing To Or From A Video Unit Equipped With A DV
Connector (Digital Dubbing) .................................... 35
Connection To A Personal Computer .......................... 36
Audio Dubbing ............................................................. 37
Insert Editing ............................................................... 37
REFERENCES
38
ADDITIONAL INFORMATION ........................................... 38
TROUBLESHOOTING ....................................................... 40
CAUTIONS ..................................................................... 45
USER MAINTENANCE ...................................................... 48
SPECIFICATIONS ............................................................ 49
INDEX ........................................................................... 50
TERMS
54
GR-D94US.book Page 4 Monday, November 17, 2003 2:12 PM

G
ETT
ING
ST
AR
TE
D
EN
5
MasterPage: Start_Right
GETTING STARTED
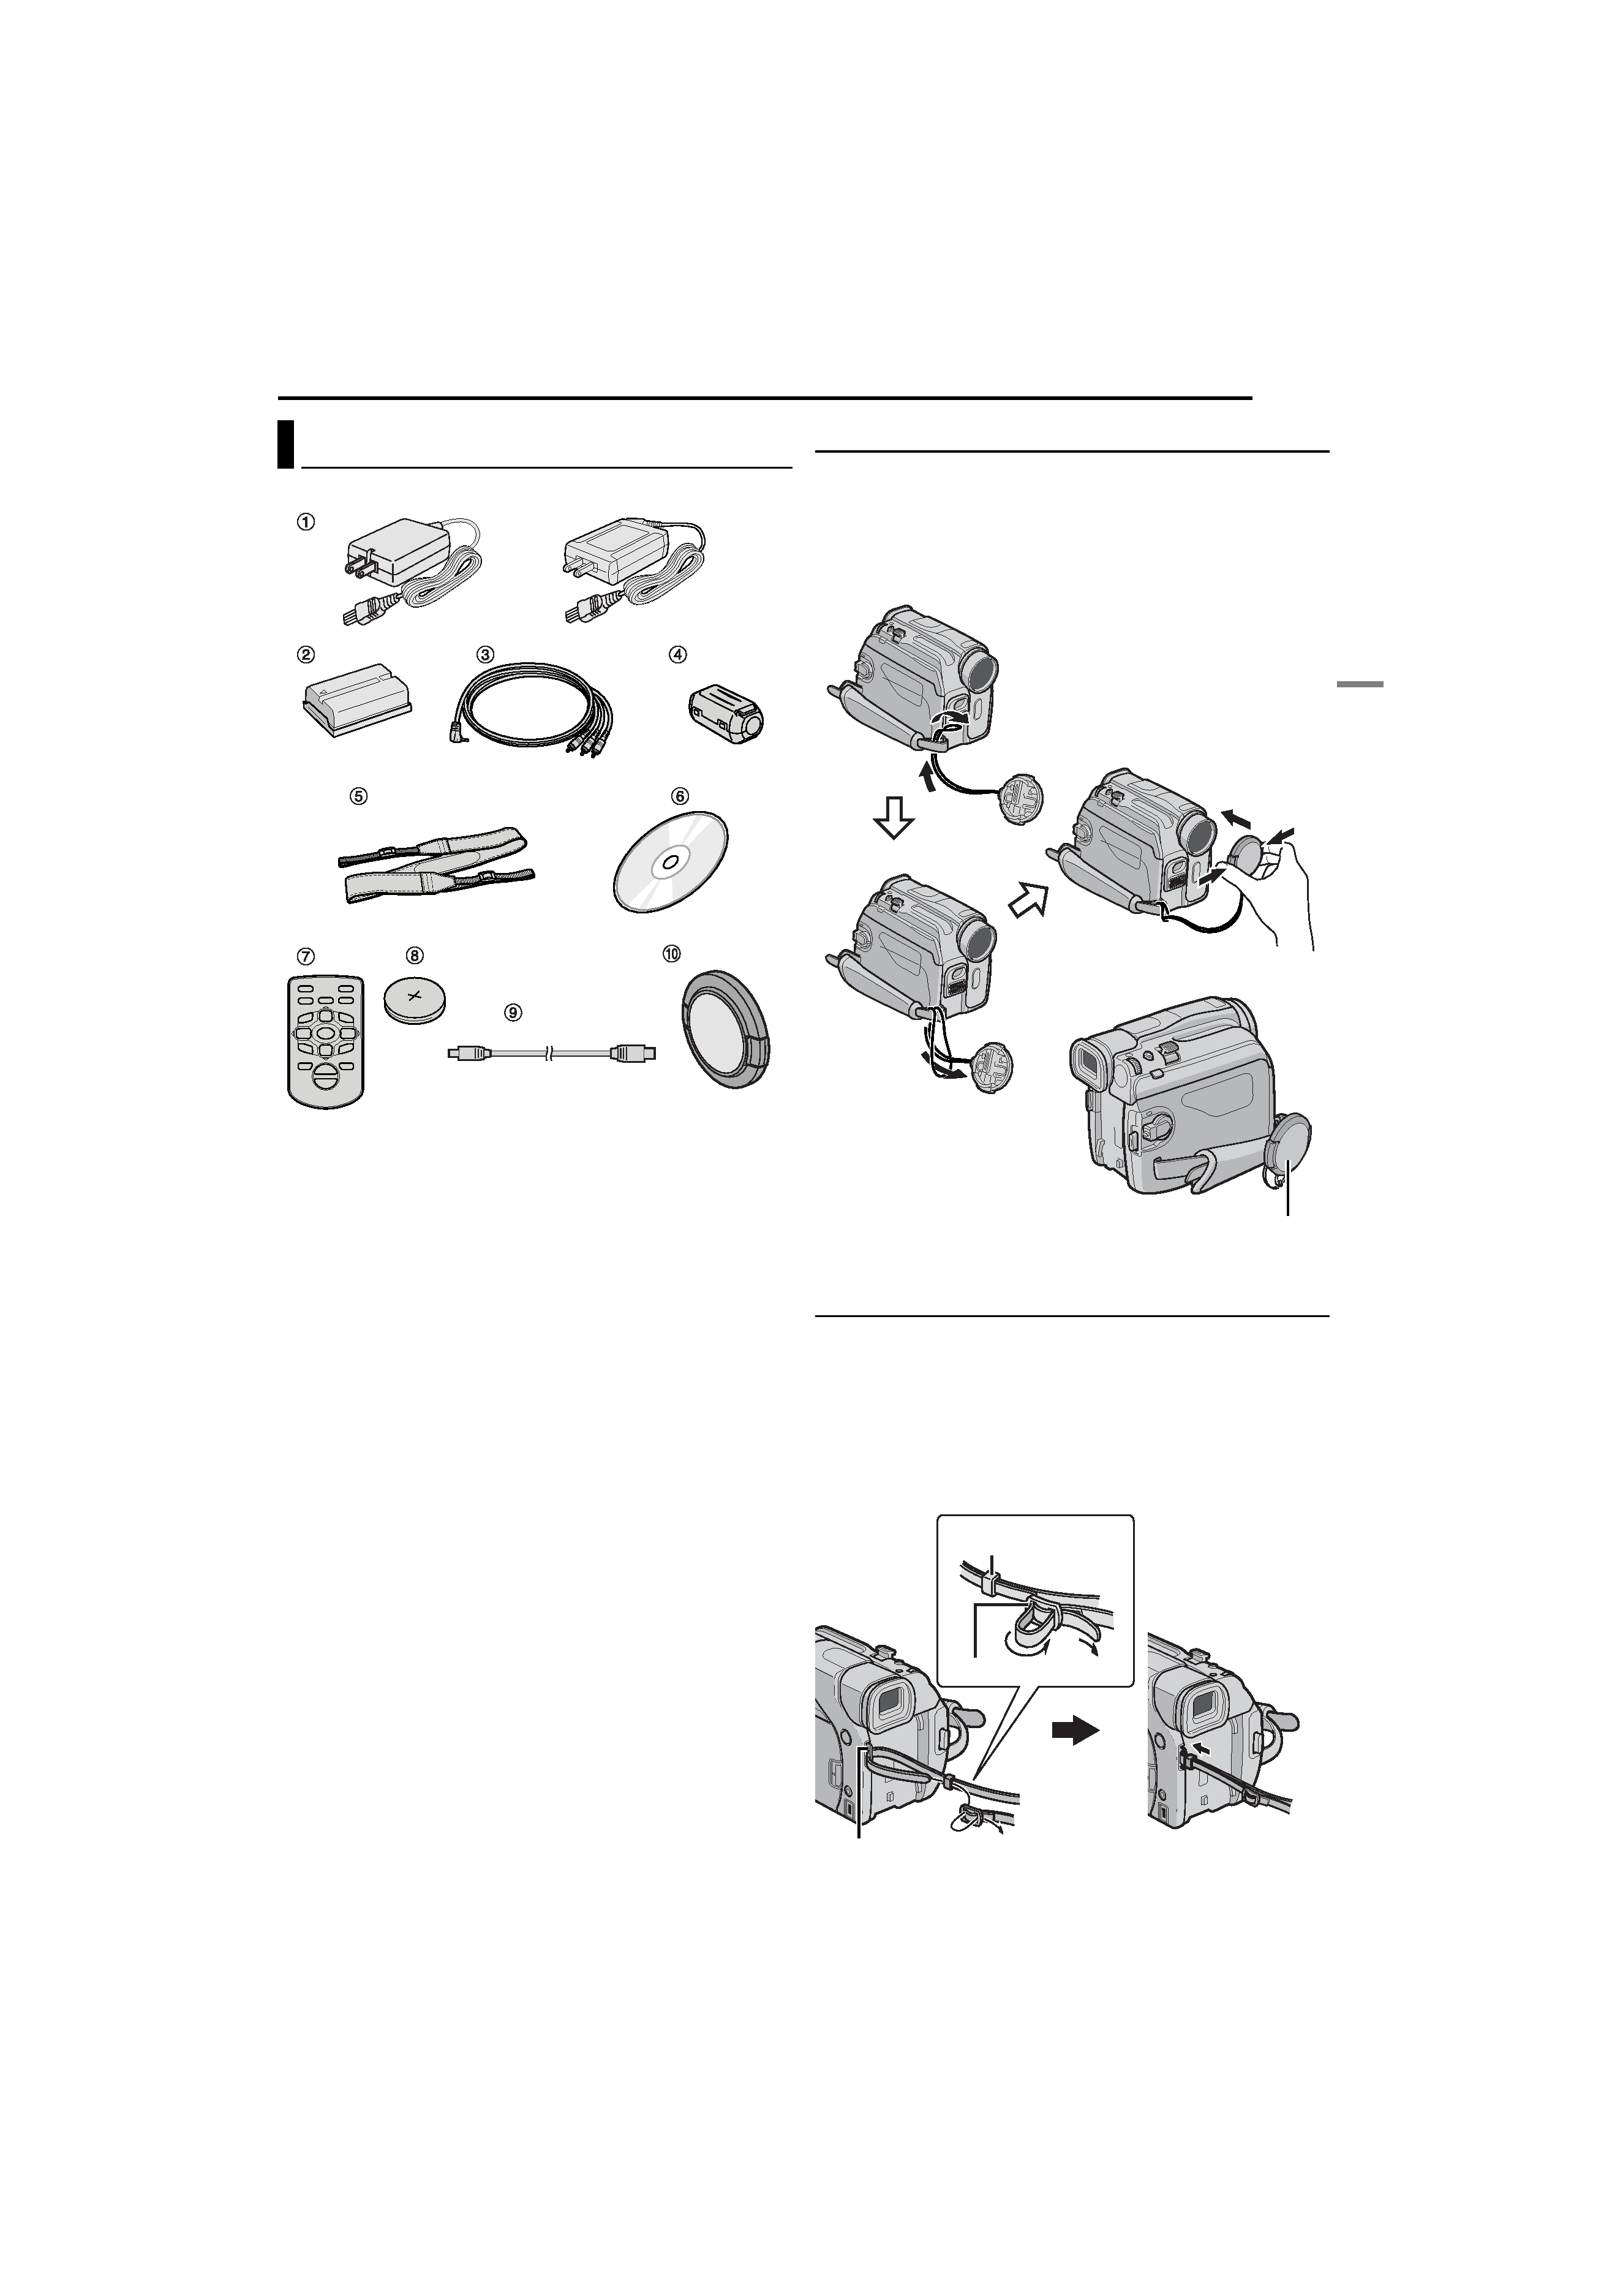
a AC Adapter AP-V14U or AP-V15U
b Battery Pack BN-V408U-B
c Audio/Video Cable (ø3.5 mini-plug to RCA plug)
d Core Filter (for USB Cable and optional S-Video
Cable.
pg. 6 for attachment)
e Shoulder Strap (See the right column for attachment)
f CD-ROM
g Remote Control Unit RM-V718U
h Lithium Battery CR2025* (for remote control unit)
i USB Cable
j Lens Cap (See the right column for attachment)
* A lithium battery is pre-installed in the Remote Control Unit
at time of shipment (with insulation sheet). To use the
Remote Control Unit, remove the insulation sheet.
NOTES:
In order to maintain optimum performance of the
camcorder, provided cables may be equipped with one or
more core filter. If a cable has only one core filter, the end
that is closest to the filter should be connected to the
camcorder.
Make sure to use the provided cables for connections. Do
not use any other cables.
How To Attach The Lens Cap
To protect the lens, attach the provided lens cap to the
camcorder as shown in the illustration.
NOTE:
To confirm the lens cap is on correctly make sure the cap is
flush to the camcorder.
How To Attach The Shoulder Strap
Follow the illustration.
1 Thread the strap through the eyelet.
2 Fold it back and thread it through the strap guide and
the buckle.
To adjust the length of the strap, loosen and then tighten
the strap in the buckle.
3 Slide the strap guide fully towards the eyelet.
Provided Accessories
9
0
2
3
4
6
we
5
T
W
or
Place here during shooting.
Push.
1
2
3
Strap guide
Buckle
Eyelet
GR-D72US_04Start.fm Page 5 Tuesday, November 18, 2003 11:48 AM
