ENGLISH
FRANÇAIS
DEUTSCH
ESPAÑOL
ITALIANO
TECHNICAL
Projector
PJTX10
PJTX10W/PJTX10E/PJTX10WAU
User's Manual Operating Guide
Please read this user's manual thoroughly to ensure correct usage understanding.
Manuel d'utilisation Guide d'utilisation
Nous vous recommandons de lire attentivement ce manuel pour bien assimiler le fonctionnement
de l'appareil.
Bedienungsanleitung Benutzerhandbuch
Um zu gewährleisten, dass Sie die Bedienung des Geräts verstanden haben, lesen Sie dieses
Handbuch bitte sorgfältig.
Manual de usuario Guía de funcionamiento
Lea atentamente el manual de usuario del proyector para garantizar un uso adecuado del mismo.
Manuale d'istruzioni Guida operativa
Vi preghiamo di leggere attentamente il manuale d'istruzioni per garantire una corretta
comprensione delle istruzioni.
TECHNICAL
1
Projector
PJ-TX10
PJ-TX10
PJ-TX10W / PJ-TX10E / PJ-TX10W(AU)
PJ-TX10W / PJ-TX10E / PJ-TX10W(AU)
User
User ''s Manual Quick Guide
s Manual Quick Guide
Thank you for purchasing this projector.
· The information in this manual is subject to change without notice.
· The manufacturer assumes no responsibility for any errors that may appear in this manual.
· The reproduction, transmission or use of this document or contents is not permitted without express
written authority.
NOTE
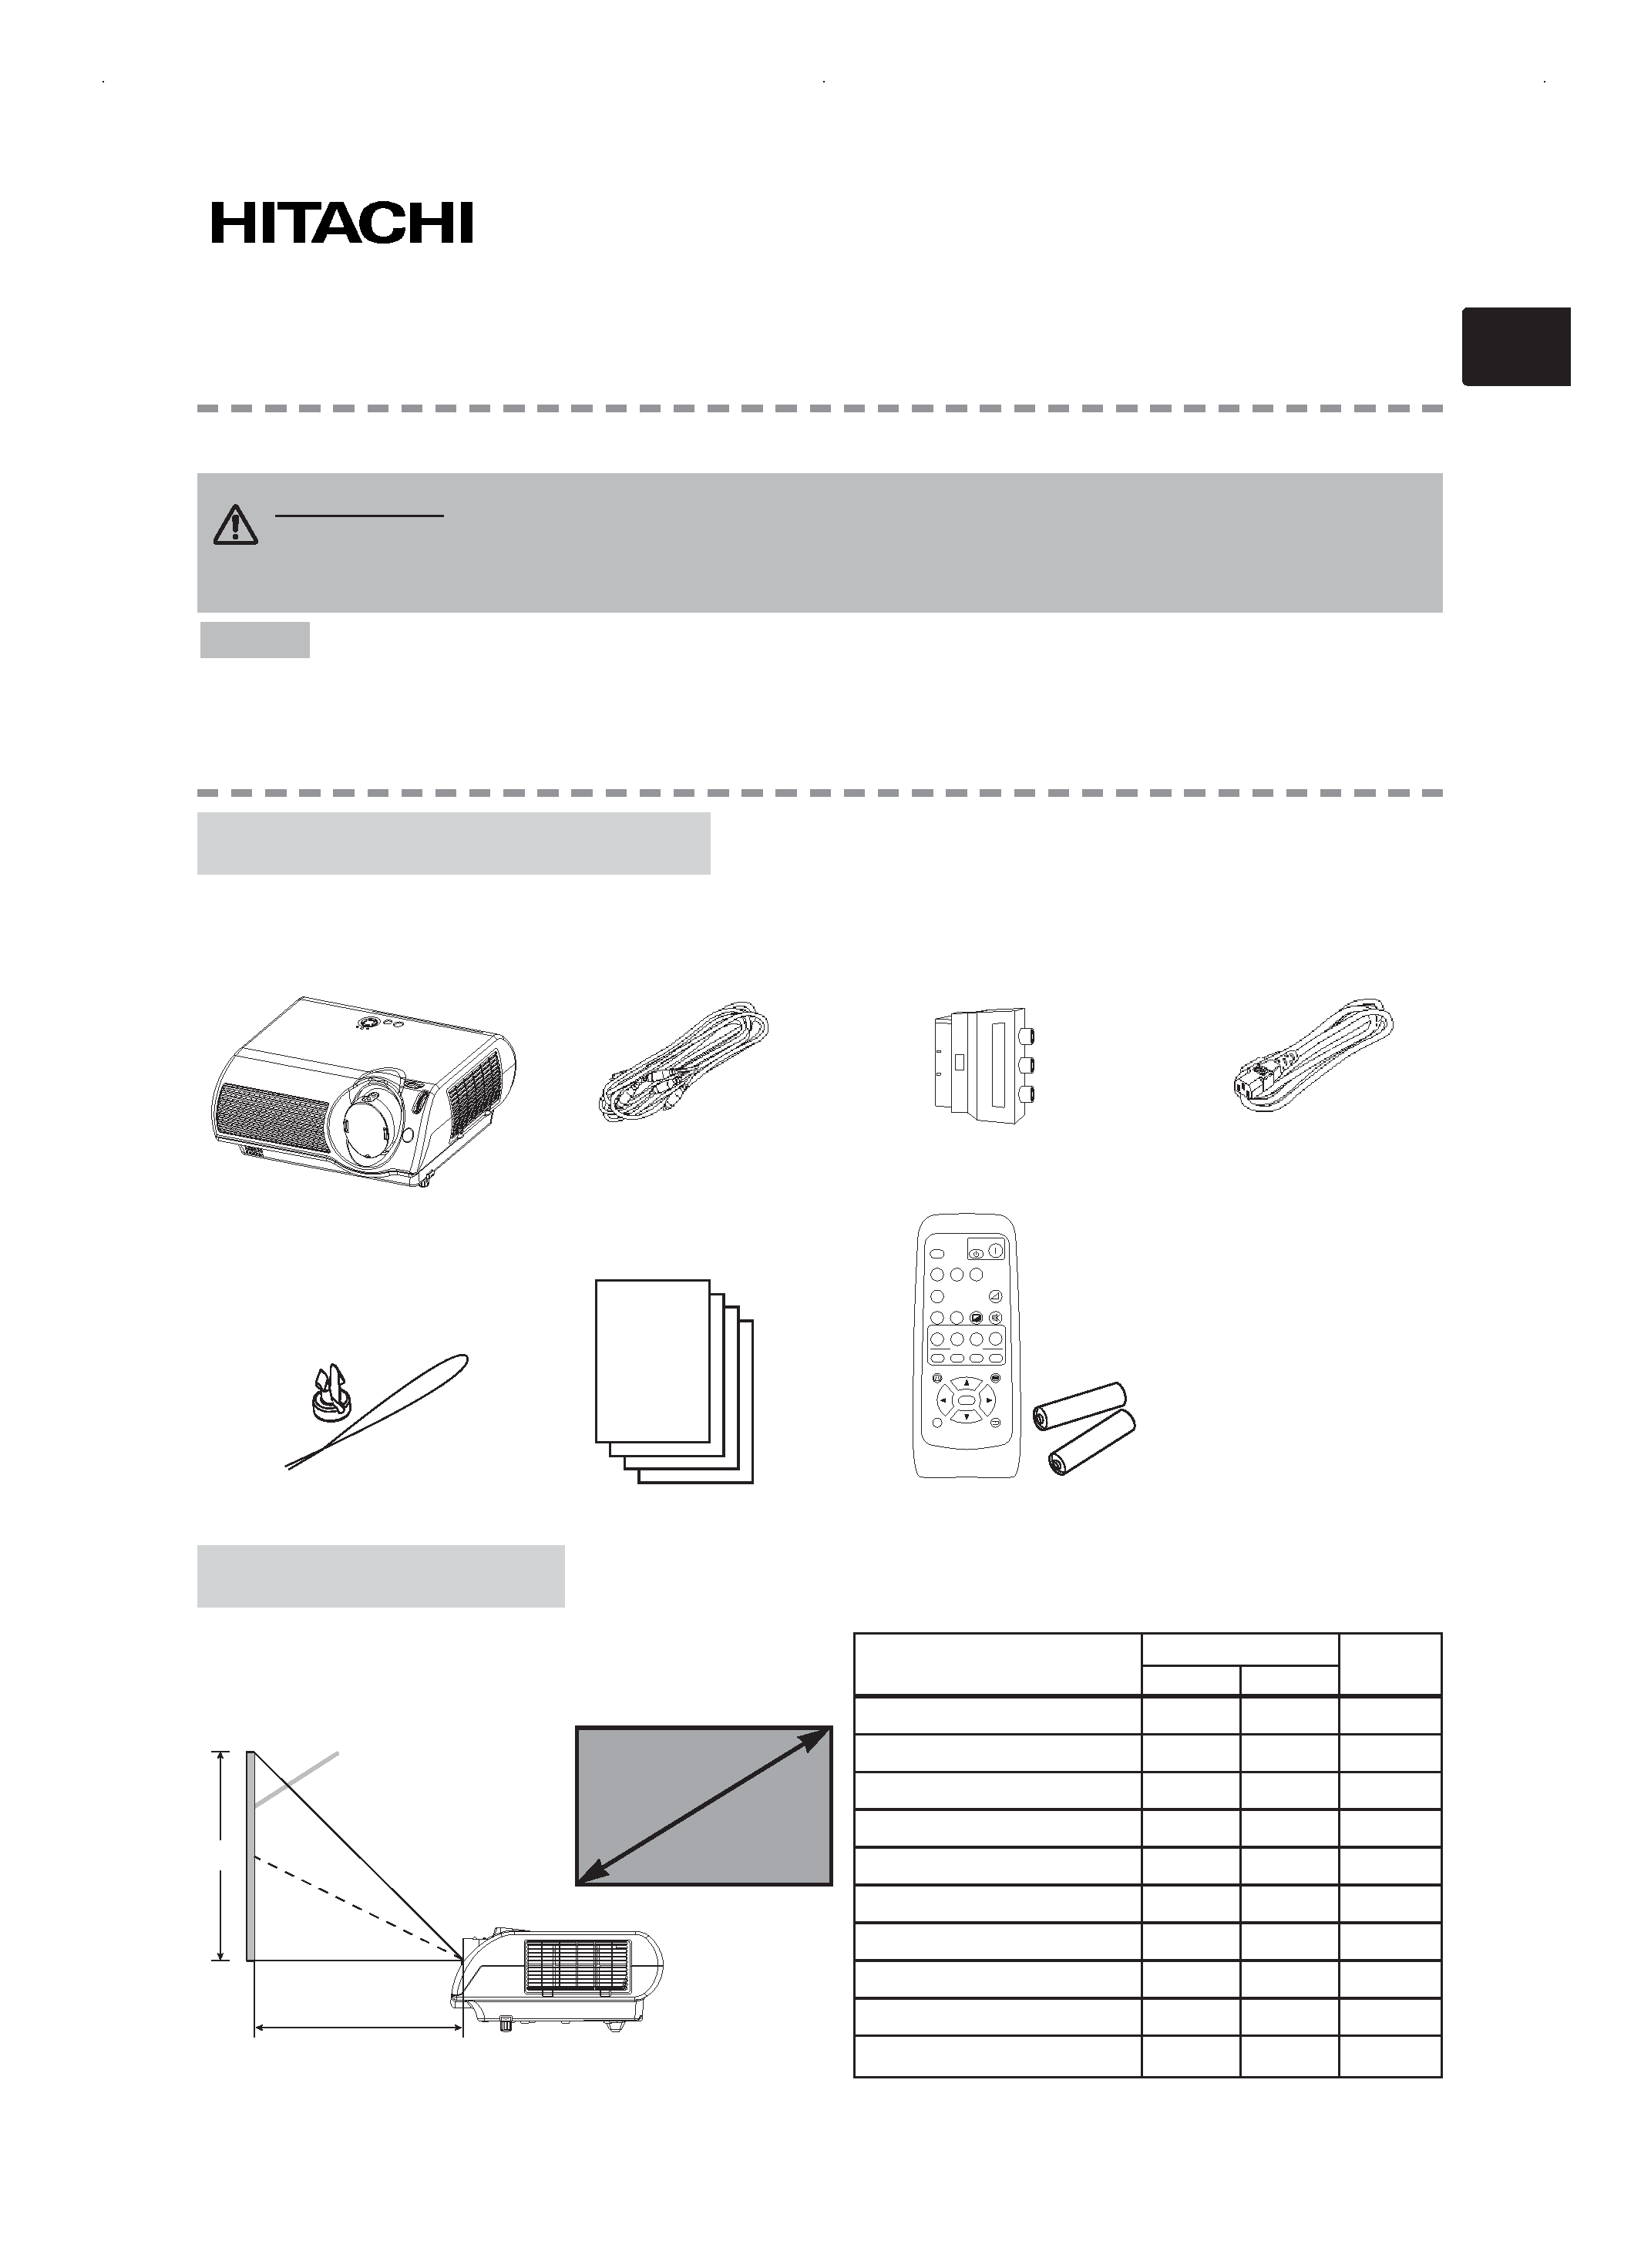
Your projector should come with the items shown below. Contact your dealer if anything is missing.
Keep the original packing material for future reshipment. For moving the projector, be sure to use the
original packing material. Use special caution for the lens part.
WARNING
Before using, read the "User's Manual - Safety Guide" and
these manuals to ensure correct usage through understanding. After reading,
store them in a safe place for future reference.
User's manuals (4)
SEARCH
SRC
VIDEO
VSV
C
WIDE
AUTO
MUTE
BLANK
CUSTOM
CINEMA
AT
CIN
M1
E
DYNAMIC
DYN
ENT
MYMEMORY
NORMAL
NOR
CUS
WID
PC
MENU
ENTER
ESC
RESET
VOLUME
COMPUTER
COMPONENT
S-VIDEO
OFF
ON
KEYSTONE
M2
M3
M4
Remote control &
AA batteries (2)
Contents Of Package
Contents Of Package
Refer to this table, in case of 16:9 aspect ratios.
The values (a) and (b) shown in the table are
calculated for a full size screen: 854x480.
Arrangement
Arrangement
(±10%)
Rivet & Strap
Projector
(with Lens Cap)
Video/Audio
cable
SCART adapter
(PJ-TX10E only)
Power cords
PJ-TX10W (3):
US, UK, Europe
PJ-TX10E (2):
UK, Europe
PJ-TX10W(AU) (1):
Australia
(a)
(b)
Screen
Side View
Screen
size
Screen Size [inch (m)]
(a) [inch (m)]
(b)
[inch (cm)]
Min.
Max.
30 (0.8)
29(0.7)
60(1.5)
15(37)
40 (1.0)
40(1.0)
81(2.1)
20(50)
50 (1.3)
50(1.3) 102(2.6) 25(62)
60 (1.5)
60(1.5) 122(3.1) 29(75)
70 (1.8)
71(1.8) 143(3.6) 34(87)
80 (2.0)
81(2.1) 163(4.2) 39(100)
90 (2.3)
91(2.3) 184(4.7) 44(112)
100 (2.5)
101(2.6) 205(5.2) 49(125)
200 (5.1)
204(5.2) 411(10.4) 98(249)
300 (7.6)
307(7.8) 616(15.7) 147(374)
2
Connecting Devices
Connecting Devices
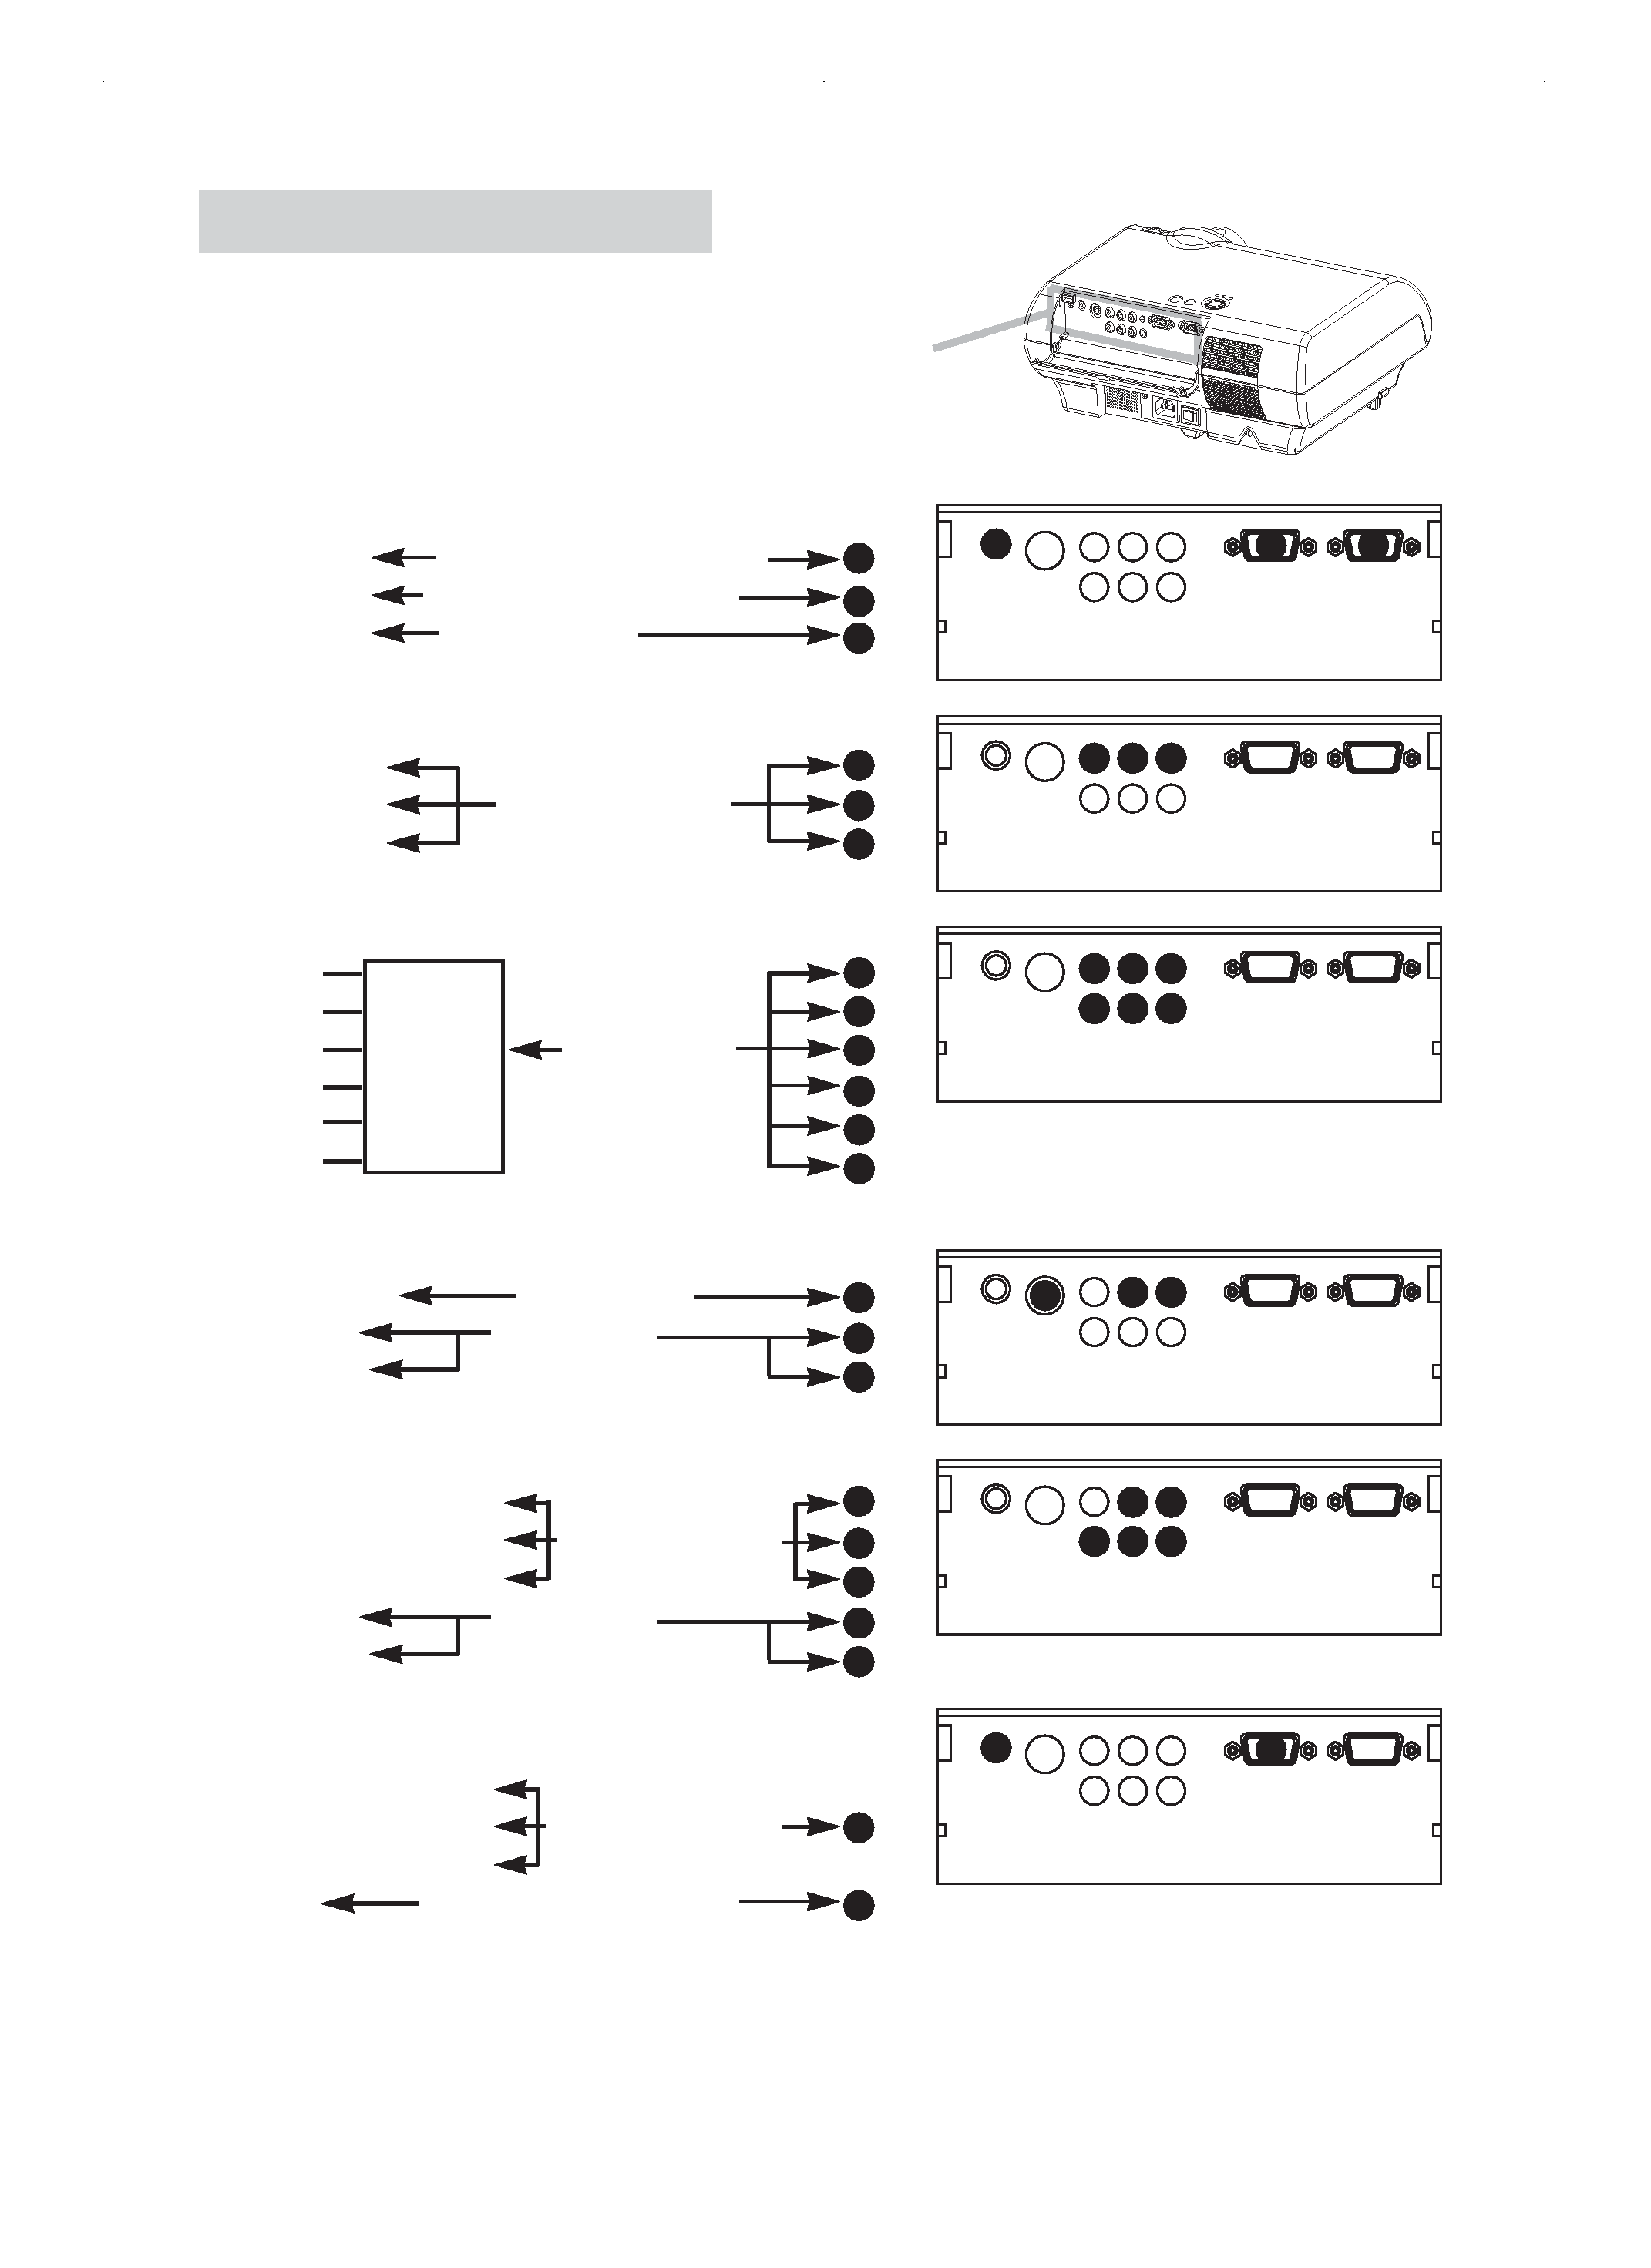
Please refer to the following for connecting your devices.
See the rear of the projector and open the ports cover.
You can see the ports.
S-VIDEO
AUDIO
Y
COMPONENT VIDEO
CB/PB
CR/PR
COMPUTER
CONTROL
S-VIDEO
AUDIO
Y
COMPONENT VIDEO
CB/PB
CR/PR
COMPUTER
CONTROL
S-VIDEO
AUDIO
Y
COMPONENT VIDEO
CB/PB
CR/PR
COMPUTER
CONTROL
S-VIDEO
AUDIO
Y
COMPONENT VIDEO
CB/PB
CR/PR
COMPUTER
CONTROL
S-VIDEO
AUDIO
Y
COMPONENT VIDEO
CB/PB
CR/PR
COMPUTER
CONTROL
S-VIDEO
AUDIO
Y
COMPONENT VIDEO
CB/PB
CR/PR
COMPUTER
CONTROL
L-AUDIO-R
VIDEO
L-AUDIO-R
VIDEO
L-AUDIO-R
VIDEO
L-AUDIO-R
VIDEO
L-AUDIO-R
VIDEO
L-AUDIO-R
VIDEO
Connecting to a computer
RGB out
RGB cable (D-sub 15 pin)
Audio out
Audio cable (Stereo mini)
RS-232C port
RS-232C cable
Connecting to a DVD/VCR player
Video out
Audio out (L)
Audio/Video cable
Audio out (R)
If using a SCART RGB input,
Video
AUDIO-L
AUDIO-R
SCART
SCART cable
G
out port
B
R
If using a S-video input,
S-video out port
S-video cable
Audio out (L)
Audio cable
Audio out (R)
If using a component input,
Component (Y) out
Component (CB/PB) out
Component cable
Component (CR/PR) out
Audio out (L)
Audio cable
Audio out (R)
If using a component input from
COMPUTER port,
Component (Y) out
Component (CB/PB) out
Component cable
Component (CR/PR) out
(with D-sub 15 pin)
Audio out
Audio cable(Stereo mini)
Power switch
3
1
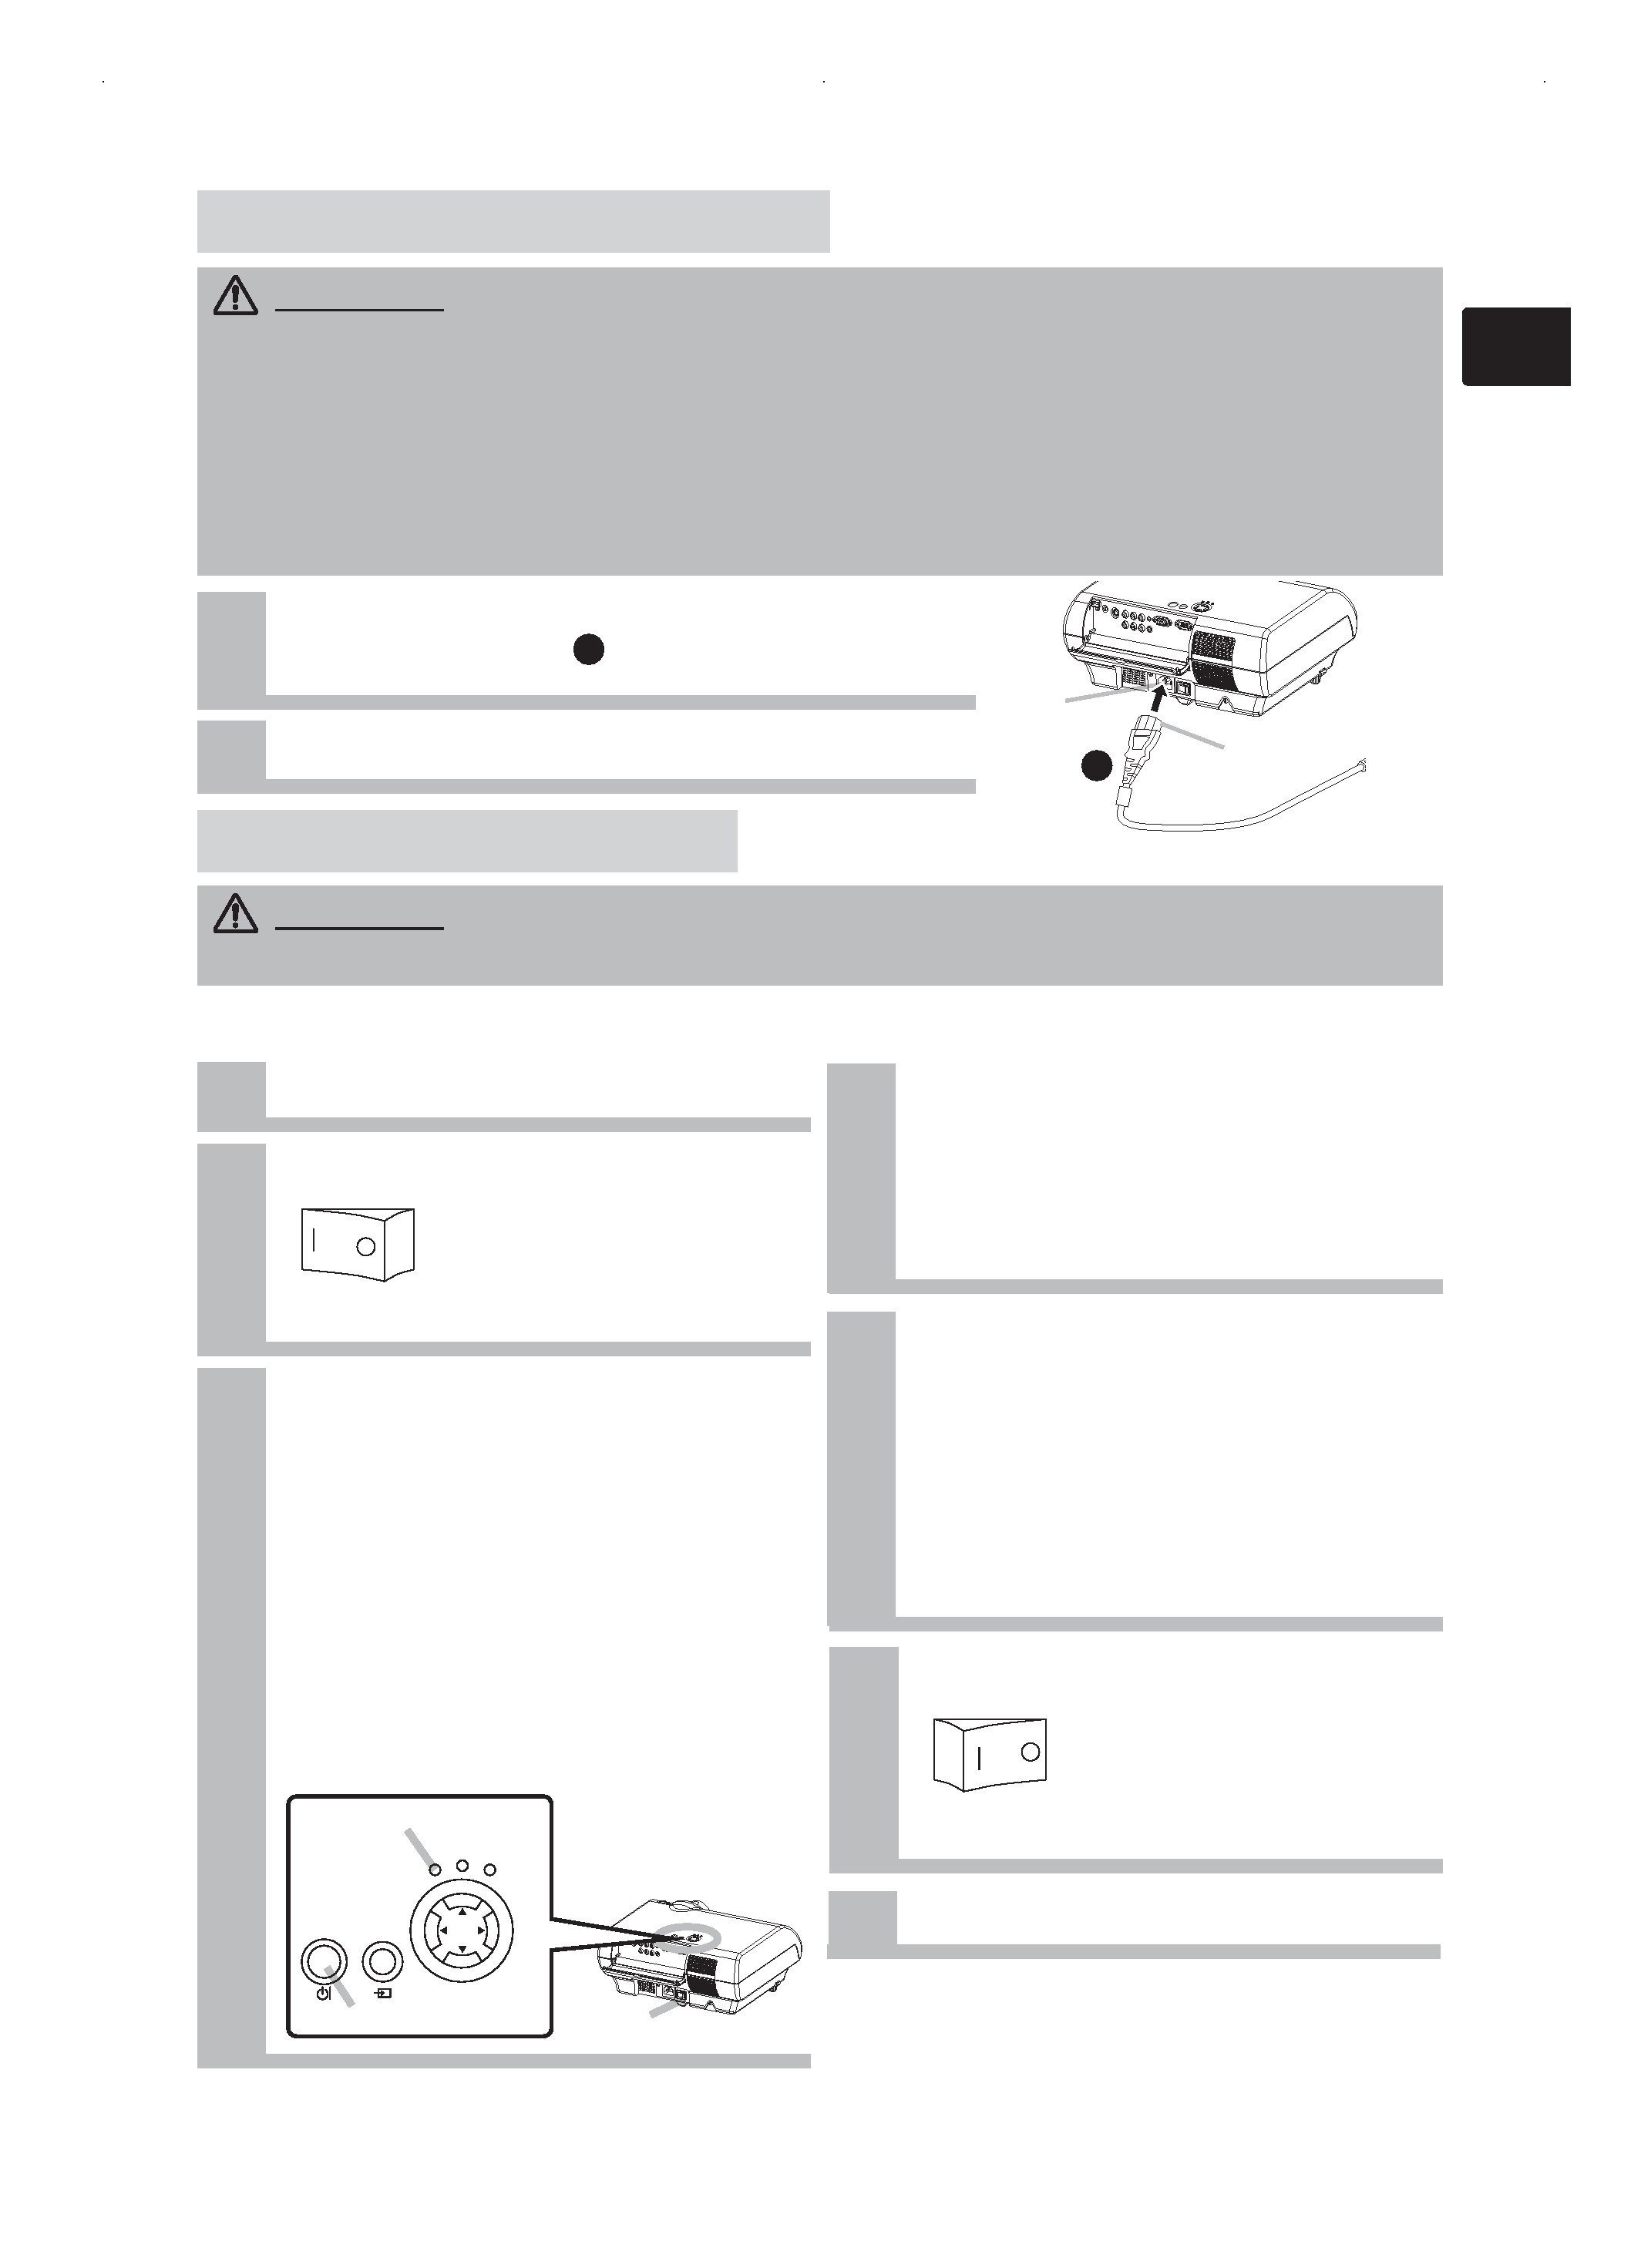
Connect the connector of the power cord to the AC
inlet of the projector.
2
Firmly plug the power cord's plug into the outlet.
1
Remove the lens cap.
2
Set the power switch to [ | ] (ON).
3
Press the STANDBY/ON button of the
projector or the ON button of the
remote control.
The projector lamp will light up and the
POWER indicator will begin blinking green.
According to a setup, the projector lamp
may light up and the POWER indicator
may begin blinking green, without
pressing this button.
When the power is completely on, the
indicator will stop blinking and light green.
The POWER indicator will light orange.
WARNING · Please use extra caution when connecting the power cord as incorrect or faulty
connections may result in FIRE and/or ELECTRICAL SHOCK. Please adhere to the "User's manual Safety
Guide" and the following.
· Only plug the power cord into outlets rated for use with the power cord's specified voltage range.
· Only use the power cord that came with the projector. If it is damaged, contact your dealer to newly get
correct one.
· Never modify the power cord. Never attempt to defeat the ground connection of the three-pronged plug.
· Make sure that you firmly connect the power cord to the projector and wall outlet.
WARNING · When the power is ON, a strong light is emitted. Do not look into the lens or vents of
the projector.
Connecting Power Supply
Connecting Power Supply
T
Turning On/Of
urning On/Of f Power
f Power
Turning ON The Power
Turning OFF The Power
Power switch (ON position)
1
Press the STANDBY/ON button of the
projector or the OFF button of the remote
control.
The message "Power off?" will appear on
the screen for approximately 5 seconds.
4
Attached the lens cap.
2
Press the STANDBY/ON button again
while "Power off?" the message is
visible.
The projector lamp will go off, and the
POWER indicator will begin blanking orange.
Then the POWER indicator will stop
blinking and light to solid orange when the
lamp cooling is complete.
3
Switch the power switch to [O] (OFF).
The POWER indicator will go off.
Power switch (OFF position)
STANDBY/ON
INPUT
POWER
LAMP
TEMP
MENU
STANDBY/ON button
POWER indicator
AC Inlet
Connector Side
Power cord
4
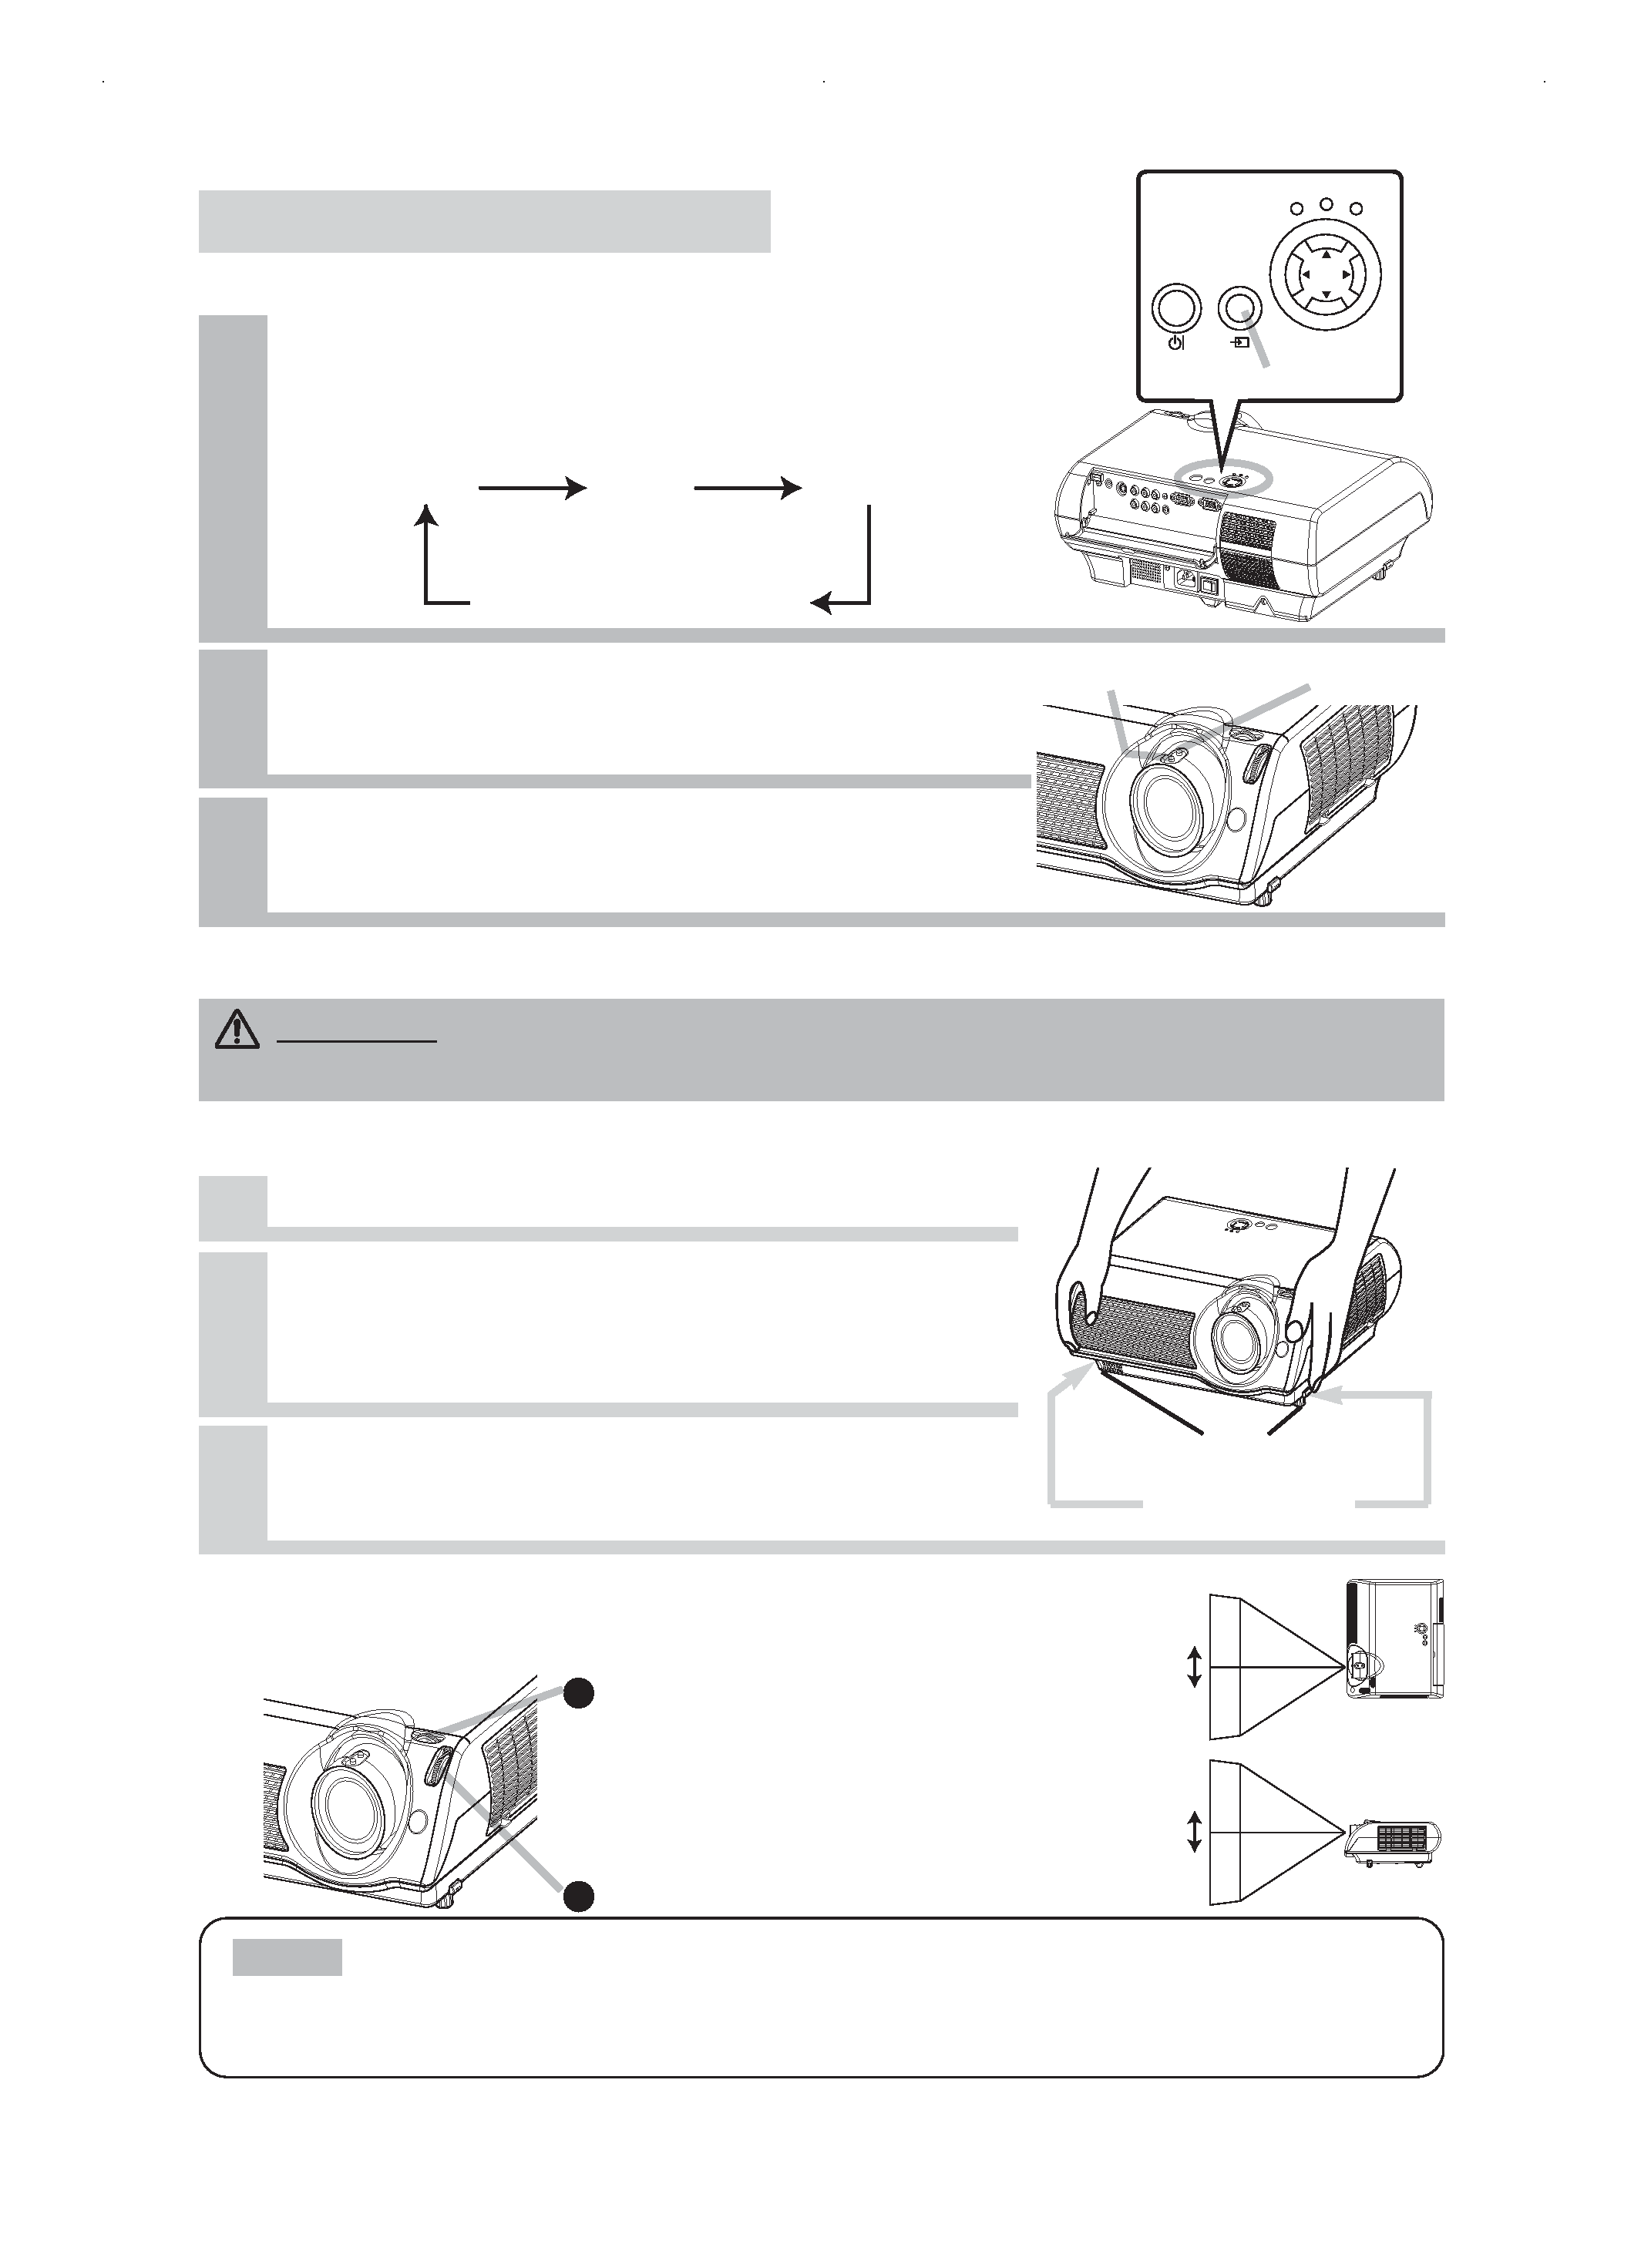
Adjusting The Projector's Elevator
Using The Picture Shift Dials
CAUTION · To prevent damaging the projector and injuring yourself, ALWAYS
HOLD THE PROJECTOR whenever using the elevator buttons to adjust the elevator feet.
You can use the elevator feet to adjust the angle of projection. The adjustment range of
the elevator feet is 0 to 9 degrees.
Press and hold in the elevator buttons.
2
Raise or lower the projector to the desired
height and then release the elevator buttons.
When you release the elevator buttons, the elevator feet will
lock into position.
3
As necessary, you can also finely adjust the
height of the projector by twisting the
elevator feet by hand.
Selecting An Input Signal
1
2
Use the zoom ring to adjust the screen
size.
Press the INPUT button.
As illustrated below, each time you press the INPUT
button, the projector switches between its input signal
ports. Select the signal you wish to project.
COMPUTER
VIDEO
S-VIDEO
COMPONENT VIDEO
STANDBY/ON
INPUT
POWER
LAMP
TEMP
MENU
INPUT button
Pr
Projecting The Pictur
ojecting The Picture
e
3
Use the focus ring to focus the picture.
Zoom ring
Focus ring
Elevator buttons
Elevator feet
1
When you want to finely adjust the picture position, use the picture shift dials.
Horizontal picture shift dial
7.5:2.5
to
2.5:7.5
10:0
to
0:10
Vertical picture shift dial
· Generally, better quality of a picture is available when the lens shift is set to the center.
· Do not attach anything other than specified options (such as an optional conversion lens) to the
screw thread. For details, please ask your dealer.
NOTE
