ENGLISH
DEUTSCH
FRANÇAIS
ITALIANO
ESPAÑOL
NEDERLANDS
NORSK
TECHNICAL
PORTGÊS
Liquid Crystal Projector
CPSX5600W
USER'S MANUAL
Please read this user's manual thoroughly to ensure correct usage through understanding.
BEDIENUNGSANLEITUNG
Bitte lessen Sie diese Bedienungsanleitung zugunsten der korrekten Bedienung
aufmerksam.
MANUEL D'UTILISATION
Nous vous recommandons de lire attentivement ce manuel pour bien assimiler le
fonctionnement de l'appareil.
MANUALE D'ISTRUZIONI
Vi preghiamo voler leggere attentamente il manuale d'sitruzioni in modo tale da poter
comprendere quanto riportato ai fini di un corretto utilizzo del proiettore.
MANUAL DE USUARIO
Lea cuidadosamente este manual del usuario para poder utilizar corretamente el
producto.
GEBRUIKSAANWIJZNG
Lees voor het qebruik alstublieft deze handleiding aandachtig door, om volledig profijt te
hebben van de uitgebreide mogelijkheden.
BRUKERHÅNDBOK
Vennligst les denne bruksanvisningen grundig for å være garantert driftssikker bruk.
INSTRUÇÕES DO PROPRIETÁRIO
Para assegurar o uso correto do equipamento, por favor leia atentamente este manual do
usuário.
TECHNICAL
REGULATORY NOTICES

ENGLISH
Liquid Crystal Projector
USER'S MANUAL
USER'S MANUAL
ENGLISH-1
Thank you for purchasing this liquid crystal projector.
CONTENTS
CONTENTS
Page
FEATURES .......................................2
BEFORE USE ...................................2
Contents of Package ..............................2
Part Names.............................................3
Loading the Batteries..............................5
INSTALLATION ................................6
Installation of the Projector and Screen........6
Angle Adjustment ...................................6
Cabling ...................................................7
Power Connection ..................................8
Example of System Setup ......................8
Plug & Play .............................................8
OPERATIONS ...................................9
Power On ...................................................9
Power Off ................................................9
Basic Operation ....................................10
Setup Menu ..........................................12
Input Menu............................................13
Image Menu..........................................14
Options Menu .......................................15
No Signal Menu ....................................16
MAINTENANCE ..............................17
Lamp.....................................................17
Air Filter ................................................19
Other Maintenance ...............................19
Page
TROUBLESHOOTING ....................20
OSD Message ......................................20
Indicators Message ..............................21
Symptom ..............................................22
SPECIFICATIONS...........................23
WARRANTY AND AFTER-SERVICE ......24
.......................................................................................
TABLES
Table 1. Installation Reference.................6
Table 2. Cabling .......................................7
Table 3. Basic Operations ......................10
Table 4. Setup Menu ..............................12
Table 5. Input Menu................................13
Table 6. Image Menu..............................14
Table 7. Options Menu ...........................15
Table 8. No Signal Menu ........................16
Table 9. OSD Message ..........................20
Table 10. Indicator Message ..................21
Table 11. Symptom ................................22
Table 12. Specifications .........................23
.......................................................................................
For "TECHNICAL" and "REGULATORY
NOTICE", see the end of this manual.
· The information in this manual is subject to change without notice.
· The manufacturer assumes no responsibility for any errors that may appear in this manual
· The reproduction, transmission or use of this document or contents is not permitted without
express written authority.
TRADEMARK ACKNOWLEDGMENT : PS/2, VGA and XGA are registered trademarks of
International Business Machines Corporation. Apple, Mac and ADB are registered trademarks of
Apple Computer, Inc. VESA and SVGA are trademarks of the Video Electronics Standard
Association. Windows is a registered trademark of Microsoft Corporation. Carefully observe the
trademarks and registered trademarks of all companies, even when not mentioned.
NOTE
WARNING · Please read the accompanying manual "SAFETY
INSTRUCTIONS" and this "USER'S MANUAL" thoroughly to ensure correct
usage through understanding. After reading, store this instruction manual in a
safe place for future reference.

ENGLISH-2
FEATURES
FEATURES
This liquid crystal projector is used to project various computer signals as well as NTSC / PAL /
SECAM video signals onto a screen. Little space is required for installation and large images can
easily be realized.
Outstanding Brightness
The UHB lamp and high-efficiency optical system assure a high level of brightness.
Partial Magnification Function
Interesting parts of images can be magnified for closer viewing.
Distortion Correction Function
Distortion-free images are quickly available.
Extra-low Noise Function
Acoustic noise level from the unit can be reduced.
BEFORE USE
BEFORE USE
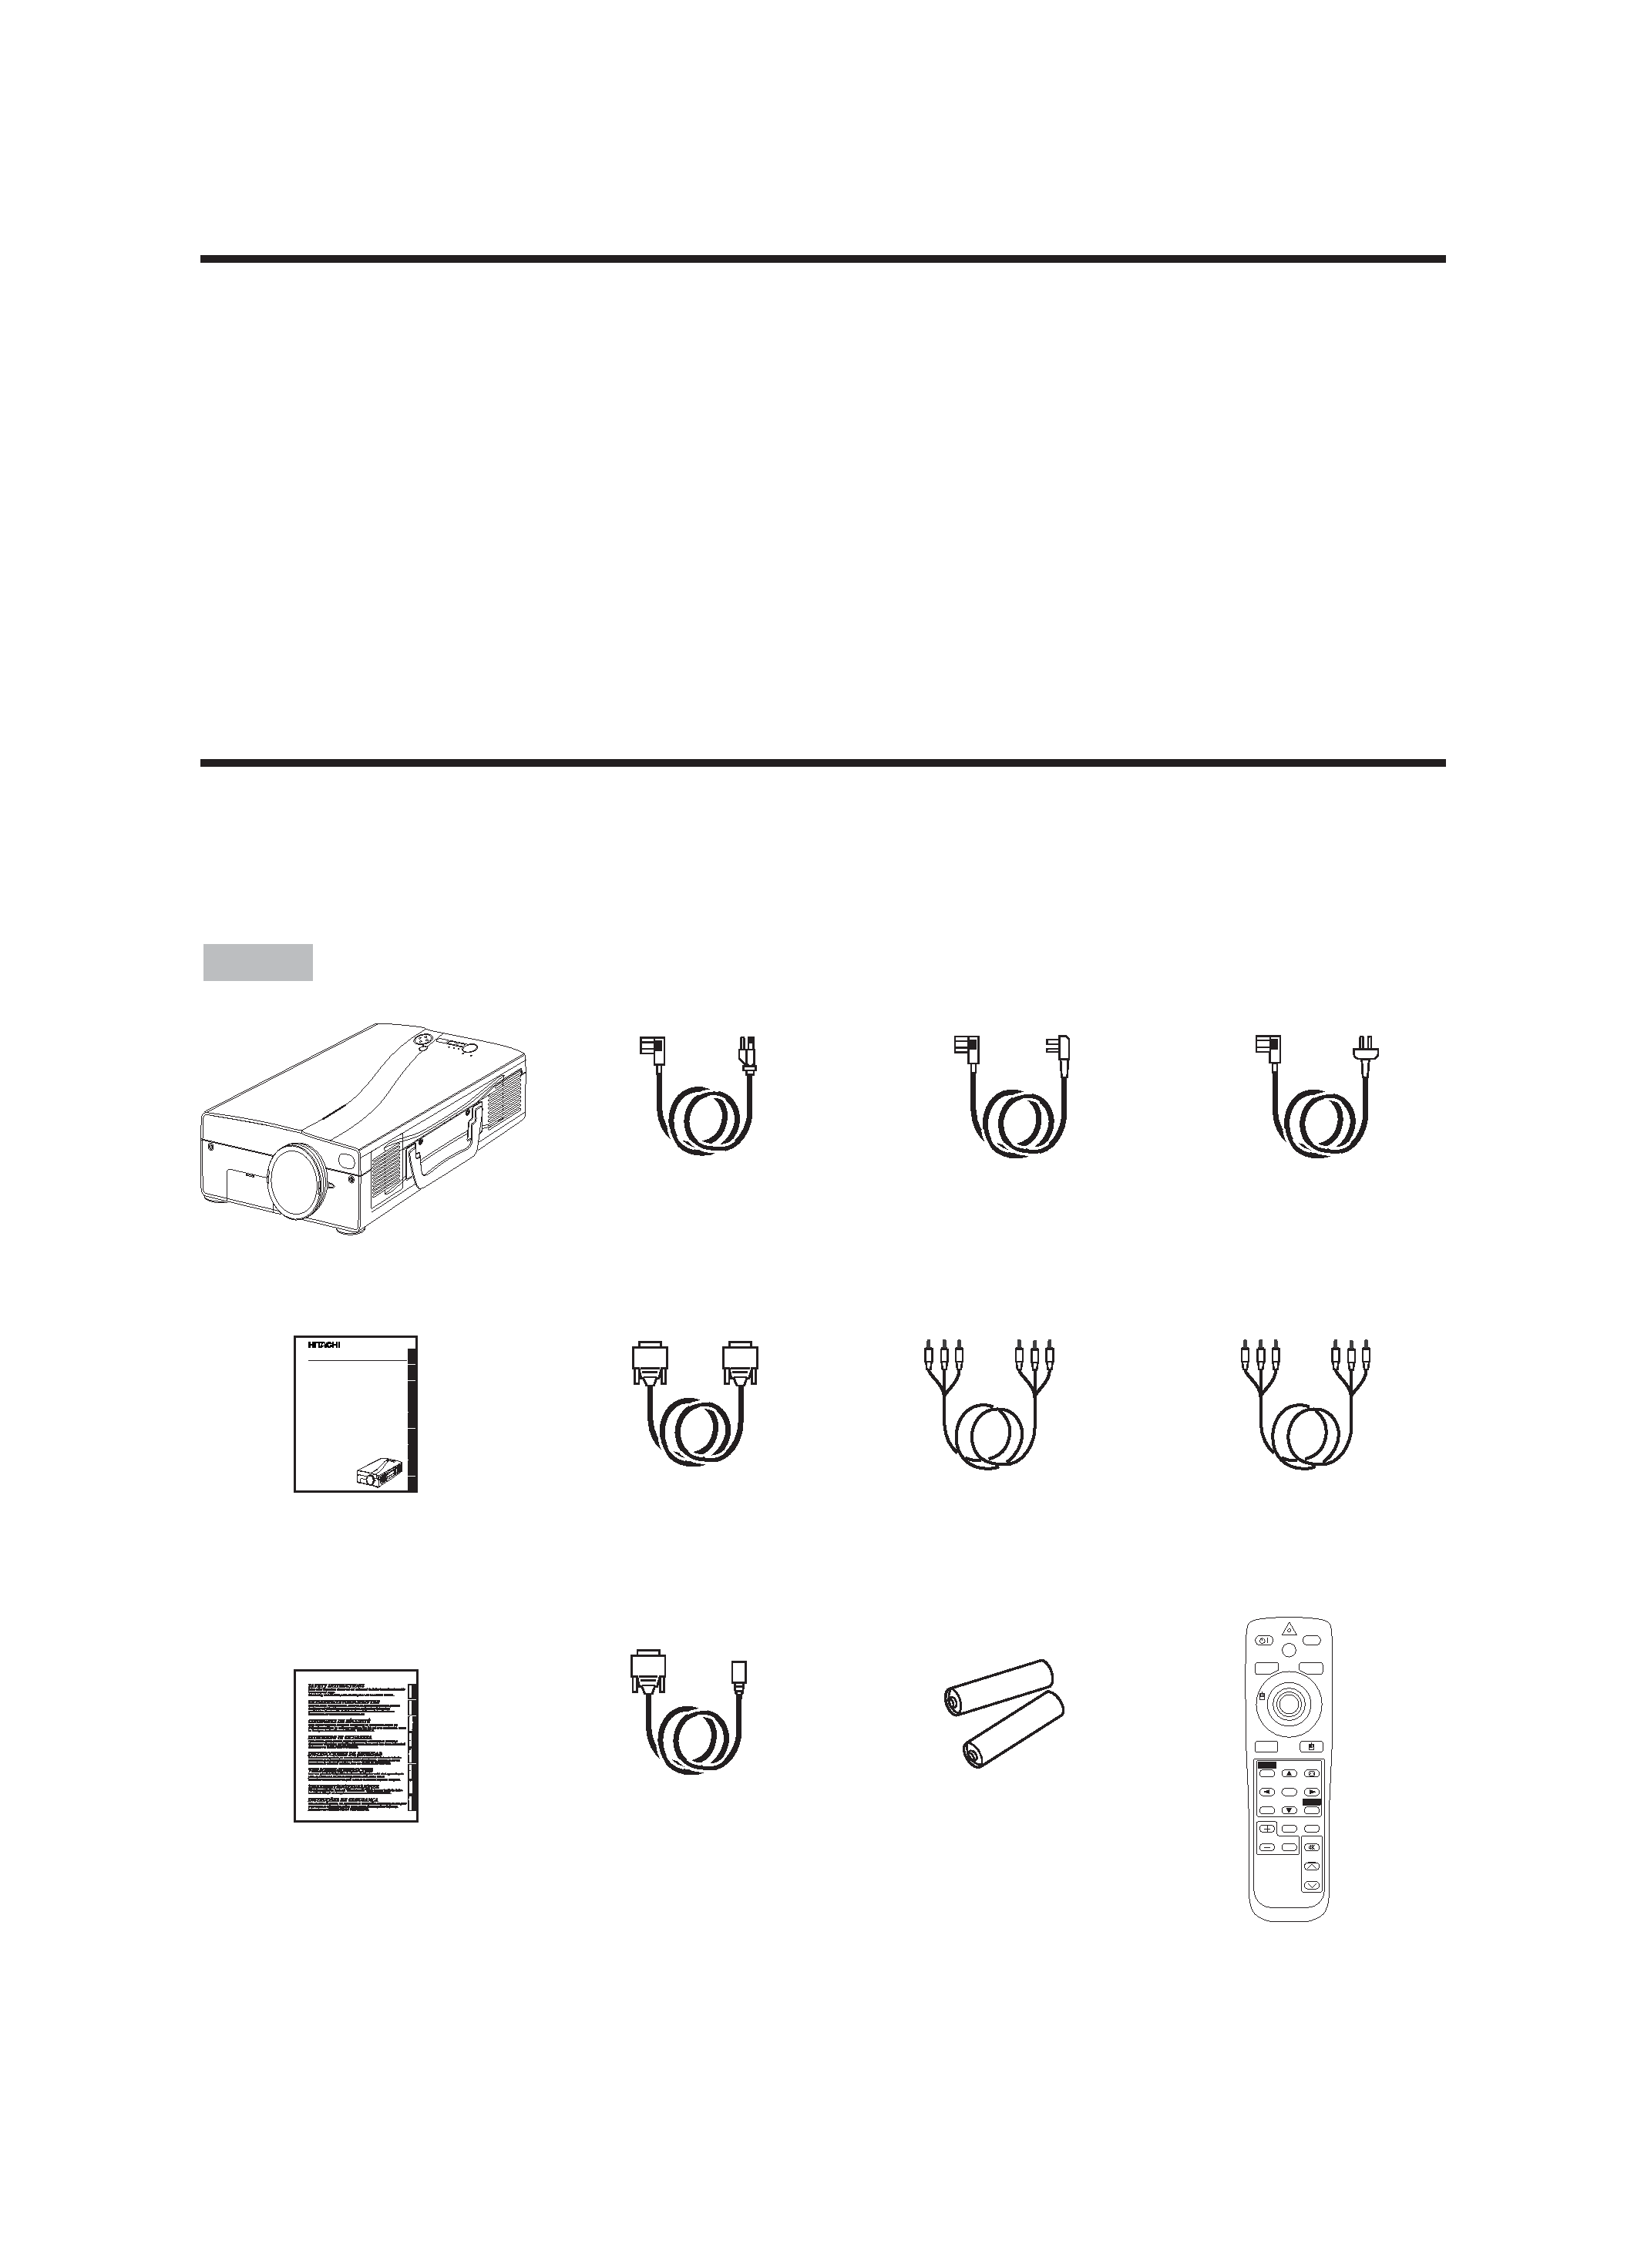
Contents of package
Make sure all of the following items are included in the package. If anything is missing, please
contact your dealer.
· Keep the original packing material for future reshipment.
NOTE
Projector
ENGLISH
DEUTSCH
FRANÇAIS
ITALIANO
ESPAÑOL
NEDERLANDS
NORSK
TECHNICAL
PORTGÊS
Liquid Crystal Projector
CP-SX5600W
USER'S MANUAL
Please read this user's manual thoroughly to ensure correct usage through understanding.
BEDIENUNGSANLEITUNG
Bitte lessen Sie diese Bedienungsanleitung zugunsten der korrekten Bedienung
aufmerksam.
MANUEL D'UTILISATION
Nous vous recommandons de lire attentivement ce manuel pour bien assimiler le
fonctionnement de l'appareil.
MANUALE D'ISTRUZIONI
Vi preghiamo voler leggere attentamente il manuale d'sitruzioni in modo tale da poter
comprendere quanto riportato ai fini di un corretto utilizzo del proiettore.
MANUAL DE USUARIO
Lea cuidadosamente este manual del usuario para poder utilizar corretamente el
producto.
GEBRUIKSAANWIJZNG
Lees voor het qebruik alstublieft deze handleiding aandachtig door, om volledig profijt te
hebben van de uitgebreide mogelijkheden.
BRUKERHÅNDBOK
Vennligst les denne bruksanvisningen grundig for å være garantert driftssikker bruk.
INSTRUÇÕES DO PROPRIETÁRIO
Para assegurar o uso correto do equipamento, por favor leia atentamente este manual do
usuário.
TECHNICAL
REGULATORY NOTICES
User's Manual
(this manual)
Safety Instructions
Power Cord
(US Type)
Power Cord
(UK Type)
Power Cord
(Europe Type)
RGB Cable
Video/Audio Cable
(with white lead)
Mouse cable
(PS/2)
STANDBY/ON
LASER
BLANK
RGB
VIDEO
AUTO
MENU
MENU SELECT
KEYSTONE
RESET
FREEZE
PinP
MAGNIFY
POSITION
OFF
VOLUME
MUTE
Remote Control
Transmitter
Batteries
for Remote Control
Transmitter
Component
Video Cable
(with green lead)

ENGLISH-3
B
B
B
B E
E
E
E F
F
F
F O
O
O
O R
R
R
R E
E
E
E U
U
U
U S
S
S
S E
E
E
E ((((c
c
c
c o
o
o
o n
n
n
n tt
tt iiiin
n
n
n u
u
u
u e
e
e
e d
d
d
d ))))
ENGLISH
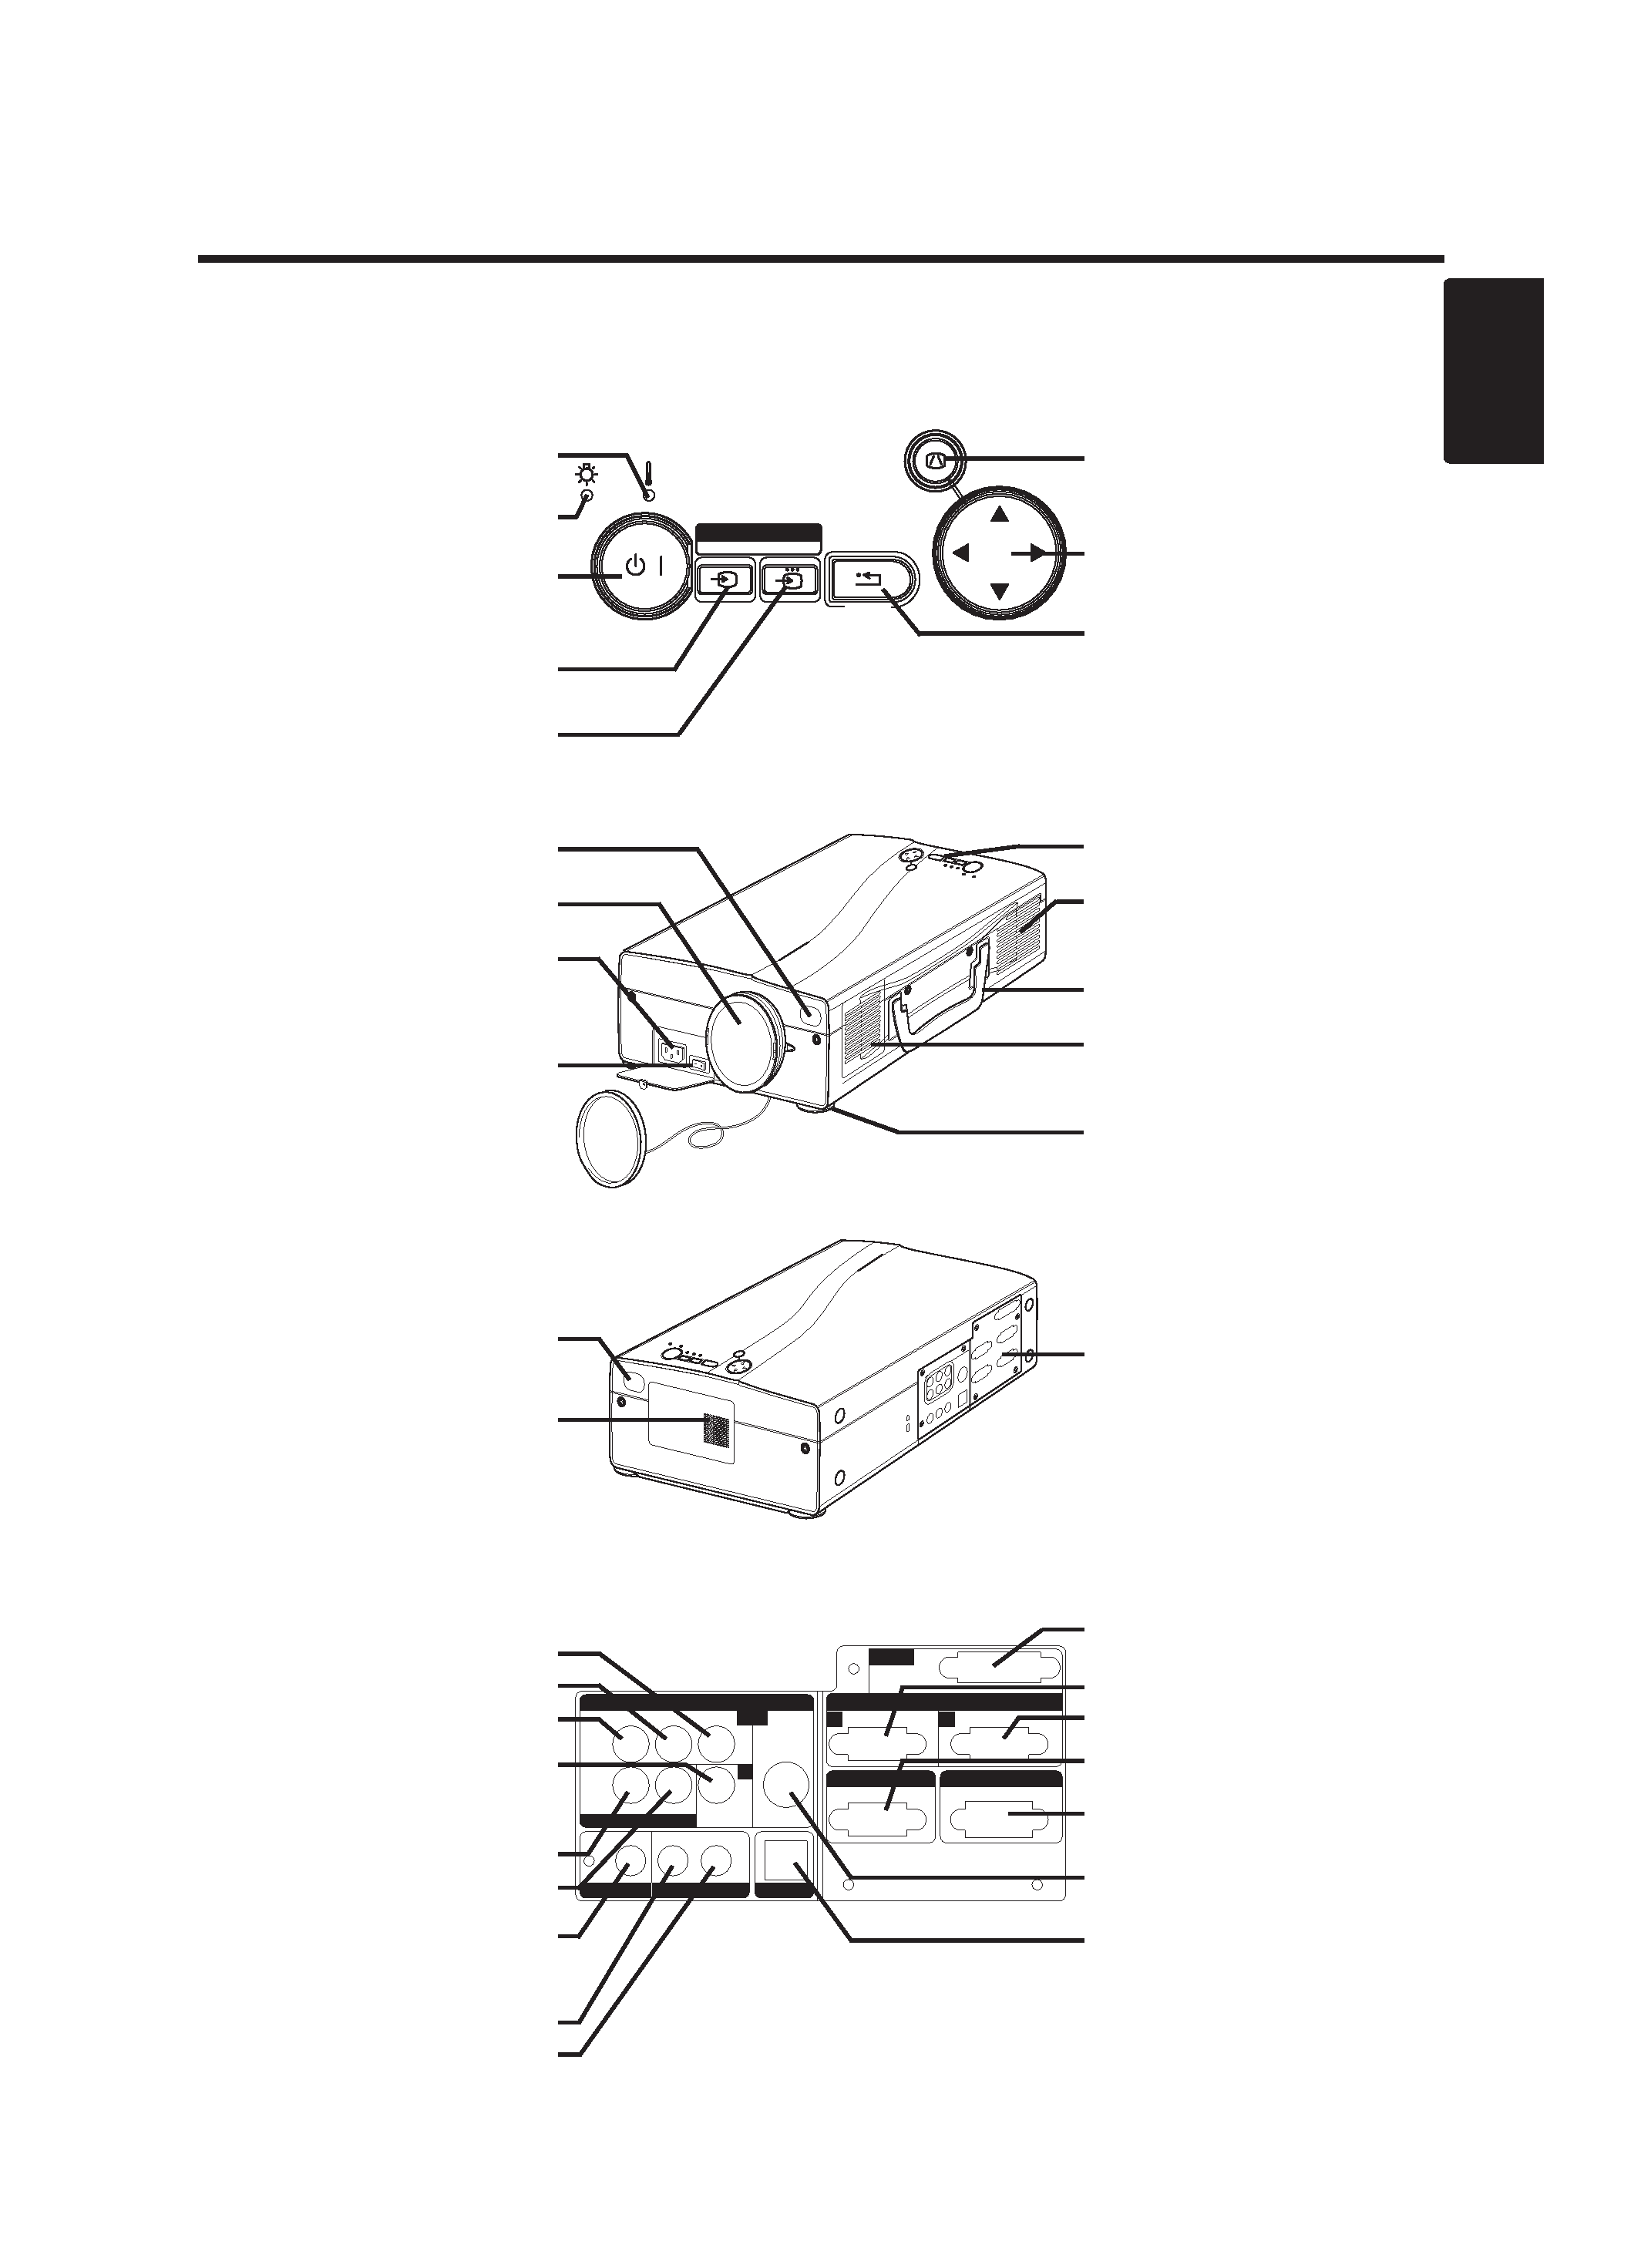
Part Names
Control Panel
(Refer to P.9 "OPERATIONS")
Front/Right View
Rear/Left View
Terminal Panel
(Refer below)
Terminal Panel
COMPONENT VIDEO
Y Terminal
CB/PB Terminal
CR/PR Terminal
VIDEO Terminal
VIDEO AUDIO IN
R Terminal
L/MONO Terminal
AUDIO OUT Terminal
RGB AUDIO IN
RGB 1/DVI Terminal
RGB 2 Terminal
VIDEO IN
VIDEO AUDIO IN
AUDIO OUT
RGBAUDIO IN
RGB OUT
CONTROL
RGB IN
DVl
USB
COMPONENT VIDEO
CR/PR
VIDEO
S-VIDEO
R
L/MONO
RGB1/DVl
RGB2
CB/PB
Y
3
12
2
3
1
LAMP
TEMP
STANDBY / ON
INPUT SELECT
RGB
VIDEO
RESET
MENU
KEYSTONE
123
TEMP Indicator
LAMP Indicator
STANDBY/ON Button
STANDBY/ON Indicator)
VIDEO Button
RGB Button
KEYSTONE
Button
MENU Button
RESET Button
Remote Control Sensor
Lens
AC Inlet
(to Power Cord)
Power Switch
Lens Cap
Control Panel
Ventilation Openings
(exhaust)
Carrying Handle
Air Filter and Intake
for the Cooling Fan
Foot Adjuster
Remote Control Sensor
Speaker
DVI Terminal
RGB IN 1 Terminal
RGB IN 2 Terminal
RGB OUT Terminal
CONTROL Terminal
S-VIDEO Terminal
USB Terminal

ENGLISH-4
B
B
B
B E
E
E
E F
F
F
F O
O
O
O R
R
R
R E
E
E
E U
U
U
U S
S
S
S E
E
E
E ((((c
c
c
c o
o
o
o n
n
n
n tt
tt iiiin
n
n
n u
u
u
u e
e
e
e d
d
d
d ))))
Part Names (continued)
STAN
DBY/O
N
LASER
BLANK
RGB
VIDEO
AUT
O
MENU
MENU
SELE
CT
KEYST
ONE
RESET
FREE
ZE
PinP
MAGNIFY
POSITION
OFF
VOLUME
MUTE
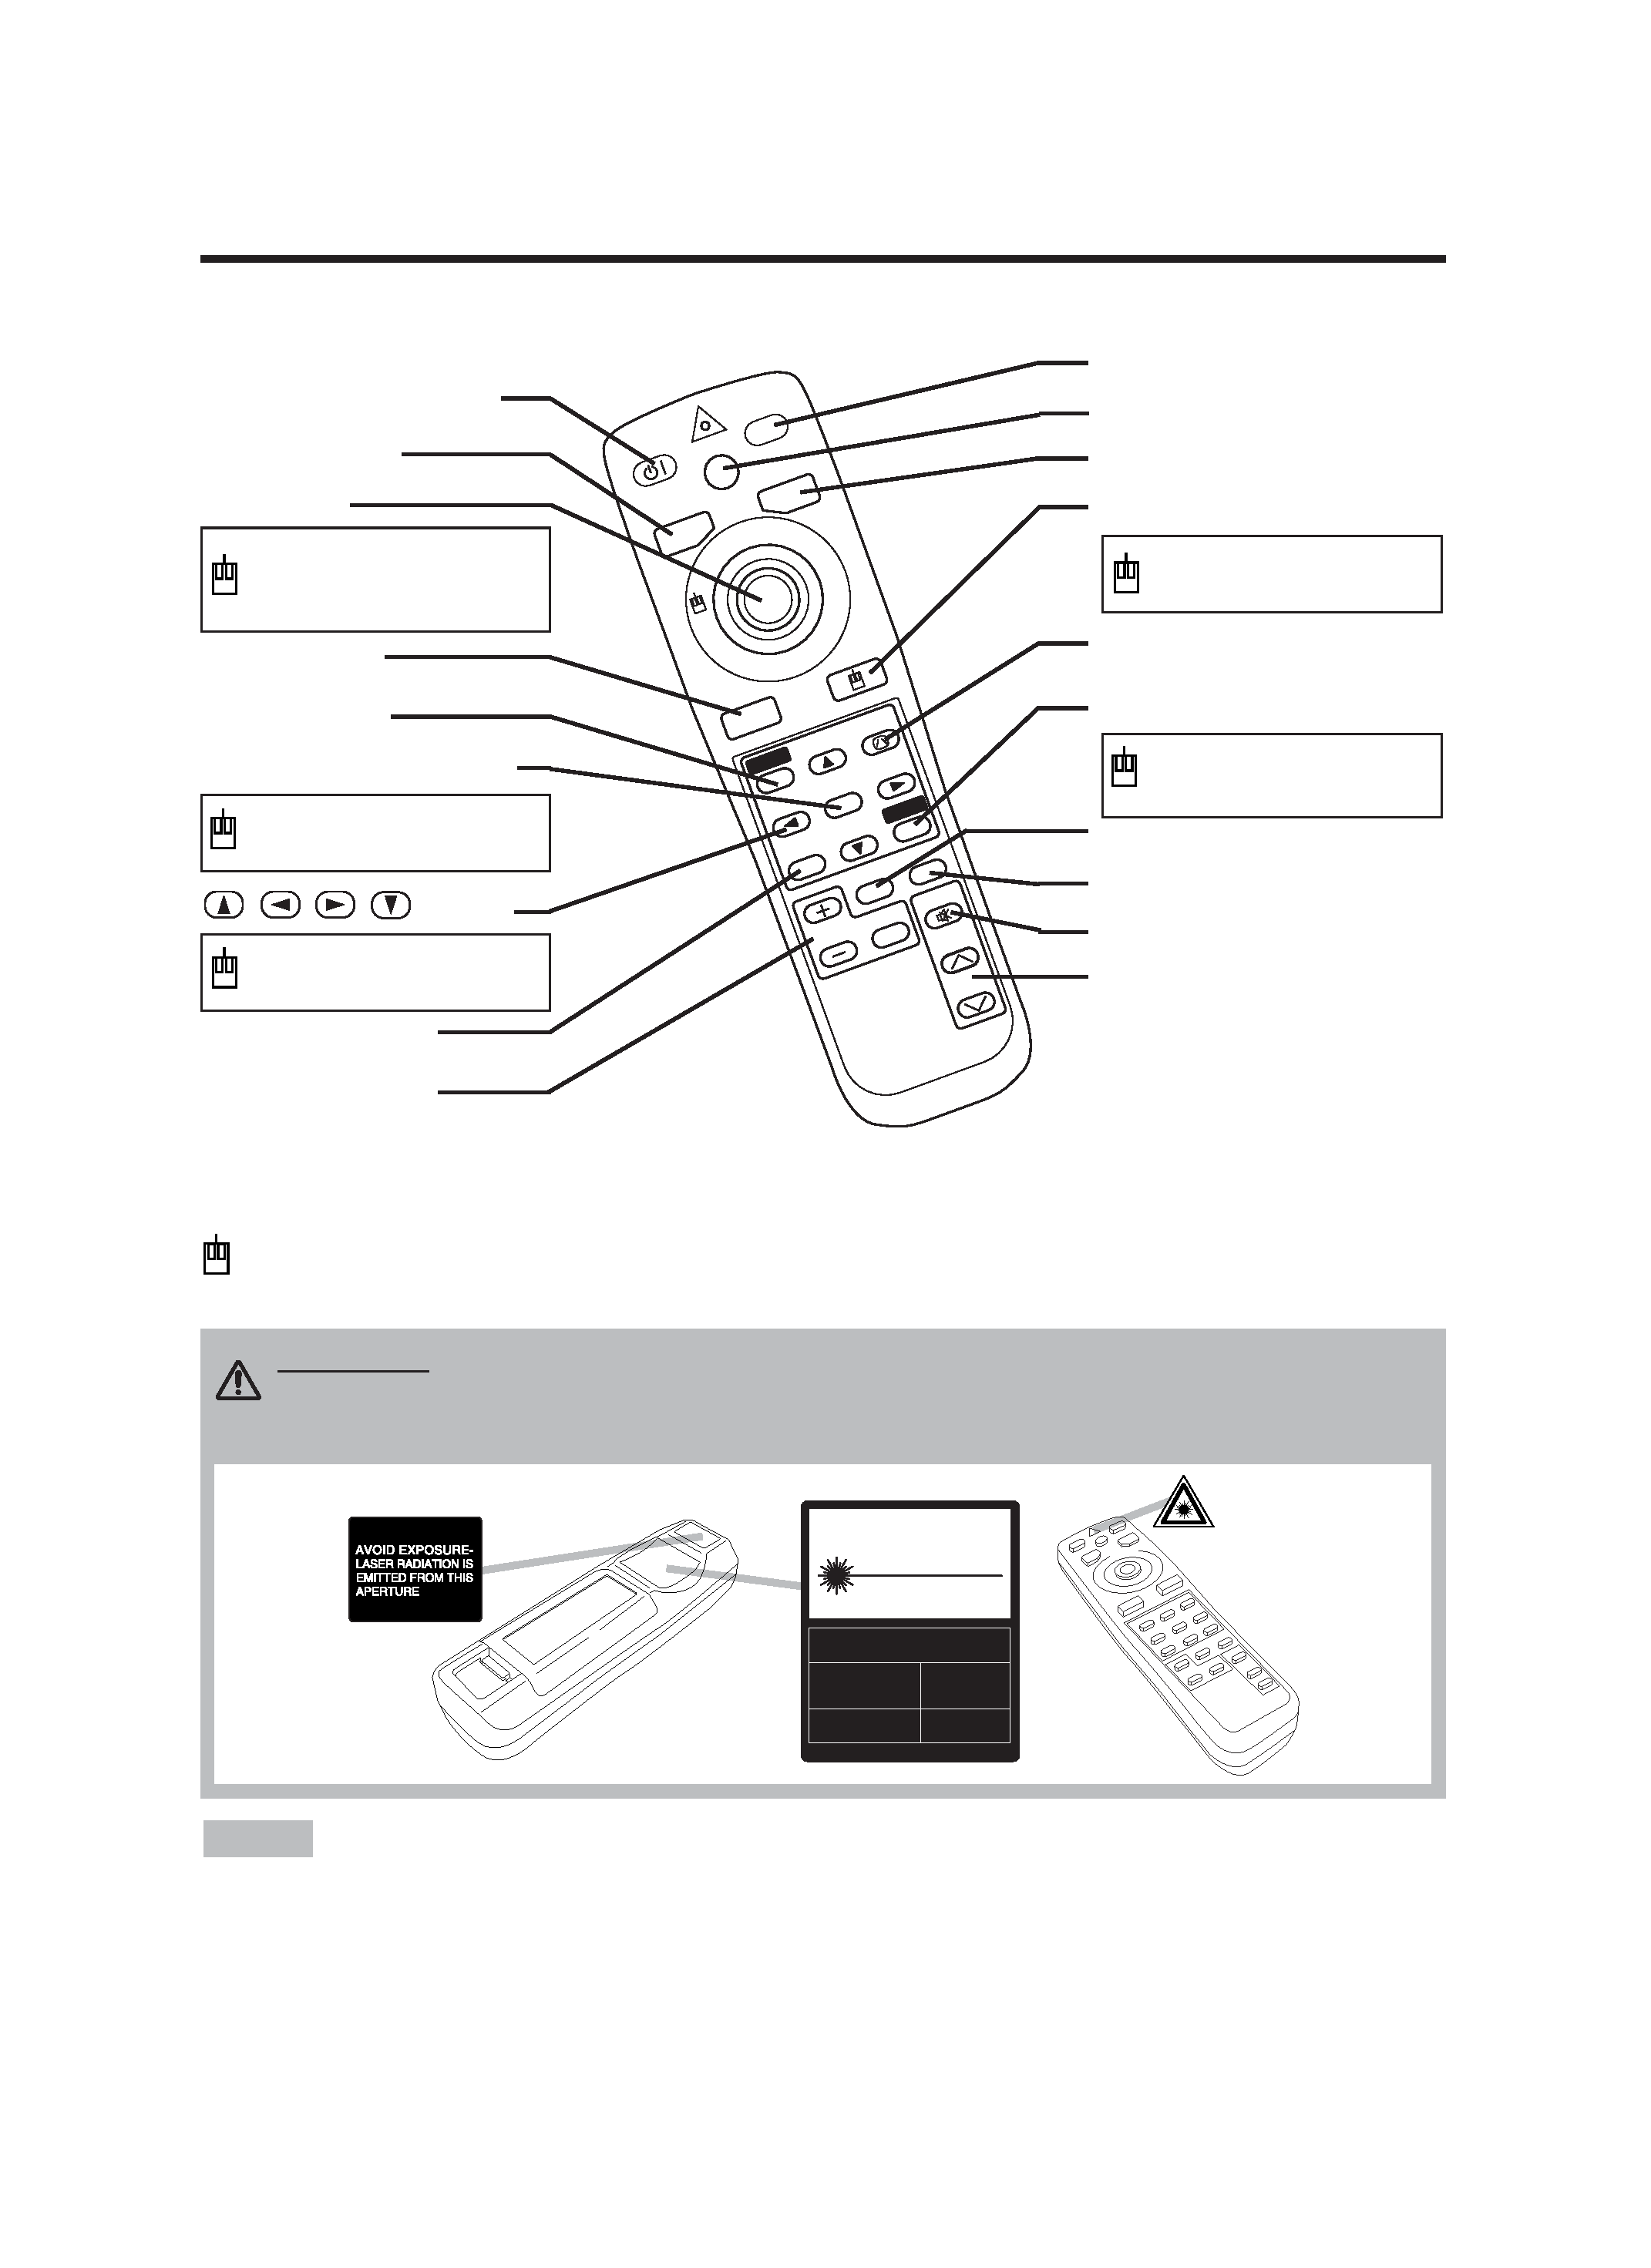
REMOTE CONTROL TRANSMITTER
(Refer to P.9 "OPERATIONS")
To prevent any malfunction;
· Do not give the remote control transmitter any physical impact. Take care not to drop.
· Do not place the heavy objects on the remote control transmitter.
· Do not wet the remote control transmitter or place it on any wet object.
· Do not place the remote control transmitter close to the cooling fan of the projector.
· Do not disassemble the remote control transmitter in case of malfunction. Please bring it to the
service station.
NOTE
CAUTION
LASER RADIATION-
DO NOT STARE INTO BEAM
WAVE LENGTH: 650nm
MAX . OUTPUT: 1mW
CLASS 2 LASER PRODUCT
RADIAZIONI LASER
NON GUARDARE NEL RAGGIO LUCE
APPARECCHIO LASER DI CLASSE 2
RAYONNEMENT LASER
NE PAS REGARDER DANS
LE FAISCEAU APPAREIL
A LASER DE CLASSE 2
LASER-STRAHLUNG
NICHT IN DEN STRAHL
BLICKEN LASER KLASSE2
MANUFACTURED
PLACE OF
MANUFACTURER:
A
MADE IN JAPAN
IEC60825-1:1993+A1:1997
STANDBY/ON Button
LASER Button
VIDEO Button
Disk Pad
Used to operate the
mouse shift function and
left click function.
AUTO Button
MENU Button
MENU SELECT Button
Used to click the left
mouse button.
,
,
,
Button
Used to operate the
mouse shift function.
MAGNIFY Button
BLANK Button
RGB Button
MOUSE / RIGHT Button
Used to click the right
mouse button.
RESET Button
Used to click the right
mouse button.
PinP Button
FREEZE Button
MUTE Button
KEYSTONE Button
VOLUME Button
These functions works when the mouse control function is activated. Remember, the POSITION,
BLANK ON and MENU ON functions disable the mouse control function.
WARNING · The laser pointer of the remote control transmitter is used in
place of a finger or rod. Never look directly into the laser beam outlet or point
the laser beam at other people. The laser beam can cause vision problems.
POSITION Button
