User s Guide
C1422R
C1422RS
C1422T
C1422TS
C1432TB
C1432TY
C2122T

CONTENTS
Safety Information
Page 1
Features Menu
Page 5
Installation Procedure
Page 2
Local Control Keys
Page 5
Getting Started using the Menus
Page 2
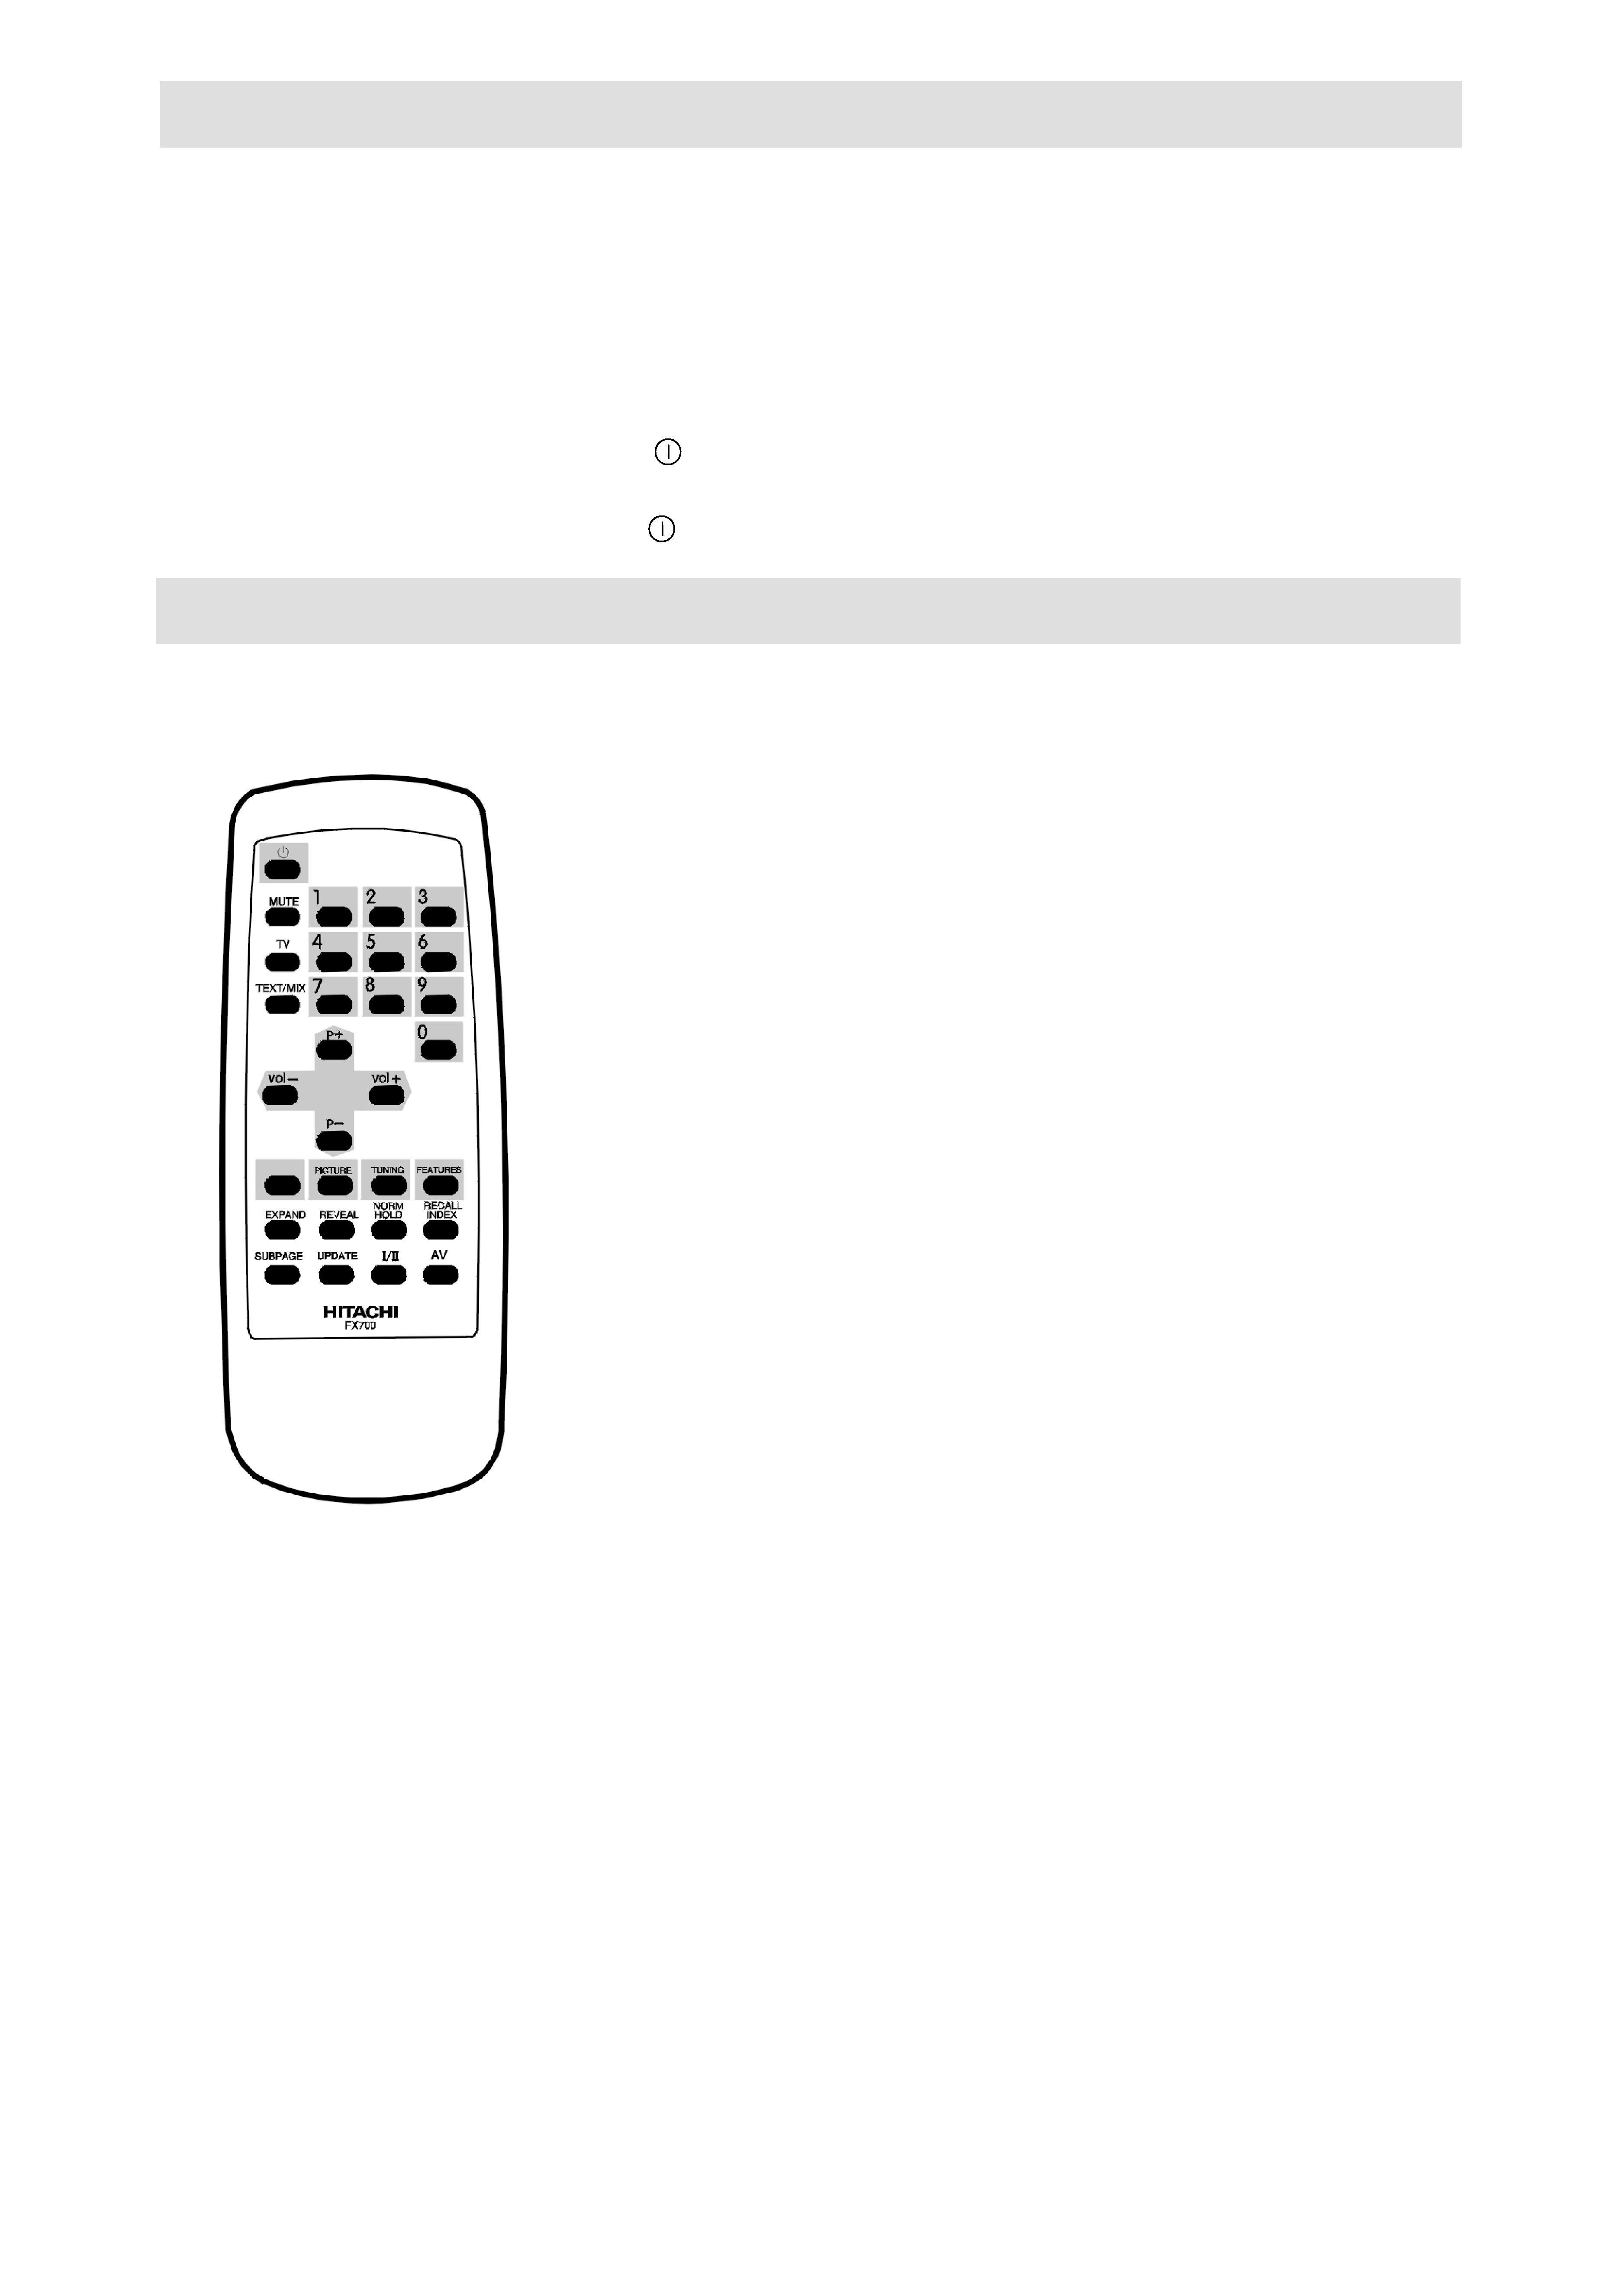
Remote Control Key Functions
Page 5
Tuning Your Television
Page 3
Your Guarantee
Page 6
Manual Tuning
Page 4
Technical Specifications
Page 7
Move Stored Channels
Page 4
Connecting Other Appliances
Page 7
Picture Controls Menu
Page 4
Safety Information
Do's and Don'ts
This television has been designed and manufactured to meet international safety standards but, like any electrical equipment, care
must be taken if you are to obtain the best results and safety is to be assured.
DO'S
DO read the operating instructions before you attempt to use the equipment.
DO consult your dealer if you are in any doubt about installation, operation or safety of your equipment.
DO be careful with glass panels or doors on equipment.
This TV is supplied with a fitted mains plug. This plug must not be cut off as it may contain a special radio interference filter, the
removal of which could lead to impaired performance. If you wish to extend the lead, obtain an appropriate safety approved
extension lead or consult your dealer.
Observe the manufacturer's instructions when connecting extension leads to the TV. Check the fuse rating on the new plug, it
should be fitted with a 5 Amp fuse which conforms to either ASTA or BSI (BS1362) approvals. These are easily identifiable by
either the
or
symbols. If you are in any doubt about the installation of an extension lead, please consult a competent
electrician.
DON'TS
DON'T continue to operate the equipment if you are in any doubt about it working normally, or if it is damaged in any way -
switch off, withdraw the mains plug and consult your dealer.
DON'T place water filled vessels on top of TV cabinets.
DON'T remove any fixed cover as this may expose dangerous voltages.
DON'T leave equipment switched on when it is unattended unless it specifically states that it is designed for unattended operation
or has a standby mode (see Remote Control Key Functions, Standby Key on page 5). Switch off using the switch on the
equipment and make sure your family know how to do this. Special arrangements may need to be made for infirm or handicapped
people.
DON'T use equipment such as personal stereos or radios so that you are distracted from the requirements of traffic safety. It is
illegal to watch television whilst driving.
DON'T obstruct the ventilation of the equipment, for example, with curtains or soft furnishings. Overheating will cause damage
and shorten the life of the equipment. . There should be a minimum gap of 10cm all round your TV.
DON'T use makeshift stands and NEVER fix legs or stands to the TV with any screws other than those provided - to ensure
complete safety always use the manufacturer's approved stand with the fixings provided.
DON'T allow electrical equipment to be exposed to rain or moisture.
ABOVE ALL
NEVER let anyone, especially children, push anything into holes, slots or any other opening in the case - this could
result in a fatal electric shock.
NEVER guess or take chances with electrical equipment of any kind - it is better to be safe than sorry.
ASTA
S
Page 1

Installation Procedure
1.
Connect your aerial to the TV at the rear of the cabinet. (On portable TV's an indoor aerial is supplied and in certain
reception conditions may not provide the best picture. Adjust the aerial position for the best result or use an external aerial).
2.
The proximity of mountains or high buildings may be responsible for ghost pictures, echoes or shadows. If this is the case,
change the orientation of the aerial.
3.
Plug the moulded 13 amp mains plug into a 220-240V/50Hz mains supply socket.
4.
Install the two AA type batteries supplied into the hand unit according to the diagram inside the battery compartment.
Secure the battery cover.
5.
Switch on your TV with the button marked
on the front panel.
Note:
Standby To save energy and preserve optimum picture quality (by de-magnetizing the tube), you are advised to switch
off your television at the on/off switch
when not in use.
Getting started using the Menus
Note:
The blue page inserted in this booklet is a Quick Set-up Guide to enable you set up your TV easily and quickly. Once
you have set up your TV the guide can be ignored, however, retain the complete Instruction Booklet for future reference.
· Green - Selects the PICTURE controls menu.
Yellow - Selects the MANUAL/TUNING menu.
Blue -
Selects the FEATURES menu.
The coloured keys select the Menus as listed above. See pages 3, 4 and 5 for
full details of their functions.
In Teletext mode they enable quick access to topical subjects related to the
magazine you have selected. Just press the key with the same colour as the
topic at the foot of the page.
, Up/Down - Moves the cursor (coloured bar) when using Menus.
When viewing television these keys will select next/previous TV station.
When using Teletext these keys will select next/previous pages.
Left/Right - Moves the cursor (coloured bar), or makes adjustments
when using Menus.
In TV and Teletext mode they will adjust the volume down and up.
Page 2

Tuning Your Television
Note:
If you have a VCR, play a tape or select the Test pattern. (See your VCR handbook for information about the test pattern).
If you have a satellite switch on Sky News or Sky One.
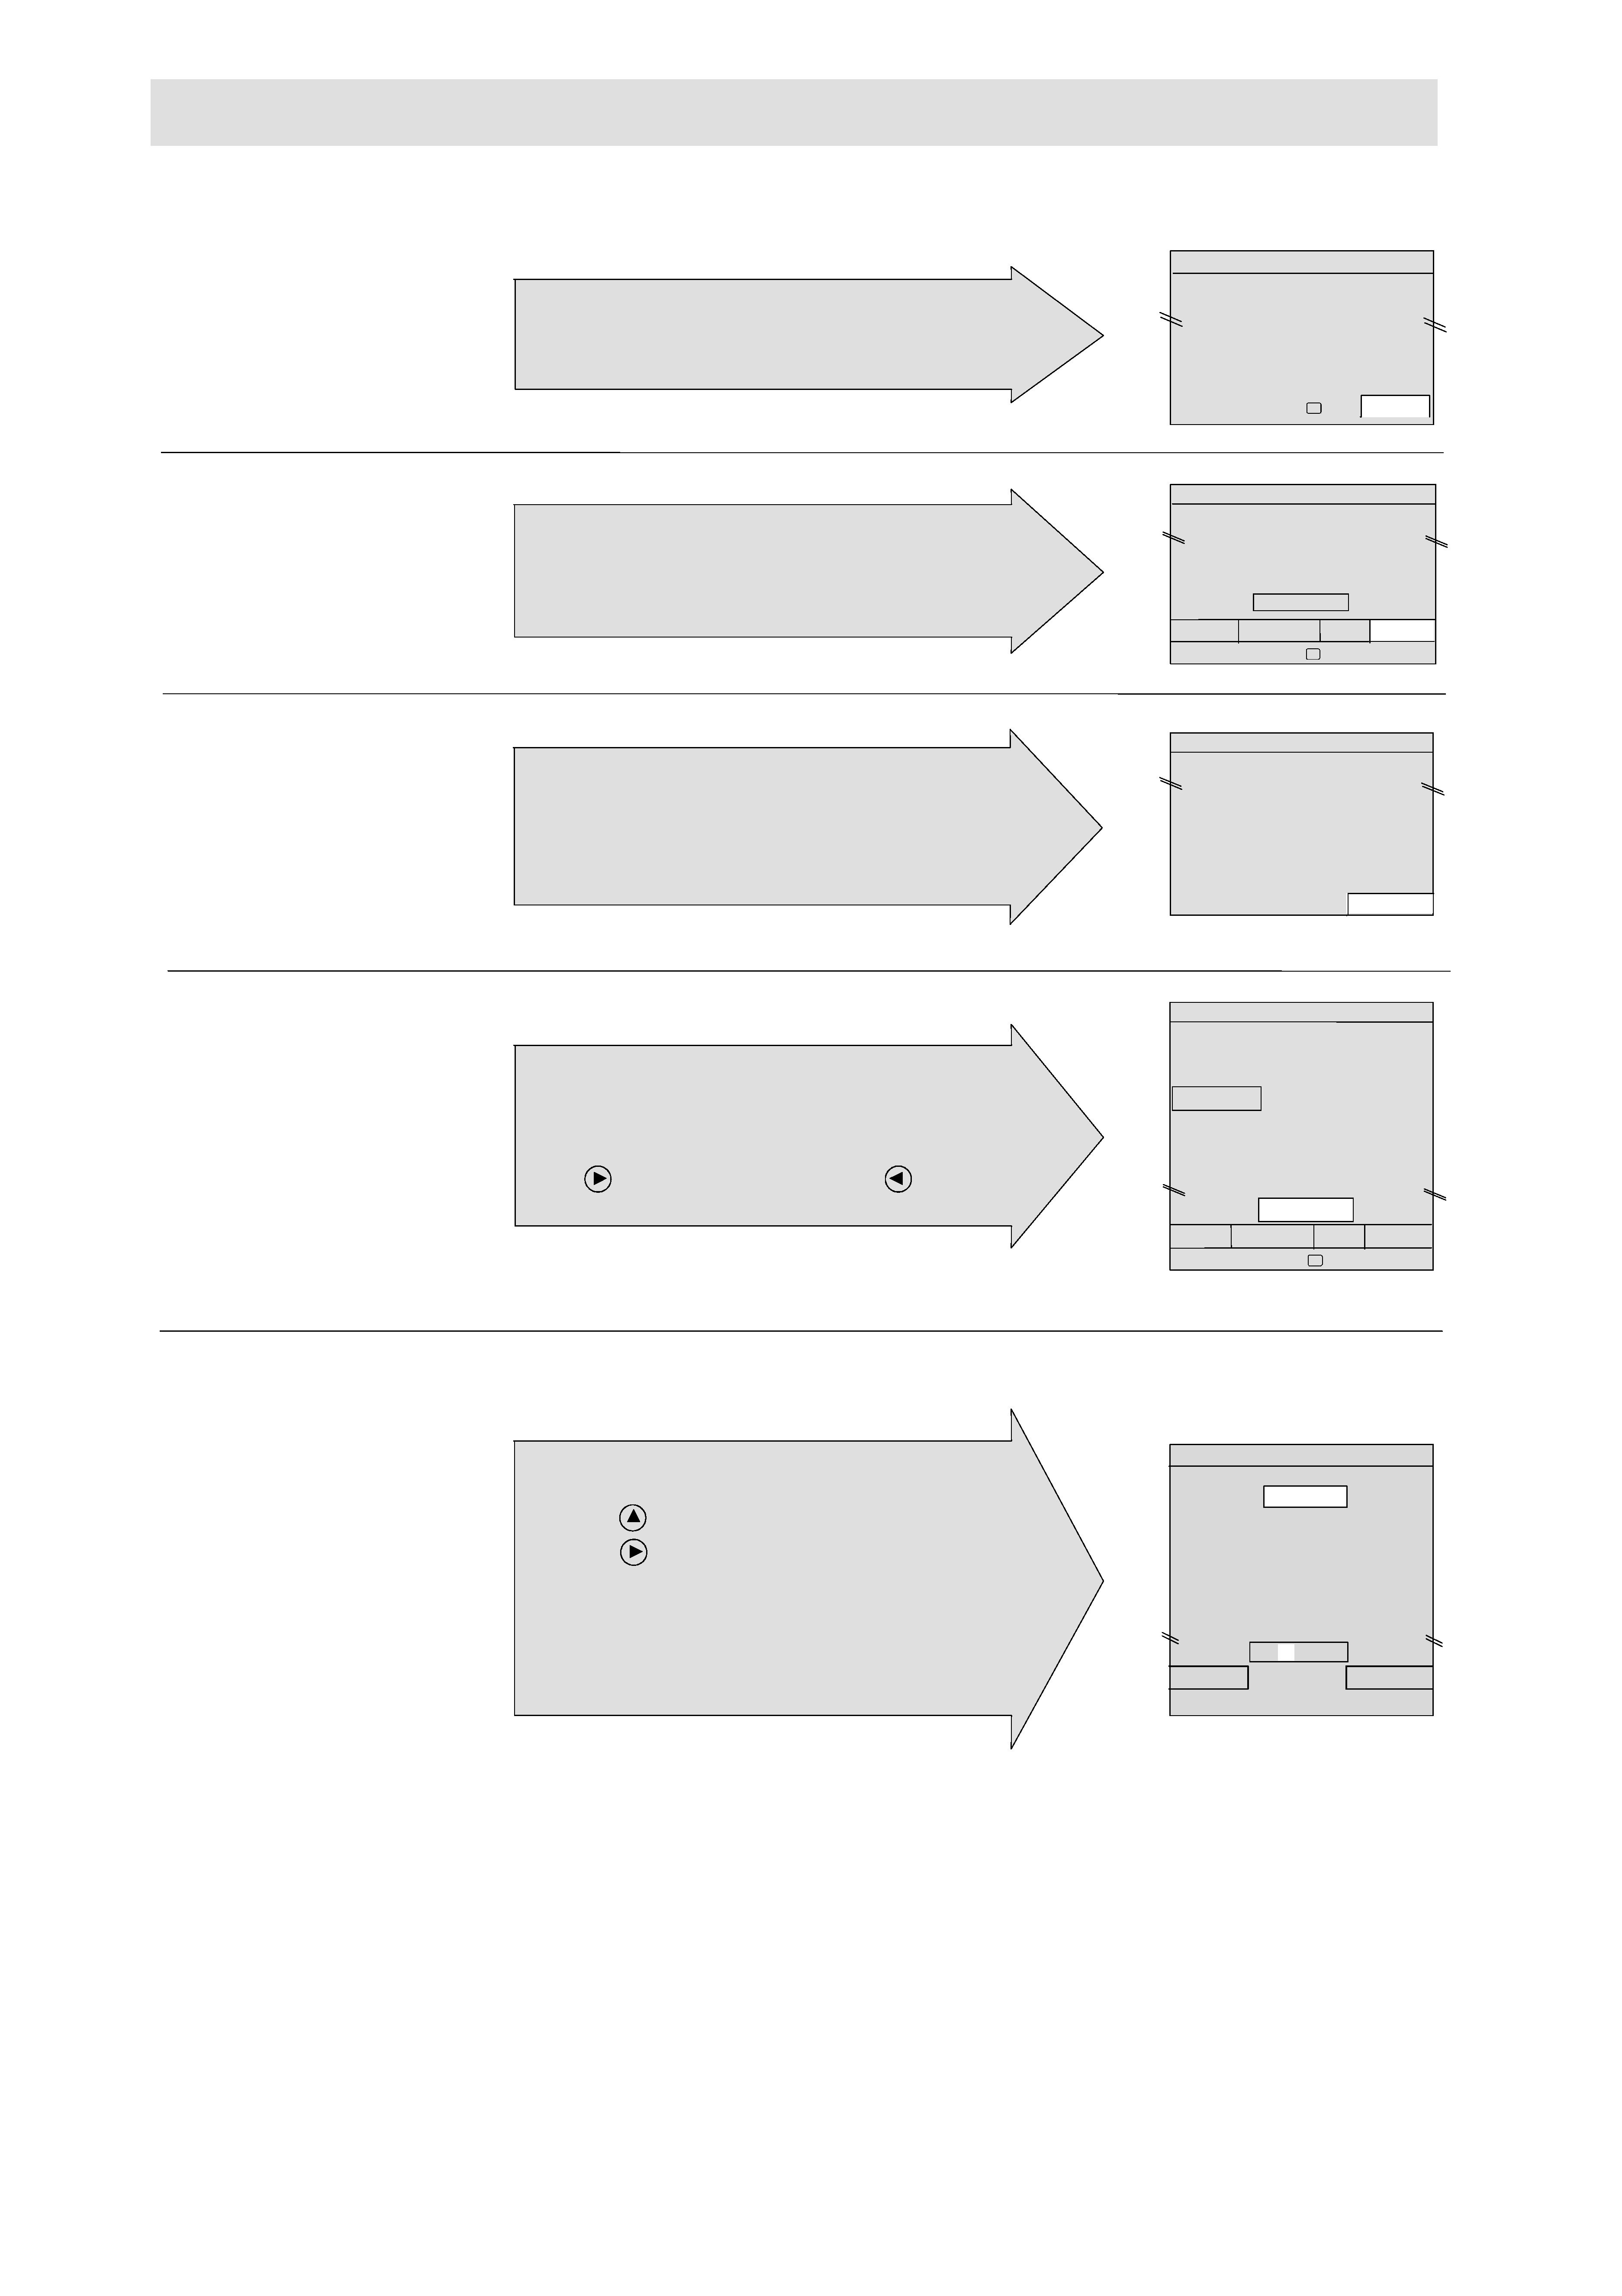
Press the YELLOW
key on your remote
control.
PROGRAMME
Press the YELLOW
key again.
SETUP
Press the BLUE key
AUTO
All stored channels (white dashes after the channel numbers) can be named to suit your own requirements.
Press the RED key.
NAME
The PROGRAMME menu will appear on your screen.
Note:
The four arrows and the TV symbol indicate the
cursor movement and the key for leaving menu mode.
1
4
3
2
The SETUP menu will appear on your screen.
Note:
The four coloured boxes at the bottom of the
display, NAME, MANUAL, SKIP, AUTO, correspond
to the coloured keys on the hand unit.
AUTO tune now tunes and stores all your local TV
stations, satellite and VCR.
This takes a few minutes.
Note:
The white graph shows the tuning progress.
You can stop tuning by pressing the blue key again.
This time the blue key is the CANCEL key.
All available TV channels, satellite and VCR will be
stored and displayed on your screen as illustrated.
Unnamed TV channels will be numbered 07 upwards,
and indicated by the four red dashes changing to white.
Press
to see channels 30 - 59. Press
to return.
The TV key cancels the menu and your TV is ready to use.
SET UP
00_ _ _ _ 10_ _ _ _ 20_ _ _ _
08_ _ _ _ 18_ _ _ _ 28_ _ _ _
09_ _ _ _ 19_ _ _ _ 29_ _ _ _
AUTO
UHF
>>>>>>
CANCEL
5
The four dashes will be high-lighted in the edit box
with a small white cursor on the first position.
a)
Press
until the character you want appears.
b)
Press
to move the cursor to the next position.
Repeat steps a and b until all four digits are entered.
Press the RED key (OK) and the name you have entered
will replace the four white dashes.
The BLUE key (CANCEL) will terminate the entry.
Press the TV key to return to television viewing.
SET UP
00 - - - -
10 - - - -
20 - - - -
01 B B C 1 11 - - - -
21 - - - -
02 B B C 2 12 - - - -
22 - - - -
03 I T V
13 - - - -
23 - - - -
04 C H 4
14 - - - -
24 - - - -
05 C H 5
15 - - - -
25 - - - -
06 S A T
16 - - - -
26 - - - -
07 - - - -
17 - - - -
27 - - - -
11 - - - -
OK
CANCEL
Select
< >
Adjust
AUTO
SET UP
00_ _ _ _ 10_ _ _ _ 20_ _ _ _
08_ _ _ _ 18_ _ _ _ 28_ _ _ _
09_ _ _ _ 19_ _ _ _ 29_ _ _ _
NAME MANUAL SKIP
Select
< >
PROGRAMME
00_ _ _ _ 10_ _ _ _ 20_ _ _ _
01_ _ _ _ 11_ _ _ _ 21_ _ _ _
08_ _ _ _ 18_ _ _ _ 28_ _ _ _
09_ _ _ _ 19_ _ _ _ 29_ _ _ _
Select
< >
SETUP
Page 3
SET UP
00 - - - -
10 - - - -
20 - - - -
01 B B C 1 11 - - - -
21 - - - -
02 B B C 2 12 - - - -
22 - - - -
03 I T V
13 - - - -
23 - - - -
04 C H 4
14 - - - -
24 - - - -
05 C H 5
15 - - - -
25 - - - -
06 S A T
16 - - - -
26 - - - -
07 - - - -
17 - - - -
27 - - - -
01 B B C 1
NAME MANUAL SKIP AUTO
Select
< >

Manual Tuning
Manual tuning need only be used for
a)
Tuning and storing other equipment connected in the aerial system
b)
Moving Auto-tuned channels, (see Move Stored Channels below).
c)
To reduce unwanted interference.
Press the YELLOW key twice. The SETUP menu will appear on your screen. See illustration in step 4 of
Tuning Your Television.
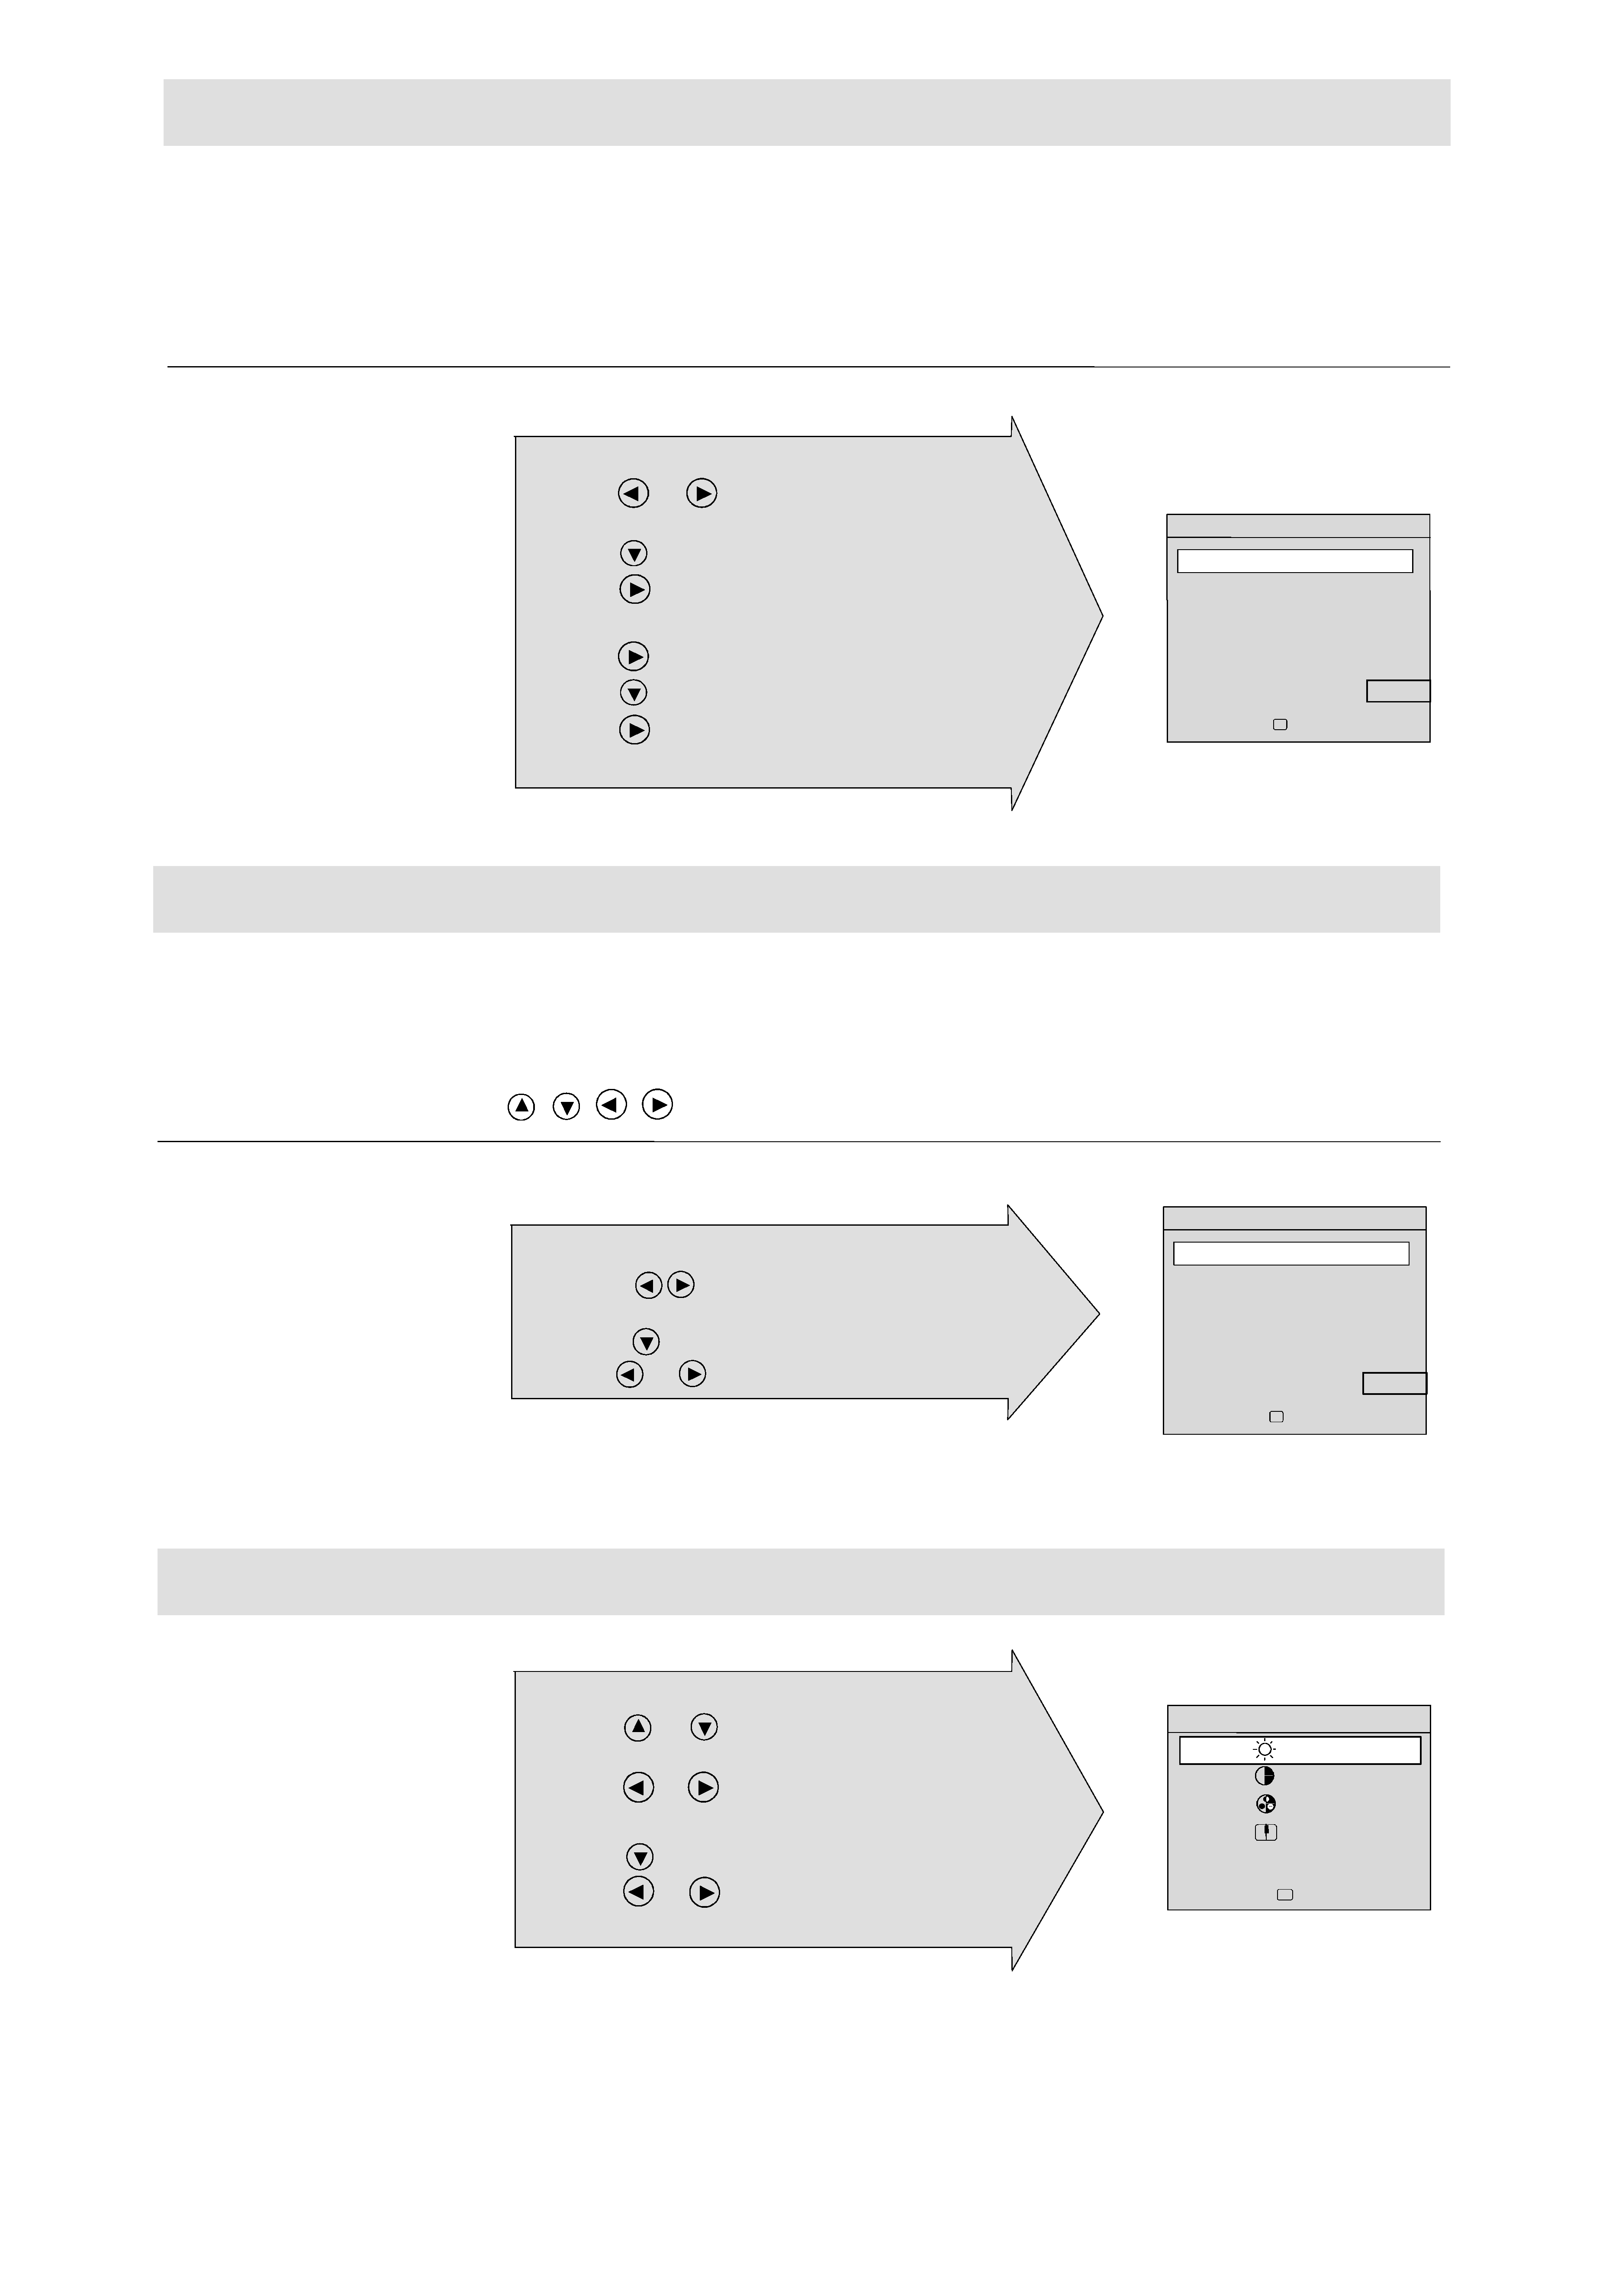
The TUNING menu will appear on the screen.
a) Press
or
to enter the VCR channel
number 00.
b) Press
to move the cursor to MANUAL.
Press the GREEN key.
c) Press
to start manual tuning. Each time a
channel is found the search will stop.
TUNING
d) Press
again until the channel you want is found.
e) Press
to move the cursor to STORE.
f) Press
to store the settings.
g) Press the TV key to return to television viewing .
Move Stored Channels
Note:
Make sure you are in television mode by pressing the
TV key before continuing.
Press the YELLOW key twice. The SETUP menu will appear on your screen. See illustration in step 4 of
Tuning Your Television.
Using the Arrow keys
,
,
,
, on your remote control, move the cursor onto the channel you want to move.
Note:
Moving a stored channel will copy your choice into its new location erasing any channel already stored there.
Press the GREEN key.
MANUAL
Note:
To clear the old channel location, select the SETUP menu, (Green key), move the blue bar with the Arrow keys to the old
channel number, press and hold the Yellow key (SKIP) until the SKIP prompt disappears.
Picture Controls Menu
Press the GREEN
key.
PICTURE
1
2
1
TUNING
PROG
00
BAND
UHF
MANUAL
>>>>
FINE
>>
>>>>>
STORE
SETUP
Select
Adjust
< >
1
The PICTURE menu will appear on your screen.
a)
Press
or
to move the cursor onto the picture
control you want to adjust, (e.g. Brightness).
b)
Press
or
to adjust the brightness setting.
Repeat steps a and b until you complete your adjustments.
c)
Press
to move the cursor to STORE.
d)
Press
or
to store the settings.
e)
Press the TV key to return to television viewing.
Page 4
PICTURE
BRI
>>>
CON
>>>>>
COL
>>>>
SHARP
>>
STORE
Select
Adjust
< >
2
TUNING
PROG
00
BAND
UHF
MANUAL
>>>>
FINE
>>
>>>>>
STORE
SETUP
Select
Adjust
< >
The manual TUNING menu will appear on your screen.
a)
Use the
Arrow keys to change the programme
number.
b)
Use the
Arrow key to move the blue bar to STORE.
c)
Press
or
to store the new number.
