(WITHOUT PRICE)
SERVICE MANUAL
& PARTS LIST
REF. NO. S/M-579
NOVEMBER 1997
QW-1805
MODULE NO.
R
BGT-100V
INDEX

- 1 -
CONTENTS
1. SPECIFICATIONS : QW-1805
1. SPECIFICATIONS · · · · · · · · · · · · · · · · · · · · · · · · · · · 1
2. OPERATION CHART · · · · · · · · · · · · · · · · · · · · · · · · · 2
3. DRAWINGS · · · · · · · · · · · · · · · · · · · · · · · · · · · · · · · · 4
3-1. BLOCK DIAGRAM · · · · · · · · · · · · · · · · · · · · · · · · · 4
3-2. CHECKING TERMINALS AND COMPONENTS · · · · 5
4. EXPLODED VIEW · · · · · · · · · · · · · · · · · · · · · · · · · · · 6
5. PARTS LIST · · · · · · · · · · · · · · · · · · · · · · · · · · · · · · · 7
6. PRECAUTIONS FOR REPAIR · · · · · · · · · · · · · · · · · · · 8
6-1. AC (ALL CLEAR) AND REMOVING OF MODULE · · · 8
6-2. ACCURACY CHECKING · · · · · · · · · · · · · · · · · · · · 8
Item
Detail
Item
Detail
Battery
CR1616
Accuracy
±15sec./month
Battery life
Approx. 18 months
Accuracy setting system Trimmer capacitor
Current consumption
4.034
µA maximum
Accuracy checking
See page 8
Alarm system
Piezo plate on Back cover
Accuracy setting
+0.25~+0.35sec./day
Function
· Shock resistant
· Electro-luminescent backlight
· World time
27 time zones (40 cities), city code display, daylight saving time on/off
· 1/100 sec. stopwatch
Measuring capacity: 23:59'59.99"
Measuring mode: Elapsed time, 1st-2nd place times
· Regular timekeeping: Hr, min, sec, am/pm, mo, date, day
· Auto-calendar (pre-programmed until the year 2039)
· Daily alarm
· Hourly time signal
· 12/24-hour formats

- 2 -
2. OPERATION CHART : QW-1805
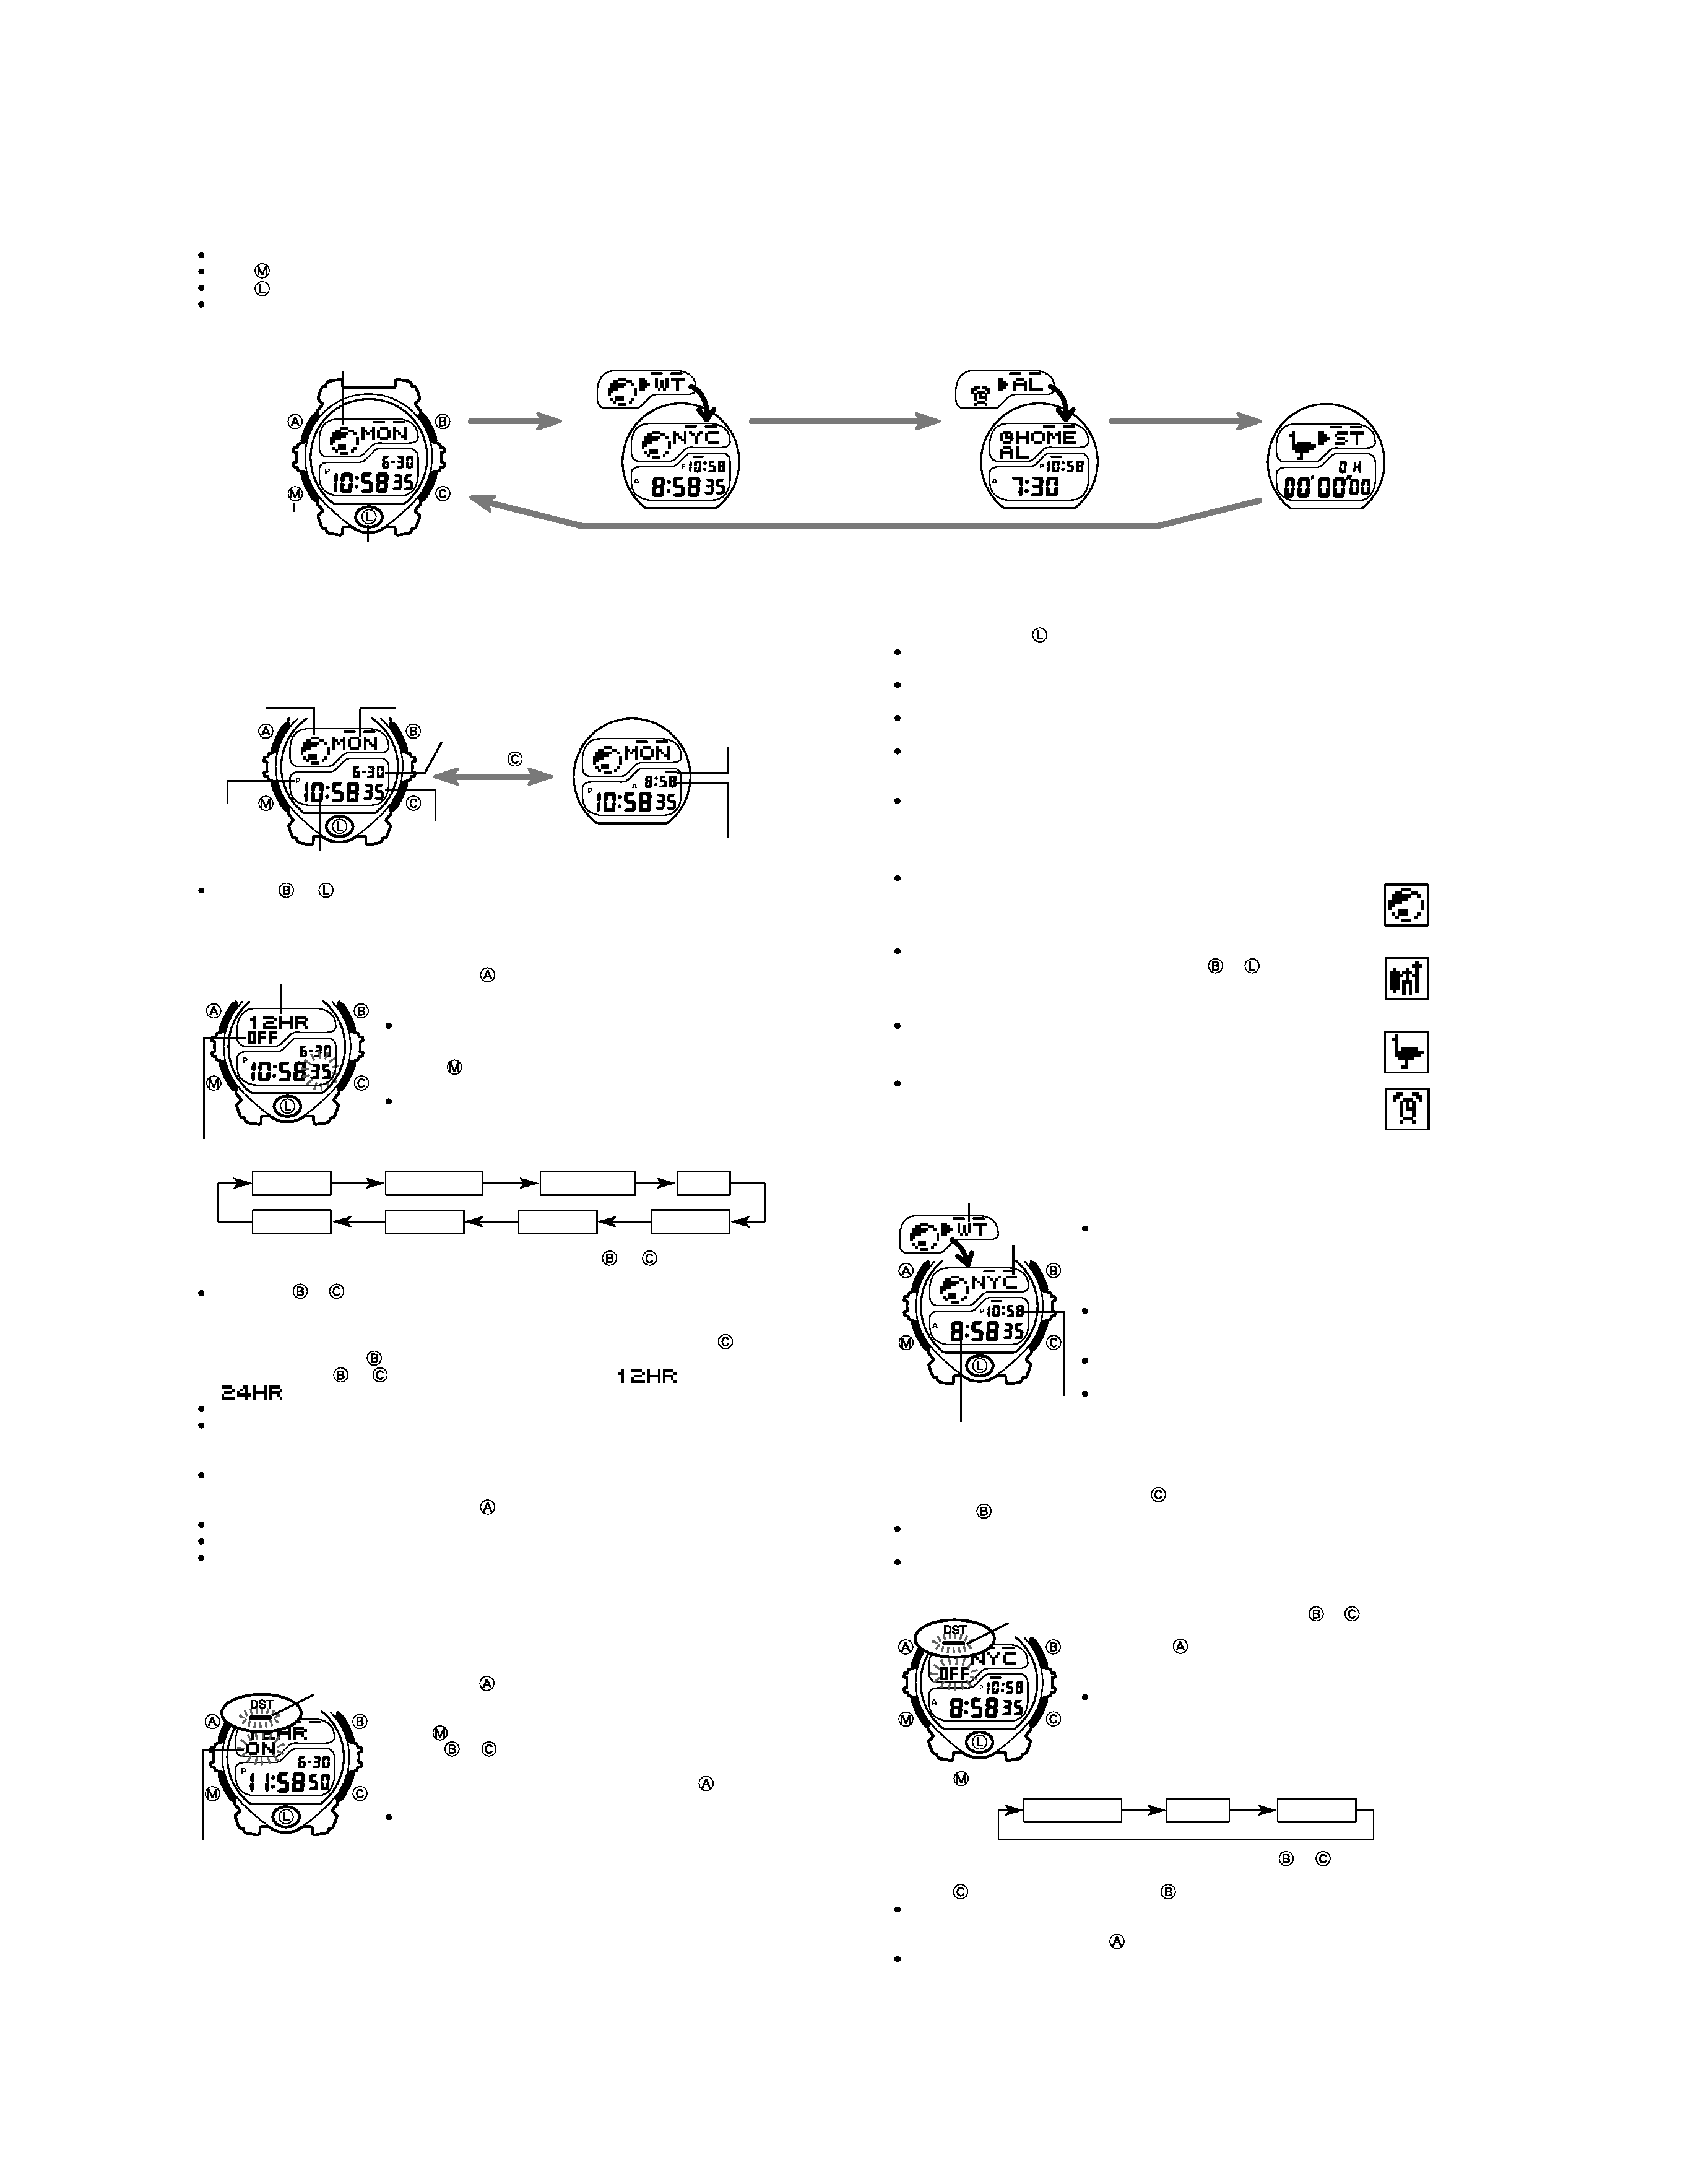
About the backlight
In any mode, press
to illuminate the display for about three seconds.
In the Timekeeping Mode, animated figures appear in the animation area whenever
the backlight is turned on.
The backlight of the watch employs an electro-luminescent (EL) light, which loses
illuminating power after very long use.
The illumination provided by the backlight may be hard to see when viewed under
direct sunlight.
The watch will emit an audible sound whenever the display is illuminated. This is
caused by a transistor that vibrates when the EL panel lights up. It does not indicate
malfunction of the watch.
The backlight automatically turns off whenever an alarm sounds.
About animated figures
The following are the animated figures that appear in each mode.
Rotating Globe
This figure appears after you have been in the Timekeeping Mode
or World Time Mode. Occasionally an airplane or a flying saucer
appears.
Dances of the World
Dancing figures appear whenever you press
or
in the Time-
keeping Mode. There are two dances for each day of the week.
However, the dance for another day of the week may appear.
Ostrich
The ostrich appears whenever you are in the Stopwatch Mode,
and runs while a stopwatch timing operation is being performed.
Alarm Clock
This figure appears whenever an alarm time is reached in any
mode except the Stopwatch Mode.
WORLD TIME MODE
The World Time Mode shows the current time in 40 cities
(27 time zones) around the world.
The time settings of the Timekeeping Mode and the
World Time Mode are independent, so you must make
separate settings for each. Note, however, that the sec-
onds counts for both modes are synchronized with each
other.
Whenever you change the time setting for any city in
the World Time Mode, the settings of all other cities are
changed accordingly.
The 12-hour/24-hour format of the World Time matches
the format you select in the Timekeeping Mode.
The time zone that is displayed when you leave the World
Time Mode will still be displayed when you enter the
World Time Mode again.
To view the time in another zone
While in the World Time Mode, press
to scroll forward through the city codes (time
zones) and
to scroll back.
For full information on city codes, see the "CITY CODE TABLE" at the back of this
manual.
Holding down either button scrolls through the city codes at high speed.
To set the World Time
1. In the World Time Mode, press
or
to scroll through
the time zones and find the one you want.
2. Hold down
until the DST On/Off setting starts to flash
on the display. The setting flashes because it is
select-
ed.
The DST indicator flashes along with the current on/off
setting.
3. Press
to change the selection in the following sequence.
4. While DST On/Off setting is selected (flashing), press
or
toggle Daylight Sav-
ing Time on ( ON ) and off ( Aff ). While the hour or minutes digits are selected,
press
to increase the setting and
to decrease it.
Holding down either button while the hour or minutes digits are selected changes
the setting at high speed.
5. After you set the time, press
to return to the World Time Mode.
If you do not operate any button for a few minutes while a selection is flashing, the
flashing stops and the watch goes back to the World Time Mode automatically.
TIMEKEEPING MODE
Use the Timekeeping Mode to set the current time and date. You can view the cur-
rent time in the zone (city) you select in the World Time Mode.
Pressing
or
while in the Timekeeping Mode causes an animated figure to
appear in the animation area of the display. A different figure appears for each day
of the week. See "About animated figures" for details.
To set the time and date
1. Hold down
while in the Timekeeping Mode until the
seconds digits start to flash on the display. The sec-
onds flash because they are
selected.
At this time, the time system indicator and DST on/off
indicator appear.
2. Press
to change the selection in the following se-
quence.
See "To switch between Standard Time and D aylight
Saving Time" for details on DST On/Off setting.
3. While the seconds digits are selected (flashing), press
or
to reset the sec-
onds to 00 .
If you press
or
while the seconds count is in the range of 30 to 59, the seconds
are reset to 00 and 1 is added to the minutes. If the seconds count is in the range
of 00 to 29, the minutes count is unchanged.
4. While hour, minutes, year, month, or day is selected (flashing), press
to in-
crease the number or
to decrease it. While the time system indicator is selected
(flashing), press
or
to switch between the 12-hour (
) and 24-hour
(
) formats.
Holding down either button changes the current selection at high speed.
With the 12-hour format, the P (PM) indicator appears to the left of the hour digits
for times in the range of noon to 11:59 pm and the A (AM) indicator appears to the
left of the hour digits for times in the range of midnight to 11:59 am.
With the 24-hour format, times are indicated in the range of 00:00 to 23:59, without
any indicator.
5. After you set the time and date, press
to return to the Timekeeping Mode.
The day of the week is automatically set in accordance with the date.
The date can be set within the range of January 1, 1995 to December 31, 2039.
If you do not operate any button for a few minutes while a selection is flashing, the
flashing stops and the watch goes back to the Timekeeping Mode automatically.
To switch between Standard Time and Daylight Saving Time
Daylight saving time (DST), which is also sometimes called "summer time," advanc-
es the time for one hour, as is the custom in some areas during the summer. Remem-
ber that not all countries or even local areas use Daylight Saving Time.
1. Hold down
while in the Timekeeping Mode until the
seconds digits start to flash on the display. The sec-
onds flash because they are
selected.
2. Use
to move the flashing to the DST on/off indicator.
3. Press
or
to toggle Daylight Saving Time on ( ON )
and off ( Aff ).
4. After you make the setting you want, press
to return
to the Timekeeping Mode.
The DST indicator appears on the display to indicate
that daylight saving time is turned on.
Alarm Mode
Stopwatch Mode
Timekeeping Mode
World Time Mode
Animation area
(Mode)
(Light)
Seconds
Hour
Time system
DST On/Off
Day
Month
Year
Minutes
Time in the zone (city) you select
in the World Time Mode.
World Time Screen
World time
indicator
Press
Date Screen
Day of week
Animation
area
PM
indicator
Hour : Minutes
Seconds
Month - Day
Time system indicator
DST on/off indicator
GENERAL GUIDE
If the digital display of your watch is continually changing, see "AUTO DISPLAY FUNCTION" for information on how to stop it.
Press
to change from mode to mode.
Press
in any mode to illuminate the display for about three seconds.
The animation area shows different animated characters and graphics, depending on the mode and the operation being performed.
DST On/Off
Hour
Minutes
Mode indicator
Current time in the
selected city
DST indicator
City code
Current time
DST on/off indicator
DST indicator

- 3 -
AUTO DISPLAY FUNCTION
The Auto Display function of this watch continually chang-
es the contents of the digital display. Note that you can-
not use any of the watch's other functions (except for back-
light) while the Auto Display function is operating.
To turning the Auto Display Off
Hold down
for about three seconds until the watch
beeps.
To turning the Auto Display On
Hold down
for about three seconds in the Timekeeping Mode until the watch beeps.
Note
The Auto Display function cannot be performed while you are making settings (i.e.
while digits or other settings are flashing on the display).
CITY CODE TABLE
(a) Elapsed time measurement
Start
Stop
Re-start
Stop
Clear
Start
Split
Split release
Stop
Clear
Start
Split
Stop
Split release
Clear
(b) Split time measurement
(c) Split time and 1st-2nd place times
First runner
finishes.
Second runner
finishes.
Record time of
first runner.
Record time of
second runner.
Tone Alarm
EL Alarm
Off
To switch between standard time and daylight saving time
1. In the World Time Mode, display the time zone whose standard/daylight saving
time setting you want to change.
You can make separate daylight saving time settings for each individual city.
2. Hold down
until the DST On/Off setting starts to flash on the display. The setting
flashes because it is
selected.
The DST indicator flashes along with the current on/ off setting.
3. Press
or
to toggle Daylight Saving Time on ( ON ) and off ( Aff ).
4. After you are finished making the setting you want, press
to return to the World
Time Mode.
The DST indicator is on the display whenever you display a city for which daylight
saving time is turned on.
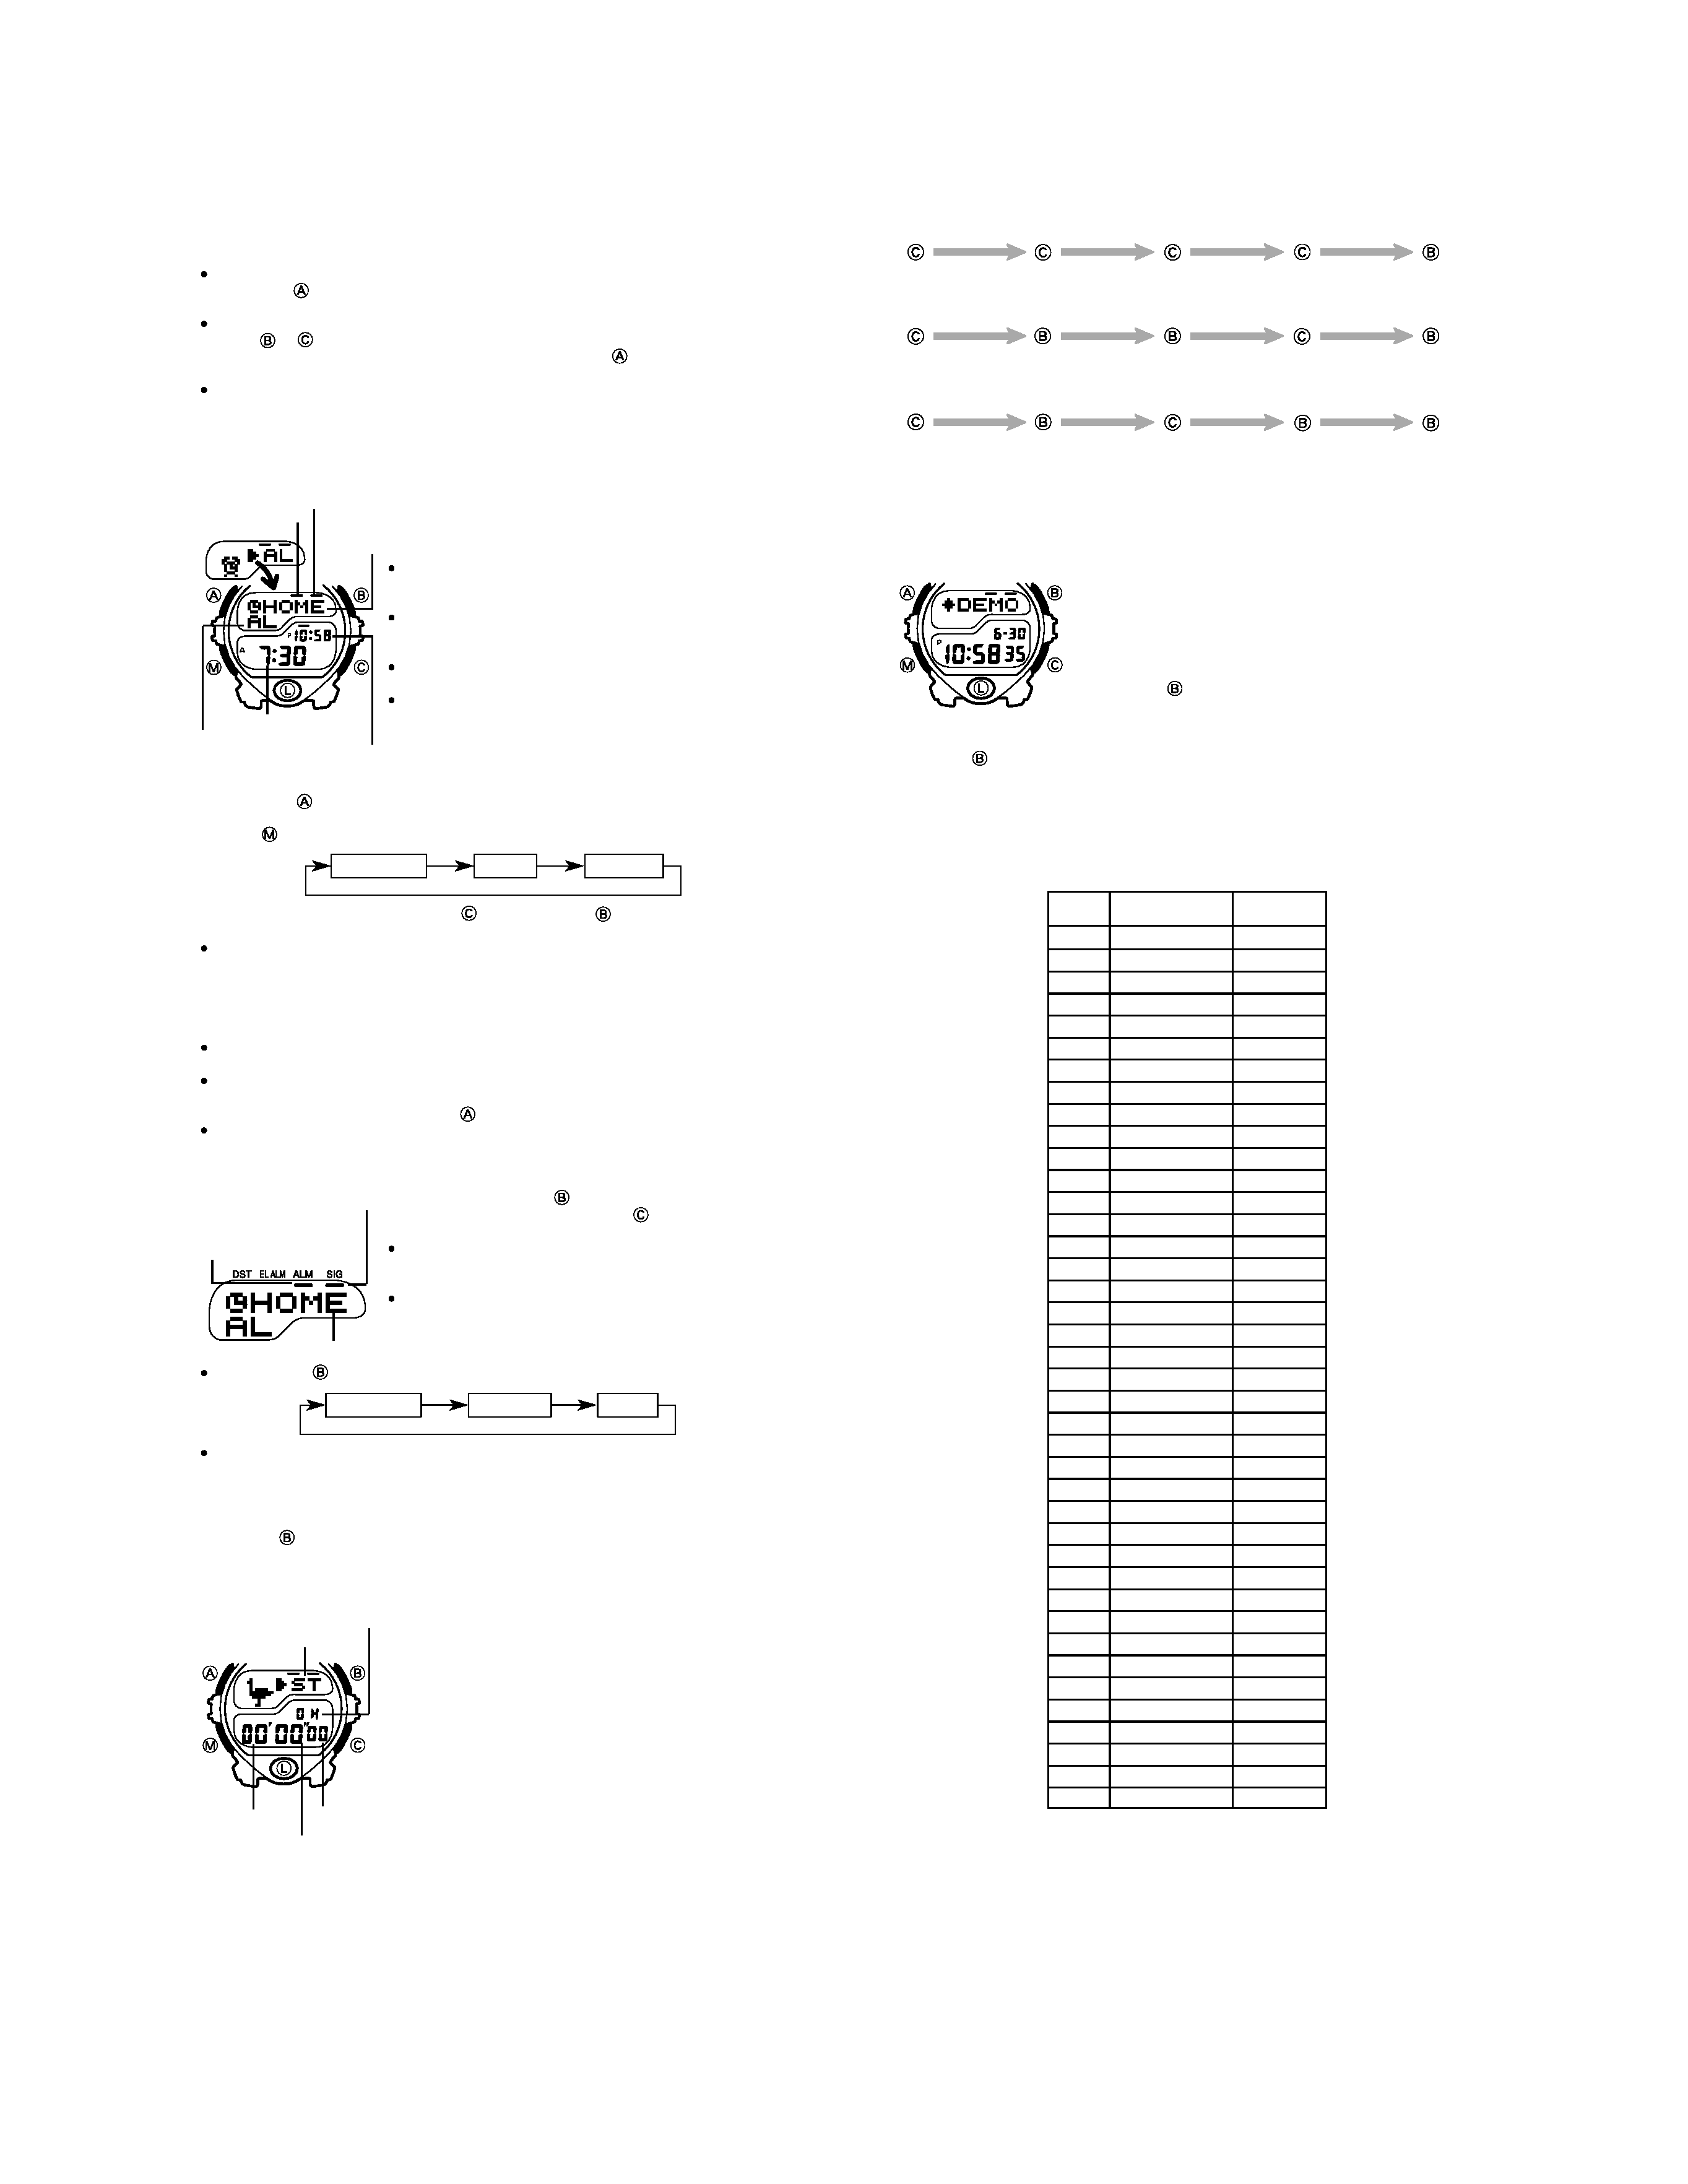
ALARM MODE
When the Daily Alarm is turned on, the alarm sounds for
20 seconds at the preset time each day. Press any button
to stop the alarm after it starts to sound.
When the Hourly Time Signal is turned on, the watch beeps
every hour on the hour.
The Daily Alarm and the Hourly Time Signal can be set
to sound in accordance with the Timekeeping Mode time
or the time of one of the World Time Mode city codes.
In addition to the alarm buzzer sounding, you can also
set the EL backlight to flash when an alarm time is
reached.
The term "current time" as used in this manual refers to
the time kept in the Timekeeping Mode.
The alarm does not sound if the alarm time is reached
while you are making watch settings (while digits or set-
tings are flashing on the display).
To set the alarm time
1. Hold down
while on the Alarm Mode until the city code starts to flash on the
display. The city code flashes because it is
selected.
2. Press
to change the selection in the following sequence.
3. While any setting is selected, press
to advance it, or
to move it back. Holding
down either button changes the setting at high speed.
If you want the Daily Alarm to operate in accordance with the time kept in the Time-
keeping Mode, select HOME for the city code. Otherwise, select the city code for
any other city you want to select. See the "CITY CODE TABLE" at the back of this
manual for a full list of city codes. Note that the HOME setting is not included in
the "CITY CODE TABLE". When scrolling through city codes on the display,
HOME
is located between the
ADL and YVR codes.
The format (12-hour and 24-hour) of the alarm time matches the format you select
for normal timekeeping.
When setting the alarm time using the 12-hour format, take care to set the time
correctly as morning (A) or afternoon (P).
4. After you set the alarm time, press
to return to the Alarm Mode.
If you do not operate any button for a few minutes while a selection is flashing, the
flashing stops and the watch goes back to the Alarm Mode automatically.
To turn the Daily Alarm and Hourly Time Signal on and off
In the Alarm Mode, use
to turn the Daily Alarm on and
off, and to select the alarm type. Use
to toggle the Hourly
Time Signal on and off.
Indicators as shown in the nearby illustration appear on
the display to indicate that the EL alarm ( EL ALM), tone
alarm (ALM), or Hourly Time Signal (SIG) is turned on.
The Hourly Time Signal sounds in accordance with the
time for the city code for which you set the alarm.
Each press of
cycles through the alarm settings as shown below.
When the EL alarm is turned on, the alarm tone sounds and the backlight flashes
whenever the alarm time is reached. Turning on the tone alarm sounds the alarm
tone only, without the flashing backlight.
To test the alarm
Hold down
while in the Alarm Mode to sound the alarm.
STOPWATCH MODE
The Stopwatch Mode lets you measure elapsed time, split
times, and two finishes. The range of the stopwatch is 23
hours, 59 minutes, 59.99 seconds.
City code
Hour
Minutes
Hourly time signal
on indicator
Tone alarm on
indicator
City code
Hours
Mode indicator
Minutes
Seconds
1/100 second
Hourly time signal
on indicator
Tone alarm on
indicator
City code
Hour : Minutes
Mode indicator
Current time
City
City
GMT
Code
differential
ADL
ADELAIDE
+9.5
ANC
ANCHORAGE
09
BCN
BARCELONA
+01
BKK
BANGKOK
+07
CAI
CAIRO
+02
CCS
CARACAS
04
CHI
CHICAGO
06
DAC
DHAKA
+06
DEL
DELHI
+5.5
DEN
DENVER
07
DXB
DUBAI
+04
GUM
GUAM
+10
HKG
HONG KONG
+08
HNL
HONOLULU
10
IST
ISTANBUL
+02
JED
JEDDAH
+03
JRS
JERUSALEM
+02
KBL
KABUL
+4.5
KHI
KARACHI
+05
LAX
LOS ANGELES
08
LON
LONDON
+00
MIA
MIAMI
05
MLE
MALE
+05
NOU
NOUMEA
+11
NYC
NEW YORK
05
PAR
PARIS
+01
PPG
PAGO PAGO
11
PPT
PAPEETE
10
RGN
YANGON
+6.5
RIO
RIO DE JANEIRO
03
ROM
ROME
+01
SEL
SEOUL
+09
SFO
SAN FRANCISCO
08
SIN
SINGAPORE
+08
SPN
SAIPAN
+10
SYD
SYDNEY
+10
THR
TEHRAN
+3.5
TYO
TOKYO
+09
WLG
WELLINGTON
+12
YVR
VANCOUVER
08
*
Based on data as of September 1997.

- 4 -
3. DRAWINGS : QW-1805
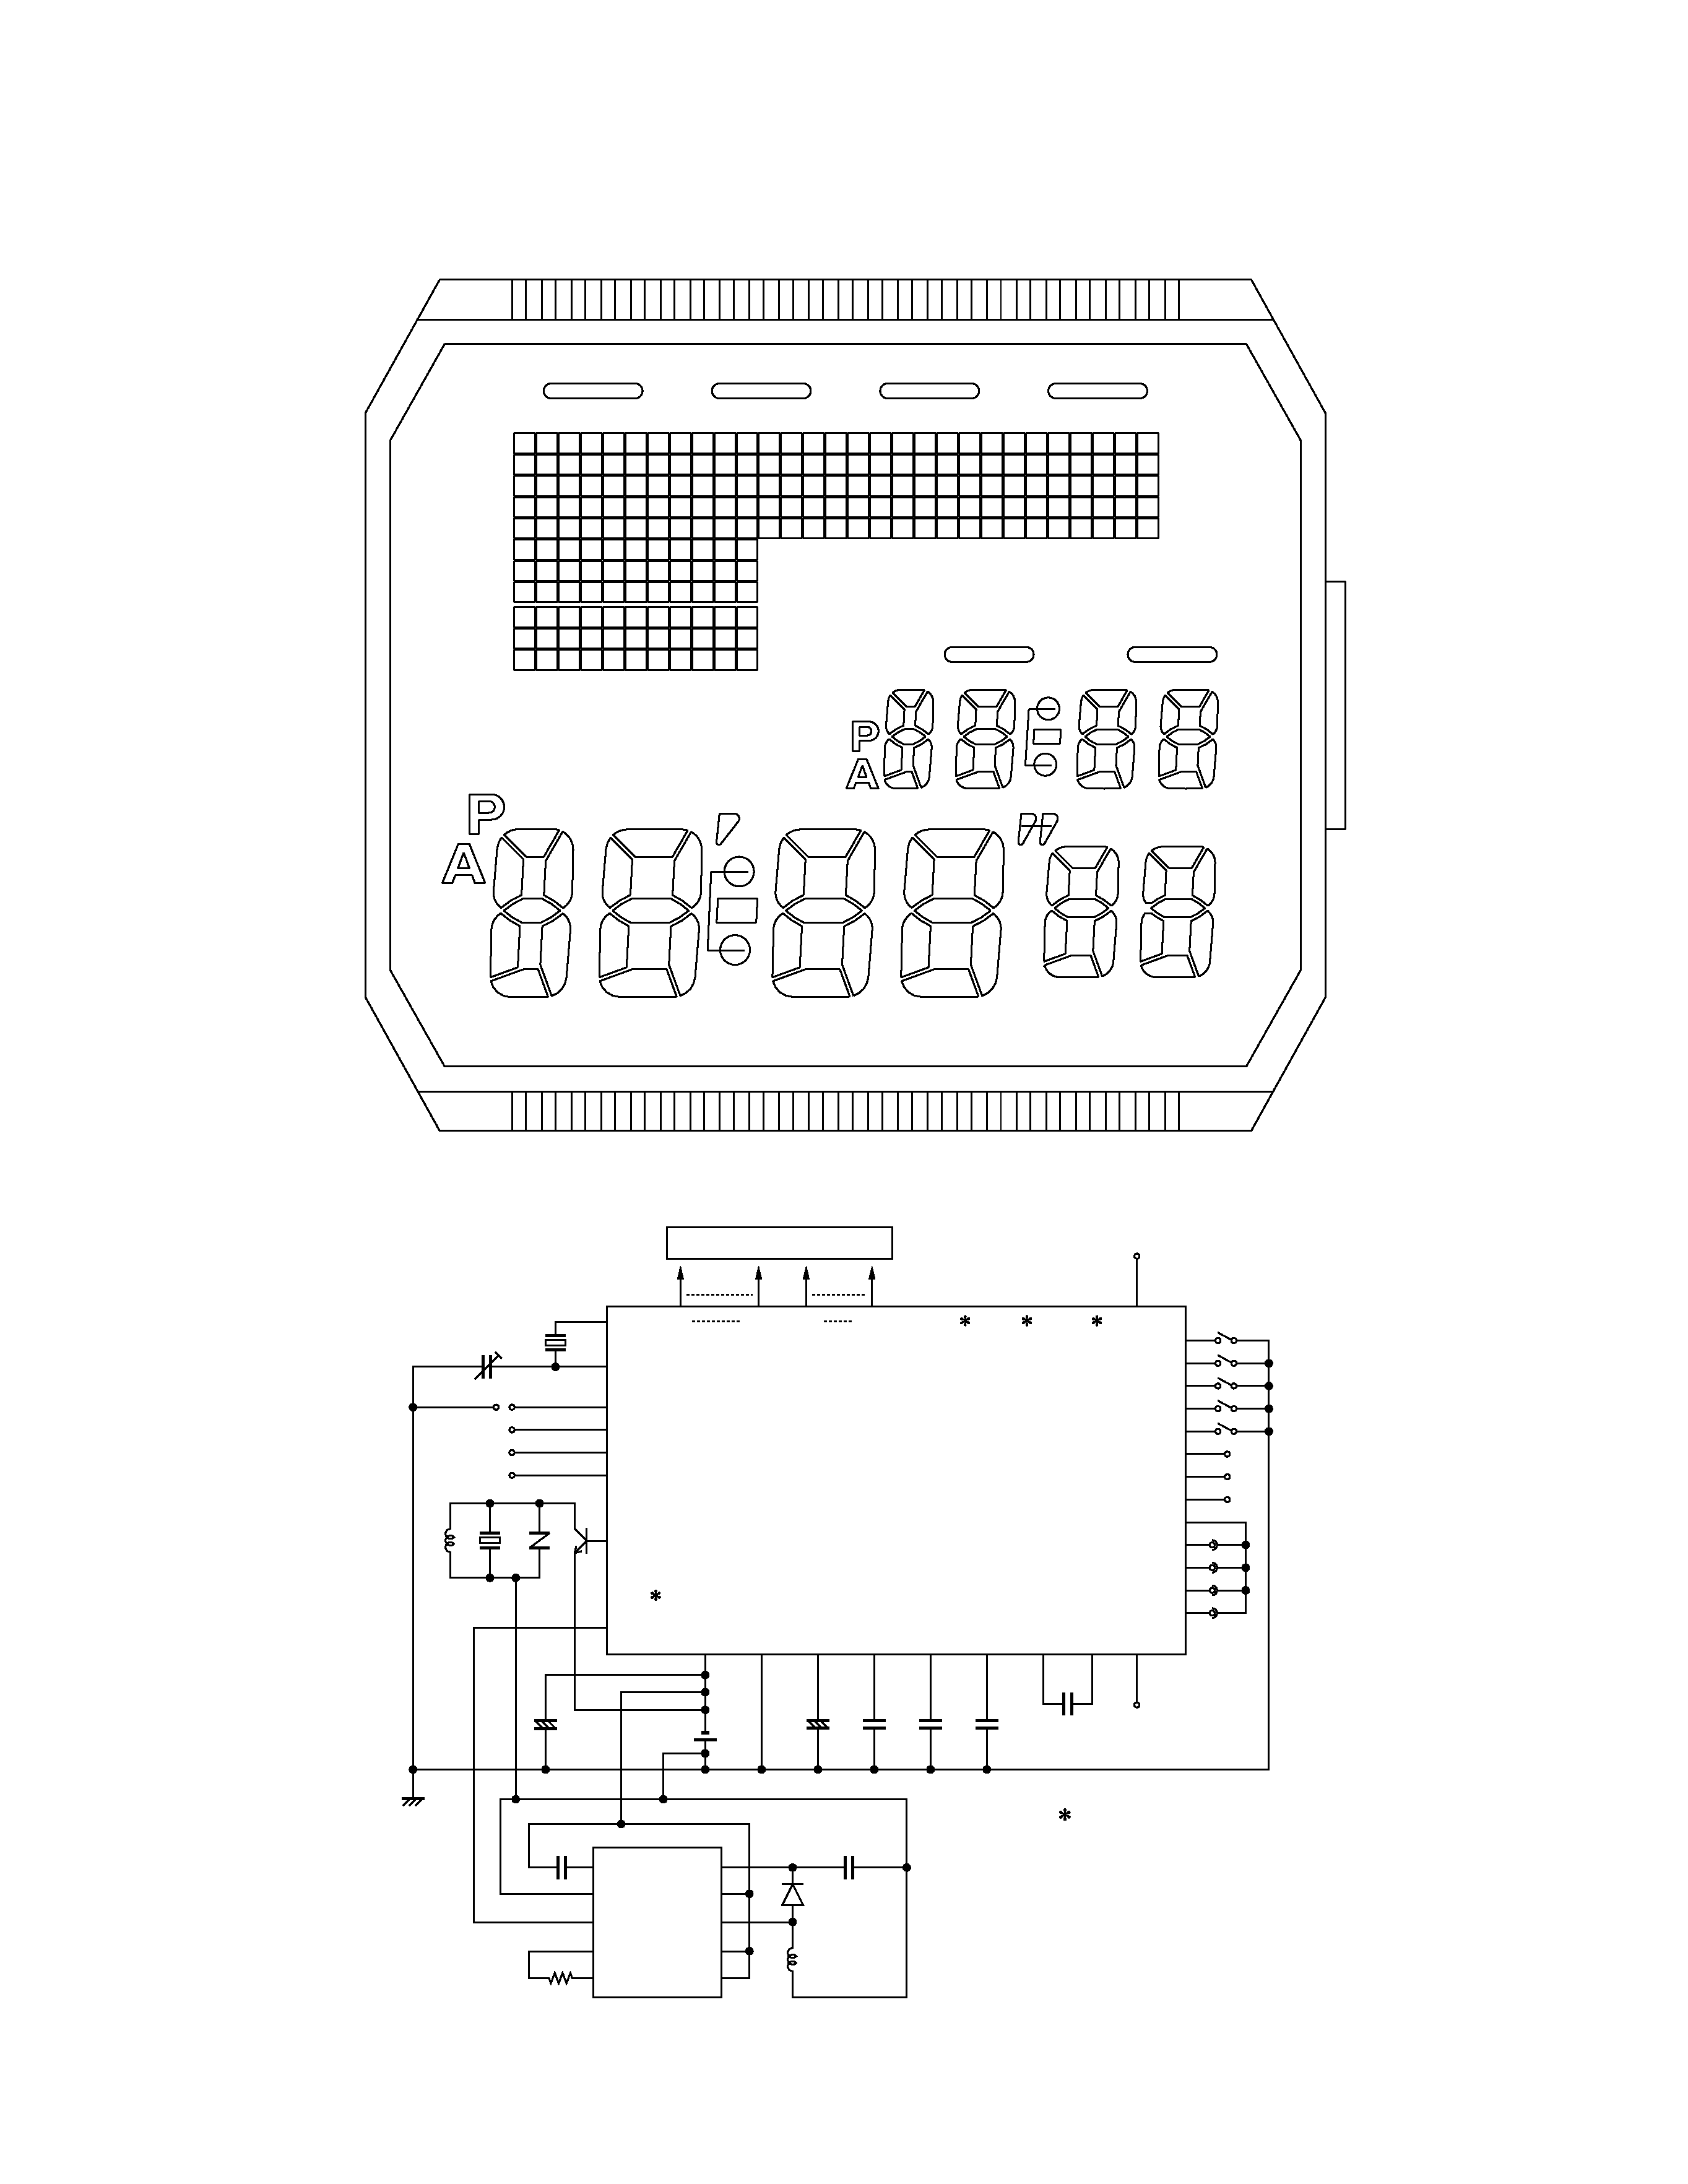
3-1. BLOCK DIAGRAM
12C7
L1
C6
C1
C2
C5
C4
C7
C7
C3
C3
C8
C8
23456789
10 11
L38 37 36 35 34 33 32 31 30 14 13
12 13 14 15 16 17 18 19 20 21 29 28 27 26 25 24 23 22
15C7
16C7
15C8
18C7
21C7
38C5
36C2
34C2
33C2
32C1
32C6
37C1
34C1
38C1
35C6
37C6
33C6
36C1
33C1
37C2
35C1
38C6
34C6
31C2
30C1
31C6
29C7
30C2
31C1
30C6
28C3
26C3
25C8
25C7
28C8
29C8
27C7
27C8
26C8
26C7
25C3
24C8
23C3
23C8
22C7
24C3
23C7
22C3
22C8
29C3
28C7
37C4
35C5
35C4
32C4
32C5
32C2
30C4
27C3
30C5
17C3
17C8
17C7
35C2
34C5
33C5
31C5
31C4
33C4
18C3
16C3
16C8
18C8
20C3
20C8
20C7
21C3
19C3
19C8
21C8
36C5
34C4
36C4
37C5
38C2
LC1
L1
L2
L3
L4
L5
L6
L7
L8
L9
L10
L11
L12
L13
L14
L15
L16
L17
L18
L19
L20
L21
LC2
LC8
LC7
LC6
L38
L37
L36
L35
L34
L33
L32
L31
L30
L29
L28
L27
L26
L25
L24
L23
L22
LC5
LC4
LC3
XTB
Xtal
CT
XT
C4
BAT
VR
PZ
LL2
KI1
KI2
KI3
KI4
VCCE
LL1
BACK
FRON
Di EL
ENB
VSS2
INV
L1
L38
LC8
BD2
SCUT
SCL
SDA
LC1
VDSP VSS3 VSS1
LSI
LCD
TOTAL
BONDING
81PINS
77PINS
VC1 VC2 EMP
LD1
AC
T1
T2
T3
LD2
RT1
RT2
R
BD1
TR
VCPE
GND
CIL
GND
GND
ELD
C7
C1
VDD
+
C3
C2
C6
C5
VCH
+
S1
S2
S4
F0
S3
KI9
KI6
KI7
KI8
KI5
KC1
KC2
KC3
KC4
Not bonding.
