QW-1471
MODULE NO.
R
REF. NO. S/M-564
AUGUST 1997
PRT-400LJ
SERVICE MANUAL
& PARTS LIST
(WITHOUT PRICE)
INDEX

-- 1 --
CONTENTS
1. SPECIFICATIONS: QW-1471 ........................................................................ 2
2. OPERATION CHART: QW-1471 ................................................................... 3
3. DRAWINGS
3-1. BLOCK DIAGRAMS: QW-1471 ......................................................................
11
3-2. CHECKING TERMINALS AND COMPONENTS: QW-1471 ..........................
12
4. EXPLODED VIEW: QW-1471 ...................................................................... 13
5. PARTS LIST: QW-1471 ............................................................................... 14
6. PRECAUTIONS FOR REPAIR: QW-1471
6-1. AC (ALL CLEAR) AND REMOVING OF MODULE ........................................
15
6-2. ACCURACY CHECKING ................................................................................
15
6-3. REPLACEMENT OF BATTREIES ..................................................................
16
6-4. REPLACEMENT OF MODULE WITH SENSOR ............................................
16
6-5. TROUBLESHOOTING OF SENSOR
MALFUNCTION OR INACCURACY TROUBLE ............................................
17
6-6. CHECKING METHOD OF INACCURACY (FOR EXAMPLE) ........................
18
6-7. HOW TO CHECK RESISTANCE VALUE OF SENSOR .................................
19
6-8. HOW TO HANDLE THE SENSOR ..................................................................
19
6-9. BATTERY REPLACEMENT ...........................................................................
20
6-10. SENSOR/MAGNETIC ....................................................................................
20
6-11. TROUBLESHOOTING ..................................................................................
21
6-12. HOW TO CHECK TILT SENSOR ..................................................................
22

-- 2 --
1. SPECIFICATIONS: QW-1471
Item
Detail
Battery
SR927W
× 2
Battery life
Approx. 1.5 years
Current consumption
2.3
µA maximum
Alarm system
Piezo plate on Cover/Back
Accuracy
±15 sec./month
Accuracy setting system Capacitor/Chip
Accuracy checking
See page 15
Accuracy setting
+0.25 ~ +0.35 sec./day
Functions
· Electro-luminescent backlight
· Auto light switch
· Digital compass
Measures and displays the direction in 16 directions
Measuring range: 0
° to 359 °
Measuring unit: 1
°
Memory capacity: Up to 5 sets of data, each set including: direction plus
month, date, and time the measurement was taken
Abnormal magnetic field detect function
Bidirectional calibration and northerly calibration function
· Altimeter
Measuring range: 0 to 4,000 m
Measuring unit: 5 m
Auto memory measurements (up to 50 sets of data, each set including
altitude, temperature, month, date, time)
Reference altitude setting
Altitude alarm
Altitude tendency graph
· Barometer
Display range: 610 to 1,100 hPa/mb
Display unit: 1 hPa/mb
Tendency graph of atmospheric pressure
· Thermometer
Display range: 10
°C to 60 °C
Display unit: 0.1
°C
· 1/100 sec. stopwatch
Measuring capacity: 23:59'59.99"
Measuring mode: Elapsed time, split time, 1st-2nd place times
· 5 daily alarms
· Hourly time signals
· Regular timekeeping: Hr, min, sec, pm, year, month, date, day
· Auto-calendar (pre-programmed to the year 2039)
· 12/24-hour formats

-- 3 --
2. OPERATION CHART: QW-1471
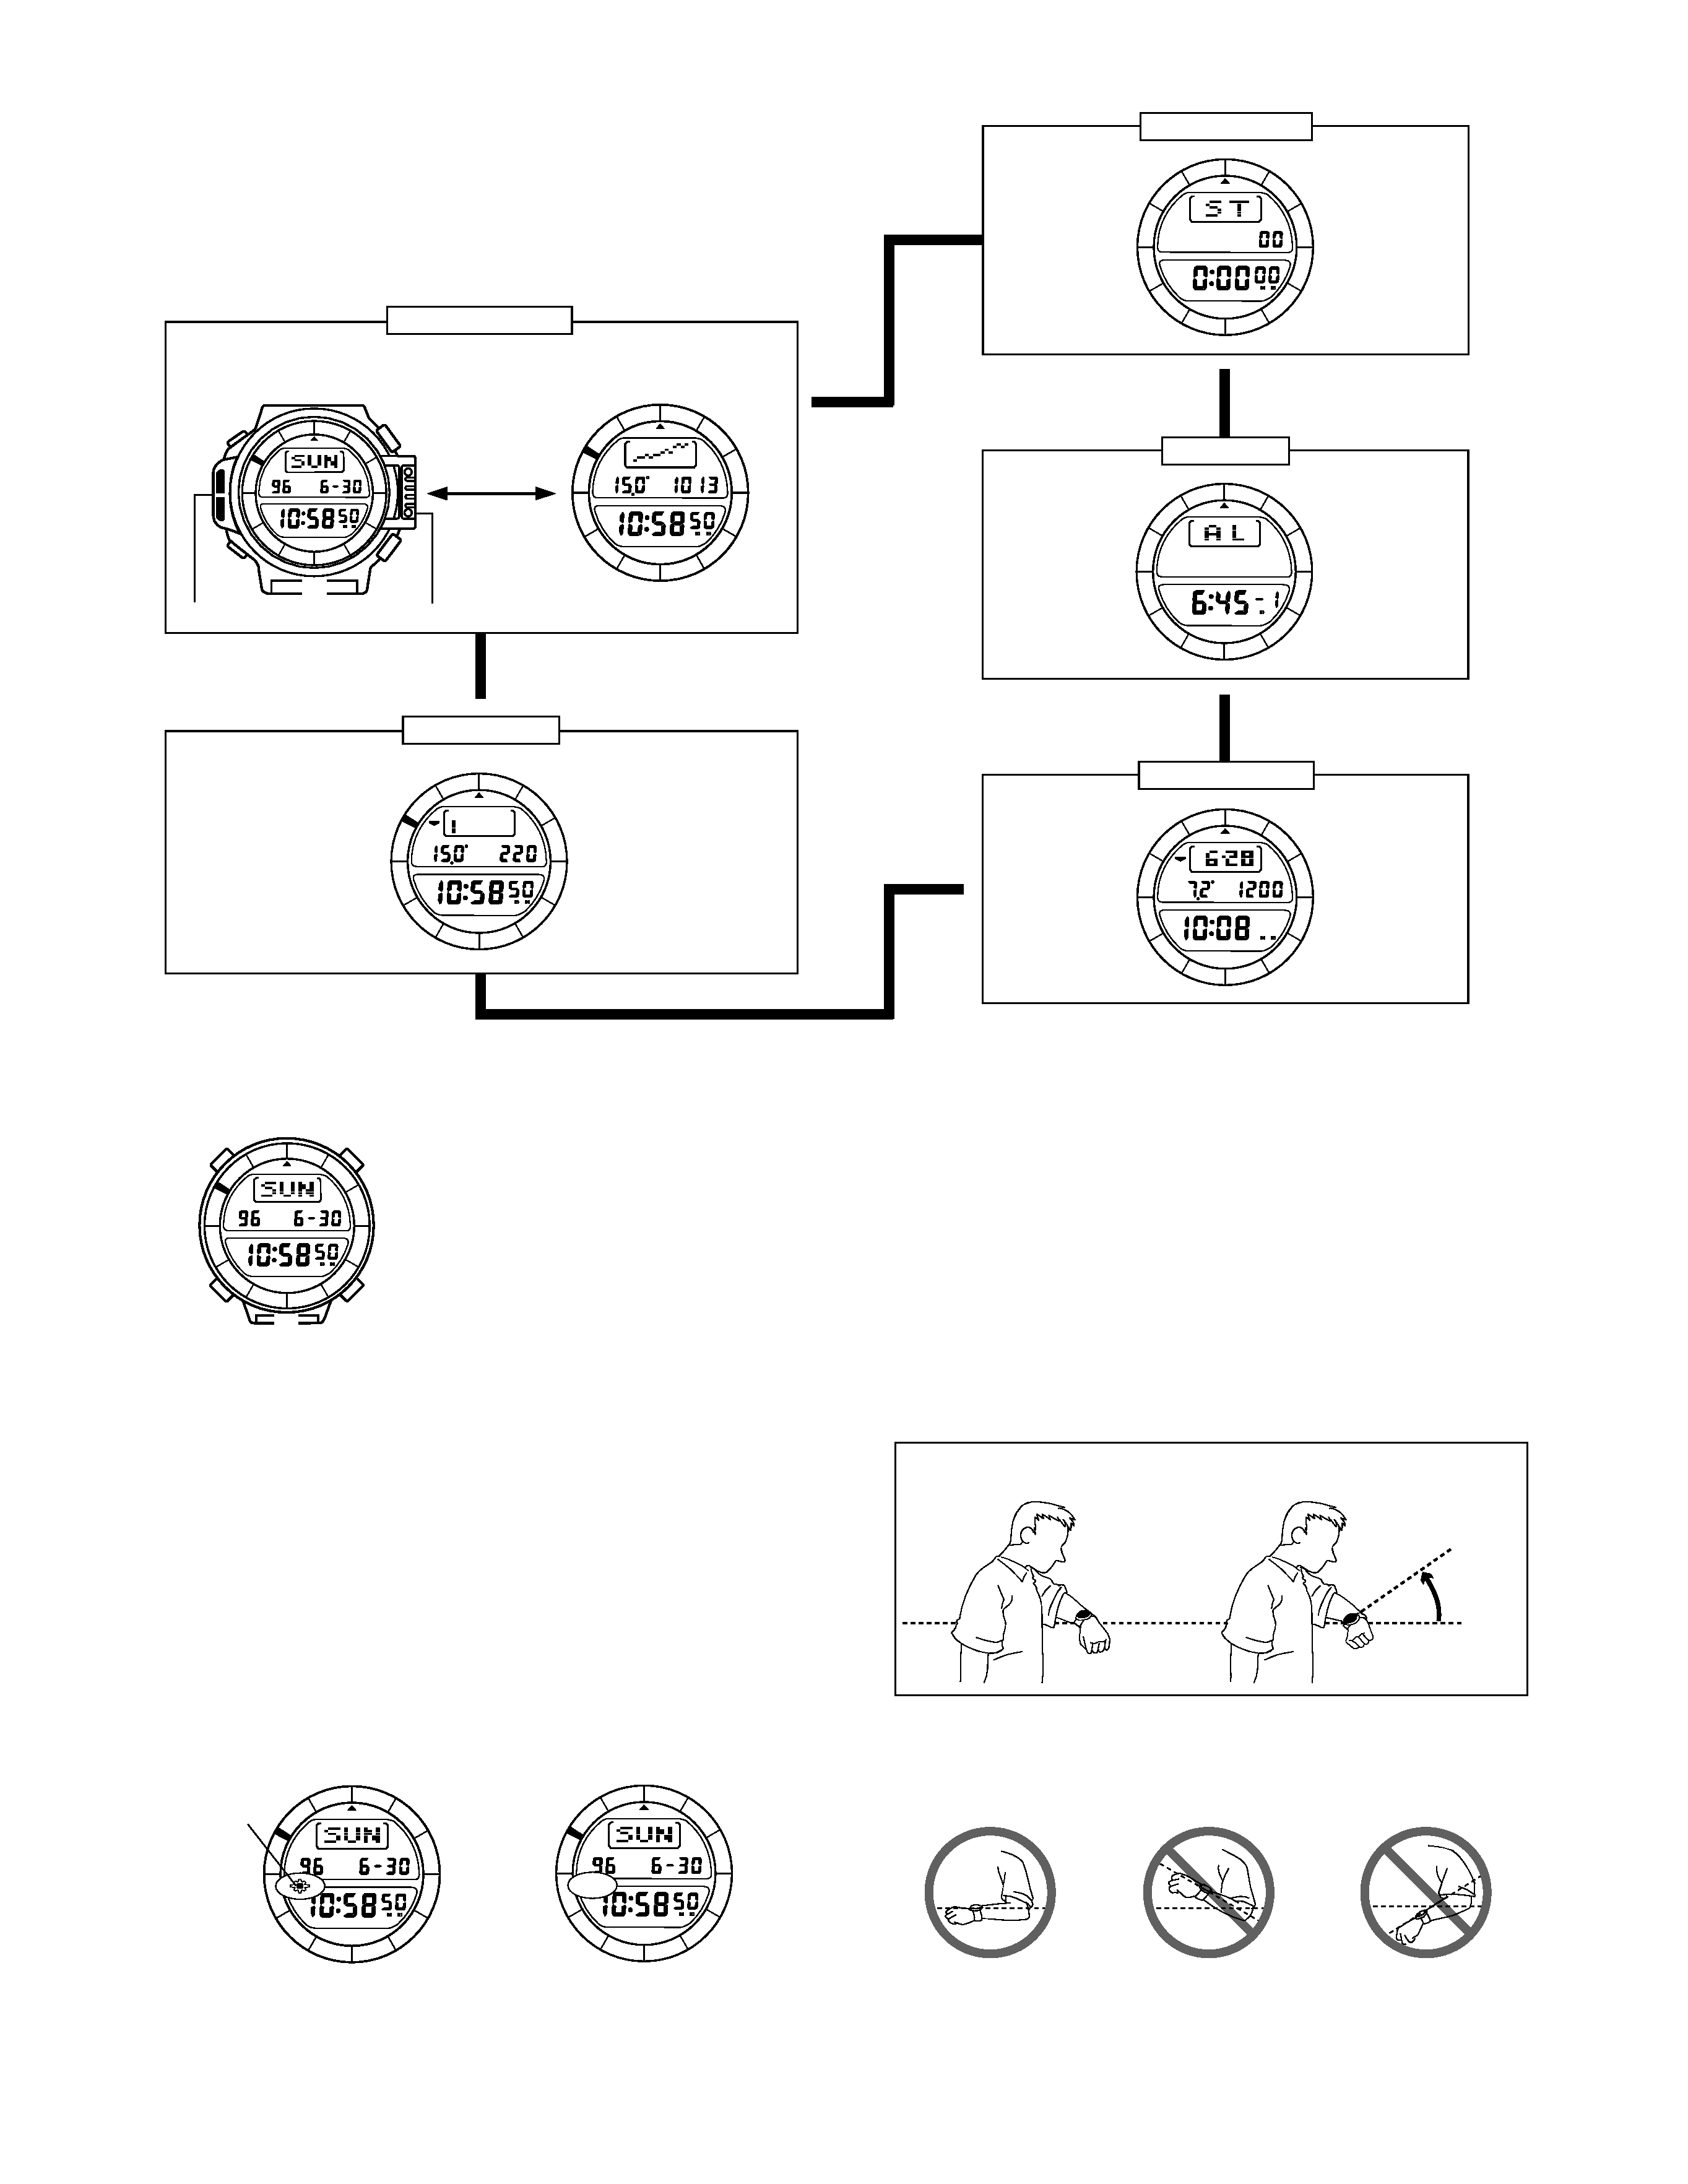
BACKLIGHT
This watch features an electroluminescent
(EL) backlight that helps you easily read the
face, even in total darkness. Its Auto
Backlight function automatically lights the
watch face whenever you turn your wrist
towards your face.
Notes
· The backlight of the watch employs an electroluminescent (EL) light,
which loses illuminating power after very long use.
· Frequent use of the backlight shortens the battery life.
· The illumination provided by the backlight may be hard to see when
viewed under direct sunlight.
· The watch will emit an audible sound whenever the display is illuminated.
This is caused by a transistor that vibrates when the EL panel lights up. It
does not indicate malfunction of the watch.
· The backlight automatically turns off whenever an alarm sounds.
To manually turn on the backlight
In any mode, press E to illuminate the display for about two seconds.
To switch the auto backlight function on and off
In the Timekeeping Mode, hold down D for one or two seconds to turn the
auto backlight function on and off.
A
B
C
P
A
S
D
E
P
A
S
P
A
S
Auto backlight
indicator
ON
OFF
w
w
w
w
N
N
E
E
S
E
S
SW
W
N
W
A
B
C
D
P
A
S
E
P
C
hPa mb
A
S
Press D .
Timekeeping Mode
Pressure sensor
Bearing sensor
Altimeter Mode
P
AUTO
ALTI
C
m
A
S
Stopwatch Mode
A
S
w
Alarm Mode
A
Data Recall Mode
AUTO
RECALL
C
m
A
S
(Timekeeping Display)
(Barometric Pressure/
Temperature Display)
More
than 40
°
Parallel to
ground
Parallel to ground
More than 15 degrees
too high
More than 15 degrees
too low
· In order to protect against running down the battery, the auto backlight
function is automatically turned off approximately three hours after you
turn it on. Repeat the above procedure to turn the auto backlight function
back on if you want.
· Pressing E in any mode illuminates the display for about two seconds,
regardless of the auto backlight function on/off setting.
About the Auto Backlight function
While the Auto Backlight function is turned on, the backlight automatically
lights for about two seconds in any mode whenever you position your wrist
as described below.
Important!
Avoid wearing the watch on the inside of your wrist. Doing so causes the
Auto Backlight to operate when it is not needed, which shortens battery life.
Moving the watch to a position that is parallel to the ground and then tilting
it towards you more than 40 degrees causes the backlight to illuminate.
· The backlight may not illuminate if the face of the watch is more than 15
degrees off parallel to the left or right. Make sure that the back of your
hand is parallel to the ground.
· The auto backlight indicator is shown on the display in all modes while
the auto backlight function is on.
· Static electricity or magnetic force can interfere with proper operation of
the auto backlight function. If the auto backlight does not illuminate, try
moving the watch back to the starting position (parallel with the ground)
and then tilt it back toward you again. If this does not work, drop your arm
all the way down so it hangs at your side, and then bring it back up again.
GENERAL GUIDE
· Press C to change from mode to mode. Hold down C for one or two
seconds in any mode to switch back to the Timekeeping Mode.
· In addition to the modes illustrated below, this watch is also equipped
with a Digital Compass Mode. See "Digital Compass Functions" for
details.

-- 4 --
· Under certain conditions the backlight may not light until about one
second or less after turn the face of the watch towards you. This does not
necessarily indicate malfunction of the backlight.
Warning!
· Never try to read your watch when mountain climbing or hiking in
areas that are dark or in areas with poor footing. Doing so is
dangerous and can result in serious personal injury.
· Never try to read your watch when running on a roadside or in any
other location where there might be vehicular or pedestrian traffic.
Doing so is dangerous and can result in serious personal injury.
· Never try to read your watch when riding on a bicycle or when
operating a motorcycle or any other motor vehicle. Doing so is
dangerous and can result in a traffic accident and serious personal
injury.
· When you are wearing the watch, make sure that its auto backlight
function is turned off before riding on a bicycle or operating a
motorcycle or any other motor vehicle. Sudden and unintended
operation of the auto backlight can create a distraction, which can
result in a traffic accident and serious personal injury.
TIMEKEEPING FUNCTIONS
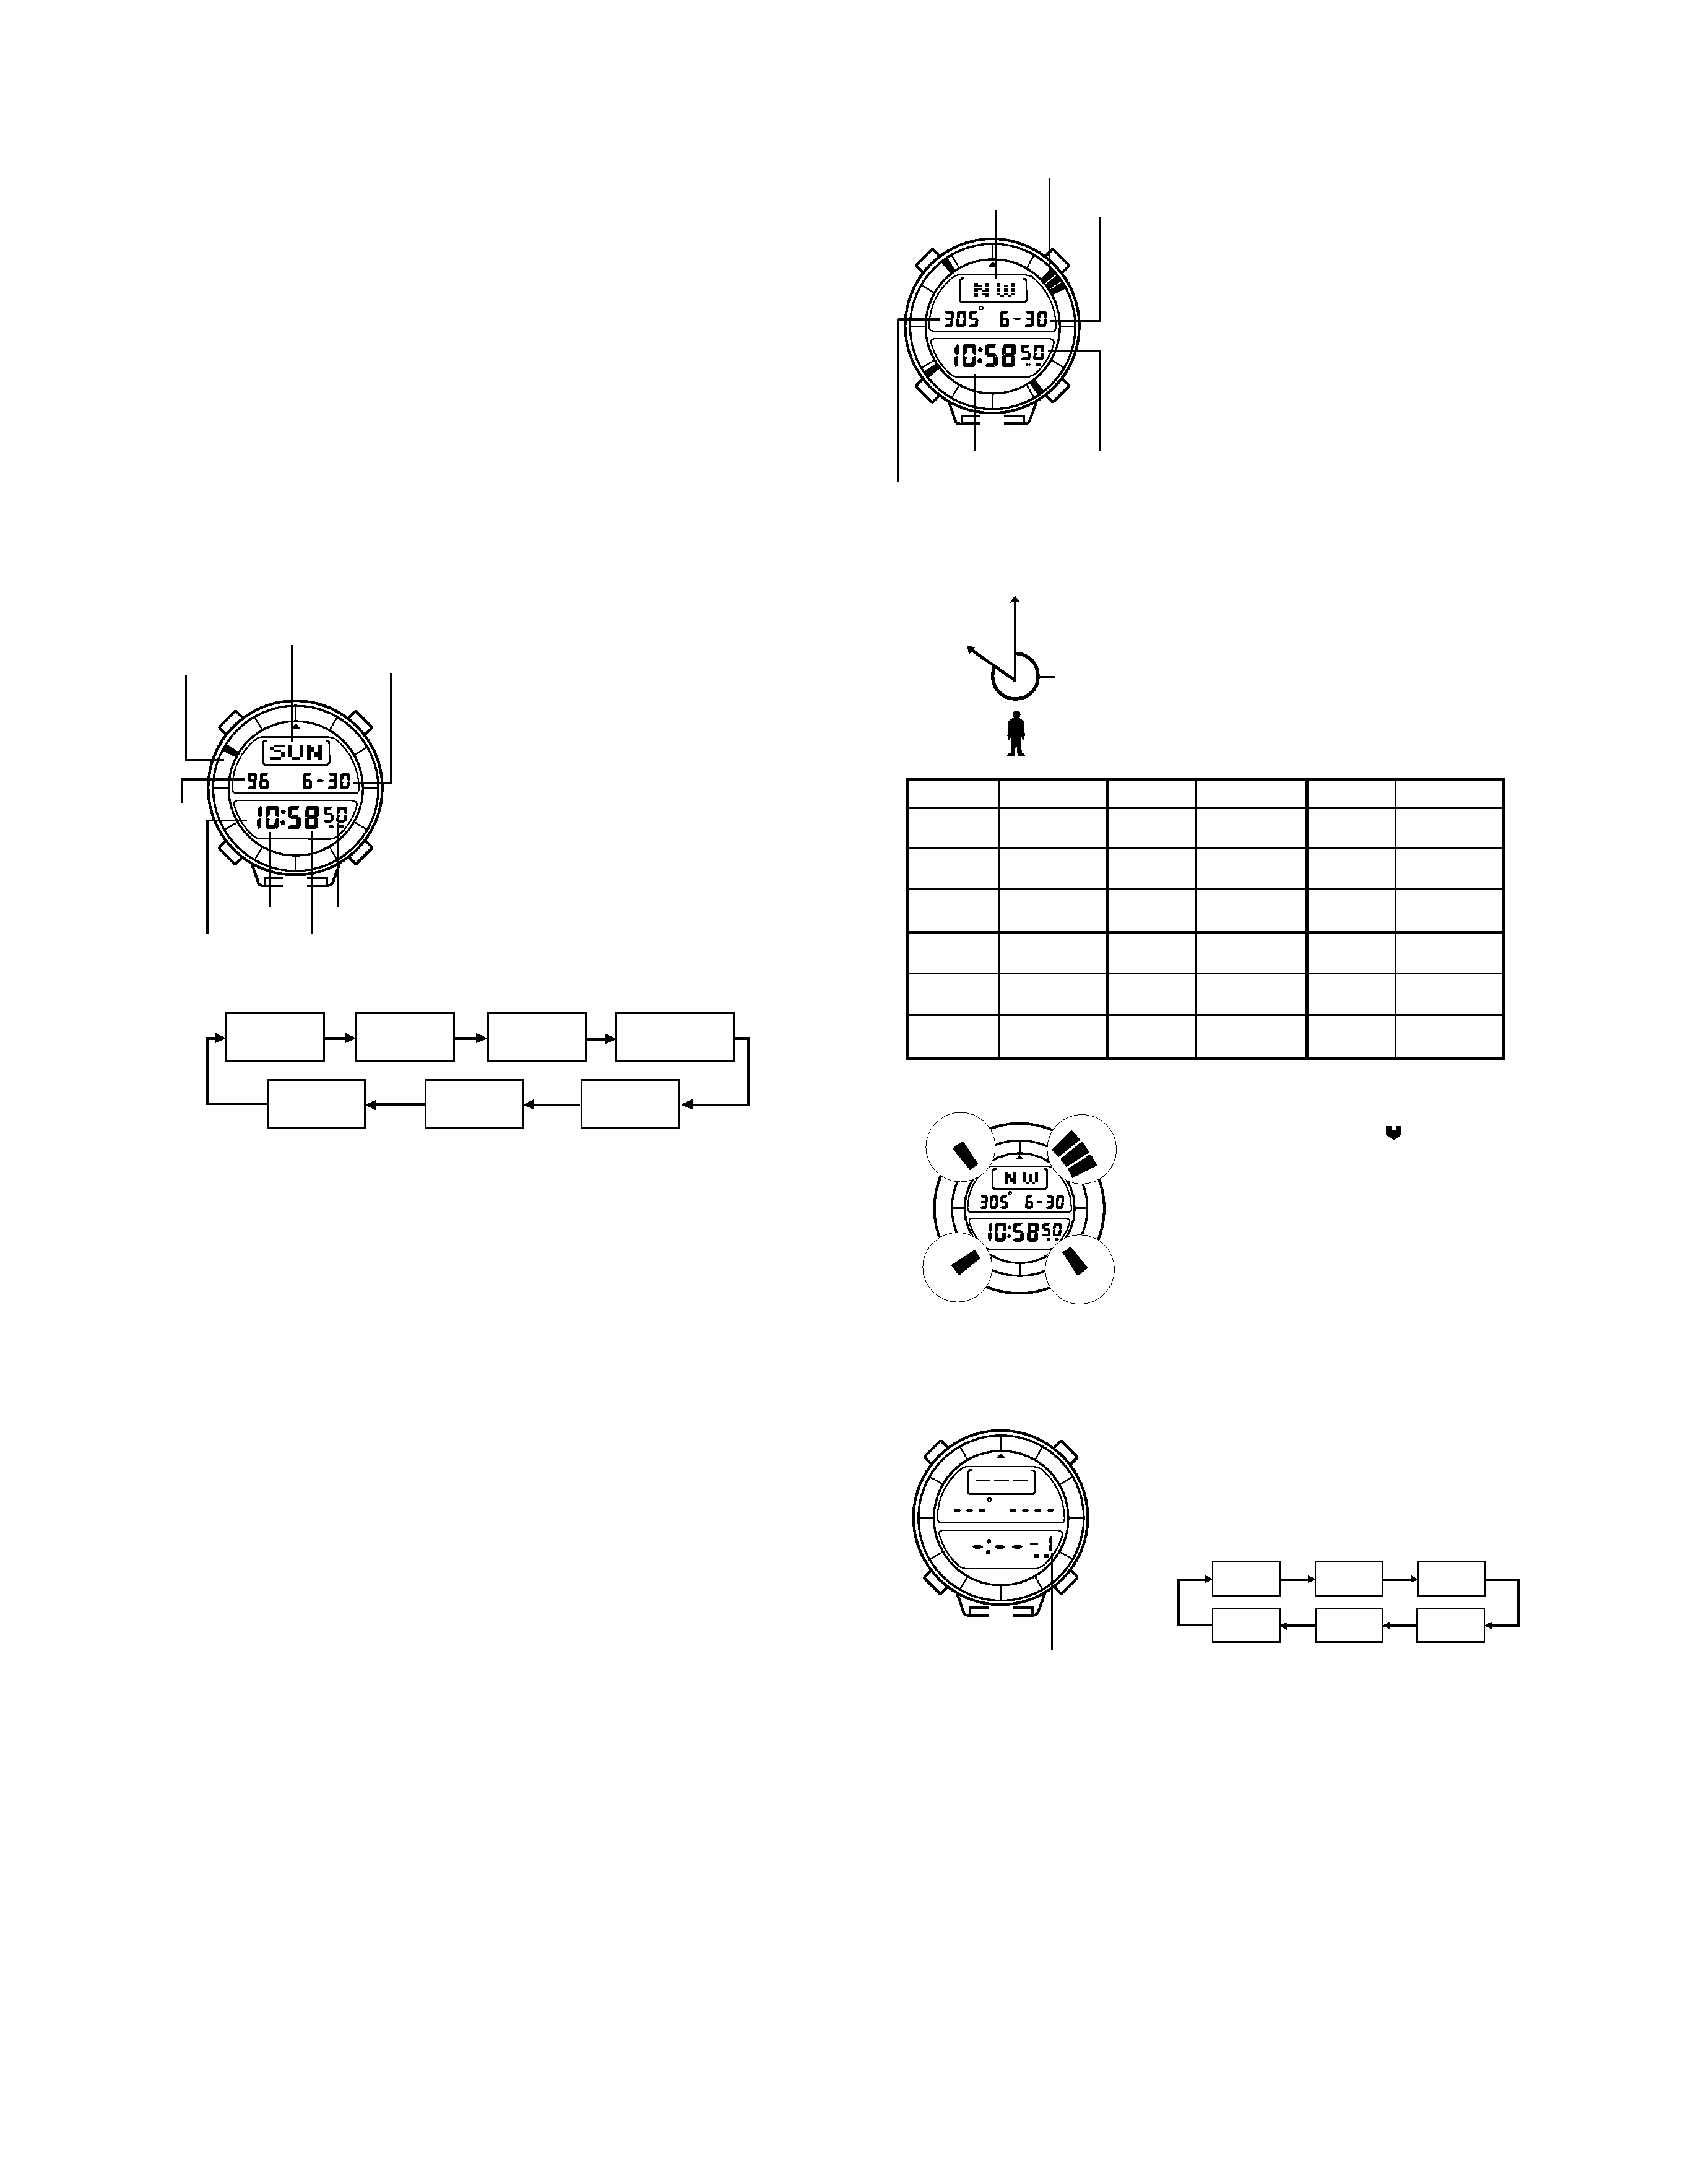
You can set the time and date in the
Timekeeping Mode, which you can enter
using C .
· In the Timekeeping Mode, the graphic
display shows counting of the seconds.
To set the time and date
1. In the Timekeeping Mode, press D until
the Timekeeping Display appears.
2. Hold down A until the seconds digits
start to flash on the display. The seconds
digits flash because they are
selected.
3. Press C to change the selection in the following sequence.
Seconds
Hour
Minutes
Date
Month
Year
12/24-Hour
Format
4. While the seconds digits are selected (flashing), press D to reset the
seconds to "00". If you press D while the seconds count is in the range of
30 to 59, it is reset to "00" and 1 is added to the minutes. If the seconds
count is in the range of 00 to 29, the minutes count is unchanged.
5. While any other digits (besides seconds) are selected (flashing), press
D to increase the number or B to decrease it. Holding down either
button changes the current selection at high speed.
While the 12/24-hour setting is selected, press B or D to switch
between the two formats.
6. After you set the time and date, press A to return to the Timekeeping
Mode (Timekeeping Display).
· The day of the week is automatically set in accordance with the date.
· The date can be set within the range of January 1, 1995 to December 31,
2039.
· If you do not operate any button for a few minutes while a selection is
flashing, the flashing stops and the watch goes back to the Timekeeping
Mode automatically.
Day of week
Graphic display
A
B
C
P
A
S
D
E
Year
Seconds
Hour
PM indicator
Minutes
Month Date
DIGITAL COMPASS FUNCTIONS
This watch features a built-in bearing sensor that indicates any one of 16
directions. Up to five sets of direction readings can be stored into memory.
Each set of data includes the direction, along with the date and time of the
measurement. Direction readings can be performed in the Digital Compass
Mode.
To enter and exit the Digital Compass Mode
1. While in the Timekeeping or Altimeter Mode, press B to enter the
Digital Compass Mode.
· At this time, the watch immediately starts a Digital Compass operation.
After about one second, the direction that the 12 o'clock position of the
watch is pointing appears on the display.
· If you do not perform any button operation for a few minutes, the watch
automatically returns to the mode you were in before entering the Digital
Compass Mode.
2. Press C to return to the mode you were in before entering the Digital
Compass Mode.
· Note that when you enter the Digital Compass Mode from the Altimeter
Mode, the Altimeter Mode measurement (see "About altitude
measurements") continues to be performed internally.
To take a direction reading without storing data into
memory
1. Place the watch on a flat surface or (if
you are wearing the watch), make sure
that your wrist is horizontal (in relation to
the horizon).
· Note that taking a measurement while the
watch is not horizontal (in relation to the
horizon) can result in large measurement
error.
2. Point the 12 o'clock position of the watch
in the direction you want to measure.
3. Press B to enter the Digital Compass
Mode and to start a Digital Compass
measurement operation.
· After about one second, the direction that
the 12 o'clock position of the watch is
pointing appears on the display.
Magnetic north indicator
A
B
C
D
E
P
BEARING
A
S
Direction
Date
Mode indicator
Time
Direction value (in degrees)
· Also, four indicators appear to indicate magnetic north, south, east, and
west.
· The direction value that appears on the
display represents the clockwise angle
formed between magnetic north (which is
0 degrees) and the displayed direction.
· You can repeat steps 1 through 3 as
many times as you like.
· The following table shows the meanings
of each of the direction abbreviations that
appear on the display.
4. Next, you can adjust the rotary direction
bezel so that the "N" or "
" mark is
aligned with the magnetic north indicator.
This correctly aligns all of the markings
on the bezel.
· The Digital Compass operation is
automatically interrupted whenever an
alarm (Daily Alarm or Hourly Time Signal)
sounds. If this happens, start the Digital
Compass operation again from the
beginning.
Direction
Meaning
Direction
Meaning
Direction
Meaning
N
E
S
North
South
East
West
NNE
East-
southeast
North-
northeast
ESE
NE
SE
Northeast
Southwest
West-
northwest
South-
southwest
ENE
SSE
East-
northeast
South-
southeast
West-
southwest
North-
northwest
SW
SSW
NW
NNW
Southeast
WNW
WSW
Northwest
W
N
N
E
E
SE
S
S
W
W
NW
P
BEARING
A
S
W
S
E
N
Magnetic north
Direction
value
Displayed
direction
To take a direction reading and store data into
memory
1. While in the Digital Compass Mode, use
D to select the memory area where you
want to store the data. Each time you
press D , the selected memory area
changes in the following sequence.
· Each memory area is identified by a number from 1 through 5. The
Normal Display shows the current time and date without a memory
number.
· If the memory area you select already contains data, that data appears
on the display whenever the memory area is selected. Performing a
Digital Compass operation replaces the existing data with the newly
measured data.
2. Use the same procedures as described in steps 1 through 4 under
"To take a direction reading without storing data into memory."
Memory number
(memory area display only)
A
B
C
D
E
BEARING
A
S
Normal
Display
Memory 1
Memory 2
Memory 5
Memory 4
Memory 3
