HV-FX8100U
OPERATING INSTRUCTIONS
INSTRUCCIONES DE MANEJO
MODE D'EMPLOI
STEREO VIDEO CASSETTE RECORDER
VIDEOGRABADORA ESTEREO
MAGNETOSCOPE STEREO
ENGLISH
ESPAÑOL
For Assistance And Information
Call Toll Free 1-800-BUY-AIWA
(United States and Puerto Rico)
FRANÇAIS
1
HV-FX8100U
QUICK START GUIDE
Welcome
Thank you for purchasing this AIWA product.
When you unpack your unit for the first time,
follow the procedures
1 to 5 below for set up.
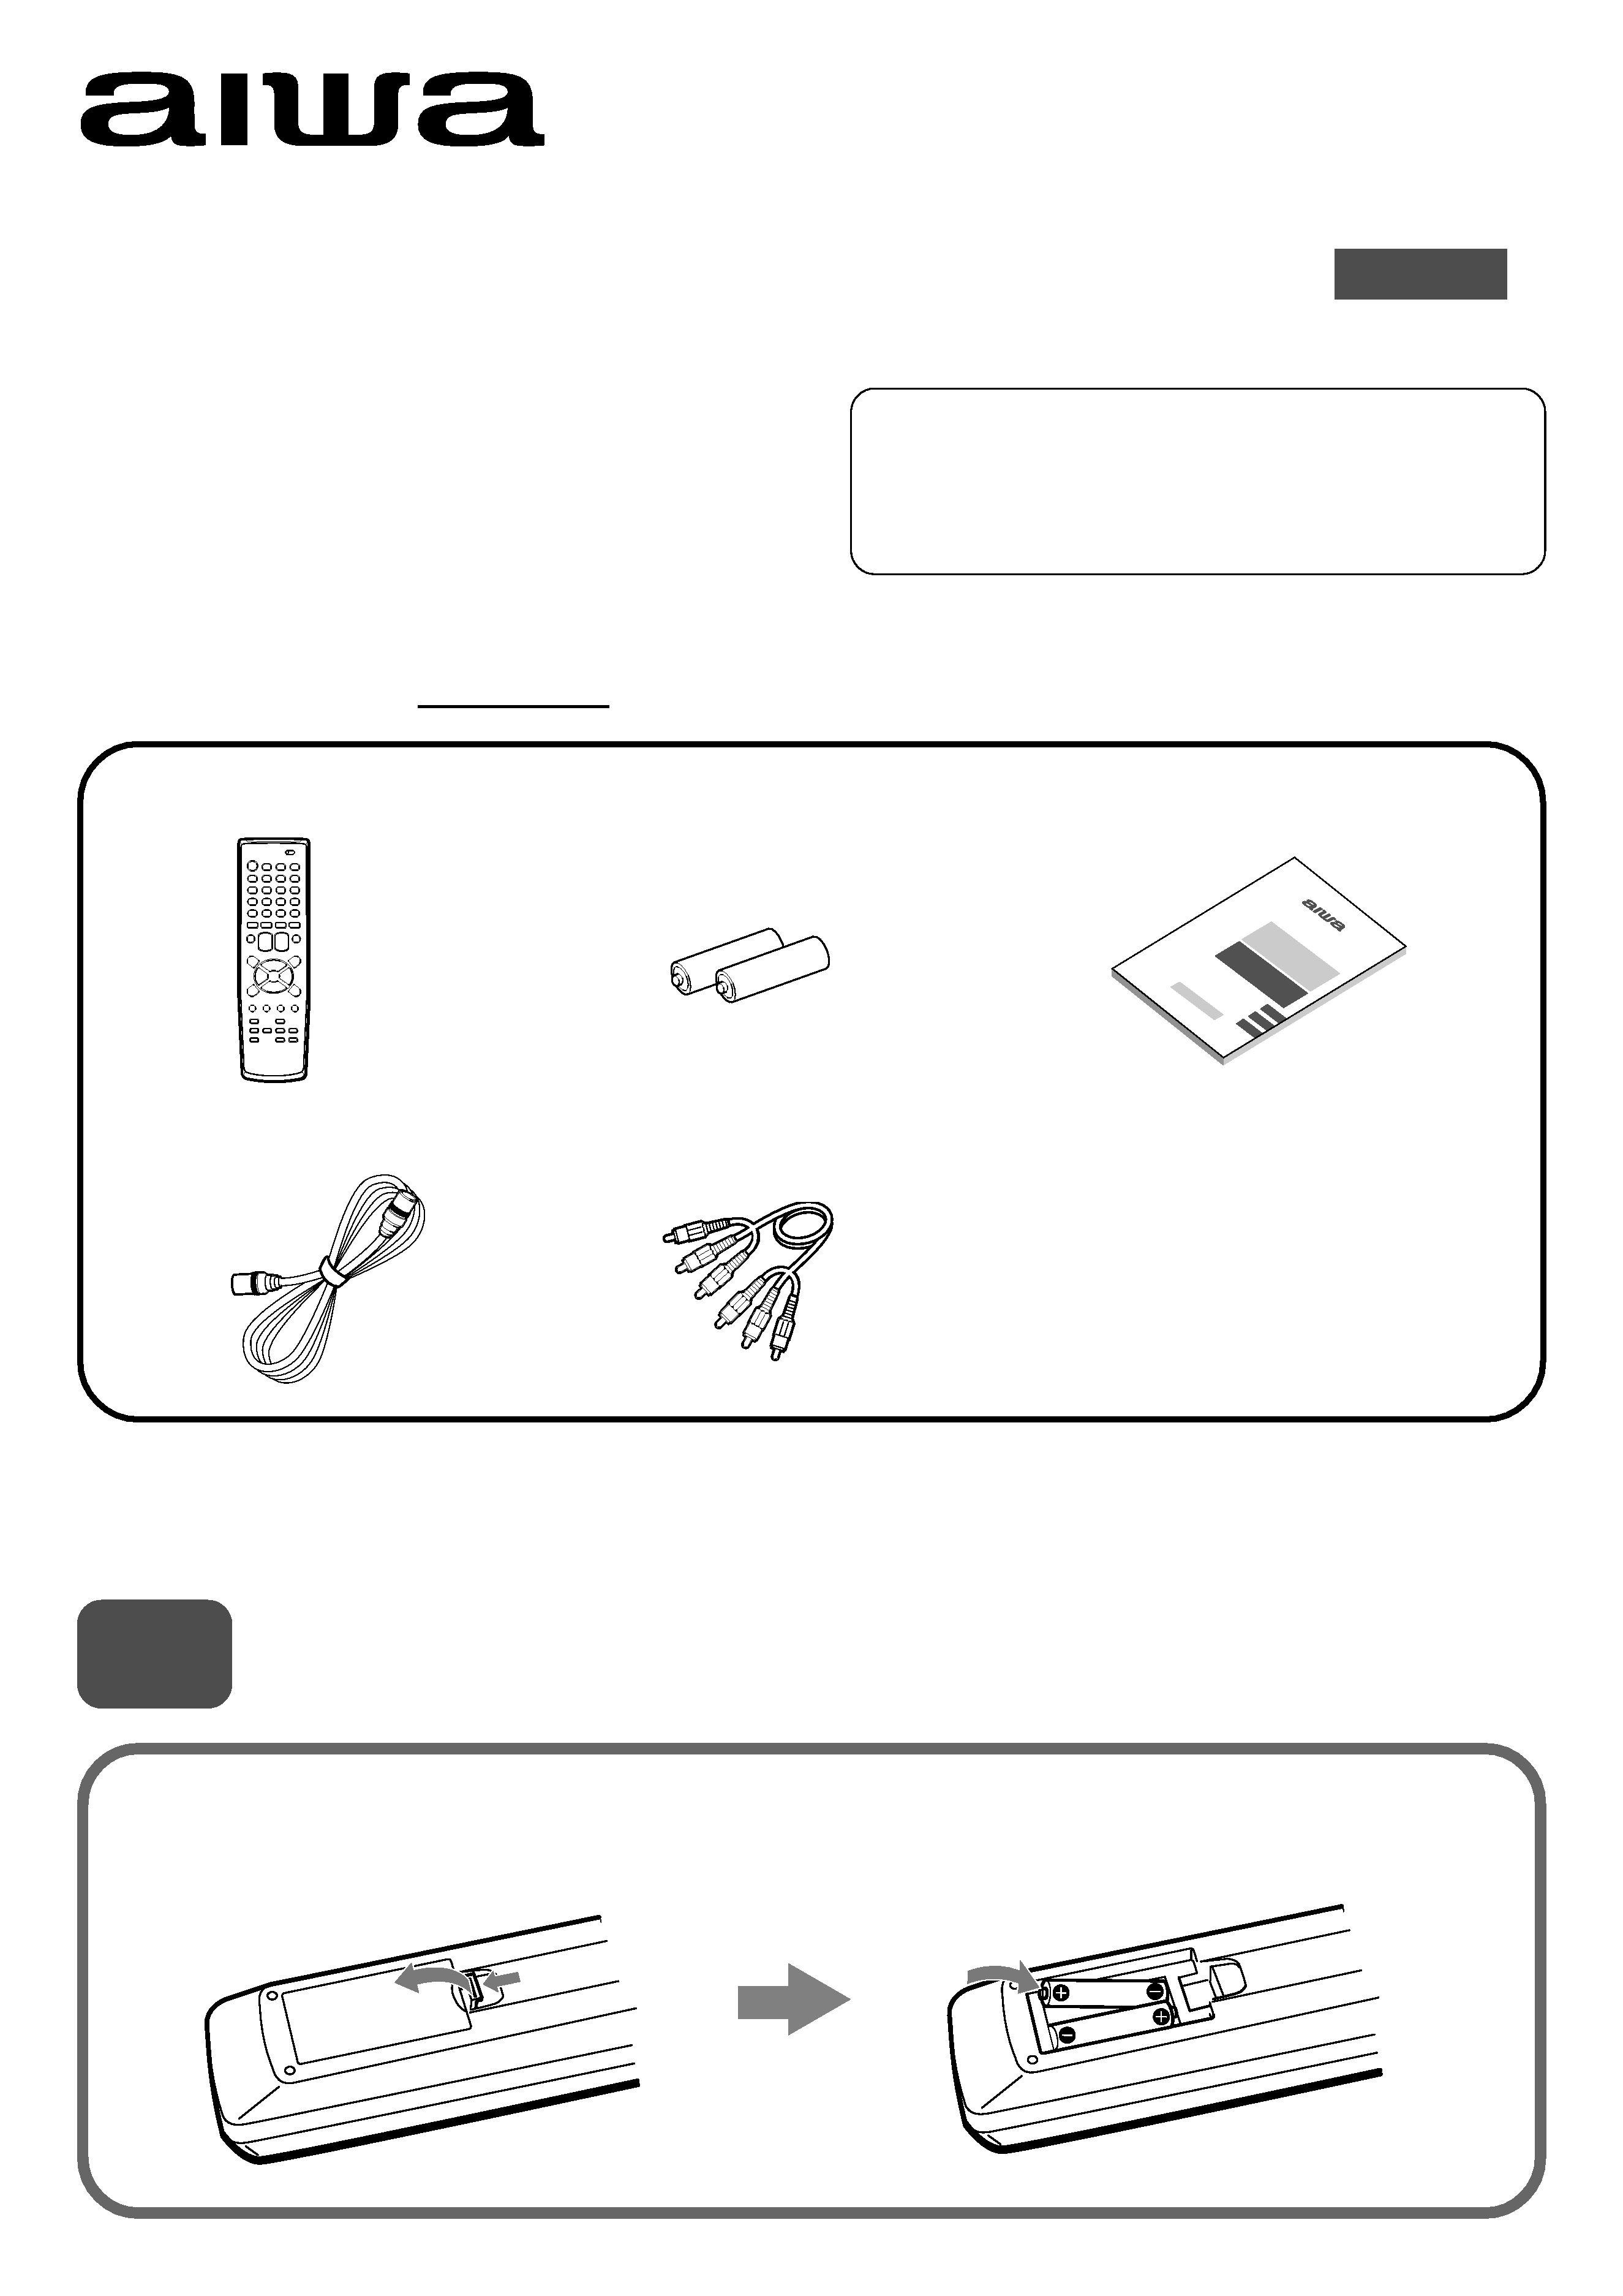
You will find these accessories in the package box.
Please read all of the information and warnings on page 1 and 2 of the operating instructions before installing or operating
your TV.
Installing Batteries in the Remote Control
1
Insert two R03 (size AAA) batteries (supplied) with the correct
polarity, as indicated inside the battery compartment.
Remote control (1)
Batteries (2)
For Assistance And Information
Call Toll Free 1-800-BUY-AIWA
(United States and Puerto Rico)
ENGLISH
Operating Instructions (1)
Audio/video cable (1)
Antenna cable (1)
2
UHF/VHF
IN (ANT)
OUT (TV)
OUT
VIDEO
L
R
AUDIO
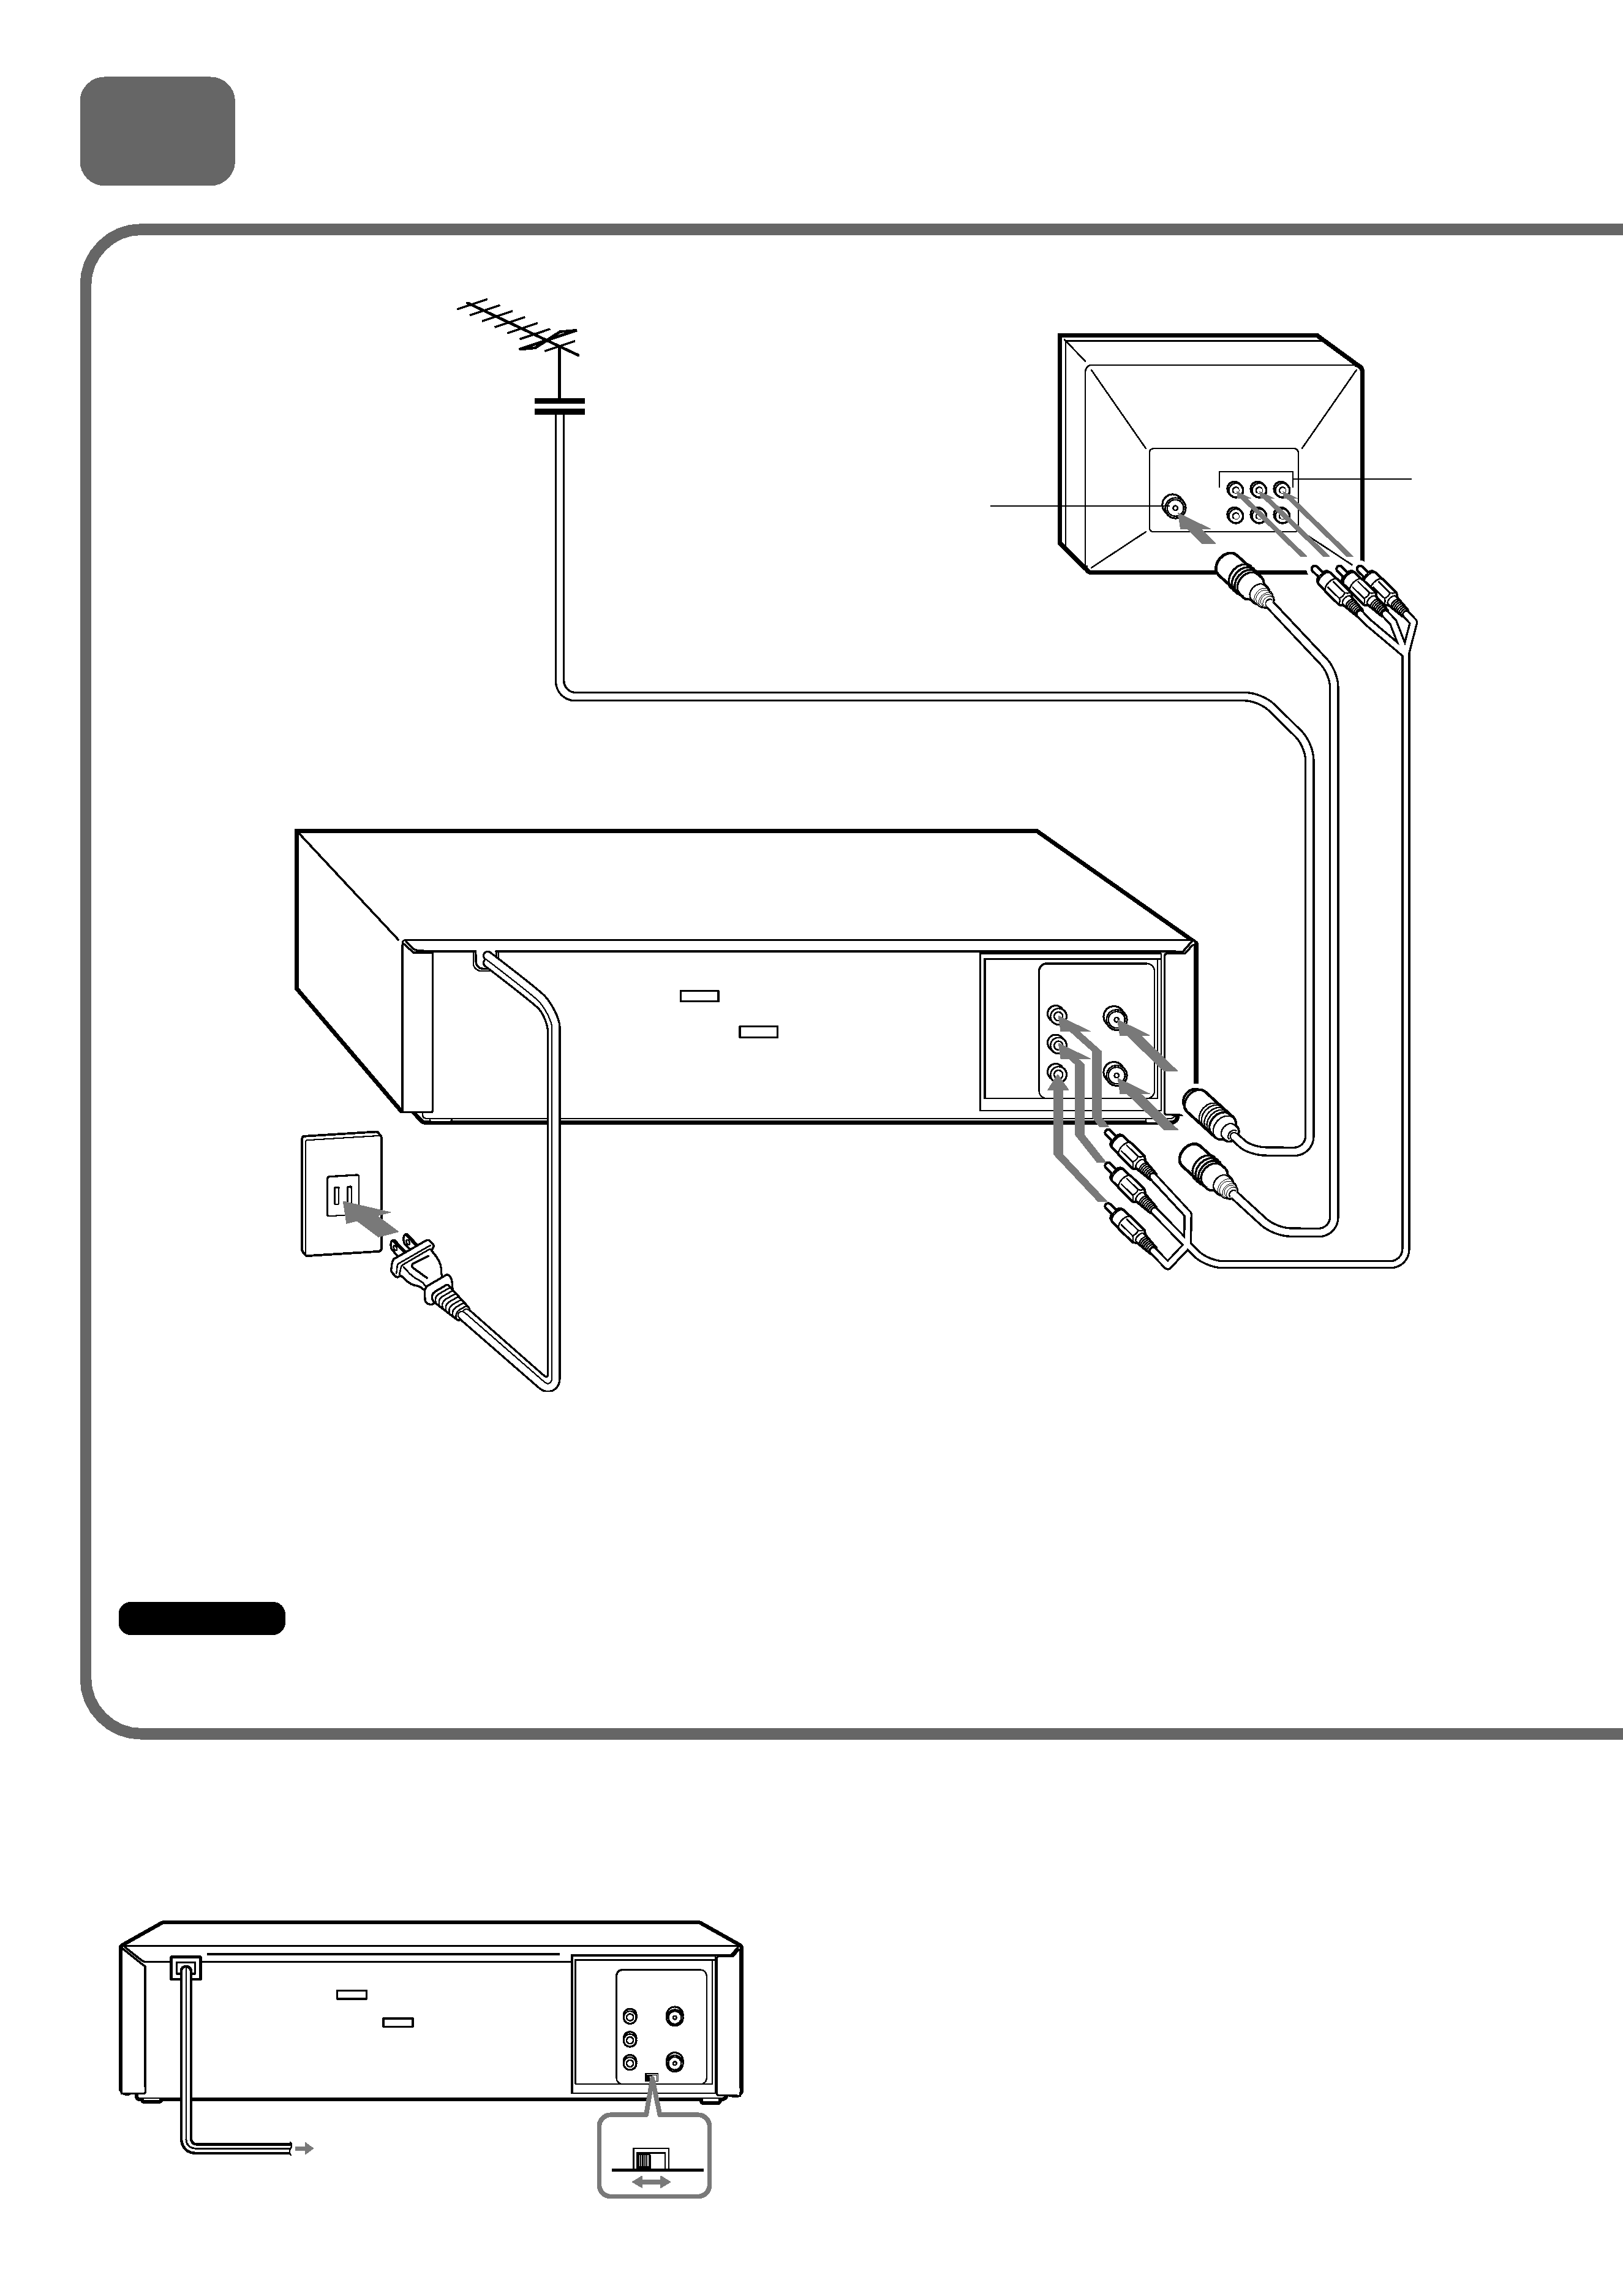
2 Connecting Antenna (or CATV)-VCR-TV
Important
Connect the AC cord to the AC outlet after all of the connections are complete.
2 Connect the supplied antenna
cable to the UHF/VHF OUT TO
TV connector on the VCR and
the antenna connector on the
TV.
1 Connect the TV antenna
cable (not supplied) to the
VCR.
AC outlet
Antenna connector
TV
3 If your TV has audio/video
input jacks, connect the VCR
and TV using the supplied
audio/video cables.
Basic connections
4 Connect the AC cord to
the AC outlet.
When the TV is connected to the UHF/VHF OUT (TV) connector using an antenna cable
Set the channel selector to 3CH or 4CH, not employed for broadcasts, and select the same channel on the TV.
Audio/video
input jacks
To select a desired TV channel on the TV
Turn the TV and VCR on, and press TV/VCR to turn off
VCR in the display window, or turn off this VCR.
OUT
VIDEO
L
R
AUDIO
3CH
4CH
3
UHF/VHF
IN (ANT)
OUT (TV)
OUT
VIDEO
L
R
AUDIO
OUT
IN
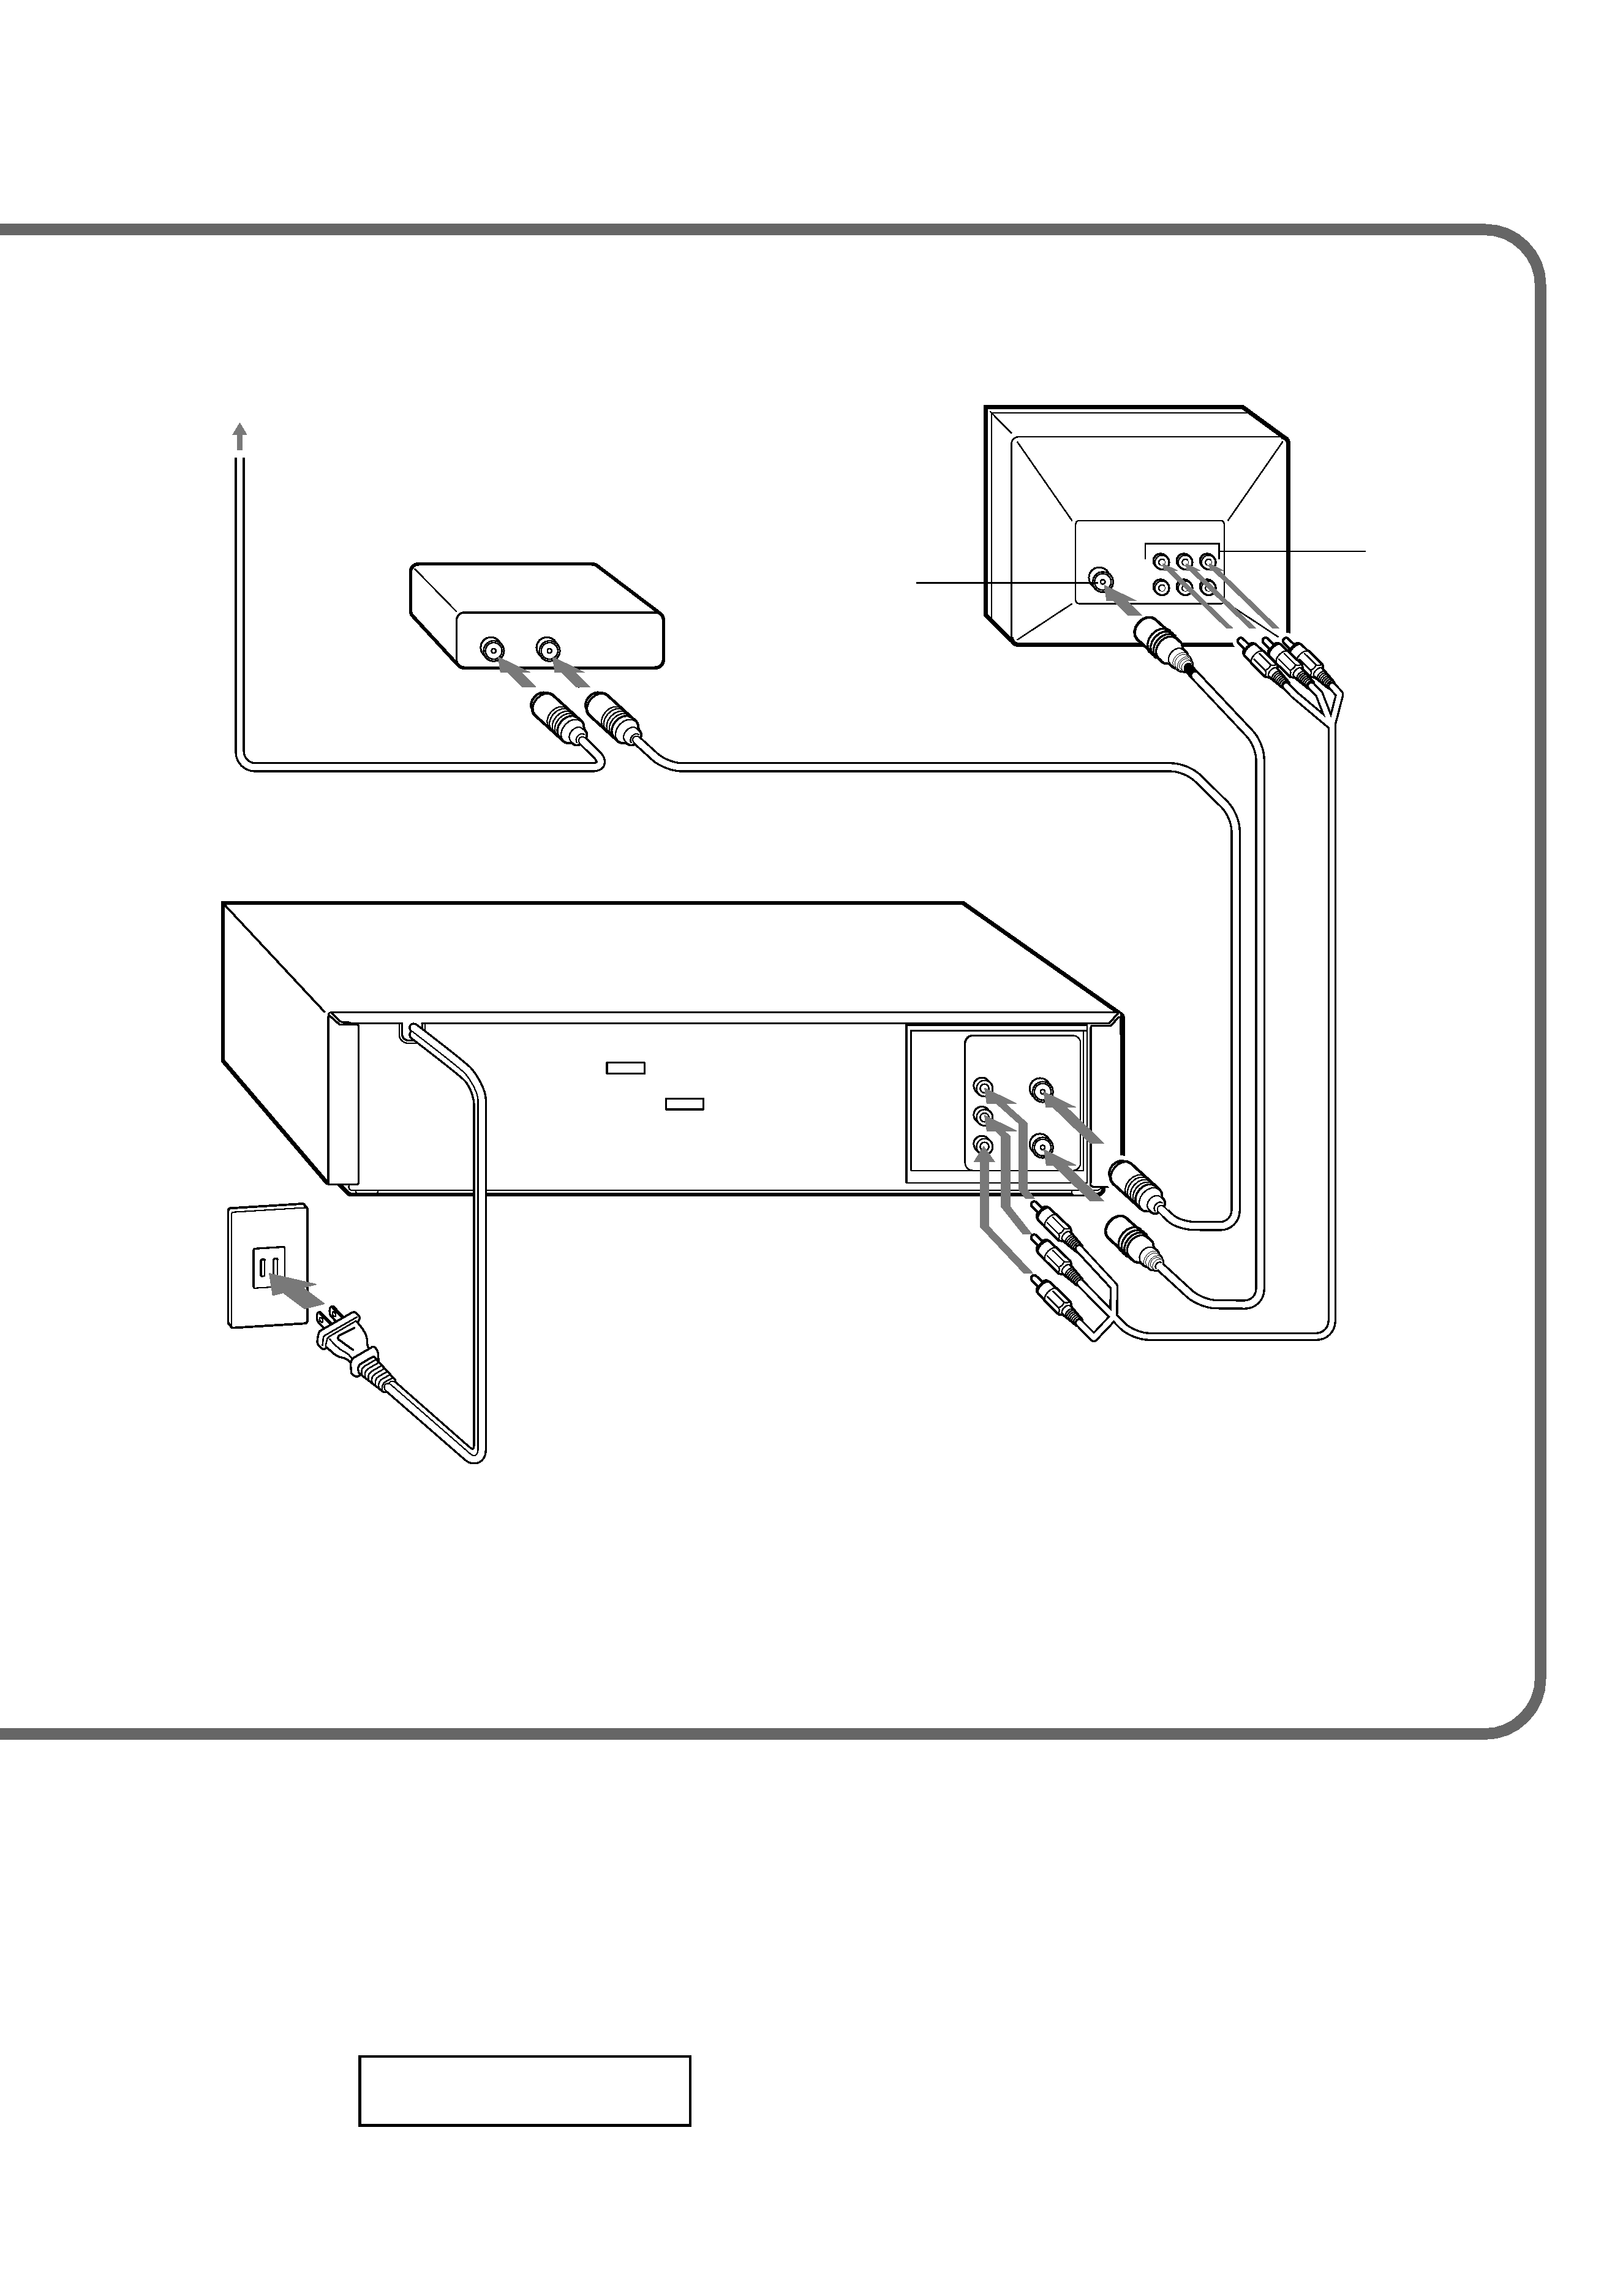
2 Connect the output
on the converter to the UHF/VHF IN
(ANT) connector on the VCR with a
coaxial cable (not supplied).
3 Connect the VCR with the
supplied antenna cable to
the TV's antenna input.
1 Connect the cable from the CATV system
to the input on the CATV converter.
CATV System
Antenna connector
AC outlet
5 Connect the AC cord to
the AC outlet.
4 If your TV has audio/video input
jacks, connect the VCR and TV
using the supplied audio and
video cables.
TV
CATV converter
(not supplied)
CATV connections
Audio/video
input jacks
To connect a CATV system without using a CATV converter
Connect the cable from the CATV system to the UHF/VHF IN (ANT) connector on the VCR in step 1 above.
To see a TV program or video program selected on the VCR
Turn the TV and VCR on, and press TV/VCR to display VCR in the display
window.
VCR
4
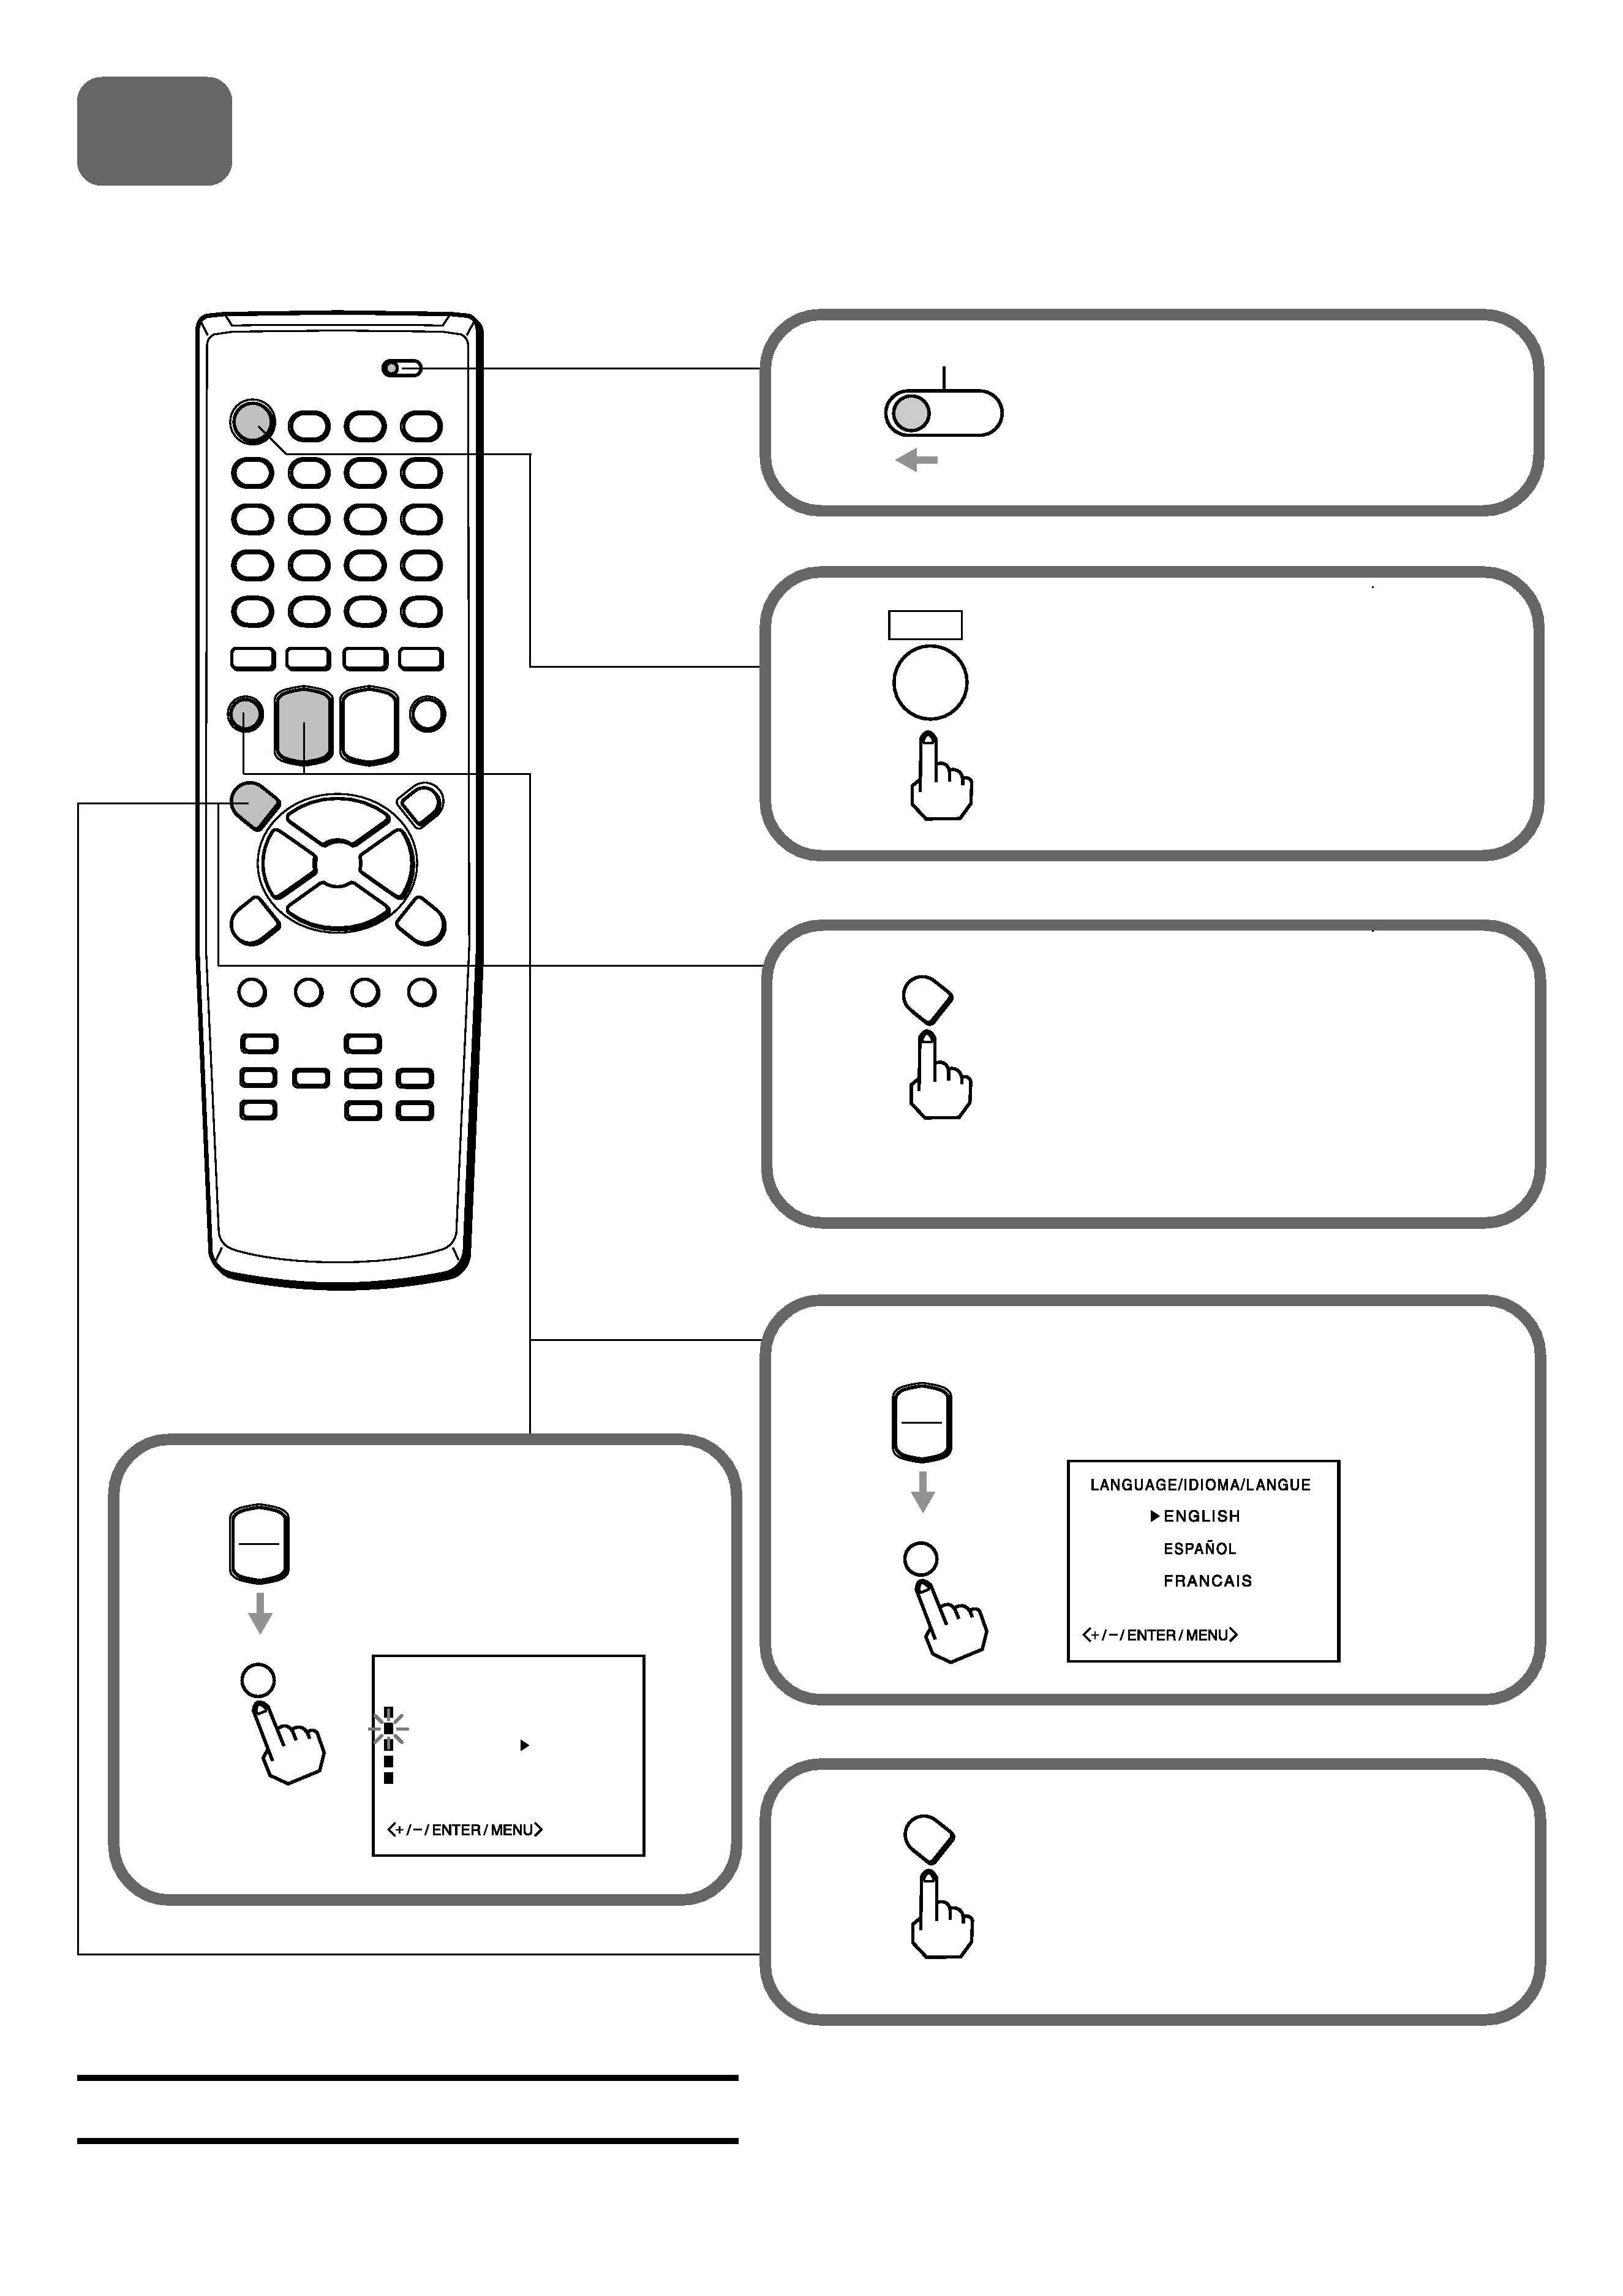
3 Setting the language
The on-screen menu can display three languages: English, Spanish and French.
3
Press
MENU .
For the first setting, SYSTEM SET
UP menu appears. From the second
setting, MENU appears. See on
page 11 in the supplied operating
instructions.
2
Press
POWER to turn on the VCR.
1
Set the
VCR/CATV/TV selector to
VCR.
VCR
TV
CATV
POWER
5
Press
SET/TRACKING + or to
select the desired language, then
press ENTER.
AIWA CO., LTD
8A-JFD-902-01
000225ATO-YX
Printed in Thailand
SET/TRACKING
ENTER
+
Press MENU twice to return
to the normal screen.
6
Press
SET/TRACKING
+ or to select
LANGUAGE/IDIOMA/
LANGUE, then press
ENTER.
4 SET/TRACKING
ENTER
+
CLOCK SET
LANGUAGE/IDIOMA/LANGUE
AU TO CLOCK
ON
OFF
STANDARD TIME
DAYLIGHT SAVING TIME
SYSTEM SET UP
MENU
MENU
