CD CARRY COMPONENT SYSTEM
CA-DW50
© 2003 Sony Corporation
3-261-564-31(1)

2 ENGLISH
WARNING
TO REDUCE THE RISK OF FIRE OR ELECTRIC
SHOCK, DO NOT EXPOSE THIS APPLIANCE TO
RAIN OR MOISTURE.
Precautions
Read the Operating Instructions carefully and
completely before operating the unit. Be sure to keep
the Operating Instructions for future reference. All
warnings and cautions in the Operating Instructions and
on the unit should be strictly followed, as well as the
safety suggestions below.
Installation
1 Water and moisture Do not use this unit near
water, such as near a bathtub, washbowl, kitchen
sink, laundry tub, in a wet basement, swimming pool,
or the like.
2 Heat Do not use this unit near sources of heat,
including heating vents, stoves, or other appliances
that generate heat.
It also should not be placed in temperatures less
than 5°C (41°F) or greater than 35°C (95°F).
3 Mounting surface Place the unit on a flat, even
surface.
4 Ventilation The unit should be situated with
adequate space around it so that proper heat
ventilation is assured.
Allow 10 cm (4 in.) clearance from the rear and the
top of the unit and 5 cm (2 in.) from each side.
- Do not place the unit on a bed, rug, or similar
surface that may block the ventilation openings.
- Do not install the unit in a bookcase, cabinet, or
airtight rack where ventilation may be impeded.
5 Objects and liquid entry Take care that objects
or liquids do not get inside the unit through the
ventilation openings.
6 Carts and stands When placed or mounted on a
stand or cart, the unit should be moved with care.
Quick stops, excessive force, and uneven surfaces
may cause the unit or cart to overturn or fall.
7 Condensation Moisture may form on the CD
pickup lens when:
- The unit is moved from a cold spot to a warm spot
- The heating system has just been turned on
- The unit is used in a very humid room
- The unit is cooled by an air conditioner
When this unit has condensation inside, it may not
function normally. Should this occur, leave the unit
for a few hours, then try to operate again.
8 Wall or ceiling mounting The unit should not be
mounted on a wall or ceiling, unless specified in the
Operating Instructions.

ENGLISH
3
Electric Power
1 Power sources Use on batteries or AC house
current, as specified in the Operating Instructions
and marked on the unit.
2 AC power cord
- When disconnecting the AC power cord, pull it out
by the AC power plug. Do not pull the cord itself.
- Never handle the AC power plug with wet hands,
as this could result in fire or shock.
- Power cords should be firmly secured to avoid
being bent, pinched, or walked upon. Pay
particular attention to the cord from the unit to the
power socket.
- Avoid overloading AC power sockets and
extension cords beyond their capacity, as this
could result in fire or shock.
3 When not in use Unplug the AC power cord from
the AC power socket or remove all the batteries if
the unit will not be used for several months or more.
When the cord is plugged in, a small amount of
current continues to flow to the unit, even when the
power is turned off.
Maintenance
Clean the unit only as recommended in the Operating
Instructions.
Damage Requiring Service
Have the units serviced by a qualified service
technician if:
- The AC power cord or plug has been damaged
- Foreign objects or liquid have got inside the unit
- The unit has been exposed to rain or water
- The unit does not seem to operate normally
- The unit exhibits a marked change in performance
- The unit has been dropped, or the cabinet has been
damaged
DO NOT ATTEMPT TO SERVICE THE UNIT
YOURSELF.
Specifications
Radio section
Frequency range, antenna FM: 87.5 - 108.0 MHz
Rod antenna. MW: 531/530 - 1,602/1,610 kHz (9/10
kHz step) Ferrite bar antenna. SW1: 3,200 - 7,300 kHz
Rod antenna. SW2: 9.5 - 21.85 MHz Rod antenna.
Deck section
Track format 4 tracks, 2 channels / Frequency range
Normal tape: 50 - 12,000 Hz (JEITA) / Recording
system AC bias / Erasing system Magnet erase /
Heads Deck 1: Recording/playback head (1), Erasure
head (1). Deck 2: Playback head (1).
CD player section
Disc Compact disc / Scanning method Non-contact
optical scanner (semiconductor laser) / Rotation speed
Approx. 500 - 200 rpm/CLV / Error correction Cross
interleave, Reed, Solomon code / Number of channels
2 channels / D/A conversion 1 bit DAC /
Laser diode properties
Material: GaAlAs
Wavelength:
= 780 nm
Emission duration: Continuous
Laser output: Less than 44.6
µW (This output is the
value measured at a distance of 200 mm from the
objective lens surface on the optical pick-up block with
7 mm aperture.)
General
Power requirements DC 12 V using eight size D (R20)
batteries, AC 220-240 V, 50/60 Hz / Dimensions (W
× H
× D) 274 × 245 × 219 mm / Weight 3.1 kg (excluding
batteries) / Power output 5 W + 5 W (JEITA, 2.7 ohms
DC), 3.5 W + 3.5 W (DIN 1% Rated Power) / Power
consumption 27 W / Accessories AC cord (1),
Remote control (1)
Speaker
Type 120 mm cone type / Dimensions (W
× H × D)
160
× 242 × 187 mm / Weight Approx. 0.9 kg × 2 /
Impedance 2.7 ohms / Allowable max. input 7 W
Specifications and external appearance are subject to
change without notice.
COPYRIGHT
Please check the copyright laws relating to
recordings from disc, radio or external tape for the
country in which the machine is being used.
If an erroneous display or malfunction occurs
Make sure that none of the deck operation buttons is
pressed.
Press
s while pressing TAPE/POWER/6STANDBY.
If the unit cannot be reset in the way above, disconnect
the AC cord and remove all the batteries to turn off the
display.
Leave the unit for a while and turn the power back on.

4 ENGLISH
Power supply
The OPR/BATT
6STANDBY indicator lights up while
the power is on or the AC cord is connected to an AC
outlet.
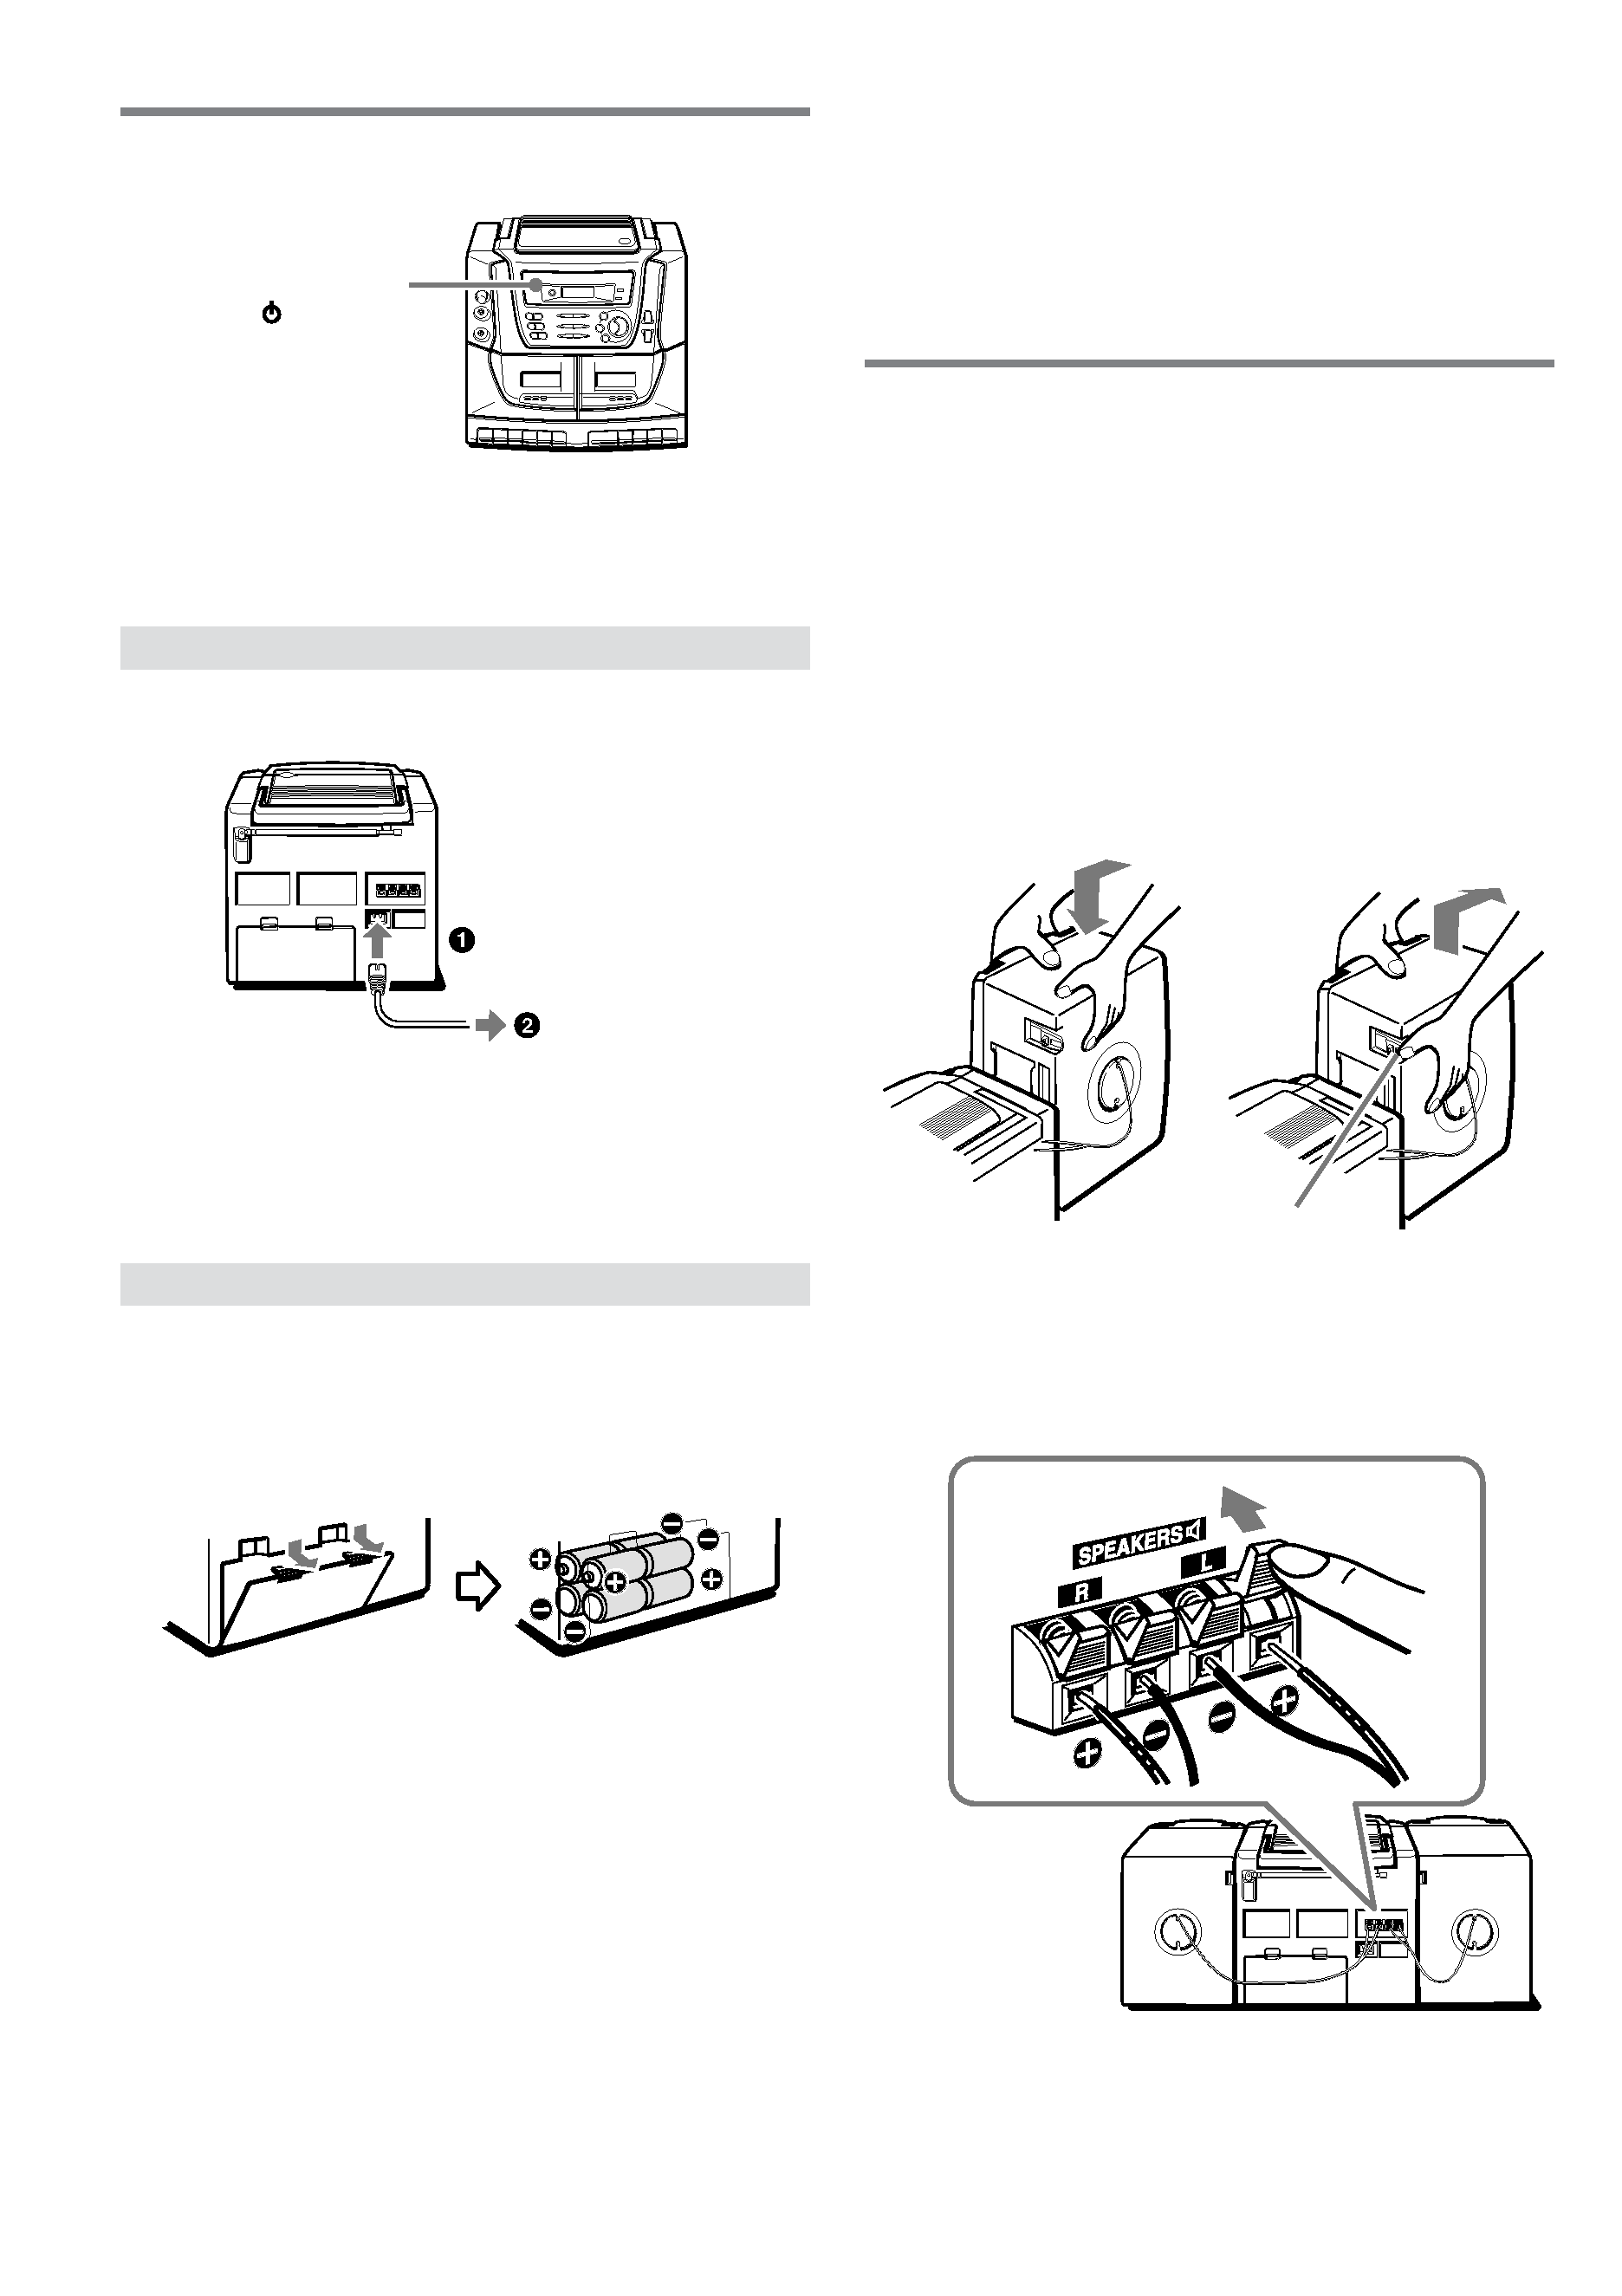
Using on AC house current
Connect the AC cord as illustrated below.
CAUTION
Use only the supplied AC cord. Use with other cords
may result in the risk of fire.
Using on batteries
Open the lid of the battery compartment on the rear and
insert eight R20 (size D) batteries, not supplied, as
illustrated below. Then close the lid.
To switch from AC power supply to battery supply,
disconnect the AC cord from the AC inlet.
When the OPR/BATT
6STANDBY indicator becomes
dim, the tape speed slows down, volume decreases, or
sound is distorted during operation, replace the
batteries.
Notes on batteries
To avoid damage from leakage or explosion, observe
the following:
· Insert the batteries with the
0 and 9 marks correctly
aligned.
· Do not mix different types of batteries or old batteries
with new ones.
· When the unit is not to be used for a long period,
remove the batteries.
Connections
IMPORTANT
· Make sure that the AC cord is disconnected and
batteries are removed before connecting speakers.
· Do not connect other than the supplied speakers.
1 Position the speakers.
To couple with the speakers, slide each speaker
down into the guide brackets on the center unit until
the height is level with the unit.
To separate the unit from the speakers, slide the
speakers up and off, while pressing the speaker
release knob.
2 Connect the speakers.
Connect the right speaker cord to the R terminals,
and the left speaker to the L terminals.
Connect the speaker cord with the white broken line
to
0 and the other cord to 9.
R20 (D)
OPR/ BATT
STANDBY
supplied AC cord
to the AC inlet of the unit
to an AC outlet
(AC 220-240 V,
50/60 Hz)
Release knob
· Never recharge the batteries, apply heat to them or
take them apart.
· Remove dead batteries.
If liquid leaks from the batteries, wipe thoroughly to
remove.

ENGLISH
5
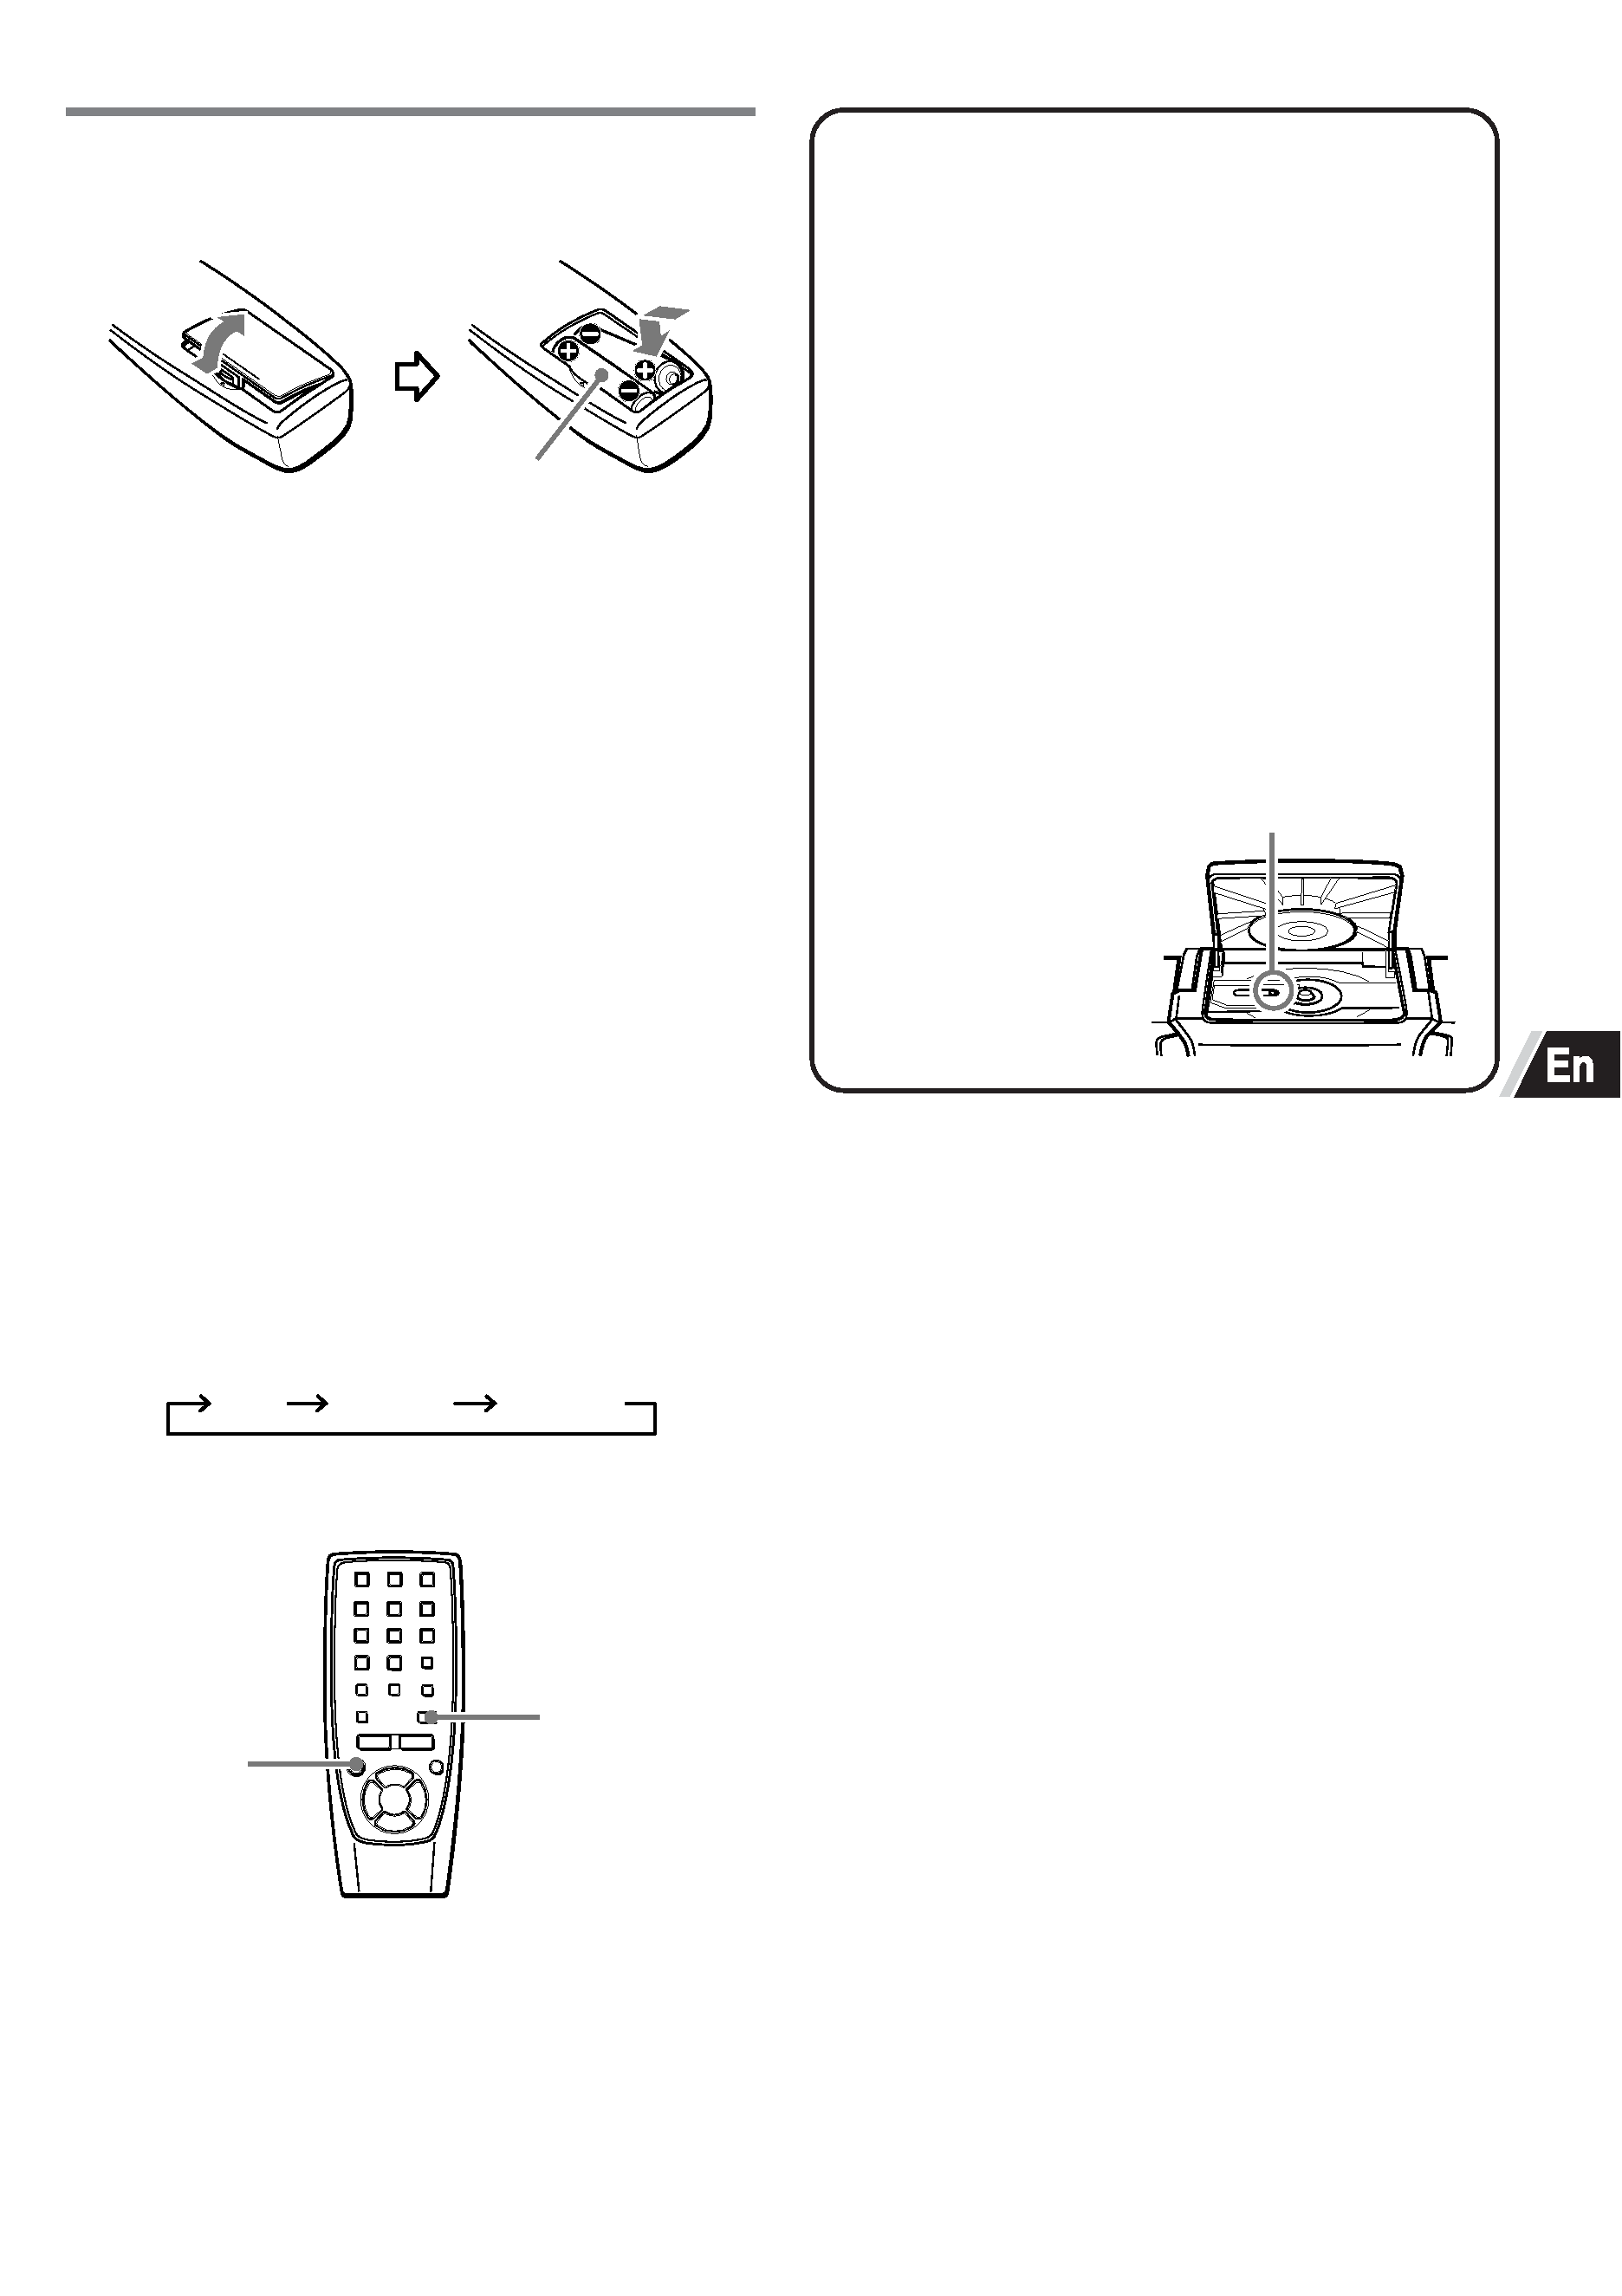
Remote control
Insert two R6 (size AA) batteries.
R6 (AA)
When the reach of the remote control signal is less than
5 meters (16 feet), replace the batteries.
The remote control may not operate correctly
when:
- The unit is exposed to intense light, such as direct
sunlight
- Objects block the remote control signal to the unit
To use the buttons on the remote control
Buttons on the remote control and the main unit with
identical indications have the same functions.
To turn the power on
Press POWER to turn on the display.
When using the unit on the batteries, this button will not
turn the power on.
To turn the power off
Press POWER to turn off the display.
When one of the deck operation buttons is pressed, this
button will not turn the power off.
To use the FUNCTION button
Each time FUNCTION is pressed while the power is on,
the function is selected cyclically.
CD
RADIO
* TAPE
* applicable when one of the deck operation buttons is
pressed
POWER
FUNCTION
Maintenance
To clean the cabinet
Use a soft cloth lightly moistened with mild
detergent solution. Do not use strong solvents
such as alcohol, benzine or thinner.
To clean the heads
When the tape heads are dirty;
- high frequency sound is not emitted
- the sound is not adequately high
- the sound is off-balance
- the tape cannot be erased
- the tape cannot be recorded on
After every 10 hours of use, clean the tape heads
with a head cleaning cassette.
Use separately sold dry-type or wet-type cleaning
cassette.
Refer to the instructions of the cleaning cassette
for details.
To clean the lens
Use a cotton swab
slightly moistened with
cleaning fluid. Wipe
gently from the center
to the edge.
Lens
